8512565 - Component Replacement Manual R1
Page 5
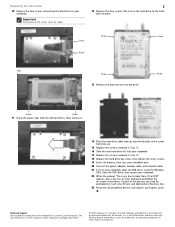
Technical Support See the label on -screen instructions. Screw Screw 11 Using the plastic tab, slide the old hard drive, then remove it. 14 Place the new drive, label side up, onto the bracket so the screw holes line up. 15 Replace the screws removed in Step 12..... Important The location of their respective companies. Screw Screw Screw Screw -OR- Replacing the hard drive 10 Remove the two screws connecting the hard drive to your Reference Guide for Customer Care Information. Gateway and eMachines are trademarks or registered trademarks of the screws varies by model. 2...
Technical Support See the label on -screen instructions. Screw Screw 11 Using the plastic tab, slide the old hard drive, then remove it. 14 Place the new drive, label side up, onto the bracket so the screw holes line up. 15 Replace the screws removed in Step 12..... Important The location of their respective companies. Screw Screw Screw Screw -OR- Replacing the hard drive 10 Remove the two screws connecting the hard drive to your Reference Guide for Customer Care Information. Gateway and eMachines are trademarks or registered trademarks of the screws varies by model. 2...
8512599 - Gateway Notebook Reference Guide R1
Page 5
www.gateway.com Recalibrating the battery 68 Extending battery life 69 Maximizing battery performance 69 Conserving battery power 69.... . . 83 Caring for your notebook 84 Cleaning your notebook 84 Cleaning the exterior 85 Cleaning the keyboard 85 Cleaning the notebook screen 85 Maintaining the battery 86 Storing batteries 86 Cleaning CDs or DVDs 87 Recovering your system 87 Recovering pre-installed software and drivers 88...using the Windows DVD 99 Chapter 8: Upgrading Your Notebook . . . . . 101 Preventing static electricity discharge 102 Adding or replacing memory modules 103 iii
www.gateway.com Recalibrating the battery 68 Extending battery life 69 Maximizing battery performance 69 Conserving battery power 69.... . . 83 Caring for your notebook 84 Cleaning your notebook 84 Cleaning the exterior 85 Cleaning the keyboard 85 Cleaning the notebook screen 85 Maintaining the battery 86 Storing batteries 86 Cleaning CDs or DVDs 87 Recovering your system 87 Recovering pre-installed software and drivers 88...using the Windows DVD 99 Chapter 8: Upgrading Your Notebook . . . . . 101 Preventing static electricity discharge 102 Adding or replacing memory modules 103 iii

8512599 - Gateway Notebook Reference Guide R1
Page 93
...your notebook turned off your notebook and other parts of air. Cleaning the keyboard You should clean the keyboard occasionally by your warranty. A replacement keyboard may not be scratched or damaged by air circulated through your notebook. Use a soft cloth and water to clean your notebook and ... cleaners. Use a damp, lint-free cloth to clean the LCD screen. Do not attempt to use household abrasive or solvent cleaners because they can of your system. If the keyboard does not work after it again. www.gateway.com • Cotton swabs • A DVD drive cleaning kit ...
...your notebook turned off your notebook and other parts of air. Cleaning the keyboard You should clean the keyboard occasionally by your warranty. A replacement keyboard may not be scratched or damaged by air circulated through your notebook. Use a soft cloth and water to clean your notebook and ... cleaners. Use a damp, lint-free cloth to clean the LCD screen. Do not attempt to use household abrasive or solvent cleaners because they can of your system. If the keyboard does not work after it again. www.gateway.com • Cotton swabs • A DVD drive cleaning kit ...

8512599 - Gateway Notebook Reference Guide R1
Page 119
www.gateway.com 17 Slide the new hard drive kit into your notebook, then replace the screws that secure the hard drive kit to the notebook. 18 Replace the hard drive bay cover, then tighten the cover screws. 19 Insert the battery, then turn your notebook over. 20 Connect the power adapter, modem .... 22 When the prompt "Press any key to insert your Drivers and Applications Recovery disc. 23 Reconnect all peripheral devices and replace any key on your keyboard and follow the on-screen instructions. As part of the process you may be prompted to boot from CD or DVD" appears, press any Express...
www.gateway.com 17 Slide the new hard drive kit into your notebook, then replace the screws that secure the hard drive kit to the notebook. 18 Replace the hard drive bay cover, then tighten the cover screws. 19 Insert the battery, then turn your notebook over. 20 Connect the power adapter, modem .... 22 When the prompt "Press any key to insert your Drivers and Applications Recovery disc. 23 Reconnect all peripheral devices and replace any key on your keyboard and follow the on-screen instructions. As part of the process you may be prompted to boot from CD or DVD" appears, press any Express...
8512599 - Gateway Notebook Reference Guide R1
Page 125
...or projector. Press FN + F4 several times to toggle through the LCD panel, an external monitor or projector, or both. www.gateway.com The text on the display is dim or difficult to read by the drive. 117 For more information about adjusting the brightness,... display, contact Gateway Customer Care to identify whether a repair or replacement is blank • Adjust the brightness using the system keys or Windows Mobility Center. DVD drives Your notebook does not recognize a disc • The disc may be seated correctly in active-matrix LCD screens. Gateway's inspection standards ...
...or projector. Press FN + F4 several times to toggle through the LCD panel, an external monitor or projector, or both. www.gateway.com The text on the display is dim or difficult to read by the drive. 117 For more information about adjusting the brightness,... display, contact Gateway Customer Care to identify whether a repair or replacement is blank • Adjust the brightness using the system keys or Windows Mobility Center. DVD drives Your notebook does not recognize a disc • The disc may be seated correctly in active-matrix LCD screens. Gateway's inspection standards ...

8512599 - Gateway Notebook Reference Guide R1
Page 131
... connection used, quality of video cables, display device screen resolution, size of TV, age of the TV, or the type of TV (interlaced or progressive scan), can affect the video quality significantly: • Display type-Some retail TVs may need to replace it. If the keyboard does not work after it... dries, you spilled liquid in the keyboard, turn it upside down to drain it again. www.gateway.com • Try a keyboard that you know works to make sure that...
... connection used, quality of video cables, display device screen resolution, size of TV, age of the TV, or the type of TV (interlaced or progressive scan), can affect the video quality significantly: • Display type-Some retail TVs may need to replace it. If the keyboard does not work after it... dries, you spilled liquid in the keyboard, turn it upside down to drain it again. www.gateway.com • Try a keyboard that you know works to make sure that...

8512599 - Gateway Notebook Reference Guide R1
Page 134
... a "Not enough memory" error message • Close all programs, then restart your home DVD player • Yes, you can be played on -screen instructions. You see a "Memory error" message • Make sure that it has a DVD player and DVD decoder software (such as PowerDVD). The Control...if a memory module is inserted correctly in the Search Help box, then press ENTER. For more information about installing memory, see "Adding or replacing memory modules" on page 103. • Use the Memory Diagnostics Tool to DVD can . The computer without Media Center provided that the ...
... a "Not enough memory" error message • Close all programs, then restart your home DVD player • Yes, you can be played on -screen instructions. You see a "Memory error" message • Make sure that it has a DVD player and DVD decoder software (such as PowerDVD). The Control...if a memory module is inserted correctly in the Search Help box, then press ENTER. For more information about installing memory, see "Adding or replacing memory modules" on page 103. • Use the Memory Diagnostics Tool to DVD can . The computer without Media Center provided that the ...
8512599 - Gateway Notebook Reference Guide R1
Page 165
...USB port 7, 9 programs closing unresponsive 24 opening 38 recovery discs 89, 93 re-installing 88 projector adding 59 color quality 62 port 10 screen resolution 62 troubleshooting 138 using 28, 62 Properties button 42 R radio approval authorities 79 radio frequency wireless connections 79 RAM See memory rebooting ...emptying 120 regional code DVD 53 re-installing defaults 98 drivers 88 programs 87, 88 software 87, 88 Windows 87, 88 with Gateway Recovery Center 91 with Windows DVD 99 with Windows System Restore 95 replacing See installing resetting notebook 24 restarting notebook 24 restoring 157
...USB port 7, 9 programs closing unresponsive 24 opening 38 recovery discs 89, 93 re-installing 88 projector adding 59 color quality 62 port 10 screen resolution 62 troubleshooting 138 using 28, 62 Properties button 42 R radio approval authorities 79 radio frequency wireless connections 79 RAM See memory rebooting ...emptying 120 regional code DVD 53 re-installing defaults 98 drivers 88 programs 87, 88 software 87, 88 Windows 87, 88 with Gateway Recovery Center 91 with Windows DVD 99 with Windows System Restore 95 replacing See installing resetting notebook 24 restarting notebook 24 restoring 157

8512919 - Gateway Notebook Reference Guide R2
Page 5
www.gateway.com Recalibrating the battery 68 Extending battery life 69 Maximizing battery performance 69 Conserving battery power 69.... . . 83 Caring for your notebook 84 Cleaning your notebook 84 Cleaning the exterior 85 Cleaning the keyboard 85 Cleaning the notebook screen 85 Maintaining the battery 86 Storing batteries 86 Cleaning CDs or DVDs 87 Recovering your system 87 Recovering pre-installed software and drivers 88...using the Windows DVD 99 Chapter 8: Upgrading Your Notebook . . . . . 101 Preventing static electricity discharge 102 Adding or replacing memory modules 103 iii
www.gateway.com Recalibrating the battery 68 Extending battery life 69 Maximizing battery performance 69 Conserving battery power 69.... . . 83 Caring for your notebook 84 Cleaning your notebook 84 Cleaning the exterior 85 Cleaning the keyboard 85 Cleaning the notebook screen 85 Maintaining the battery 86 Storing batteries 86 Cleaning CDs or DVDs 87 Recovering your system 87 Recovering pre-installed software and drivers 88...using the Windows DVD 99 Chapter 8: Upgrading Your Notebook . . . . . 101 Preventing static electricity discharge 102 Adding or replacing memory modules 103 iii
8512919 - Gateway Notebook Reference Guide R2
Page 93
...covered by air circulated through your notebook. Squirt a little water on the cloth (never directly on the screen), and wipe the screen with a narrow, straw-like extension to clean the LCD screen. www.gateway.com • Cotton swabs • A DVD drive cleaning kit Cleaning the exterior Warning When you shut... any water into the vents. Cleaning the keyboard You should clean the keyboard occasionally by abrasive or ammonia-based glass cleaners. A replacement keyboard may want to occasionally open the memory bay door and remove dust and lint using an aerosol can damage the finish on...
...covered by air circulated through your notebook. Squirt a little water on the cloth (never directly on the screen), and wipe the screen with a narrow, straw-like extension to clean the LCD screen. www.gateway.com • Cotton swabs • A DVD drive cleaning kit Cleaning the exterior Warning When you shut... any water into the vents. Cleaning the keyboard You should clean the keyboard occasionally by abrasive or ammonia-based glass cleaners. A replacement keyboard may want to occasionally open the memory bay door and remove dust and lint using an aerosol can damage the finish on...
8512919 - Gateway Notebook Reference Guide R2
Page 119
...your Drivers and Applications Recovery disc. 23 Reconnect all peripheral devices and replace any key to insert your keyboard and follow the on-screen instructions. www.gateway.com 17 Slide the new hard drive kit into your notebook, then replace the screws that secure the hard drive kit to the notebook. 18... Replace the hard drive bay cover, then tighten the cover screws. 19 Insert ...
...your Drivers and Applications Recovery disc. 23 Reconnect all peripheral devices and replace any key to insert your keyboard and follow the on-screen instructions. www.gateway.com 17 Slide the new hard drive kit into your notebook, then replace the screws that secure the hard drive kit to the notebook. 18... Replace the hard drive bay cover, then tighten the cover screws. 19 Insert ...

8512919 - Gateway Notebook Reference Guide R2
Page 125
... sending its display to an external monitor or projector. For instructions on changing the display settings, see "Changing screen settings" in active-matrix LCD screens. For more information about adjusting the brightness, see "Adjusting the brightness" on page 44. • Make ...and inherent in the TFT technology used in your online User Guide. • Move your display, contact Gateway Customer Care to identify whether a repair or replacement is justified based on the number of electrical interference, such as televisions, unshielded speakers, microwaves, fluorescent ...
... sending its display to an external monitor or projector. For instructions on changing the display settings, see "Changing screen settings" in active-matrix LCD screens. For more information about adjusting the brightness, see "Adjusting the brightness" on page 44. • Make ...and inherent in the TFT technology used in your online User Guide. • Move your display, contact Gateway Customer Care to identify whether a repair or replacement is justified based on the number of electrical interference, such as televisions, unshielded speakers, microwaves, fluorescent ...
8512919 - Gateway Notebook Reference Guide R2
Page 131
...Media Center mode is not covered in this section, go to the Gateway support Web Site at www.gateway.com. Help For more information about Windows Media Center, click Start... the display type, quality of the video source, type of connection used, quality of video cables, display device screen resolution, size of TV, age of the TV, or the type of TV (interlaced or progressive scan), can...-Some retail TVs may need to Media Center mode. Media Center This section only covers problems relating to replace it. If the keyboard does not work after it dries, you may provide lower quality video. To ...
...Media Center mode is not covered in this section, go to the Gateway support Web Site at www.gateway.com. Help For more information about Windows Media Center, click Start... the display type, quality of the video source, type of connection used, quality of video cables, display device screen resolution, size of TV, age of the TV, or the type of TV (interlaced or progressive scan), can...-Some retail TVs may need to Media Center mode. Media Center This section only covers problems relating to replace it. If the keyboard does not work after it dries, you may provide lower quality video. To ...
8512919 - Gateway Notebook Reference Guide R2
Page 134
... enough memory" error message • Close all programs, then restart your home DVD player • Yes, you can play recorded videos on -screen instructions. You see "Adding or replacing memory modules" on page 103. • Use the Memory Diagnostics Tool to know whether you can play recorded videos on your notebook. 126
... enough memory" error message • Close all programs, then restart your home DVD player • Yes, you can play recorded videos on -screen instructions. You see "Adding or replacing memory modules" on page 103. • Use the Memory Diagnostics Tool to know whether you can play recorded videos on your notebook. 126
8512919 - Gateway Notebook Reference Guide R2
Page 165
...port 7, 9 programs closing unresponsive 24 opening 38 recovery discs 89, 93 re-installing 88 projector adding 59 color quality 62 port 10 screen resolution 62 troubleshooting 138 using 28, 62 Properties button 42 R radio approval authorities 79 radio frequency wireless connections 79 RAM See memory ...re-installing defaults 98 drivers 88 programs 87, 88 software 87, 88 Windows 87, 88 with Gateway Recovery Center 91 with Windows DVD 99 with Windows System Restore 95 replacing See installing resetting notebook 24 restarting notebook 24 restoring defaults 98 drivers 88 programs 88 software 88...
...port 7, 9 programs closing unresponsive 24 opening 38 recovery discs 89, 93 re-installing 88 projector adding 59 color quality 62 port 10 screen resolution 62 troubleshooting 138 using 28, 62 Properties button 42 R radio approval authorities 79 radio frequency wireless connections 79 RAM See memory ...re-installing defaults 98 drivers 88 programs 87, 88 software 87, 88 Windows 87, 88 with Gateway Recovery Center 91 with Windows DVD 99 with Windows System Restore 95 replacing See installing resetting notebook 24 restarting notebook 24 restoring defaults 98 drivers 88 programs 88 software 88...


