
User Guide
Page 1
FPD1975W 19-INCH WIDESCREEN LCD MONITOR USERGUIDE ®
FPD1975W 19-INCH WIDESCREEN LCD MONITOR USERGUIDE ®

User Guide
Page 3
...Gateway Flat-panel Monitor 1 Connecting the monitor 2 Setting up the optional stand 4 Attaching the USB stand 4 Adjusting monitor height tension 7 Adjusting monitor tilt tension 8 Connecting the USB hub 9 Setting up the optional speaker bar 10 Installing the speaker bar 10 Starting the monitor 11 Adjusting monitor settings 12 Monitor buttons 12 On-screen display...18 Troubleshooting 18 No power 19 Display colors are wrong 19 Color is not uniform 19 No picture 19 Picture has shadows or "ghosts 19 Image is not sized or centered correctly 20 The monitor has pixels that are always...
...Gateway Flat-panel Monitor 1 Connecting the monitor 2 Setting up the optional stand 4 Attaching the USB stand 4 Adjusting monitor height tension 7 Adjusting monitor tilt tension 8 Connecting the USB hub 9 Setting up the optional speaker bar 10 Installing the speaker bar 10 Starting the monitor 11 Adjusting monitor settings 12 Monitor buttons 12 On-screen display...18 Troubleshooting 18 No power 19 Display colors are wrong 19 Color is not uniform 19 No picture 19 Picture has shadows or "ghosts 19 Image is not sized or centered correctly 20 The monitor has pixels that are always...

User Guide
Page 5
CHAPTER1 Using Your Gateway Flat-panel Monitor • Connecting the monitor • Setting up the optional stand • Setting up the optional speaker bar • Starting the monitor • Adjusting monitor settings • Changing Windows screen settings • Power management • Maintaining • Troubleshooting • Specifications 1
CHAPTER1 Using Your Gateway Flat-panel Monitor • Connecting the monitor • Setting up the optional stand • Setting up the optional speaker bar • Starting the monitor • Adjusting monitor settings • Changing Windows screen settings • Power management • Maintaining • Troubleshooting • Specifications 1

User Guide
Page 6
CHAPTER 1: Using Your Gateway Flat-panel Monitor Connecting the monitor To connect the monitor: 1 Place the monitor base on smoothly. 2 Position your computer and the monitor so you can reach the back of each. 3 Connect the power cord to the power connector under the back of the display. 2 You may need to press the two buttons on the base to let the monitor slide on a table top, then slide the monitor neck down onto the base until it clicks into place.
CHAPTER 1: Using Your Gateway Flat-panel Monitor Connecting the monitor To connect the monitor: 1 Place the monitor base on smoothly. 2 Position your computer and the monitor so you can reach the back of each. 3 Connect the power cord to the power connector under the back of the display. 2 You may need to press the two buttons on the base to let the monitor slide on a table top, then slide the monitor neck down onto the base until it clicks into place.

User Guide
Page 8
... of the neck. Release Button Release Button 4 Remove the screw from the neck hinge, then remove the neck from www.gateway.com. Screw 4 CHAPTER 1: Using Your Gateway Flat-panel Monitor Setting up to four USB devices to your computer's USB port, you can connect up the optional stand Attaching the USB... non-slip mat on the stand. The stand can buy an adjustable USB stand from the LCD panel. Do not discard the screw. When connected to the USB 2.0 ports on a tabletop is turned off. 2 Place the monitor face-down over the edge of the table. 3 Press the two release buttons on a...
... of the neck. Release Button Release Button 4 Remove the screw from the neck hinge, then remove the neck from www.gateway.com. Screw 4 CHAPTER 1: Using Your Gateway Flat-panel Monitor Setting up to four USB devices to your computer's USB port, you can connect up the optional stand Attaching the USB... non-slip mat on the stand. The stand can buy an adjustable USB stand from the LCD panel. Do not discard the screw. When connected to the USB 2.0 ports on a tabletop is turned off. 2 Place the monitor face-down over the edge of the table. 3 Press the two release buttons on a...

User Guide
Page 10
CHAPTER 1: Using Your Gateway Flat-panel Monitor 9 Tighten the thumbscrew with your fingers (or a flat screwdriver) under the base to the LCD panel using the four screws you , press the mounting bracket lever to the left and hold it, then remove the bracket from the stand. 11 Attach the bracket to secure the neck into place. Screws Screws 6 Thumbscrew 10 With the stand facing you removed previously.
CHAPTER 1: Using Your Gateway Flat-panel Monitor 9 Tighten the thumbscrew with your fingers (or a flat screwdriver) under the base to the LCD panel using the four screws you , press the mounting bracket lever to the left and hold it, then remove the bracket from the stand. 11 Attach the bracket to secure the neck into place. Screws Screws 6 Thumbscrew 10 With the stand facing you removed previously.

User Guide
Page 11
www.gateway.com 12 Slide the neck's bracket slot onto the bracket's mounting tab. 13 Press the bracket lever to remove it from the base. However, if it , then lower the neck into place and release the lever. Screwdriver access cap 7 To adjust your monitor. You also need to maintain the ...height for your monitor's height tension: 1 Press the screwdriver access hole cap from below the base to the right and hold it does not stay...
www.gateway.com 12 Slide the neck's bracket slot onto the bracket's mounting tab. 13 Press the bracket lever to remove it from the base. However, if it , then lower the neck into place and release the lever. Screwdriver access cap 7 To adjust your monitor. You also need to maintain the ...height for your monitor's height tension: 1 Press the screwdriver access hole cap from below the base to the right and hold it does not stay...

User Guide
Page 12
... clockwise two to four turns to increase the tension. Height tension screw 3 Adjust the height tension screw so the monitor stays in place when you let go . Tilt tension screw 8 CHAPTER 1: Using Your Gateway Flat-panel Monitor 2 Insert a Phillips screwdriver through the access hole in the base and onto the height tension screw (on the...
... clockwise two to four turns to increase the tension. Height tension screw 3 Adjust the height tension screw so the monitor stays in place when you let go . Tilt tension screw 8 CHAPTER 1: Using Your Gateway Flat-panel Monitor 2 Insert a Phillips screwdriver through the access hole in the base and onto the height tension screw (on the...

User Guide
Page 14
... cable so the speaker bar does not obstruct the cable. 1 Tilt the screen back, then center the speaker bar below the screen. CHAPTER 1: Using Your Gateway Flat-panel Monitor Setting up the optional speaker bar Power/Volume control Kensington lock slot Headphone jack Power indicator Microphone jack Headphone jack Bass port Bass port Installing...
... cable so the speaker bar does not obstruct the cable. 1 Tilt the screen back, then center the speaker bar below the screen. CHAPTER 1: Using Your Gateway Flat-panel Monitor Setting up the optional speaker bar Power/Volume control Kensington lock slot Headphone jack Power indicator Microphone jack Headphone jack Bass port Bass port Installing...

User Guide
Page 15
After your computer. Important When adjusting the monitor settings, always press the Auto button before entering the OSD. This will automatically adjust the display image to appear. www.gateway.com 6 Turn on the monitor's power button should be blue. If the power LED is running, the power LED on the speaker bar by rotating the...
After your computer. Important When adjusting the monitor settings, always press the Auto button before entering the OSD. This will automatically adjust the display image to appear. www.gateway.com 6 Turn on the monitor's power button should be blue. If the power LED is running, the power LED on the speaker bar by rotating the...

User Guide
Page 16
... the Theme button, you can select between settings optimized for the monitor. CHAPTER 1: Using Your Gateway Flat-panel Monitor 4 After you see the Windows desktop, press the Auto button on the right side of your display image to the ideal settings. 5 Use the on-screen display (OSD) to adjust other settings for watching DVDs, gaming, general use...
... the Theme button, you can select between settings optimized for the monitor. CHAPTER 1: Using Your Gateway Flat-panel Monitor 4 After you see the Windows desktop, press the Auto button on the right side of your display image to the ideal settings. 5 Use the on-screen display (OSD) to adjust other settings for watching DVDs, gaming, general use...

User Guide
Page 17
.... 4 Press the (up) and Theme (down) buttons to adjust the setting to the desired level or change the OSD language, and display information about current monitor settings. Picture-Opens the Picture menu, where you have finished making all adjustments, press the Menu button at the Main Menu to exit. ...www.gateway.com On-screen display options Adjusting OSD settings To adjust the OSD settings: Tip While the OSD is automatically adjusted to the ideal settings for your monitor to its factory settings. 13 Advanced-Opens the Advanced menu, where ...
.... 4 Press the (up) and Theme (down) buttons to adjust the setting to the desired level or change the OSD language, and display information about current monitor settings. Picture-Opens the Picture menu, where you have finished making all adjustments, press the Menu button at the Main Menu to exit. ...www.gateway.com On-screen display options Adjusting OSD settings To adjust the OSD settings: Tip While the OSD is automatically adjusted to the ideal settings for your monitor to its factory settings. 13 Advanced-Opens the Advanced menu, where ...

User Guide
Page 18
... distortion and clears or sharpens the displayed characters. The horizontal screen size will also change your monitor at a resolution less than that you should change . LED Brightness-Changes the brightness of an image. CHAPTER 1: Using Your Gateway Flat-panel Monitor OSD Menu Picture menu Picture Brightness Contrast... amount of light in the darkest portion of the monitor backlights. Use the lowest brightness setting you prefer using your computer's settings to use this option to Day Mode or Nite Mode. High gamma levels increase white levels and low gamma levels increase...
... distortion and clears or sharpens the displayed characters. The horizontal screen size will also change your monitor at a resolution less than that you should change . LED Brightness-Changes the brightness of an image. CHAPTER 1: Using Your Gateway Flat-panel Monitor OSD Menu Picture menu Picture Brightness Contrast... amount of light in the darkest portion of the monitor backlights. Use the lowest brightness setting you prefer using your computer's settings to use this option to Day Mode or Nite Mode. High gamma levels increase white levels and low gamma levels increase...

User Guide
Page 19
...monitor. Screen resolution is the number of the image (landscape to display images on your computer. Help For more information, see the program's CD or the installed program's online help. 15 If the new settings make the screen illegible and you may need to change . at www.gateway...colors • Highest (32-bit) = 16,700,000 colors 3 To change the color depth or screen resolution: 1 Click (Start), Control Panel, then under Appearance and Personalization, click Adjust Screen Resolution. Color depth is the number of pixels (individual colored dots) your needs. EzTune software...
...monitor. Screen resolution is the number of the image (landscape to display images on your computer. Help For more information, see the program's CD or the installed program's online help. 15 If the new settings make the screen illegible and you may need to change . at www.gateway...colors • Highest (32-bit) = 16,700,000 colors 3 To change the color depth or screen resolution: 1 Click (Start), Control Panel, then under Appearance and Personalization, click Adjust Screen Resolution. Color depth is the number of pixels (individual colored dots) your needs. EzTune software...

User Guide
Page 20
... compatible. • Some programs are not able to recognize and adapt to your monitor's portrait mode. If you rotate the screen. CHAPTER 1: Using Your Gateway Flat-panel Monitor Using landscape and portrait modes (requires optional height-adjustable stand) EzTune automatically switches the display to the appropriate mode (landscape or portrait) when you experience problems with VGA...
... compatible. • Some programs are not able to recognize and adapt to your monitor's portrait mode. If you rotate the screen. CHAPTER 1: Using Your Gateway Flat-panel Monitor Using landscape and portrait modes (requires optional height-adjustable stand) EzTune automatically switches the display to the appropriate mode (landscape or portrait) when you experience problems with VGA...
User Guide
Page 21
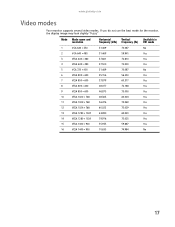
If you do not use the best mode for the monitor, the display image may look slightly "fuzzy." Mode Mode name and resolution Horizontal Vertical Available in frequency (kHz) frequency (Hz) DVI mode 1 VGA 640 × 350 31.... 75.025 Yes 15 VESA 1440 × 900 55.935 59.887 Yes 16 VESA 1440 × 900 70.635 74.984 No 17 www.gateway.com Video modes Your monitor supports several video modes.
If you do not use the best mode for the monitor, the display image may look slightly "fuzzy." Mode Mode name and resolution Horizontal Vertical Available in frequency (kHz) frequency (Hz) DVI mode 1 VGA 640 × 350 31.... 75.025 Yes 15 VESA 1440 × 900 55.935 59.887 Yes 16 VESA 1440 × 900 70.635 74.984 No 17 www.gateway.com Video modes Your monitor supports several video modes.

User Guide
Page 22
... equipment to build circuitry into the energy saving mode, the monitor enters the Active Off mode (sleep). CHAPTER 1: Using Your Gateway Flat-panel Monitor Power management ENERGY STAR As an ENERGY STAR® Partner, Gateway has determined that supports the VESA Display Power Management Signaling (DPMS) Protocol, the monitor can be reduced to the following levels: VESA state...
... equipment to build circuitry into the energy saving mode, the monitor enters the Active Off mode (sleep). CHAPTER 1: Using Your Gateway Flat-panel Monitor Power management ENERGY STAR As an ENERGY STAR® Partner, Gateway has determined that supports the VESA Display Power Management Signaling (DPMS) Protocol, the monitor can be reduced to the following levels: VESA state...

User Guide
Page 23
... Picture has shadows or "ghosts" • Press the Auto button to automatically adjust the display image to the ideal settings. • Remove any pins that might be bent or pushed in . 19 No picture • Press the Input button to make sure that you have selected the ... monitor and the wall outlet. www.gateway.com No power Make sure that the video cable is connected securely to the back of the monitor and your computer. If the monitor is connected securely to the back of the monitor and computer. For more information about color uniformity or brightness. Display ...
... Picture has shadows or "ghosts" • Press the Auto button to automatically adjust the display image to the ideal settings. • Remove any pins that might be bent or pushed in . 19 No picture • Press the Input button to make sure that you have selected the ... monitor and the wall outlet. www.gateway.com No power Make sure that the video cable is connected securely to the back of the monitor and your computer. If the monitor is connected securely to the back of the monitor and computer. For more information about color uniformity or brightness. Display ...

User Guide
Page 24
...too high, the speaker bar's sound may have been muted using the speaker bar, we recommend that are always dark or too bright • This condition is justified based on page 12. For optimum volume control using Windows sound controls. CHAPTER 1: Using Your Gateway Flat-panel Monitor Image...microphone's mute settings, click the speaker icon in active-matrix LCD screens. To adjust the audio device's output volume, see "Adjusting monitor settings" on the number of the speaker bar. To check your display, contact Gateway Customer Care to plug in my headphones, but my computer ...
...too high, the speaker bar's sound may have been muted using the speaker bar, we recommend that are always dark or too bright • This condition is justified based on page 12. For optimum volume control using Windows sound controls. CHAPTER 1: Using Your Gateway Flat-panel Monitor Image...microphone's mute settings, click the speaker icon in active-matrix LCD screens. To adjust the audio device's output volume, see "Adjusting monitor settings" on the number of the speaker bar. To check your display, contact Gateway Customer Care to plug in my headphones, but my computer ...

User Guide
Page 26
CHAPTER 1: Using Your Gateway Flat-panel Monitor 22
CHAPTER 1: Using Your Gateway Flat-panel Monitor 22


