
User Guide
Page 3
...Gateway Flat-panel Monitor 1 Connecting the monitor 2 Setting up the optional stand 4 Attaching the USB stand 4 Adjusting monitor height tension 7 Adjusting monitor tilt tension 8 Connecting the USB hub 9 Setting up the optional speaker bar 10 Installing the speaker bar 10 Starting the monitor 11 Adjusting monitor settings 12 Monitor buttons 12 On-screen display...18 Maintaining 18 Troubleshooting 18 No power 19 Display colors are wrong 19 Color is not uniform 19 No picture 19 Picture has shadows or "ghosts 19 Image is not sized or centered correctly 20 The monitor has pixels ...
...Gateway Flat-panel Monitor 1 Connecting the monitor 2 Setting up the optional stand 4 Attaching the USB stand 4 Adjusting monitor height tension 7 Adjusting monitor tilt tension 8 Connecting the USB hub 9 Setting up the optional speaker bar 10 Installing the speaker bar 10 Starting the monitor 11 Adjusting monitor settings 12 Monitor buttons 12 On-screen display...18 Maintaining 18 Troubleshooting 18 No power 19 Display colors are wrong 19 Color is not uniform 19 No picture 19 Picture has shadows or "ghosts 19 Image is not sized or centered correctly 20 The monitor has pixels ...

User Guide
Page 5
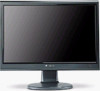
CHAPTER1 Using Your Gateway Flat-panel Monitor • Connecting the monitor • Setting up the optional stand • Setting up the optional speaker bar • Starting the monitor • Adjusting monitor settings • Changing Windows screen settings • Power management • Maintaining • Troubleshooting • Specifications 1
CHAPTER1 Using Your Gateway Flat-panel Monitor • Connecting the monitor • Setting up the optional stand • Setting up the optional speaker bar • Starting the monitor • Adjusting monitor settings • Changing Windows screen settings • Power management • Maintaining • Troubleshooting • Specifications 1

User Guide
Page 15
... clockwise. www.gateway.com 6 Turn on the front of monitor. This will automatically adjust the display image to appear. Important When adjusting the monitor settings, always press the Auto button before entering the OSD. After your computer is not blue or you do not see "Troubleshooting" on page ...18. 3 Adjust the tilt of the monitor for the current screen resolution. 11 For more troubleshooting information, see a display image, check the connections. The power LED on the power button turns on...
... clockwise. www.gateway.com 6 Turn on the front of monitor. This will automatically adjust the display image to appear. Important When adjusting the monitor settings, always press the Auto button before entering the OSD. After your computer is not blue or you do not see "Troubleshooting" on page ...18. 3 Adjust the tilt of the monitor for the current screen resolution. 11 For more troubleshooting information, see a display image, check the connections. The power LED on the power button turns on...

User Guide
Page 22
CHAPTER 1: Using Your Gateway Flat-panel Monitor Power management ENERGY STAR As an ENERGY STAR® Partner, Gateway has determined that supports the VESA Display Power Management Signaling (DPMS) Protocol, the monitor can be reduced to reduce energy consumption during periods of non-use . In the ...into their products to the following levels: VESA state LED indicator Power consumption On Active Off Blue Orange < 38 W This monitor complies with the EPA's International ENERGY STAR Program, which is a program designed to encourage manufacturers of computer equipment to build...
CHAPTER 1: Using Your Gateway Flat-panel Monitor Power management ENERGY STAR As an ENERGY STAR® Partner, Gateway has determined that supports the VESA Display Power Management Signaling (DPMS) Protocol, the monitor can be reduced to reduce energy consumption during periods of non-use . In the ...into their products to the following levels: VESA state LED indicator Power consumption On Active Off Blue Orange < 38 W This monitor complies with the EPA's International ENERGY STAR Program, which is a program designed to encourage manufacturers of computer equipment to build...


