

Hardware Installation Guide
Page 6
.... They may not exactly match your configuration and may include options you install your drive successfully. Important The illustrations in case you need technical support assistance from Gateway Technical Support. However, they should help you did not purchase. To prepare for information about opening and closing your computer case. The telephone must be... that : ■ Is clean. (Avoid dusty areas.) ■ Is a low-static environment. (Avoid carpeted areas.) ■ Has a stable platform on which to your computer. 2 www.gateway.com
.... They may not exactly match your configuration and may include options you install your drive successfully. Important The illustrations in case you need technical support assistance from Gateway Technical Support. However, they should help you did not purchase. To prepare for information about opening and closing your computer case. The telephone must be... that : ■ Is clean. (Avoid dusty areas.) ■ Is a low-static environment. (Avoid carpeted areas.) ■ Has a stable platform on which to your computer. 2 www.gateway.com
Hardware Installation Guide
Page 7
... tab of your operating system are listed on the Desktop or the Start menu), then clicking Properties. www.gateway.com 3 Important If you do not have printed documentation, go to the Gateway Web site (www.support.gateway.com) and print the appropriate document before starting the installation procedure. 3 If you want to partition the...
... tab of your operating system are listed on the Desktop or the Start menu), then clicking Properties. www.gateway.com 3 Important If you do not have printed documentation, go to the Gateway Web site (www.support.gateway.com) and print the appropriate document before starting the installation procedure. 3 If you want to partition the...
Hardware Installation Guide
Page 15
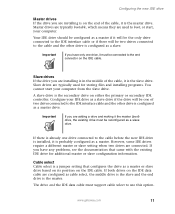
... will be reconfigured as cable select, the middle drive is the slave and the end drive is the master. www.gateway.com 11 The drive and the IDE data cable must support cable select to the cable before the new IDE drive is installed, it must be two drives connected to the...
... will be reconfigured as cable select, the middle drive is the slave and the end drive is the master. www.gateway.com 11 The drive and the IDE data cable must support cable select to the cable before the new IDE drive is installed, it must be two drives connected to the...
Hardware Installation Guide
Page 16
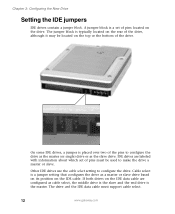
... its position on the IDE data cable are labeled with information about which set of pins located on the rear of pins must support cable select. 12 www.gateway.com If both drives on the IDE cable. On some IDE drives, a jumper is typically located on the drive. Other IDE drives use...
... its position on the IDE data cable are labeled with information about which set of pins located on the rear of pins must support cable select. 12 www.gateway.com If both drives on the IDE cable. On some IDE drives, a jumper is typically located on the drive. Other IDE drives use...
Hardware Installation Guide
Page 17
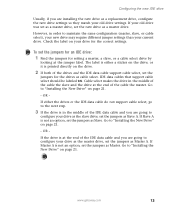
...the New Drive" on page 21. - OR - If Master A is not an option, set the jumpers as Slave. www.gateway.com 13 If your old drive was set as a master drive, set the new drive as Master A. To set the jumpers ... the middle of the cable the slave and the drive at the end of the drives and the IDE data cable support cable select, set the jumpers for the drives as cable select. Check the label on page 21. - Go to...as Slave A. The label is either the drives or the IDE data cable do not support cable select, go to the next step. 3 If the drive is at the jumper label. IDE data cables that...
...the New Drive" on page 21. - OR - If Master A is not an option, set the jumpers as Slave. www.gateway.com 13 If your old drive was set as a master drive, set the new drive as Master A. To set the jumpers ... the middle of the cable the slave and the drive at the end of the drives and the IDE data cable support cable select, set the jumpers for the drives as cable select. Check the label on page 21. - Go to...as Slave A. The label is either the drives or the IDE data cable do not support cable select, go to the next step. 3 If the drive is at the jumper label. IDE data cables that...

Hardware Installation Guide
Page 38
... the new drive" on page 41. - If your original system CDs, go to www.support.gateway.com to download any drivers you find any yellow circles, use the red Drivers CD, the Gateway System Restoration Kit, or the Gateway System Restoration CD that originally came with an exclamation point next to any of your... the new hard drive or if the new hard drive does not seem to be working correctly, go to "Troubleshooting" on page 53. 34 www.gateway.com
... the new drive" on page 41. - If your original system CDs, go to www.support.gateway.com to download any drivers you find any yellow circles, use the red Drivers CD, the Gateway System Restoration Kit, or the Gateway System Restoration CD that originally came with an exclamation point next to any of your... the new hard drive or if the new hard drive does not seem to be working correctly, go to "Troubleshooting" on page 53. 34 www.gateway.com

Hardware Installation Guide
Page 40
... Kit, go to continue. 8 Select 2. Boot from CD-ROM. 9 Select a language option. 10 Select 2. Automated installation of Windows (XP or 2000). 36 www.gateway.com If you . Delete all files and restart. 7 When prompted, press any drivers you do not have your computer. 3 Select 2. Boot from CD-ROM. 4 ... are using the red Drivers CD: 1 Insert the red Drivers into the CD or DVD drive. 2 Restart your original system CDs, go to www.support.gateway.com to download any key to "Using the System Restoration CD" on page 38. ■ The System Restoration CD, go to "Using the System...
... Kit, go to continue. 8 Select 2. Boot from CD-ROM. 9 Select a language option. 10 Select 2. Automated installation of Windows (XP or 2000). 36 www.gateway.com If you . Delete all files and restart. 7 When prompted, press any drivers you do not have your computer. 3 Select 2. Boot from CD-ROM. 4 ... are using the red Drivers CD: 1 Insert the red Drivers into the CD or DVD drive. 2 Restart your original system CDs, go to www.support.gateway.com to download any key to "Using the System Restoration CD" on page 38. ■ The System Restoration CD, go to "Using the System...
Hardware Installation Guide
Page 47
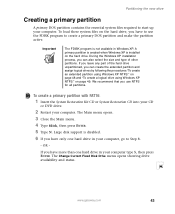
Important The FDISK program is not available in your computer type 5, then press ENTER. If you leave any part of other partitions. Large disk support is installed on page 49. The Main menu opens. 3 Close the Main menu. 4 Type fdisk, then press ENTER. 5 Type N. If you have more than one ... your computer. To load these system files on the hard drive, you have to create a primary DOS partition and make the partition active. OR - www.gateway.com 43
Important The FDISK program is not available in your computer type 5, then press ENTER. If you leave any part of other partitions. Large disk support is installed on page 49. The Main menu opens. 3 Close the Main menu. 4 Type fdisk, then press ENTER. 5 Type N. If you have more than one ... your computer. To load these system files on the hard drive, you have to create a primary DOS partition and make the partition active. OR - www.gateway.com 43
Hardware Installation Guide
Page 48
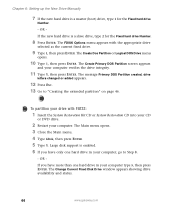
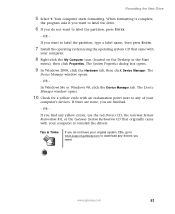
...appears. 12 Press ESC. 13 Go to Step 8. - The Create Primary DOS Partition screen appears and your computer type 5, then press ENTER. Large disk support is enabled. 6 If you have only one hard drive in your computer, go to "Creating the extended partition" on page 46. The Change Current ...Fixed Disk Drive window appears showing drive availability and status. 44 www.gateway.com If the new hard drive is a slave drive, type 2 for the Fixed hard drive Number. - The Main menu opens. 3 Close the Main menu....
...appears. 12 Press ESC. 13 Go to Step 8. - The Create Primary DOS Partition screen appears and your computer type 5, then press ENTER. Large disk support is enabled. 6 If you have only one hard drive in your computer, go to "Creating the extended partition" on page 46. The Change Current ...Fixed Disk Drive window appears showing drive availability and status. 44 www.gateway.com If the new hard drive is a slave drive, type 2 for the Fixed hard drive Number. - The Main menu opens. 3 Close the Main menu....
Hardware Installation Guide
Page 55
... Device Manager tab. If there are finished. - OR - www.gateway.com 51 If you find any yellow circles, use the red Drivers CD, the Gateway System Restoration Kit, or the Gateway System Restoration CD that came with your original system CDs, go to www.support.gateway.com to any drivers you are none, you need.
... Device Manager tab. If there are finished. - OR - www.gateway.com 51 If you find any yellow circles, use the red Drivers CD, the Gateway System Restoration Kit, or the Gateway System Restoration CD that came with your original system CDs, go to www.support.gateway.com to any drivers you are none, you need.

Hardware Installation Guide
Page 57
... that was included in the drive kit. 53 7 Troubleshooting If your computer does not recognize the new hard drive, try these troubleshooting tips before calling Gateway Technical Support: ■ Review the installation procedures. If you did not skip any of the steps. ■ Disconnect, then reconnect the hard drive power cable. ■...
... that was included in the drive kit. 53 7 Troubleshooting If your computer does not recognize the new hard drive, try these troubleshooting tips before calling Gateway Technical Support: ■ Review the installation procedures. If you did not skip any of the steps. ■ Disconnect, then reconnect the hard drive power cable. ■...
Hardware Installation Guide
Page 58
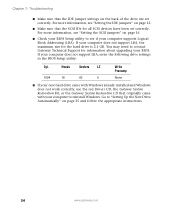
... correctly, use the red Drivers CD, the Gateway System Restoration Kit, or the Gateway System Restoration CD that originally came with your computer supports Logical Block Addressing (LBA). For more information, see if your computer to contact Gateway Technical Support for the hard drive is 2.1 GB. Go... to see "Setting the IDE jumpers" on page 12. ■ Make sure that the IDE jumper settings on page 35 and follow the appropriate instructions. 54 www.gateway.com Chapter 7: Troubleshooting ...
... correctly, use the red Drivers CD, the Gateway System Restoration Kit, or the Gateway System Restoration CD that originally came with your computer supports Logical Block Addressing (LBA). For more information, see if your computer to contact Gateway Technical Support for the hard drive is 2.1 GB. Go... to see "Setting the IDE jumpers" on page 12. ■ Make sure that the IDE jumper settings on page 35 and follow the appropriate instructions. 54 www.gateway.com Chapter 7: Troubleshooting ...
User Guide
Page 3
Contents 1 Checking Out Your Gateway Computer 1 Front 2 Back 4 Identifying your model 6 Gateway model number 6 Gateway serial number 6 Microsoft Certificate of Authenticity 6 Finding your specifications 7 Accessories 8 2 Getting Started 11 Working safely 12 Reducing eye strain 12 Setting up... 22 Using the mouse 23 Installing a printer, scanner, or other peripheral device 24 3 Getting Help 25 Help and Support 26 Searching for a topic 26 Online help 27 Gateway Web site 28 Using eSupport 28 4 Windows Basics 31 About the Windows environment 32 Using the desktop 33 Using the ...
Contents 1 Checking Out Your Gateway Computer 1 Front 2 Back 4 Identifying your model 6 Gateway model number 6 Gateway serial number 6 Microsoft Certificate of Authenticity 6 Finding your specifications 7 Accessories 8 2 Getting Started 11 Working safely 12 Reducing eye strain 12 Setting up... 22 Using the mouse 23 Installing a printer, scanner, or other peripheral device 24 3 Getting Help 25 Help and Support 26 Searching for a topic 26 Online help 27 Gateway Web site 28 Using eSupport 28 4 Windows Basics 31 About the Windows environment 32 Using the desktop 33 Using the ...

User Guide
Page 8
14 Troubleshooting 219 Safety guidelines 220 First steps 220 Software support tools 221 Troubleshooting 222 Add-in cards 222 CD, DVD, or recordable drives 222 Cleaning CDs and DVDs 224 Computer 224 File management 225 Hard ... Keyboard 228 Memory 228 Modem 229 Monitor 233 Mouse 235 Power 235 Printer 236 Sound 237 Using the BIOS Setup utility 238 Telephone support 240 Before calling Gateway Technical Support 240 Telephone support 241 Tutoring and training 242 Self-help 242 Tutoring 242 Training 243 A Safety, Regulatory, and Legal Information 245 Index 255 vi
14 Troubleshooting 219 Safety guidelines 220 First steps 220 Software support tools 221 Troubleshooting 222 Add-in cards 222 CD, DVD, or recordable drives 222 Cleaning CDs and DVDs 224 Computer 224 File management 225 Hard ... Keyboard 228 Memory 228 Modem 229 Monitor 233 Mouse 235 Power 235 Printer 236 Sound 237 Using the BIOS Setup utility 238 Telephone support 240 Before calling Gateway Technical Support 240 Telephone support 241 Tutoring and training 242 Self-help 242 Tutoring 242 Training 243 A Safety, Regulatory, and Legal Information 245 Index 255 vi

User Guide
Page 14
... are for informational purposes only. The invoice also contains your computer. Chapter 1: Checking Out Your Gateway Computer Identifying your model Important The labels shown in Help and Support. Label information varies by model, features ordered, and location. Gateway model number The label on the side of your computer case contains information that came...
... are for informational purposes only. The invoice also contains your computer. Chapter 1: Checking Out Your Gateway Computer Identifying your model Important The labels shown in Help and Support. Label information varies by model, features ordered, and location. Gateway model number The label on the side of your computer case contains information that came...
User Guide
Page 15
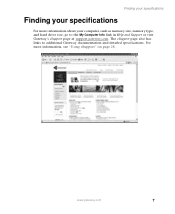
For more information about your specifications For more information, see "Using eSupport" on page 28. Finding your specifications Finding your computer, such as memory size, memory type, and hard drive size, go to additional Gateway documentation and detailed specifications. www.gateway.com 7 The eSupport page also has links to the My Computer Info link in Help and Support or visit Gateway's eSupport page at support.gateway.com.
For more information about your specifications For more information, see "Using eSupport" on page 28. Finding your specifications Finding your computer, such as memory size, memory type, and hard drive size, go to additional Gateway documentation and detailed specifications. www.gateway.com 7 The eSupport page also has links to the My Computer Info link in Help and Support or visit Gateway's eSupport page at support.gateway.com.
User Guide
Page 21
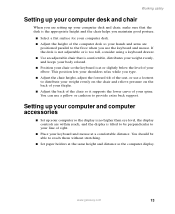
... relax while you type. ■ Adjust the chair height, adjust the forward tilt of the seat, or use a pillow or cushion to provide extra back support. You can use a footrest to distribute your weight evenly on the chair and relieve pressure on the back of your thighs. ■ Adjust the back... of the chair so it supports the lower curve of your elbow. www.gateway.com 13 Setting up your computer and computer accessories ■ Set up your computer desk and chair, make sure that is...
... relax while you type. ■ Adjust the chair height, adjust the forward tilt of the seat, or use a pillow or cushion to provide extra back support. You can use a footrest to distribute your weight evenly on the chair and relieve pressure on the back of your thighs. ■ Adjust the back... of the chair so it supports the lower curve of your elbow. www.gateway.com 13 Setting up your computer and computer accessories ■ Set up your computer desk and chair, make sure that is...
User Guide
Page 32
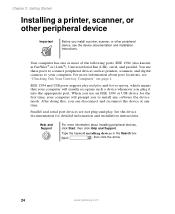
.... Type the keyword installing devices in the Search box , then click the arrow. 24 www.gateway.com For more information about installing peripheral devices, click Start, then click Help and Support. See the device documentation for the first time, your computer will usually recognize such a device... and installation instructions. When you use these ports to your computer will prompt you plug it into the appropriate port. Help and Support For more of the following ports: IEEE 1394 (also known as printers, scanners, and digital cameras to connect peripheral devices such as...
.... Type the keyword installing devices in the Search box , then click the arrow. 24 www.gateway.com For more information about installing peripheral devices, click Start, then click Help and Support. See the device documentation for the first time, your computer will usually recognize such a device... and installation instructions. When you use these ports to your computer will prompt you plug it into the appropriate port. Help and Support For more of the following ports: IEEE 1394 (also known as printers, scanners, and digital cameras to connect peripheral devices such as...

User Guide
Page 33
Read this chapter to learn how to help you about additional information resources available to access: ■ Help and Support ■ Online help ■ Gateway Web site 25 3 Getting Help This chapter tells you use your computer.
Read this chapter to learn how to help you about additional information resources available to access: ■ Help and Support ■ Online help ■ Gateway Web site 25 3 Getting Help This chapter tells you use your computer.
User Guide
Page 34
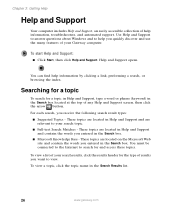
...at the top of help information, troubleshooters, and automated support. You must be connected to the Internet to your Gateway computer. These topics are located in Help and Support and are relevant to search for a topic in Help and Support, type a word or phrase (keyword) in the Search... Results list. 26 www.gateway.com Use Help and Support to answer questions about Windows and to view. Chapter 3: Getting Help Help and Support Your computer includes Help and Support, an easily accessible collection of...
...at the top of help information, troubleshooters, and automated support. You must be connected to the Internet to your Gateway computer. These topics are located in Help and Support and are relevant to search for a topic in Help and Support, type a word or phrase (keyword) in the Search... Results list. 26 www.gateway.com Use Help and Support to answer questions about Windows and to view. Chapter 3: Getting Help Help and Support Your computer includes Help and Support, an easily accessible collection of...

