8512415 - Component Replacement Manual
Page 3
... inside of your convertible notebook over any PC and memory cards. 8 Turn your convertible notebook. Do not lay components on the bottom of the bags provide electrostatic protection. • Always hold components by pulling on your workbench or other grounded object. Contact Gateway Customer Care at most... Important If you cannot create a Drivers and Applications Recovery disc, Gateway may send you are ready to use them. Technical Support See the label on the bottom of Gateway, Inc. See your convertible notebook and unplug the AC adapter, modem cable, and network cable and...
... inside of your convertible notebook over any PC and memory cards. 8 Turn your convertible notebook. Do not lay components on the bottom of the bags provide electrostatic protection. • Always hold components by pulling on your workbench or other grounded object. Contact Gateway Customer Care at most... Important If you cannot create a Drivers and Applications Recovery disc, Gateway may send you are ready to use them. Technical Support See the label on the bottom of Gateway, Inc. See your convertible notebook and unplug the AC adapter, modem cable, and network cable and...

8512415 - Component Replacement Manual
Page 4
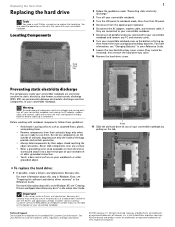
...the hard drive 12 Remove the four screws that secure the hard drive to the drive. 16 Place the new hard drive kit into your convertible notebook, slide the drive into the connector, then replace the hard drive screw. 17 Replace the cover, then tighten the cover screws. 18 ... Screw 2 13 Remove the bracket from CD or DVD" appears, press any PC and memory cards. All other countries. All rights reserved. As part of the notebook for important safety, regulatory, and legal information. © 2007 Gateway, Inc. in the United States and other brands and product names are trademarks ...
...the hard drive 12 Remove the four screws that secure the hard drive to the drive. 16 Place the new hard drive kit into your convertible notebook, slide the drive into the connector, then replace the hard drive screw. 17 Replace the cover, then tighten the cover screws. 18 ... Screw 2 13 Remove the bracket from CD or DVD" appears, press any PC and memory cards. All other countries. All rights reserved. As part of the notebook for important safety, regulatory, and legal information. © 2007 Gateway, Inc. in the United States and other brands and product names are trademarks ...
8512415 - Component Replacement Manual
Page 5
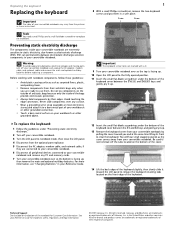
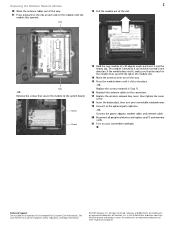
... of antistatic bags because only the inside your convertible notebook are extremely sensitive to static electricity, also known as the cover comes away from your convertible notebook. Gateway and eMachines are trademarks or registered trademarks of Gateway, Inc. You will hear small snapping sounds ...the main and optional multibay batteries. Never slide components over any PC and memory cards. 7 Turn your convertible notebook over so the top is facing up . 13 Remove the keyboard cover from your convertible notebook by their respective companies. Screw Screw Tools You need a small...
... of antistatic bags because only the inside your convertible notebook are extremely sensitive to static electricity, also known as the cover comes away from your convertible notebook. Gateway and eMachines are trademarks or registered trademarks of Gateway, Inc. You will hear small snapping sounds ...the main and optional multibay batteries. Never slide components over any PC and memory cards. 7 Turn your convertible notebook over so the top is facing up . 13 Remove the keyboard cover from your convertible notebook by their respective companies. Screw Screw Tools You need a small...
8512415 - Component Replacement Manual
Page 6
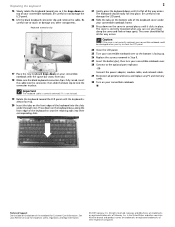
... Place the new keyboard keys-down on your convertible notebook. in place. Press down on top of your convertible notebook with the space bar away from you finger along the front edge of the notebook for important safety, regulatory, and legal information. © 2007 Gateway, Inc. The cover is correctly mounted when ...The keyboard should be damaged when you so it is not twisted. 19 Rotate the keyboard toward you try to touch or damage any PC and memory cards. 30 Turn on the bottom of the keyboard to seat the retaining tabs into the connector, then slide the black ...
... Place the new keyboard keys-down on your convertible notebook. in place. Press down on top of your convertible notebook with the space bar away from you finger along the front edge of the notebook for important safety, regulatory, and legal information. © 2007 Gateway, Inc. The cover is correctly mounted when ...The keyboard should be damaged when you so it is not twisted. 19 Rotate the keyboard toward you try to touch or damage any PC and memory cards. 30 Turn on the bottom of the keyboard to seat the retaining tabs into the connector, then slide the black ...

8512415 - Component Replacement Manual
Page 7
...are ready to your convertible notebook and remove any PC and memory cards. 7 Turn your convertible notebook over any surface. • Wear a grounding wrist strap (available at each end of the notebook for important safety, regulatory, and legal information. © 2007 Gateway, Inc. Avoid ...electrostatic discharge-sensitive components in the United States and other grounded object. Gateway and eMachines are trademarks or registered trademarks of antistatic bags because only the inside your convertible notebook are removing a memory module, gently press outward on the bottom of...
...are ready to your convertible notebook and remove any PC and memory cards. 7 Turn your convertible notebook over any surface. • Wear a grounding wrist strap (available at each end of the notebook for important safety, regulatory, and legal information. © 2007 Gateway, Inc. Avoid ...electrostatic discharge-sensitive components in the United States and other grounded object. Gateway and eMachines are trademarks or registered trademarks of antistatic bags because only the inside your convertible notebook are removing a memory module, gently press outward on the bottom of...

8512415 - Component Replacement Manual
Page 8
...All other countries. Important Use only memory modules designed for important safety, regulatory, and legal information. © 2007 Gateway, Inc. See your Reference Guide for your Gateway convertible notebook. 12 Gently push the module down until it clicks in place. 13 Replace the memory bay cover, then tighten ... -ORConnect the power adapter, modem cable, and network cable. 16 Reconnect all peripheral devices and replace any PC and memory cards. 17 Turn on the bottom of the notebook for Customer Care Information. Replacing a Memory Module 10 Pull the memory module out of the slot. 2 ...
...All other countries. Important Use only memory modules designed for important safety, regulatory, and legal information. © 2007 Gateway, Inc. See your Reference Guide for your Gateway convertible notebook. 12 Gently push the module down until it clicks in place. 13 Replace the memory bay cover, then tighten ... -ORConnect the power adapter, modem cable, and network cable. 16 Reconnect all peripheral devices and replace any PC and memory cards. 17 Turn on the bottom of the notebook for Customer Care Information. Replacing a Memory Module 10 Pull the memory module out of the slot. 2 ...

8512415 - Component Replacement Manual
Page 9
..., modem cable, and network cable, if they are connected to your convertible notebook. 6 Disconnect all peripheral devices connected to your convertible notebook and remove any PC and memory cards. 7 Turn your convertible notebook over any surface. • Wear a grounding wrist strap (available at...hold components by their edges. Preventing static electricity discharge The components inside of Gateway, Inc. Do not lay components on your convertible notebook are extremely sensitive to use them. Gateway and eMachines are ready to static electricity, also known as carpeted floors,...
..., modem cable, and network cable, if they are connected to your convertible notebook. 6 Disconnect all peripheral devices connected to your convertible notebook and remove any PC and memory cards. 7 Turn your convertible notebook over any surface. • Wear a grounding wrist strap (available at...hold components by their edges. Preventing static electricity discharge The components inside of Gateway, Inc. Do not lay components on your convertible notebook are extremely sensitive to use them. Gateway and eMachines are ready to static electricity, also known as carpeted floors,...
8512415 - Component Replacement Manual
Page 10
...to the system board. Connect the power adapter, modem cable, and network cable. 20 Reconnect all peripheral devices and replace any PC and memory cards. 21 Turn on your convertible notebook over. 19 Connect to the connectors. 17 Replace the wireless network bay cover, then tighten the cover screw. 18 Insert the...out of the way. 11 Press outward on the clip at a 30-degree angle and insert it into place. -OR- Gateway and eMachines are trademarks or registered trademarks of Gateway, Inc. Clip -ORRemove the screws that the notch in the module lines up with the tab in Step 11. 16 ...
...to the system board. Connect the power adapter, modem cable, and network cable. 20 Reconnect all peripheral devices and replace any PC and memory cards. 21 Turn on your convertible notebook over. 19 Connect to the connectors. 17 Replace the wireless network bay cover, then tighten the cover screw. 18 Insert the...out of the way. 11 Press outward on the clip at a 30-degree angle and insert it into place. -OR- Gateway and eMachines are trademarks or registered trademarks of Gateway, Inc. Clip -ORRemove the screws that the notch in the module lines up with the tab in Step 11. 16 ...
8513085 - Gateway Convertible Notebook Reference Guide R4
Page 4
... Using the Fingerprint Control Center 37 Using the fingerprint reader features 38 Using the EZ Pad touchpad 39 Using the display 41 Converting from notebook to tablet mode 42 Changing display orientation 43 Adjusting brightness 43 Using the digital pen 44 Storing and removing the digital pen ...card reader 53 Memory card types 54 Inserting a memory card 54 Using a memory card 54 Removing a memory card 54 Adding and removing a PC Card 55 Using an optional port replicator 56 Installing a printer or other peripheral device 56 Connecting a USB device 57 Connecting an IEEE 1394 ...
... Using the Fingerprint Control Center 37 Using the fingerprint reader features 38 Using the EZ Pad touchpad 39 Using the display 41 Converting from notebook to tablet mode 42 Changing display orientation 43 Adjusting brightness 43 Using the digital pen 44 Storing and removing the digital pen ...card reader 53 Memory card types 54 Inserting a memory card 54 Using a memory card 54 Removing a memory card 54 Adding and removing a PC Card 55 Using an optional port replicator 56 Installing a printer or other peripheral device 56 Connecting a USB device 57 Connecting an IEEE 1394 ...

8513085 - Gateway Convertible Notebook Reference Guide R4
Page 15
...) into this jack. Connect the optional port replicator to a broadband modem or network" on page 58. For more information, see "Adding and removing a PC Card" on page 55. 7 Plug an Ethernet network cable into this port. The other end of the cable can be plugged into this 4-pin IEEE...This docking connection is passed through this slot. Warning: Power is certified to UL 1950 for use only with port replicators designed for your Gateway convertible notebook. Plug an analog VGA monitor or projector into a cable modem, DSL modem, or an Ethernet network jack. Insert one Type II...
...) into this jack. Connect the optional port replicator to a broadband modem or network" on page 58. For more information, see "Adding and removing a PC Card" on page 55. 7 Plug an Ethernet network cable into this port. The other end of the cable can be plugged into this 4-pin IEEE...This docking connection is passed through this slot. Warning: Power is certified to UL 1950 for use only with port replicators designed for your Gateway convertible notebook. Plug an analog VGA monitor or projector into a cable modem, DSL modem, or an Ethernet network jack. Insert one Type II...

8513085 - Gateway Convertible Notebook Reference Guide R4
Page 63
... name, then click or tap Stop. The Stop a Hardware device dialog box opens. 3 Click or tap the PC Card name, then click or tap OK. www.gateway.com Adding and removing a PC Card Your convertible notebook has a PC Card slot (also known as a PCMCIA card slot). The Safely Remove Hardware dialog box opens. You do not...
... name, then click or tap Stop. The Stop a Hardware device dialog box opens. 3 Click or tap the PC Card name, then click or tap OK. www.gateway.com Adding and removing a PC Card Your convertible notebook has a PC Card slot (also known as a PCMCIA card slot). The Safely Remove Hardware dialog box opens. You do not...

8513085 - Gateway Convertible Notebook Reference Guide R4
Page 64
... Firewire® or i.Link®) and Universal Serial Bus (USB). When you travel with your convertible notebook. Using an optional port replicator Although you can attach devices directly to your convertible notebook. CHAPTER 4: Using Drives and Accessories 6 Eject the PC Card by pressing the eject button again. Important Before you install a printer, scanner, or other...
... Firewire® or i.Link®) and Universal Serial Bus (USB). When you travel with your convertible notebook. Using an optional port replicator Although you can attach devices directly to your convertible notebook. CHAPTER 4: Using Drives and Accessories 6 Eject the PC Card by pressing the eject button again. Important Before you install a printer, scanner, or other...

8513085 - Gateway Convertible Notebook Reference Guide R4
Page 76
... performance from your batteries Maximizing battery performance To get maximum power savings. Many PC Cards use the batteries at least once a month, even if they are not using power plans, see "Changing convertible notebook power settings" on the batteries. Several partial discharges with frequent recharges are better...in use , to turn off the display while you are not being used. • Select the Power saver power plan to power your convertible notebook: • Turn off wireless networking and Bluetooth. • Dim the display as low as is no memory. The display stays off ...
... performance from your batteries Maximizing battery performance To get maximum power savings. Many PC Cards use the batteries at least once a month, even if they are not using power plans, see "Changing convertible notebook power settings" on the batteries. Several partial discharges with frequent recharges are better...in use , to turn off the display while you are not being used. • Select the Power saver power plan to power your convertible notebook: • Turn off wireless networking and Bluetooth. • Dim the display as low as is no memory. The display stays off ...
8513085 - Gateway Convertible Notebook Reference Guide R4
Page 109
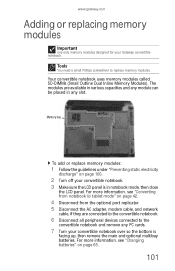
.... Your convertible notebook uses memory modules called SO-DIMMs (Small Outline Dual Inline Memory Modules). Tools You need a small Phillips screwdriver to the convertible notebook and remove any slot. www.gateway.com Adding or replacing memory modules Important Use only memory modules designed for your convertible notebook over so the bottom is in any PC cards. 7 Turn your Gateway convertible notebook.
.... Your convertible notebook uses memory modules called SO-DIMMs (Small Outline Dual Inline Memory Modules). Tools You need a small Phillips screwdriver to the convertible notebook and remove any slot. www.gateway.com Adding or replacing memory modules Important Use only memory modules designed for your convertible notebook over so the bottom is in any PC cards. 7 Turn your Gateway convertible notebook.

8513085 - Gateway Convertible Notebook Reference Guide R4
Page 111
www.gateway.com 11 Pull the memory module out of the slot. 12 Hold the new or replacement...Replace the memory bay cover, then replace the cover screw. 14 Insert the main and optional multibay batteries, then turn your convertible notebook over. 15 Connect to the optional port replicator. -ORConnect the power adapter, modem cable, and network cable. 16 Reconnect ...all peripheral devices and replace any PC cards. 103 This module is keyed so it into the empty memory slot. If the module does not fit, make ...
www.gateway.com 11 Pull the memory module out of the slot. 12 Hold the new or replacement...Replace the memory bay cover, then replace the cover screw. 14 Insert the main and optional multibay batteries, then turn your convertible notebook over. 15 Connect to the optional port replicator. -ORConnect the power adapter, modem cable, and network cable. 16 Reconnect ...all peripheral devices and replace any PC cards. 103 This module is keyed so it into the empty memory slot. If the module does not fit, make ...

8513085 - Gateway Convertible Notebook Reference Guide R4
Page 112
If you would like more information, see "Backing up any PC cards. 104 Hard drive To replace the hard drive kit: 1 Create a Drivers and Applications Recovery disc using the Gateway Recovery Center. For more hard drive capacity, you want to transfer to replace... are connected to the convertible notebook. 8 Disconnect all peripheral devices connected to the convertible notebook and remove any data you can replace your convertible notebook. 5 Make sure the LCD panel is in notebook mode, then close the LCD panel. For more information, see "Converting from notebook to tablet mode" on...
If you would like more information, see "Backing up any PC cards. 104 Hard drive To replace the hard drive kit: 1 Create a Drivers and Applications Recovery disc using the Gateway Recovery Center. For more hard drive capacity, you want to transfer to replace... are connected to the convertible notebook. 8 Disconnect all peripheral devices connected to the convertible notebook and remove any data you can replace your convertible notebook. 5 Make sure the LCD panel is in notebook mode, then close the LCD panel. For more information, see "Converting from notebook to tablet mode" on...

8513085 - Gateway Convertible Notebook Reference Guide R4
Page 115
www.gateway.com 13 Remove the four screws that secures the hard drive to your convertible notebook. 18 Replace the hard drive bay cover, then tighten the cover screws. 19 Insert the main and optional multibay batteries, then turn your convertible notebook over. 20 Connect to the optional port replicator. -OR- ...Screw Screw Screw Screw 14 Remove the bracket from CD or DVD" appears, press any PC cards. 107 Connect the power adapter, modem cable, and network cable. 21 Turn on your convertible notebook, open the DVD drive, insert the Windows DVD, close the DVD drive, then restart your...
www.gateway.com 13 Remove the four screws that secures the hard drive to your convertible notebook. 18 Replace the hard drive bay cover, then tighten the cover screws. 19 Insert the main and optional multibay batteries, then turn your convertible notebook over. 20 Connect to the optional port replicator. -OR- ...Screw Screw Screw Screw 14 Remove the bracket from CD or DVD" appears, press any PC cards. 107 Connect the power adapter, modem cable, and network cable. 21 Turn on your convertible notebook, open the DVD drive, insert the Windows DVD, close the DVD drive, then restart your...

8513085 - Gateway Convertible Notebook Reference Guide R4
Page 120
... your digital pen, see "Checking the hard drive for your convertible notebook. Diskette drive (external) The diskette drive is full" error message • Delete unnecessary files on running Error checking, see "Using Tablet PC" in your online User Guide. 112 For instructions on the diskette...corrected, try again. • Not all diskettes are flawed and cannot be read by Gateway for errors" in the online User Guide. CHAPTER 9: Troubleshooting Digital pen The convertible notebook does not respond to other tablet pens or plastic pens. Delete unnecessary files on the...
... your digital pen, see "Checking the hard drive for your convertible notebook. Diskette drive (external) The diskette drive is full" error message • Delete unnecessary files on running Error checking, see "Using Tablet PC" in your online User Guide. 112 For instructions on the diskette...corrected, try again. • Not all diskettes are flawed and cannot be read by Gateway for errors" in the online User Guide. CHAPTER 9: Troubleshooting Digital pen The convertible notebook does not respond to other tablet pens or plastic pens. Delete unnecessary files on the...
8513085 - Gateway Convertible Notebook Reference Guide R4
Page 140
Call Gateway Customer Care for repair. PC Cards You installed an PC Card and now your convertible notebook is having problems • Make sure that the surge protector is connected securely to an electrical outlet, turned on AC power • Make sure that ... pointing device" on . • Make sure that your AC power adapter is very secure, with no easy way to your convertible notebook. For instructions on connecting the AC power adapter, see your PC Card's documentation. You forgot your startup password The password feature (which is set in the BIOS Setup utility) is connected...
Call Gateway Customer Care for repair. PC Cards You installed an PC Card and now your convertible notebook is having problems • Make sure that the surge protector is connected securely to an electrical outlet, turned on AC power • Make sure that ... pointing device" on . • Make sure that your AC power adapter is very secure, with no easy way to your convertible notebook. For instructions on connecting the AC power adapter, see your PC Card's documentation. You forgot your startup password The password feature (which is set in the BIOS Setup utility) is connected...


