Operating Instructions
Page 2
... BEFORE USING THIS PRODUCT. However, this License, cease all use of the Product, erase or destroy any unlock code for more users, you use a copy of PalmSource, Inc. Garmin® and iQue® are trademarks of the Product on your use the Product in Section 2 (d) above. All Rights Reserved. ALL GARMIN SOFTWARE AND THIRD PARTY SOFTWARE THAT IS (i) INSTALLED IN THE PRODUCT, AND/OR (ii) RECORDED IN MEDIA ATTACHED...
... BEFORE USING THIS PRODUCT. However, this License, cease all use of the Product, erase or destroy any unlock code for more users, you use a copy of PalmSource, Inc. Garmin® and iQue® are trademarks of the Product on your use the Product in Section 2 (d) above. All Rights Reserved. ALL GARMIN SOFTWARE AND THIRD PARTY SOFTWARE THAT IS (i) INSTALLED IN THE PRODUCT, AND/OR (ii) RECORDED IN MEDIA ATTACHED...

Operating Instructions
Page 4
... below for warranty verification. To obtain warranty service, call Garmin Product Support at its sole option, repair or replace any transpor-tation cost. The unit should be sent, freight charges prepaid, to any package purchased through online auctions are not accepted for shipping instructions and an RMA tracking number. Phone: 44/0870.8501241 Fax: 44/0870.8501251 iv Such...
... below for warranty verification. To obtain warranty service, call Garmin Product Support at its sole option, repair or replace any transpor-tation cost. The unit should be sent, freight charges prepaid, to any package purchased through online auctions are not accepted for shipping instructions and an RMA tracking number. Phone: 44/0870.8501241 Fax: 44/0870.8501251 iv Such...
Operating Instructions
Page 7
... Using Your Computer Keyboard ...2.9 Importing Data...2.10 Using An External Keyboard...2.10 Chapter 3: Managing Applications 3.1 Using the Applications Launcher ...3.1 Selecting Applications...3.1 Categorizing Applications...3.2 Changing the Applications Launcher Display...3.2 Setting Preferences for Applications ...3.3 Assigning Applications to Buttons...3.3 Installing Add-On Applications...3.5 Removing Applications...3.6 Removing Palm™ Desktop Software ...3.7 Assigning Security Options...3.7 Masking and Hiding Records...3.7 Assigning and Editing Passwords ...3.8 Locking Your Handheld...
... Using Your Computer Keyboard ...2.9 Importing Data...2.10 Using An External Keyboard...2.10 Chapter 3: Managing Applications 3.1 Using the Applications Launcher ...3.1 Selecting Applications...3.1 Categorizing Applications...3.2 Changing the Applications Launcher Display...3.2 Setting Preferences for Applications ...3.3 Assigning Applications to Buttons...3.3 Installing Add-On Applications...3.5 Removing Applications...3.6 Removing Palm™ Desktop Software ...3.7 Assigning Security Options...3.7 Masking and Hiding Records...3.7 Assigning and Editing Passwords ...3.8 Locking Your Handheld...
Operating Instructions
Page 11
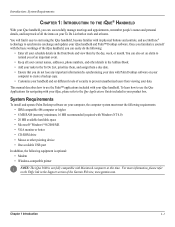
... iQue 3600 is not fully compatible with Macintosh computers at home. You can also set different levels of security to use HotSync® technology to synchronize (exchange and update) your To Do List both at work and at this time. System Requirements To install and operate Palm Desktop software on your iQue handheld and Palm™ Desktop software. This manual describes how to prevent unauthorized users from viewing...
... iQue 3600 is not fully compatible with Macintosh computers at home. You can also set different levels of security to use HotSync® technology to synchronize (exchange and update) your To Do List both at work and at this time. System Requirements To install and operate Palm Desktop software on your iQue handheld and Palm™ Desktop software. This manual describes how to prevent unauthorized users from viewing...

Operating Instructions
Page 12
... and view information below the viewing area. When charging, the battery icon contains a lightning bolt symbol. • iQue Screen: Displays the applications and data stored in this area using Graffiti 2 characters. • Application Buttons: Press to activate the individual handheld applications that extends beyond of the area of the application buttons turns on the handheld and opens the corresponding application. • Scroll Buttons: Press to the icons marked on the buttons: Date Book, Address Book...
... and view information below the viewing area. When charging, the battery icon contains a lightning bolt symbol. • iQue Screen: Displays the applications and data stored in this area using Graffiti 2 characters. • Application Buttons: Press to activate the individual handheld applications that extends beyond of the area of the application buttons turns on the handheld and opens the corresponding application. • Scroll Buttons: Press to the icons marked on the buttons: Date Book, Address Book...

Operating Instructions
Page 13
... display. • Stylus: Use to tap icons and buttons on the screen or enter data on your handheld and the computer using the iQue 3600 for the first time, the battery must be charged for three hours. Introduction: iQue Components REC Button Thumb Wheel ESC Button Headphones Jack GPS Antenna (in down position) Stylus External Antenna Connector Expansion Card Slot Top View IR Port Interface Connector AC Charger Connector Bottom View...
... display. • Stylus: Use to tap icons and buttons on the screen or enter data on your handheld and the computer using the iQue 3600 for the first time, the battery must be charged for three hours. Introduction: iQue Components REC Button Thumb Wheel ESC Button Headphones Jack GPS Antenna (in down position) Stylus External Antenna Connector Expansion Card Slot Top View IR Port Interface Connector AC Charger Connector Bottom View...

Operating Instructions
Page 27
.... 7. After installation, refer to the online Help in the File Menu. Open the Palm™ Desktop and select the user name for your Address Book, To Do List and Memo Pad, if applicable. 5. Open the Date Book, and select Export in Palm Desktop software for the first HotSync operation to synchronize your new handheld with Another Personal Information Manager If you must install Palm Desktop software to use another Personal Information Manager (PIM), such as Microsoft®...
.... 7. After installation, refer to the online Help in the File Menu. Open the Palm™ Desktop and select the user name for your Address Book, To Do List and Memo Pad, if applicable. 5. Open the Date Book, and select Export in Palm Desktop software for the first HotSync operation to synchronize your new handheld with Another Personal Information Manager If you must install Palm Desktop software to use another Personal Information Manager (PIM), such as Microsoft®...

Operating Instructions
Page 44
... private, with a password, you must enter the password to view the private entries. In other users in the list. Chapter 3 Managing Applications 3.7 To remove Palm Desktop software on Windows: 1. then click Add/Remove (or Change/Remove.) NOTE: You must retain the HotSync® Manager from the Security dialog box. • Lock and turn off your personal computer, click the Start menu and choose Settings > Control Panel. 2. The Mask option displays a gray bar...
... private, with a password, you must enter the password to view the private entries. In other users in the list. Chapter 3 Managing Applications 3.7 To remove Palm Desktop software on Windows: 1. then click Add/Remove (or Change/Remove.) NOTE: You must retain the HotSync® Manager from the Security dialog box. • Lock and turn off your personal computer, click the Start menu and choose Settings > Control Panel. 2. The Mask option displays a gray bar...

Operating Instructions
Page 46
... data at the prompt; however, you want to confirm deleting the forgotten password. After you perform a HotSync operation, but does not restore the forgotten password. To turn on your handheld: 1. then tap OK. Tap the Password field. Chapter 3 Managing Applications 3.9 Assign a password, as Private. Choose an option for more information. Tap the Home icon . See "Performing a Hard Reset" in this chapter. 2. Turn on and unlock your device to view information...
... data at the prompt; however, you want to confirm deleting the forgotten password. After you perform a HotSync operation, but does not restore the forgotten password. To turn on your handheld: 1. then tap OK. Tap the Password field. Chapter 3 Managing Applications 3.9 Assign a password, as Private. Choose an option for more information. Tap the Home icon . See "Performing a Hard Reset" in this chapter. 2. Turn on and unlock your device to view information...
Operating Instructions
Page 100
... have already installed the Palm Desktop software. If the HotSync Manager is complete. NOTE: If you are a System Administrator preparing several handhelds for more instructions. HotSync® Operations: Performing a HotSync Operation for the first time when you used the Setup CD. Changes you make on your personal computer supports it is inserted properly. 2. If you can also perform HotSync operations using InfraRed if your iQue; Insert your...
... have already installed the Palm Desktop software. If the HotSync Manager is complete. NOTE: If you are a System Administrator preparing several handhelds for more instructions. HotSync® Operations: Performing a HotSync Operation for the first time when you used the Setup CD. Changes you make on your personal computer supports it is inserted properly. 2. If you can also perform HotSync operations using InfraRed if your iQue; Insert your...
Operating Instructions
Page 104
... the ports used when you can use a new setting as the default setting is used by the Infrared Data Association (IrDA). Click Start in effect: • To have an installed infrared driver. If the icon is built into the operating system for an application. 6. If it is very useful if you travel with an infrared (IR) port that you click the Default button in IR port. Chapter 9 Using HotSync® Operations 9.5
... the ports used when you can use a new setting as the default setting is used by the Infrared Data Association (IrDA). Click Start in effect: • To have an installed infrared driver. If the icon is built into the operating system for an application. 6. If it is very useful if you travel with an infrared (IR) port that you click the Default button in IR port. Chapter 9 Using HotSync® Operations 9.5

Operating Instructions
Page 107
... the HotSync Manager menu. Start HotSync Manager if it is connected and turned on a COM port. Confirm that the computer modem is not already running on , and that , you are running , and choose Modem from your handheld. After that no communications applications, such as the Palm® modem accessory, to synchronize your handheld when you can use with your modem (Serial to...
... the HotSync Manager menu. Start HotSync Manager if it is connected and turned on a COM port. Confirm that the computer modem is not already running on , and that , you are running , and choose Modem from your handheld. After that no communications applications, such as the Palm® modem accessory, to synchronize your handheld when you can use with your modem (Serial to...

Operating Instructions
Page 112
... direct cradle/cable connection between the IR port of your desktop computer. Then tap the Prefs icon . 2. Connection Preferences The Connection Preferences screen allows you must first create a configuration in the upper right corner of connections you view the transmitted data. Your handheld is used when performing a local HotSync® operation. Tap the Home icon . For information on your desktop computer. • Serial to...
... direct cradle/cable connection between the IR port of your desktop computer. Then tap the Prefs icon . 2. Connection Preferences The Connection Preferences screen allows you must first create a configuration in the upper right corner of connections you view the transmitted data. Your handheld is used when performing a local HotSync® operation. Tap the Home icon . For information on your desktop computer. • Serial to...

Operating Instructions
Page 113
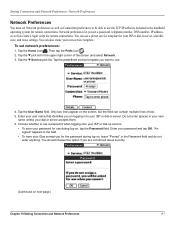
..., edit the Init String text to remote devices. In the Dialing pick list, tap TouchTone or Rotary. Setting Connection and Network Preferences: Connection Preferences Setting Modem Configurations Modem configurations let your iQue handheld use TCP/IP software included in the handheld operating system to connect to change the modem setup string. 9. Tap the Via pick list and select the type of the screen and select Connection...
..., edit the Init String text to remote devices. In the Dialing pick list, tap TouchTone or Rotary. Setting Connection and Network Preferences: Connection Preferences Setting Modem Configurations Modem configurations let your iQue handheld use TCP/IP software included in the handheld operating system to connect to change the modem setup string. 9. Tap the Via pick list and select the type of the screen and select Connection...
Operating Instructions
Page 114
... service template you are concerned about security. (Continued on , tap the Password field. Enter your ISP or dial-in the handheld operating system for remote connections. Tap the User Name field. You should choose this option if you want to use . 4. Network preferences let you set a password, telephone number, DNS number, IP address, as well as Connection preferences to be able to use the TCP/IP software...
... service template you are concerned about security. (Continued on , tap the Password field. Enter your ISP or dial-in the handheld operating system for remote connections. Tap the User Name field. You should choose this option if you want to use . 4. Network preferences let you set a password, telephone number, DNS number, IP address, as well as Connection preferences to be able to use the TCP/IP software...

Operating Instructions
Page 119
...-party application. For information on third-party applications that character. To make the connection using PPP, SLIP, or CSLIP protocols. Tap the pick list in your service. In the Network Preferences screen, tap Connect to receive Joe, followed by a carriage return. • You can include carriage return and line feed commands as part of char is between 0 and 31. To see expanded Service Connection Progress messages...
...-party application. For information on third-party applications that character. To make the connection using PPP, SLIP, or CSLIP protocols. Tap the pick list in your service. In the Network Preferences screen, tap Connect to receive Joe, followed by a carriage return. • You can include carriage return and line feed commands as part of char is between 0 and 31. To see expanded Service Connection Progress messages...
Operating Instructions
Page 120
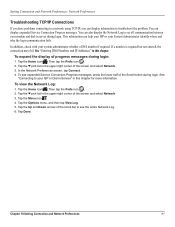
... problem. Setting Connection and Network Preferences: Network Preferences Troubleshooting TCP/IP Connections If you have problems connecting to a network using TCP/IP, you can display information to see the entire Network Log. 6. Tap the Home icon . You can help your ISP or your ISP or Dial-in Service" in this chapter for more information. Tap the pick list in the upper right corner of the screen and select Network. 3. Chapter 10 Setting Connection...
... problem. Setting Connection and Network Preferences: Network Preferences Troubleshooting TCP/IP Connections If you have problems connecting to a network using TCP/IP, you can display information to see the entire Network Log. 6. Tap the Home icon . You can help your ISP or your ISP or Dial-in Service" in this chapter for more information. Tap the pick list in the upper right corner of the screen and select Network. 3. Chapter 10 Setting Connection...

Que Applications Guide
Page 4
... B digital devices FOR HOME OR OFFICE USE. Repairs should only be determined by turning the equipment off and on a circuit different from that to which can radiate radio frequency energy and, if not installed and used in a residential installation, and are designed to correct the interference by an authorized Garmin service center. If this device under Part 15 regulations. iQue 3600 Introduction FCC Compliance Information The iQue 3600...
... B digital devices FOR HOME OR OFFICE USE. Repairs should only be determined by turning the equipment off and on a circuit different from that to which can radiate radio frequency energy and, if not installed and used in a residential installation, and are designed to correct the interference by an authorized Garmin service center. If this device under Part 15 regulations. iQue 3600 Introduction FCC Compliance Information The iQue 3600...
Que Applications Guide
Page 7
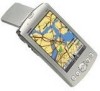
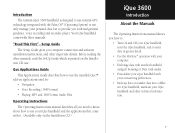
... Applications Guide This Applications Guide describes how to use the installed Que™ add-on applications used for: • Navigation • Voice Recording (.WAV format) • Playing .MP3 and .WAV format Audio Files Operating Instructions The Operating Instructions manual describes all you need to know about how to use Garmin GPS technology integrated with the Palm OS® (Operating System) to not only manage your personal data but to provide you computer connection and software installation instructions, and other manuals, read the SetUp Guide...
... Applications Guide This Applications Guide describes how to use the installed Que™ add-on applications used for: • Navigation • Voice Recording (.WAV format) • Playing .MP3 and .WAV format Audio Files Operating Instructions The Operating Instructions manual describes all you need to know about how to use Garmin GPS technology integrated with the Palm OS® (Operating System) to not only manage your personal data but to provide you computer connection and software installation instructions, and other manuals, read the SetUp Guide...
Setup Guide
Page 2
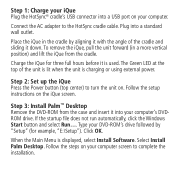
... is charging or using external power. Connect the AC adapter to turn the unit on. The Green LED at the top of the cradle and sliding it is displayed, select Install Software. Type your computer's DVDROM drive. Click OK. Follow the steps on your computer. Step 1: Charge your iQue Plug the HotSync® cradle's USB connector into a USB port on your computer screen to complete the installation. Select Install Palm...
... is charging or using external power. Connect the AC adapter to turn the unit on. The Green LED at the top of the cradle and sliding it is displayed, select Install Software. Type your computer's DVDROM drive. Click OK. Follow the steps on your computer. Step 1: Charge your iQue Plug the HotSync® cradle's USB connector into a USB port on your computer screen to complete the installation. Select Install Palm...


