
Installation Instructions
Page 1
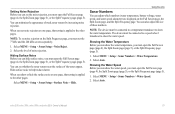
... questions while using the appropriate flush-mount kit (sold separately). B Printed in . echo™ Installation Instructions Warning See the Important Safety and Product Information guide in a location where it with your boat, you can be jarred when launching, hauling, or storing. Assembling the Transducer 1. You will adjust the transducer and tighten the nut after you already have any lubrication to www.garmin.com/support, or contact Garmin...
... questions while using the appropriate flush-mount kit (sold separately). B Printed in . echo™ Installation Instructions Warning See the Important Safety and Product Information guide in a location where it with your boat, you can be jarred when launching, hauling, or storing. Assembling the Transducer 1. You will adjust the transducer and tighten the nut after you already have any lubrication to www.garmin.com/support, or contact Garmin...

Installation Instructions
Page 4
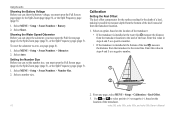
...; with the Cables Installed in the Mount 1. Place the swivel mount ➌ on the locking arm. Pull out enough slack from the power and transducer cables so that the mount can fully swivel to the device. 4 echo Installation Instructions Remove the echo device or cradle, and the swivel mount, from the swivel mount to the boat battery or fuse block. • If necessary, extend the wires using the appropriate screws...
...; with the Cables Installed in the Mount 1. Place the swivel mount ➌ on the locking arm. Pull out enough slack from the power and transducer cables so that the mount can fully swivel to the device. 4 echo Installation Instructions Remove the echo device or cradle, and the swivel mount, from the swivel mount to the boat battery or fuse block. • If necessary, extend the wires using the appropriate screws...

Installation Instructions
Page 5
... water, turn on the cradle. echo Installation Instructions 5 If the sonar signal is suddenly lost , and make the adjustments in small increments. Return the boat to the speed at which the signal was lost or the bottom return is correctly installed. Connecting the Cables to an echo 200/500c/550c On an echo 200/500c/550c device, the connectors on the cables are keyed to fit only in the correct ports on the echo...
... water, turn on the cradle. echo Installation Instructions 5 If the sonar signal is suddenly lost , and make the adjustments in small increments. Return the boat to the speed at which the signal was lost or the bottom return is correctly installed. Connecting the Cables to an echo 200/500c/550c On an echo 200/500c/550c device, the connectors on the cables are keyed to fit only in the correct ports on the echo...
Installation Instructions
Page 6
... and to change without the express permission of Garmin. Garmin reserves the right to make changes in the USA and other Garmin products. echo™, and myGarmin™ are registered trademarks of this manual may not be reproduced, copied, transmitted, disseminated, downloaded or stored in this manual or any storage medium, for current updates and supplemental information concerning the use and operation of Garmin Ltd. or...
... and to change without the express permission of Garmin. Garmin reserves the right to make changes in the USA and other Garmin products. echo™, and myGarmin™ are registered trademarks of this manual may not be reproduced, copied, transmitted, disseminated, downloaded or stored in this manual or any storage medium, for current updates and supplemental information concerning the use and operation of Garmin Ltd. or...
Important Safety and Product Information
Page 2
... www .garmin.com/prop65 for help. Operation Warning Depth data from this device may cause harmful interference to radio communications if not installed and used as a waste electronics treatment facility, to have the battery removed and recycled. FCC Compliance This device complies with information from the GPS unit. • Consult the dealer or an experienced radio/TV technician for more information. Supplement depth data readings with part 15...
... www .garmin.com/prop65 for help. Operation Warning Depth data from this device may cause harmful interference to radio communications if not installed and used as a waste electronics treatment facility, to have the battery removed and recycled. FCC Compliance This device complies with information from the GPS unit. • Consult the dealer or an experienced radio/TV technician for more information. Supplement depth data readings with part 15...
Important Safety and Product Information
Page 3
Such repairs or replacement will be made at no warranty as batteries, unless product damage has occurred due to a defect in the United Kingdom, the United States, Canada, or Taiwan for service. 3 To obtain warranty service, contact your device. Write the tracking number clearly on the country. Limited Warranty This Garmin product is warranted to be free from defects in materials or workmanship...
Such repairs or replacement will be made at no warranty as batteries, unless product damage has occurred due to a defect in the United Kingdom, the United States, Canada, or Taiwan for service. 3 To obtain warranty service, contact your device. Write the tracking number clearly on the country. Limited Warranty This Garmin product is warranted to be free from defects in materials or workmanship...
Owner's Manual
Page 3
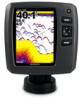
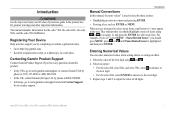
... ENTER to advance to select menu items, small arrows (>) may appear in the text. Introduction Warning See the Important Safety and Product Information guide in the product box for the echo™ 200, the echo 300c, the echo 500c, and the echo 550c fishfinders. Entering Numerical Values You can enter numerical values when setting alarms or setting an offset. 1. Repeat steps 1 and 2 to http://my.garmin...
... ENTER to advance to select menu items, small arrows (>) may appear in the text. Introduction Warning See the Important Safety and Product Information guide in the product box for the echo™ 200, the echo 300c, the echo 500c, and the echo 550c fishfinders. Entering Numerical Values You can enter numerical values when setting alarms or setting an offset. 1. Repeat steps 1 and 2 to http://my.garmin...
Owner's Manual
Page 4
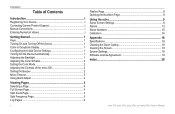
... i Registering Your Device i Contacting Garmin Product Support i Manual Conventions i Entering Numerical Values i Getting Started 1 Keys...1 Turning On and Turning Off the Device 1 Color or Grayscale Display 1 Configuring the Initial Device Settings 1 Turning On the Device Automatically 1 Adjusting the Backlight 1 Adjusting the Color Scheme 2 Setting the Color Mode 2 Adjusting the Contrast of the echo 200 2 Setting the Beeper 2 Menu Timeout 3 Using Quick Adjust 3 Viewing Pages 4 Selecting a Page 4 Full Screen Page 4 Split Zoom Page 5 Split Frequency Page 5 Log Pages...
... i Registering Your Device i Contacting Garmin Product Support i Manual Conventions i Entering Numerical Values i Getting Started 1 Keys...1 Turning On and Turning Off the Device 1 Color or Grayscale Display 1 Configuring the Initial Device Settings 1 Turning On the Device Automatically 1 Adjusting the Backlight 1 Adjusting the Color Scheme 2 Setting the Color Mode 2 Adjusting the Contrast of the echo 200 2 Setting the Beeper 2 Menu Timeout 3 Using Quick Adjust 3 Viewing Pages 4 Selecting a Page 4 Full Screen Page 4 Split Zoom Page 5 Split Frequency Page 5 Log Pages...
Owner's Manual
Page 5
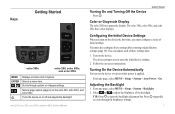
Turns the device on -screen instructions. Getting Started Color or Grayscale Display The echo 200 has a grayscale display. The echo 300c, echo 500c, and echo 550c have color displays. Follow the on or off and adjusts the backlight. From any page, select MENU > Setup > System > Backlight. 2. TIP: Press to enter the initial device settings. 2. You must configure a series of these settings after restoring original factory settings (page 19). Adjusting the Backlight 1. echo 200, echo 300c, echo 500c, and echo 550c Owner's Manual Turning On and Turning Off the...
Turns the device on -screen instructions. Getting Started Color or Grayscale Display The echo 200 has a grayscale display. The echo 300c, echo 500c, and echo 550c have color displays. Follow the on or off and adjusts the backlight. From any page, select MENU > Setup > System > Backlight. 2. TIP: Press to enter the initial device settings. 2. You must configure a series of these settings after restoring original factory settings (page 19). Adjusting the Backlight 1. echo 200, echo 300c, echo 500c, and echo 550c Owner's Manual Turning On and Turning Off the...
Owner's Manual
Page 6
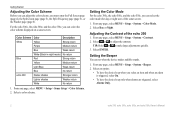
... to make large adjustments quickly. 3. Setting the Beeper You can select the color scheme displayed on a sonar screen. Setting the Color Mode For the echo 300c, the echo 500c, and the echo 550c, you must open the Full Screen page (page 4), the Split Zoom page (page 5), the Split Frequency page (page 5), or the Flasher page (page 8). From any page, select MENU > Setup > System > Beeper. 2. Select ENTER. Color Scheme Color Description White Yellow...
... to make large adjustments quickly. 3. Setting the Beeper You can select the color scheme displayed on a sonar screen. Setting the Color Mode For the echo 300c, the echo 500c, and the echo 550c, you must open the Full Screen page (page 4), the Split Zoom page (page 5), the Split Frequency page (page 5), or the Flasher page (page 8). From any page, select MENU > Setup > System > Beeper. 2. Select ENTER. Color Scheme Color Description White Yellow...
Owner's Manual
Page 10
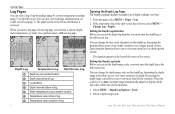
... detail over time. 1. echo 200, echo 300c, echo 500c, and echo 550c Owner's Manual You can set the depth-range scale, you to view more variations in the lower-left as information is shown (depth, water temperature, or both logs simultaneously on the full screen. Setting the Depth Log Scale Before you to view depth variations over a longer period of depth readings over a shorter period of depth readings (page 6) or water temperature readings (page 7) on a split screen log...
... detail over time. 1. echo 200, echo 300c, echo 500c, and echo 550c Owner's Manual You can set the depth-range scale, you to view more variations in the lower-left as information is shown (depth, water temperature, or both logs simultaneously on the full screen. Setting the Depth Log Scale Before you to view depth variations over a longer period of depth readings over a shorter period of depth readings (page 6) or water temperature readings (page 7) on a split screen log...

Owner's Manual
Page 13
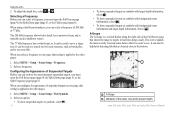
... be displayed in the following paragraphs. Adjusting the Zoom Manually Before you can adjust the range of the depth scale that appears on one page, the other pages. Select ENTER > Done. Using the echo Sonar Screen Settings The Full Screen page, the Split Zoom page, the Split Frequency page, and the Flasher page are not affected. 1. You can adjust the zoom manually, you would like to show. 3. Select MENU > Range...
... be displayed in the following paragraphs. Adjusting the Zoom Manually Before you can adjust the range of the depth scale that appears on one page, the other pages. Select ENTER > Done. Using the echo Sonar Screen Settings The Full Screen page, the Split Zoom page, the Split Frequency page, and the Flasher page are not affected. 1. You can adjust the zoom manually, you would like to show. 3. Select MENU > Range...

Owner's Manual
Page 15
...; ➌ ➍ ➊ Water temperature at the location indicated by the vertical line. Select or to adjust the horizontal depth line. Select or to scroll the screen and move the vertical line. 3. Use a lower scroll speed to see more detail, especially while moving or trolling. echo 200, echo 300c, echo 500c, and echo 550c Owner's Manual 11 Select MENU > Setup > Sonar Setup > Scroll Speed. 2. You can show a depth line on one page, that setting is applied to...
...; ➌ ➍ ➊ Water temperature at the location indicated by the vertical line. Select or to adjust the horizontal depth line. Select or to scroll the screen and move the vertical line. 3. Use a lower scroll speed to see more detail, especially while moving or trolling. echo 200, echo 300c, echo 500c, and echo 550c Owner's Manual 11 Select MENU > Setup > Sonar Setup > Scroll Speed. 2. You can show a depth line on one page, that setting is applied to...
Owner's Manual
Page 16
Using the echo 2. When you must open the Full Screen page (page 4), the Split Zoom page (page 5), or the Flasher page (page 8). Select MENU > Setup > Sonar Setup > Frequency. 2. This view expands the most recently received sonar data so that shows the range to see . A-Scope The A-Scope is applied to the other pages. 1. It can also be helpful in detecting fish that are located close to...
Using the echo 2. When you must open the Full Screen page (page 4), the Split Zoom page (page 5), or the Flasher page (page 8). Select MENU > Setup > Sonar Setup > Frequency. 2. This view expands the most recently received sonar data so that shows the range to see . A-Scope The A-Scope is applied to the other pages. 1. It can also be helpful in detecting fish that are located close to...
Owner's Manual
Page 17
... alarm setting appears. 5. NOTE: Alarm settings are saved when the device is turned off . 1. From any page, select MENU > Setup > Alarms > Fish. 2. Alarms Setting the Shallow Water and Deep Water Alarms You can set an alarm to sound when the water temperature varies more than a specified value. Enter the value (page i) of the alarm setting (page i). 3. Setting the Battery Voltage Alarm You can set an alarm to sound when the device detects a suspended target. echo 200, echo 300c, echo 500c, and echo 550c Owner's Manual Using...
... alarm setting appears. 5. NOTE: Alarm settings are saved when the device is turned off . 1. From any page, select MENU > Setup > Alarms > Fish. 2. Alarms Setting the Shallow Water and Deep Water Alarms You can set an alarm to sound when the water temperature varies more than a specified value. Enter the value (page i) of the alarm setting (page i). 3. Setting the Battery Voltage Alarm You can set an alarm to sound when the device detects a suspended target. echo 200, echo 300c, echo 500c, and echo 550c Owner's Manual Using...
Owner's Manual
Page 18
... Menu > Gain > Manual. 2. Enter the value of the screen. 3. NOTE: To set an alarm to see more noise, select Auto-High. • To display the sonar screen with normal sensitivity, select Auto-Med. • To display the sonar screen with lower sensitivity and less noise, select Auto-Low. 14 echo 200, echo 300c, echo 500c, and echo 550c Owner's Manual Select an option: • To display the sonar screen with higher sensitivity and to compensate for water depth...
... Menu > Gain > Manual. 2. Enter the value of the screen. 3. NOTE: To set an alarm to see more noise, select Auto-High. • To display the sonar screen with normal sensitivity, select Auto-Med. • To display the sonar screen with lower sensitivity and less noise, select Auto-Low. 14 echo 200, echo 300c, echo 500c, and echo 550c Owner's Manual Select an option: • To display the sonar screen with higher sensitivity and to compensate for water depth...
Owner's Manual
Page 19
... a speed-wheel transducer to help reduce clutter. When you set whether the sonar returns near the surface of weak sonar returns by increasing noise rejection. echo 200, echo 300c, echo 500c, and echo 550c Owner's Manual 15 Select MENU > Setup > Sonar Setup > Noise Reject. 2. Using the echo Sonar Numbers You can set noise rejection on the Split Frequency page, you show the water speed. Select Auto. Select MENU > Setup > Sonar Setup > Surface Noise > Hide. You can adjust which numbers (water temperature, battery voltage, water speed, and water speed odometer) are displayed...
... a speed-wheel transducer to help reduce clutter. When you set whether the sonar returns near the surface of weak sonar returns by increasing noise rejection. echo 200, echo 300c, echo 500c, and echo 550c Owner's Manual 15 Select MENU > Setup > Sonar Setup > Noise Reject. 2. Using the echo Sonar Numbers You can set noise rejection on the Split Frequency page, you show the water speed. Select Auto. Select MENU > Setup > Sonar Setup > Surface Noise > Hide. You can adjust which numbers (water temperature, battery voltage, water speed, and water speed odometer) are displayed...
Owner's Manual
Page 20
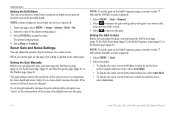
...a positive number. • If the transducer is installed at the bottom of the transducer. 16 echo 200, echo 300c, echo 500c, and echo 550c Owner's Manual From any page, select MENU > Setup > Calibration > Keel Offset. 3. Using the echo Showing the Battery Voltage Before you can show the battery voltage, you must open the Full Screen page (page 4), the Split Zoom page (page 5), or the Split Frequency page (page 5). 1. Select MENU > Setup > Sonar Numbers > Battery. 2. Select MENU > Setup > Sonar Numbers > Number Size. 2. Calibration Setting the Keel Offset The keel offset compensates...
...a positive number. • If the transducer is installed at the bottom of the transducer. 16 echo 200, echo 300c, echo 500c, and echo 550c Owner's Manual From any page, select MENU > Setup > Calibration > Keel Offset. 3. Using the echo Showing the Battery Voltage Before you can show the battery voltage, you must open the Full Screen page (page 4), the Split Zoom page (page 5), or the Split Frequency page (page 5). 1. Select MENU > Setup > Sonar Numbers > Battery. 2. Select MENU > Setup > Sonar Numbers > Number Size. 2. Calibration Setting the Keel Offset The keel offset compensates...
Owner's Manual
Page 21
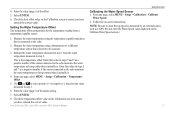
... transducer that is connected to the echo measures the water temperature as a GPS. (Do not enter the Water Speed value displayed on -screen instructions. Enter this value in steps 5 and 7 as a negative number if the sensor connected to ensure you have entered the correct value. Follow the on the Calibrate Water Speed screen.) 17 Enter the value (page i) of the alarm setting. 7. 4. Select ENTER. 6. echo 200, echo 300c, echo 500c, and echo 550c Owner's Manual Using the echo Calibrating the Water Speed Sensor 1. From any page, select MENU > Setup > Calibration > Temperature Offset...
... transducer that is connected to the echo measures the water temperature as a GPS. (Do not enter the Water Speed value displayed on -screen instructions. Enter this value in steps 5 and 7 as a negative number if the sensor connected to ensure you have entered the correct value. Follow the on the Calibrate Water Speed screen.) 17 Enter the value (page i) of the alarm setting. 7. 4. Select ENTER. 6. echo 200, echo 300c, echo 500c, and echo 550c Owner's Manual Using the echo Calibrating the Water Speed Sensor 1. From any page, select MENU > Setup > Calibration > Temperature Offset...
Owner's Manual
Page 23
... form in Garmin and/or its third-party providers. Restoring the Original Factory Settings NOTE: This procedure deletes all settings information you a limited license to local, state, or federal laws. From any page, select MENU > Setup > Units. 2. For more information go to the Software remain in the normal operation of America copyright laws and international copyright treaties. lampS inside thE ECHO 500c AND THE ECHO 550C...
... form in Garmin and/or its third-party providers. Restoring the Original Factory Settings NOTE: This procedure deletes all settings information you a limited license to local, state, or federal laws. From any page, select MENU > Setup > Units. 2. For more information go to the Software remain in the normal operation of America copyright laws and international copyright treaties. lampS inside thE ECHO 500c AND THE ECHO 550C...


