
Owner's Manual
Page 1
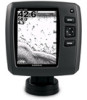
echo™ 200, 300c, 500c and 550c owner's manual
echo™ 200, 300c, 500c and 550c owner's manual
Owner's Manual
Page 3
... highlight a series of all digits. Repeat steps 1 and 2 to http://my.garmin.com. • Keep the original sales receipt, or a photocopy, in a menu and pressing ENTER. • Pressing a key, such as ENTER or MENU. echo 200, echo 300c, echo 500c, and echo 550c Owner's Manual i This manual includes information for product warnings and other important information. Introduction Warning...
... highlight a series of all digits. Repeat steps 1 and 2 to http://my.garmin.com. • Keep the original sales receipt, or a photocopy, in a menu and pressing ENTER. • Pressing a key, such as ENTER or MENU. echo 200, echo 300c, echo 500c, and echo 550c Owner's Manual i This manual includes information for product warnings and other important information. Introduction Warning...
Owner's Manual
Page 4
... 5 Split Frequency Page 5 Log Pages 6 ii Flasher Page 8 Opening the Numbers Page 8 Using the echo 9 Sonar Screen Settings 9 Alarms 13 Sonar Numbers 15 Calibration 16 Appendix 18 Specifications 18 Cleaning the Outer Casing 18 Cleaning the Screen 18 System Settings 18 Software License Agreement 19 Index 20 echo 200, echo 300c, echo 500c, and echo 550c Owner's Manual
... 5 Split Frequency Page 5 Log Pages 6 ii Flasher Page 8 Opening the Numbers Page 8 Using the echo 9 Sonar Screen Settings 9 Alarms 13 Sonar Numbers 15 Calibration 16 Appendix 18 Specifications 18 Cleaning the Outer Casing 18 Cleaning the Screen 18 System Settings 18 Software License Agreement 19 Index 20 echo 200, echo 300c, echo 500c, and echo 550c Owner's Manual
Owner's Manual
Page 5
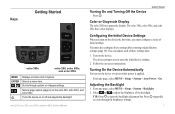
... On the Device Automatically You can update each of options. Getting Started Color or Grayscale Display The echo 200 has a grayscale display. Turn on the echo 200, echo 500c, and echo 550c. The device prompts you must also configure these settings later. 1. From any page, select MENU.... Select and to cycle through options or changes settings. Selects page options (page 4) on the device. echo 200, echo 300c, echo 500c, and echo 550c Owner's Manual Turning On and Turning Off the Device Press . Scrolls through the brightness settings. 1 Configuring the Initial Device...
... On the Device Automatically You can update each of options. Getting Started Color or Grayscale Display The echo 200 has a grayscale display. Turn on the echo 200, echo 500c, and echo 550c. The device prompts you must also configure these settings later. 1. From any page, select MENU.... Select and to cycle through options or changes settings. Selects page options (page 4) on the device. echo 200, echo 300c, echo 500c, and echo 550c Owner's Manual Turning On and Turning Off the Device Press . Scrolls through the brightness settings. 1 Configuring the Initial Device...
Owner's Manual
Page 6
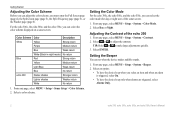
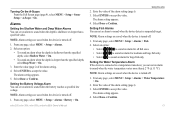
... option: • To have the device beep only when alarms are triggered, select Alarms Only. 2 echo 200, echo 300c, echo 500c, and echo 550c Owner's Manual For the echo 300c, the echo 500c, and the echo 550c, you select an item and when an alarm is triggered, select On. • To have ...Blue Weak return White (Black in night mode) No return Blue Red Strong return Yellow Medium return Light Blue Weak return Blue No return echo 200 Darker shades Stronger return Lighter shades Weaker return White No return 1. From any page, select MENU > Setup > System > Contrast. ...
... option: • To have the device beep only when alarms are triggered, select Alarms Only. 2 echo 200, echo 300c, echo 500c, and echo 550c Owner's Manual For the echo 300c, the echo 500c, and the echo 550c, you select an item and when an alarm is triggered, select On. • To have ...Blue Weak return White (Black in night mode) No return Blue Red Strong return Yellow Medium return Light Blue Weak return Blue No return echo 200 Darker shades Stronger return Lighter shades Weaker return White No return 1. From any page, select MENU > Setup > System > Contrast. ...
Owner's Manual
Page 7
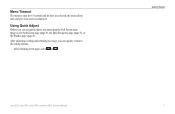
After returning to the setting options. echo 200, echo 300c, echo 500c, and echo 550c Owner's Manual Getting Started 3 After adjusting a setting and returning to a page, you must open for 15 seconds and no keys are selected, the menu closes and your previous screen is displayed. Using Quick Adjust Before you can use quick adjust, you can quickly return to the page, select or . Menu Timeout If a menu is open the Full Screen page (page 4), the Split Zoom page (page 5), the Split Frequency page (page 5), or the Flasher page (page 8).
After returning to the setting options. echo 200, echo 300c, echo 500c, and echo 550c Owner's Manual Getting Started 3 After adjusting a setting and returning to a page, you must open for 15 seconds and no keys are selected, the menu closes and your previous screen is displayed. Using Quick Adjust Before you can use quick adjust, you can quickly return to the page, select or . Menu Timeout If a menu is open the Full Screen page (page 4), the Split Zoom page (page 5), the Split Frequency page (page 5), or the Flasher page (page 8).
Owner's Manual
Page 8
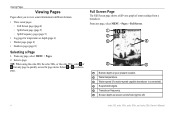
... temperature or depth (page 6) • Flasher page (page 8) • Numbers page (page 8) Selecting a Page 1. From any page to left. 4 echo 200, echo 300c, echo 500c, and echo 550c Owner's Manual TIP: When using the echo 200, the echo 500c, or the echo 550c, select or from any page, select MENU > Pages > Full Screen. ➊ ➋ ➌ ➍ ➎ ➏ ➊ Bottom...
... temperature or depth (page 6) • Flasher page (page 8) • Numbers page (page 8) Selecting a Page 1. From any page to left. 4 echo 200, echo 300c, echo 500c, and echo 550c Owner's Manual TIP: When using the echo 200, the echo 500c, or the echo 550c, select or from any page, select MENU > Pages > Full Screen. ➊ ➋ ➌ ➍ ➎ ➏ ➊ Bottom...
Owner's Manual
Page 9
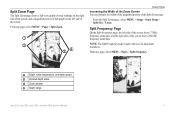
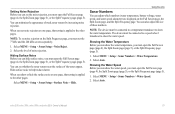
echo 200, echo 300c, echo 500c, and echo 550c Owner's Manual 5 Split Frequency Page On the Split Frequency page, the left side of the screen. From the Split Zoom page , select MENU > Setup > Sonar Setup > Split ... portion of that graph on the left side of the screen shows 77 kHz frequency sonar data, and the right side of the screen shows 200 kHz frequency sonar data. From any page, select MENU > Pages > Split Frequency. ➊ Depth, water temperature, and water speed. ➋ Zoomed depth scale. ➌ Zoom...
echo 200, echo 300c, echo 500c, and echo 550c Owner's Manual 5 Split Frequency Page On the Split Frequency page, the left side of the screen. From the Split Zoom page , select MENU > Setup > Sonar Setup > Split ... portion of that graph on the left side of the screen shows 77 kHz frequency sonar data, and the right side of the screen shows 200 kHz frequency sonar data. From any page, select MENU > Pages > Split Frequency. ➊ Depth, water temperature, and water speed. ➋ Zoomed depth scale. ➌ Zoom...
Owner's Manual
Page 10
... the Depth Log Scale Before you can set the depth log duration, you must open the depth log or the split screen log. echo 200, echo 300c, echo 500c, and echo 550c Owner's Manual You can change the depth-range scale on the full screen. Setting the Depth Log Duration Before you can view a log of depth...
... the Depth Log Scale Before you can set the depth log duration, you must open the depth log or the split screen log. echo 200, echo 300c, echo 500c, and echo 550c Owner's Manual You can change the depth-range scale on the full screen. Setting the Depth Log Duration Before you can view a log of depth...
Owner's Manual
Page 11
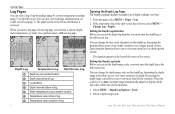
... Log Simultaneously. Viewing the Temperature Log Page The Temperature Log page displays a graphic log of water temperature readings over a longer period of time. 1. echo 200, echo 300c, echo 500c, and echo 550c Owner's Manual 7 From any page, select MENU > Pages > Log. 2. Decreasing the time scale allows you to view more detail over a shorter period of time. Viewing...
... Log Simultaneously. Viewing the Temperature Log Page The Temperature Log page displays a graphic log of water temperature readings over a longer period of time. 1. echo 200, echo 300c, echo 500c, and echo 550c Owner's Manual 7 From any page, select MENU > Pages > Log. 2. Decreasing the time scale allows you to view more detail over a shorter period of time. Viewing...
Owner's Manual
Page 12
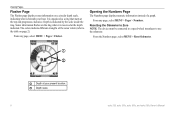
... on a circular depth scale, indicating what is indicated by the scale inside the ring. Depth is beneath your present location. ➋ Depth scale. 8 echo 200, echo 300c, echo 500c, and echo 550c Owner's Manual From any page, select MENU > Pages > Flasher. Sonar information flashes on page 2). Opening the Numbers Page The Numbers page displays numeric information instead...
... on a circular depth scale, indicating what is indicated by the scale inside the ring. Depth is beneath your present location. ➋ Depth scale. 8 echo 200, echo 300c, echo 500c, and echo 550c Owner's Manual From any page, select MENU > Pages > Flasher. Sonar information flashes on page 2). Opening the Numbers Page The Numbers page displays numeric information instead...

Owner's Manual
Page 13
...range of the water to the other pages are a visual representation of 15 meters and a starting depth. Select ENTER > Done. echo 200, echo 300c, echo 500c, and echo 550c Owner's Manual 9 For example, if you must open the Full Screen page (page 4), the Split Zoom page (page 5), the Split Frequency... page (page 5), or the Flasher page (page 8). Select MENU > Range. 2. Using the echo Sonar Screen Settings The Full Screen page, ...
...range of the water to the other pages are a visual representation of 15 meters and a starting depth. Select ENTER > Done. echo 200, echo 300c, echo 500c, and echo 550c Owner's Manual 9 For example, if you must open the Full Screen page (page 4), the Split Zoom page (page 5), the Split Frequency... page (page 5), or the Flasher page (page 8). Select MENU > Range. 2. Using the echo Sonar Screen Settings The Full Screen page, ...
Owner's Manual
Page 14
... screen or viewing the sonar history, select MENU > Resume Sonar. 10 echo 200, echo 300c, echo 500c, and echo 550c Owner's Manual Select an option. • For the echo 200, echo 500c, or echo 550c, select Pause/Rewind Sonar. • For the echo 300c, select Pause Sonar. You can lock the screen to the water... The distance from the water bottom to Auto Zoom on one page, that setting does not affect the other pages. 1. Using the echo Adjusting the Zoom Automatically Before you can adjust the zoom automatically, you must open the Full Screen page (page 4), the Split Zoom page...
... screen or viewing the sonar history, select MENU > Resume Sonar. 10 echo 200, echo 300c, echo 500c, and echo 550c Owner's Manual Select an option. • For the echo 200, echo 500c, or echo 550c, select Pause/Rewind Sonar. • For the echo 300c, select Pause Sonar. You can lock the screen to the water... The distance from the water bottom to Auto Zoom on one page, that setting does not affect the other pages. 1. Using the echo Adjusting the Zoom Automatically Before you can adjust the zoom automatically, you must open the Full Screen page (page 4), the Split Zoom page...

Owner's Manual
Page 15
... Depth of the screen. You can set the scroll speed on one page, the line is applied to the other pages. 1. echo 200, echo 300c, echo 500c, and echo 550c Owner's Manual 11 Use a higher scroll speed to display the sonar information on a sonar screen. When you set the rate at the location ...also displayed on the other pages. 1. Select MENU > Setup > Sonar Setup > Scroll Speed. 2. Sonar History Rewind When using the echo 200, the echo 500c, or the echo 550c, you can pause the screen and then scroll the screen to view your sonar history, you must open the Full Screen page...
... Depth of the screen. You can set the scroll speed on one page, the line is applied to the other pages. 1. echo 200, echo 300c, echo 500c, and echo 550c Owner's Manual 11 Use a higher scroll speed to display the sonar information on a sonar screen. When you set the rate at the location ...also displayed on the other pages. 1. Select MENU > Setup > Sonar Setup > Scroll Speed. 2. Sonar History Rewind When using the echo 200, the echo 500c, or the echo 550c, you can pause the screen and then scroll the screen to view your sonar history, you must open the Full Screen page...
Owner's Manual
Page 16
...bottom. ➊ ➋ ➊ A-Scope ➋ Diameter of suspended targets on one page, that are located close to see . Using the echo 2. The 200 kHz frequency shows better detail, has a narrower beam, and is applied to the other pages. 1. Select MENU > Setup > Sonar Setup > ...page that shows the range to cover a larger area. A-Scope The A-Scope is applied to the other pages. 1. echo 200, echo 300c, echo 500c, and echo 550c Owner's Manual Selecting a Frequency Before you can select a frequency, you can be used to targets in shallower waters. It can set...
...bottom. ➊ ➋ ➊ A-Scope ➋ Diameter of suspended targets on one page, that are located close to see . Using the echo 2. The 200 kHz frequency shows better detail, has a narrower beam, and is applied to the other pages. 1. Select MENU > Setup > Sonar Setup > ...page that shows the range to cover a larger area. A-Scope The A-Scope is applied to the other pages. 1. echo 200, echo 300c, echo 500c, and echo 550c Owner's Manual Selecting a Frequency Before you can select a frequency, you can be used to targets in shallower waters. It can set...
Owner's Manual
Page 17
... to a temperature transducer, you can set an alarm to sound when the depth is shallower or deeper than ± 2 °F (±.1.1 °C). echo 200, echo 300c, echo 500c, and echo 550c Owner's Manual Using the echo 2. NOTE: Alarm settings are saved when the device is turned off . 1. Select ENTER to accept the value. The alarm setting appears. 4. Setting...
... to a temperature transducer, you can set an alarm to sound when the depth is shallower or deeper than ± 2 °F (±.1.1 °C). echo 200, echo 300c, echo 500c, and echo 550c Owner's Manual Using the echo 2. NOTE: Alarm settings are saved when the device is turned off . 1. Select ENTER to accept the value. The alarm setting appears. 4. Setting...
Owner's Manual
Page 18
...normal sensitivity, select Auto-Med. • To display the sonar screen with lower sensitivity and less noise, select Auto-Low. 14 echo 200, echo 300c, echo 500c, and echo 550c Owner's Manual If the screen is turned off. 1. Select to increase the gain setting until you begin to see "noise" in the water ... water portion of the screen. 3. Select ENTER to show weaker signals and more detail, increase the gain. Select Menu > Gain > Manual. 2. Using the echo Setting the Drift Alarm You can adjust the amount of gain and noise on one page, that setting is applied to the other pages...
...normal sensitivity, select Auto-Med. • To display the sonar screen with lower sensitivity and less noise, select Auto-Low. 14 echo 200, echo 300c, echo 500c, and echo 550c Owner's Manual If the screen is turned off. 1. Select to increase the gain setting until you begin to see "noise" in the water ... water portion of the screen. 3. Select ENTER to show weaker signals and more detail, increase the gain. Select Menu > Gain > Manual. 2. Using the echo Setting the Drift Alarm You can adjust the amount of gain and noise on one page, that setting is applied to the other pages...
Owner's Manual
Page 19
... Select MENU > Setup > Sonar Setup > Noise Reject. 2. Select MENU > Setup > Sonar Setup > Surface Noise > Hide. echo 200, echo 300c, echo 500c, and echo 550c Owner's Manual 15 You can minimize the appearance of those numbers. Showing the Water Temperature Before you can show the water temperature, you must open... open the Full Screen page (page 4), the Split Zoom page (page 5), or the Split Frequency page (page 5). 1. Using the echo Sonar Numbers You can adjust which numbers (water temperature, battery voltage, water speed, and water speed odometer) are displayed on the Split ...
... Select MENU > Setup > Sonar Setup > Noise Reject. 2. Select MENU > Setup > Sonar Setup > Surface Noise > Hide. echo 200, echo 300c, echo 500c, and echo 550c Owner's Manual 15 You can minimize the appearance of those numbers. Showing the Water Temperature Before you can show the water temperature, you must open... open the Full Screen page (page 4), the Split Zoom page (page 5), or the Split Frequency page (page 5). 1. Using the echo Sonar Numbers You can adjust which numbers (water temperature, battery voltage, water speed, and water speed odometer) are displayed on the Split ...
Owner's Manual
Page 20
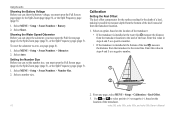
Using the echo Showing the Battery Voltage Before you can show the odometer, you must open the Full Screen page (page 4), the Split Zoom page (page 5), or the ... page, select MENU > Setup > Calibration > Keel Offset. 3. Use and to measure depth from the bottom of the keel instead of the transducer. 16 echo 200, echo 300c, echo 500c, and echo 550c Owner's Manual Select MENU > Setup > Sonar Numbers > Odometer. 2. Enter this value in steps 4 and 5 as a positive number. • If the transducer is installed at the...
Using the echo Showing the Battery Voltage Before you can show the odometer, you must open the Full Screen page (page 4), the Split Zoom page (page 5), or the ... page, select MENU > Setup > Calibration > Keel Offset. 3. Use and to measure depth from the bottom of the keel instead of the transducer. 16 echo 200, echo 300c, echo 500c, and echo 550c Owner's Manual Select MENU > Setup > Sonar Numbers > Odometer. 2. Enter this value in steps 4 and 5 as a positive number. • If the transducer is installed at the...
Owner's Manual
Page 21
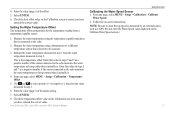
...page, select MENU > Setup > Calibration > Temperature Offset. 5. Enter the value (page i) of the offset. 5. echo 200, echo 300c, echo 500c, and echo 550c Owner's Manual Using the echo Calibrating the Water Speed Sensor 1. Measure the water temperature using the temperature-capable transducer that is known to the... echo measures the water temperature as a negative number if the sensor connected to be...
...page, select MENU > Setup > Calibration > Temperature Offset. 5. Enter the value (page i) of the offset. 5. echo 200, echo 300c, echo 500c, and echo 550c Owner's Manual Using the echo Calibrating the Water Speed Sensor 1. Measure the water temperature using the temperature-capable transducer that is known to the... echo measures the water temperature as a negative number if the sensor connected to be...


