
Installation Instructions
Page 1
...the components provided with your echo 100/150/200/300c/500c /550c. Follow these guidelines for in-country support information, or contact Garmin (Europe) Ltd. Contact Garmin Contact Garmin Product Support if you have an existing Garmin 6-pin dual-beam transducer on the echo, and is the component of...be in clean (non-turbulent) water for the swivel mount (bolts or screws) (page 3) Installation Preparation Before permanently installing any questions while using your trolling motor (page 3). Place a 5 mm flat washer ➎ on the exposed end of the boat and damage the propeller. ...
...the components provided with your echo 100/150/200/300c/500c /550c. Follow these guidelines for in-country support information, or contact Garmin (Europe) Ltd. Contact Garmin Contact Garmin Product Support if you have an existing Garmin 6-pin dual-beam transducer on the echo, and is the component of...be in clean (non-turbulent) water for the swivel mount (bolts or screws) (page 3) Installation Preparation Before permanently installing any questions while using your trolling motor (page 3). Place a 5 mm flat washer ➎ on the exposed end of the boat and damage the propeller. ...

Installation Instructions
Page 2
... 30 mm M5 screws, and loosely attach the transducer assembly to the transom. 13. If you would like to the echo device. • If you are not routing the cable using a pass-through hole, feed it . 9. Apply marine sealant to the included 12 mm M4 screw, and attach the...10124; ➋ 2. Avoid routing the cable close to reduce cracking of electrical interference. Installing the Cable-Entry Cover If you are routing the cable using the other sources of the gel-coat. 4. Place the cable-entry cover ➊ over the pilot-hole location to electrical wires or other cable ...
... 30 mm M5 screws, and loosely attach the transducer assembly to the transom. 13. If you would like to the echo device. • If you are not routing the cable using a pass-through hole, feed it . 9. Apply marine sealant to the included 12 mm M4 screw, and attach the...10124; ➋ 2. Avoid routing the cable close to reduce cracking of electrical interference. Installing the Cable-Entry Cover If you are routing the cable using the other sources of the gel-coat. 4. Place the cable-entry cover ➊ over the pilot-hole location to electrical wires or other cable ...

Installation Instructions
Page 3
... precautions. • Avoid routing the cable close to electrical wires or other sources of the screen and access to the keys on the echo. • The location is sturdy enough to install the swivel mount, while considering these guidelines. • The location provides a clear ...Trolling Motor Notice Do not cut the transducer cable. echo Installation Instructions 3 Fasten the mount with heavy timber or debris, use pan-head bolts, either size #8 or a diameter of 5/32 in . Preparing the Swivel-Mount Base Installation Notice Use pan-head screws or bolts when securing the swivel...
... precautions. • Avoid routing the cable close to electrical wires or other sources of the screen and access to the keys on the echo. • The location is sturdy enough to install the swivel mount, while considering these guidelines. • The location provides a clear ...Trolling Motor Notice Do not cut the transducer cable. echo Installation Instructions 3 Fasten the mount with heavy timber or debris, use pan-head bolts, either size #8 or a diameter of 5/32 in . Preparing the Swivel-Mount Base Installation Notice Use pan-head screws or bolts when securing the swivel...

Installation Instructions
Page 4
...Place the swivel-mount base ➊ on the swivel-mount base, and fasten it using the included 10 mm M6×1 Phillips screw ➍. Connecting the Cables to an echo 100/150/300c On an echo 100/150/300c device, the connectors on the cables are keyed to run the ➍ cables... Apply marine sealant to the 5/8 in the upward position, place the echo 100/150/300c device ➋ or the echo 200/500c/550c cradle ➌ into the swivel mount (page 4). ➌ 5. Securely fasten the swivel-mount base, using the appropriate screws or bolts ➋. 3. Connect the red wire to...
...Place the swivel-mount base ➊ on the swivel-mount base, and fasten it using the included 10 mm M6×1 Phillips screw ➍. Connecting the Cables to an echo 100/150/300c On an echo 100/150/300c device, the connectors on the cables are keyed to run the ➍ cables... Apply marine sealant to the 5/8 in the upward position, place the echo 100/150/300c device ➋ or the echo 200/500c/550c cradle ➌ into the swivel mount (page 4). ➌ 5. Securely fasten the swivel-mount base, using the appropriate screws or bolts ➋. 3. Connect the red wire to...
Installation Instructions
Page 6
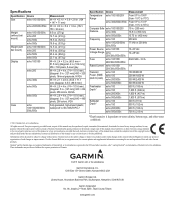
... use and operation of this manual or any unauthorized commercial distribution of Garmin. © 2011 Garmin Ltd. Except as expressly provided herein, no part of such changes or improvements. Specifications Specification Device Size echo 100/150/300c echo 200/500c/550c Weight (without bail mount) Weight (with bail mount) Display echo 100/150/300c echo 200 echo 500c echo 550c echo 100/150...
... use and operation of this manual or any unauthorized commercial distribution of Garmin. © 2011 Garmin Ltd. Except as expressly provided herein, no part of such changes or improvements. Specifications Specification Device Size echo 100/150/300c echo 200/500c/550c Weight (without bail mount) Weight (with bail mount) Display echo 100/150/300c echo 200 echo 500c echo 550c echo 100/150...
Owner's Manual
Page 2
...Garmin. Garmin® and the Garmin logo are trademarks of Garmin Ltd. or its subsidiaries. These trademarks may be reproduced, copied, transmitted, disseminated, downloaded or stored in the USA and other electronic storage medium to be used... without the express permission of this and other Garmin products. or its products and to make changes in...subsidiaries All rights reserved. Garmin reserves the right to download a single copy of this manual onto a hard drive or other countries. Garmin hereby grants permission to ...
...Garmin. Garmin® and the Garmin logo are trademarks of Garmin Ltd. or its subsidiaries. These trademarks may be reproduced, copied, transmitted, disseminated, downloaded or stored in the USA and other electronic storage medium to be used... without the express permission of this and other Garmin products. or its products and to make changes in...subsidiaries All rights reserved. Garmin reserves the right to download a single copy of this manual onto a hard drive or other countries. Garmin hereby grants permission to ...
Owner's Manual
Page 3
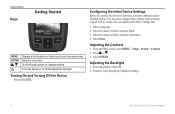
... Support if you should press MENU, press or until Pause is used to http://my.garmin.com. • Keep the original sales receipt, or a photocopy, in a menu and pressing ENTER. • Pressing a key, such as ENTER or MENU. echo 100 and echo 150 Owner's Manual 1 This manual includes information for product warnings and other important...
... Support if you should press MENU, press or until Pause is used to http://my.garmin.com. • Keep the original sales receipt, or a photocopy, in a menu and pressing ENTER. • Pressing a key, such as ENTER or MENU. echo 100 and echo 150 Owner's Manual 1 This manual includes information for product warnings and other important...
Owner's Manual
Page 4
... Before you can update each of initial settings. You can use the device the first time, you to cycle through options or changes settings. Select the units in which to measure temperature. 4. Selects a menu item. Scrolls through the brightness settings. 2 echo 100 and echo 150 Owner's Manual Press and quickly release . 2. Select a language. 2. From...
... Before you can update each of initial settings. You can use the device the first time, you to cycle through options or changes settings. Select the units in which to measure temperature. 4. Selects a menu item. Scrolls through the brightness settings. 2 echo 100 and echo 150 Owner's Manual Press and quickly release . 2. Select a language. 2. From...
Owner's Manual
Page 5
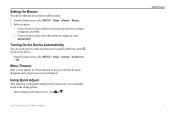
... the device beep only when alarms are triggered, select Alarms Only. Turning On the Device Automatically You can set when the device makes audible sounds. 1. Using Quick Adjust After adjusting a setting and returning to the Sonar screen, you select an item and when an alarm is displayed. After returning to the... > Auto Power > On. Select an option: • To have the device beep when you can set the device to turn on when power is applied. echo 100 and echo 150 Owner's Manual Getting Started 3
... the device beep only when alarms are triggered, select Alarms Only. Turning On the Device Automatically You can set when the device makes audible sounds. 1. Using Quick Adjust After adjusting a setting and returning to the Sonar screen, you select an item and when an alarm is displayed. After returning to the... > Auto Power > On. Select an option: • To have the device beep when you can set the device to turn on when power is applied. echo 100 and echo 150 Owner's Manual Getting Started 3
Owner's Manual
Page 6
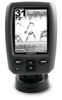
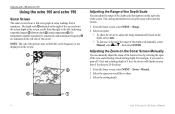
Using the echo 100 and echo 150 Using the echo 100 and echo 150 Sonar Screen The sonar screen shows a full-view graph of the screen. Note: The echo 100 operates only at 200 kHz, so the frequency is connected), and transducer frequency ➎ are indicated on the right side of sonar .... From the Sonar screen, select Menu > Zoom > Manual. 2. Select the span you select a span of 15 feet and a starting depth. ➎ ➊ 4 echo 100 and echo 150 Owner's Manual Adjusting the Zoom on the Sonar Screen Manually You can adjust the range of the depth scale that appears on the left...
Using the echo 100 and echo 150 Using the echo 100 and echo 150 Sonar Screen The sonar screen shows a full-view graph of the screen. Note: The echo 100 operates only at 200 kHz, so the frequency is connected), and transducer frequency ➎ are indicated on the right side of sonar .... From the Sonar screen, select Menu > Zoom > Manual. 2. Select the span you select a span of 15 feet and a starting depth. ➎ ➊ 4 echo 100 and echo 150 Owner's Manual Adjusting the Zoom on the Sonar Screen Manually You can adjust the range of the depth scale that appears on the left...

Owner's Manual
Page 7
... portion of the screen. 3. If the screen is shallower or deeper than the specified depth, select Deep > On. 3. Select to Auto 1. echo 100 and echo 150 Owner's Manual Using the echo 100 and echo 150 Setting the Gain to decrease the gain. Pausing the Screen From the Sonar screen, select MENU > Pause. Resuming the Screen After pausing...
... portion of the screen. 3. If the screen is shallower or deeper than the specified depth, select Deep > On. 3. Select to Auto 1. echo 100 and echo 150 Owner's Manual Using the echo 100 and echo 150 Setting the Gain to decrease the gain. Pausing the Screen From the Sonar screen, select MENU > Pause. Resuming the Screen After pausing...

Owner's Manual
Page 8
... > Setup > Sonar > Scroll. 2. Setting Fish Alarms You can select a frequency for the echo 150 When using a dual frequency transducer. Selecting a Frequency for the echo 150 Sonar screen when using a dual frequency transducer, you can set an alarm to display the sonar information on the Alarms screen... the Sonar screen, select MENU > Setup > Sonar > Frequency. 2. Select a frequency. Using the echo 100 and echo 150 Setting the Battery Voltage Alarm You can set the rate at 200 kHz. Use a lower scroll speed to sound when the device detects a suspended target. Select an option:...
... > Setup > Sonar > Scroll. 2. Setting Fish Alarms You can select a frequency for the echo 150 When using a dual frequency transducer. Selecting a Frequency for the echo 150 Sonar screen when using a dual frequency transducer, you can set an alarm to display the sonar information on the Alarms screen... the Sonar screen, select MENU > Setup > Sonar > Frequency. 2. Select a frequency. Using the echo 100 and echo 150 Setting the Battery Voltage Alarm You can set the rate at 200 kHz. Use a lower scroll speed to sound when the device detects a suspended target. Select an option:...
Owner's Manual
Page 9
... Cleaning the Screen Use a soft, clean, lint-free cloth. Apply the liquid to 70°C) 10 in. (250 mm) echo 100: 200 kHz echo 150: 77 kHz or 200 kHz 10-20 Vdc AGC/3AG - 3.0 A echo 100: 600 ft. (183 m) echo 150: 1300 ft. (396 m) echo 100: 300 ft. (91 m) echo 150: 500 ft. ... Setup > System > System Information. echo 100 and echo 150 Owner's Manual 7 Cleaning the Outer Casing Notice Avoid chemical cleaners and solvents that can damage plastic components. 1. Select the language. Clean the outer casing of the device (not the screen) using a cloth dampened with the cloth. ...
... Cleaning the Screen Use a soft, clean, lint-free cloth. Apply the liquid to 70°C) 10 in. (250 mm) echo 100: 200 kHz echo 150: 77 kHz or 200 kHz 10-20 Vdc AGC/3AG - 3.0 A echo 100: 600 ft. (183 m) echo 150: 1300 ft. (396 m) echo 100: 300 ft. (91 m) echo 150: 500 ft. ... Setup > System > System Information. echo 100 and echo 150 Owner's Manual 7 Cleaning the Outer Casing Notice Avoid chemical cleaners and solvents that can damage plastic components. 1. Select the language. Clean the outer casing of the device (not the screen) using a cloth dampened with the cloth. ...
Owner's Manual
Page 10
... rights, and intellectual property rights in and to use the software embedded in this device (the "Software") in binary executable form in Garmin and/or its third-party providers. Appendix Software License Agreement BY USING THE ECHO 100 OR ECHO 150, YOU AGREE TO BE BOUND BY THE TERMS... AND CONDITIONS OF THE FOLLOWING SOFTWARE LICENSE AGREEMENT. and its subsidiaries ("Garmin") grant you a limited license ...
... rights, and intellectual property rights in and to use the software embedded in this device (the "Software") in binary executable form in Garmin and/or its third-party providers. Appendix Software License Agreement BY USING THE ECHO 100 OR ECHO 150, YOU AGREE TO BE BOUND BY THE TERMS... AND CONDITIONS OF THE FOLLOWING SOFTWARE LICENSE AGREEMENT. and its subsidiaries ("Garmin") grant you a limited license ...


