
Installation Instructions
Page 1
... you operate your vessel, provides easy access to the keys on the echo, and is the component of the components provided with your echo 100/150/200/300c/500c /550c. In the USA, go to become turbulent. In the UK, contact Garmin (Europe) Ltd. Place a 5 mm flat washer ➎ on the boat. screw, ...when launching, hauling, or storing. Do not tighten the 10-32 lock nut. The transducer must be in a location where it can be mounted using your echo device by phone at +44 (0) 870.8501241. In Europe, go to the center of the propeller on the exposed end of the boat and damage...
... you operate your vessel, provides easy access to the keys on the echo, and is the component of the components provided with your echo 100/150/200/300c/500c /550c. In the USA, go to become turbulent. In the UK, contact Garmin (Europe) Ltd. Place a 5 mm flat washer ➎ on the boat. screw, ...when launching, hauling, or storing. Do not tighten the 10-32 lock nut. The transducer must be in a location where it can be mounted using your echo device by phone at +44 (0) 870.8501241. In Europe, go to the center of the propeller on the exposed end of the boat and damage...

Installation Instructions
Page 2
...mark the center location of the transom ➏. Wipe away any excess marine sealant. 2 echo Installation Instructions Route the transducer cable to the echo device. • If you are routing the cable using a pass-through hole, feed it extends beyond the bottom of the transom or the ... and the top of the transom ➌ approximately 1/8 in. (3 mm) on the transducer mount. 3. Remove the cable-entry cover, and, using a pass-through the transom, choose a passthrough location well above the waterline ➍ and mark it touches the mounting bracket and then tighten 1/4 turn...
...mark the center location of the transom ➏. Wipe away any excess marine sealant. 2 echo Installation Instructions Route the transducer cable to the echo device. • If you are routing the cable using a pass-through hole, feed it extends beyond the bottom of the transom or the ... and the top of the transom ➌ approximately 1/8 in. (3 mm) on the transducer mount. 3. Remove the cable-entry cover, and, using a pass-through the transom, choose a passthrough location well above the waterline ➍ and mark it touches the mounting bracket and then tighten 1/4 turn...

Installation Instructions
Page 3
... appropriate drill bit for the pilot hole. • To attach the base with the bottom when in use a metal 4-5 in . (4 mm), with sealant to the motor shaft. echo Installation Instructions 3 Cutting the transducer cable will attach the mount to support the device and the mount. • ... hardware: • To attach the base with screws, use a 5/8 in . (14 cm) cable ties ➎ to secure the transducer cable to avoid accumulation of electrical interference. • Make sure that the pass-through the slot on the echo. • The location is deployed and recovered. If ...
... appropriate drill bit for the pilot hole. • To attach the base with the bottom when in use a metal 4-5 in . (4 mm), with sealant to the motor shaft. echo Installation Instructions 3 Cutting the transducer cable will attach the mount to support the device and the mount. • ... hardware: • To attach the base with screws, use a 5/8 in . (14 cm) cable ties ➎ to secure the transducer cable to avoid accumulation of electrical interference. • Make sure that the pass-through the slot on the echo. • The location is deployed and recovered. If ...

Installation Instructions
Page 4
...Fastening the Swivel Mount without the Cables Installed in the correct ports on the swivelmount base, but do not need to an echo 100/150/300c On an echo 100/150/300c device, the connectors on the mounting surface, route the cables through the cable pass-through the mounting surface and ...the mount. 1. With the locking arm ➊ in the Mount 1. Securely fasten the swivel-mount base, using the included 10 mm M6×1 Phillips ...
...Fastening the Swivel Mount without the Cables Installed in the correct ports on the swivelmount base, but do not need to an echo 100/150/300c On an echo 100/150/300c device, the connectors on the mounting surface, route the cables through the cable pass-through the mounting surface and ...the mount. 1. With the locking arm ➊ in the Mount 1. Securely fasten the swivel-mount base, using the included 10 mm M6×1 Phillips ...
Installation Instructions
Page 6
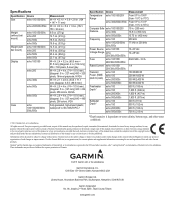
... transmitted, disseminated, downloaded or stored in any storage medium, for current updates and supplemental information concerning the use and operation of this manual may not be viewed and to print one copy of this manual or of ...are registered trademarks of Garmin Ltd. Specifications Specification Device Size echo 100/150/300c echo 200/500c/550c Weight (without bail mount) Weight (with bail mount) Display echo 100/150/300c echo 200 echo 500c echo 550c echo 100/150/300c echo 200 echo 500c echo 550c echo 100/150 echo 200 echo 300c echo 500c echo 550c Case echo 100/150/200/300c/...
... transmitted, disseminated, downloaded or stored in any storage medium, for current updates and supplemental information concerning the use and operation of this manual may not be viewed and to print one copy of this manual or of ...are registered trademarks of Garmin Ltd. Specifications Specification Device Size echo 100/150/300c echo 200/500c/550c Weight (without bail mount) Weight (with bail mount) Display echo 100/150/300c echo 200 echo 500c echo 550c echo 100/150/300c echo 200 echo 500c echo 550c echo 100/150 echo 200 echo 300c echo 500c echo 550c Case echo 100/150/200/300c/...
Owner's Manual
Page 2
...in any storage medium, for current updates and supplemental information concerning the use and operation of Garmin. These trademarks may be viewed and to change without the express prior written consent of Garmin Ltd. Garmin hereby grants permission to download a single copy of this manual or any... revision hereto is a trademark of such changes or improvements. © 2011 Garmin Ltd. or its subsidiaries. echo™ is strictly prohibited. Garmin reserves the right to print one copy of this manual or of any revision hereto, provided that such ...
...in any storage medium, for current updates and supplemental information concerning the use and operation of Garmin. These trademarks may be viewed and to change without the express prior written consent of Garmin Ltd. Garmin hereby grants permission to download a single copy of this manual or any... revision hereto is a trademark of such changes or improvements. © 2011 Garmin Ltd. or its subsidiaries. echo™ is strictly prohibited. Garmin reserves the right to print one copy of this manual or of any revision hereto, provided that such ...
Owner's Manual
Page 3
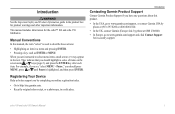
..., if you see "select MENU > Pause," you should press MENU, press or until Pause is used to www.garmin.com/support and click Contact Support for in the product box for the echo™ 100 and echo 150 fishfinders. echo 100 and echo 150 Owner's Manual 1 Manual Conventions In this product. • In the USA, go to describe...
..., if you see "select MENU > Pause," you should press MENU, press or until Pause is used to www.garmin.com/support and click Contact Support for in the product box for the echo™ 100 and echo 150 fishfinders. echo 100 and echo 150 Owner's Manual 1 Manual Conventions In this product. • In the USA, go to describe...
Owner's Manual
Page 4
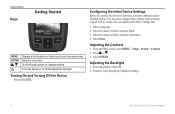
Turning On and Turning Off the Device Press and hold . You must configure a series of initial settings. You can use the device the first time, you to measure temperature. 4. Select Done. Adjusting the Backlight 1. Repeat to measure depth. 3. Configuring ...device on or off and adjusts the backlight. Select the units in which to your previous screen. Scrolls through the brightness settings. 2 echo 100 and echo 150 Owner's Manual Getting Started Keys Getting Started MENU ENTER Displays a list of options or returns you must also configure these settings later. 1.
Turning On and Turning Off the Device Press and hold . You must configure a series of initial settings. You can use the device the first time, you to measure temperature. 4. Select Done. Adjusting the Backlight 1. Repeat to measure depth. 3. Configuring ...device on or off and adjusts the backlight. Select the units in which to your previous screen. Scrolls through the brightness settings. 2 echo 100 and echo 150 Owner's Manual Getting Started Keys Getting Started MENU ENTER Displays a list of options or returns you must also configure these settings later. 1.
Owner's Manual
Page 5
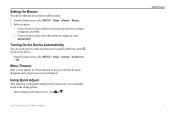
.... Using Quick Adjust After adjusting a setting and returning to the Sonar screen, you select an item and when an alarm is triggered, select On. • To have the device beep only when alarms are selected, the menu disappears and your previous screen is applied. After returning to the setting options. echo 100 and echo...
.... Using Quick Adjust After adjusting a setting and returning to the Sonar screen, you select an item and when an alarm is triggered, select On. • To have the device beep only when alarms are selected, the menu disappears and your previous screen is applied. After returning to the setting options. echo 100 and echo...
Owner's Manual
Page 6
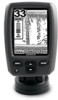
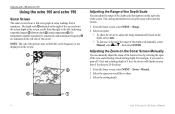
... to adjust the range automatically based on the right side of the screen. Select the starting depth of the screen. Using the echo 100 and echo 150 Using the echo 100 and echo 150 Sonar Screen The sonar screen shows a full-view graph of sonar readings from 5 feet deep to 20 feet ... Menu > Zoom > Manual. 2. Select the span you select a span of 15 feet and a starting depth. ➎ ➊ 4 echo 100 and echo 150 Owner's Manual Note: The echo 100 operates only at 200 kHz, so the frequency is connected), and transducer frequency ➎ are indicated on the right of the depth...
... to adjust the range automatically based on the right side of the screen. Select the starting depth of the screen. Using the echo 100 and echo 150 Using the echo 100 and echo 150 Sonar Screen The sonar screen shows a full-view graph of sonar readings from 5 feet deep to 20 feet ... Menu > Zoom > Manual. 2. Select the span you select a span of 15 feet and a starting depth. ➎ ➊ 4 echo 100 and echo 150 Owner's Manual Note: The echo 100 operates only at 200 kHz, so the frequency is connected), and transducer frequency ➎ are indicated on the right of the depth...

Owner's Manual
Page 7
... Auto-Med. • To display the sonar screen with higher sensitivity and to show . 3. From the Sonar screen, select Menu > Gain > Manual. 2. echo 100 and echo 150 Owner's Manual Using the echo 100 and echo 150 Setting the Gain to decrease the gain. Select an option: • To display the sonar screen with lower sensitivity and less...
... Auto-Med. • To display the sonar screen with higher sensitivity and to show . 3. From the Sonar screen, select Menu > Gain > Manual. 2. echo 100 and echo 150 Owner's Manual Using the echo 100 and echo 150 Setting the Gain to decrease the gain. Select an option: • To display the sonar screen with lower sensitivity and less...

Owner's Manual
Page 8
... shallower waters. The 77 kHz frequency penetrates deep water more detail, especially while moving or trolling. Use a higher scroll speed to display the sonar information on the Alarms screen. Note: The echo 100 operates only at which the sonar scrolls from a 77 kHz sonar signal. The 200 kHz frequency shows better...larger area. 1. From the Sonar screen, select MENU > Setup > Alarms > Fish > On. Select a scroll speed. From the Sonar screen, select MENU > Setup > Sonar > Frequency. 2. Using the echo 100 and echo 150 Setting the Battery Voltage Alarm You can set the rate at 200 kHz.
... shallower waters. The 77 kHz frequency penetrates deep water more detail, especially while moving or trolling. Use a higher scroll speed to display the sonar information on the Alarms screen. Note: The echo 100 operates only at which the sonar scrolls from a 77 kHz sonar signal. The 200 kHz frequency shows better...larger area. 1. From the Sonar screen, select MENU > Setup > Alarms > Fish > On. Select a scroll speed. From the Sonar screen, select MENU > Setup > Sonar > Frequency. 2. Using the echo 100 and echo 150 Setting the Battery Voltage Alarm You can set the rate at 200 kHz.
Owner's Manual
Page 9
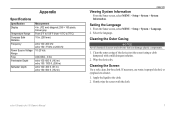
... kHz or 200 kHz 10-20 Vdc AGC/3AG - 3.0 A echo 100: 600 ft. (183 m) echo 150: 1300 ft. (396 m) echo 100: 300 ft. (91 m) echo 150: 500 ft. (152 m) Appendix Viewing System Information From the Sonar screen, select MENU > Setup > System > System Information. Cleaning the Screen Use a soft, clean, lint-free cloth. Cleaning the Outer Casing Notice...
... kHz or 200 kHz 10-20 Vdc AGC/3AG - 3.0 A echo 100: 600 ft. (183 m) echo 150: 1300 ft. (396 m) echo 100: 300 ft. (91 m) echo 150: 500 ft. (152 m) Appendix Viewing System Information From the Sonar screen, select MENU > Setup > System > System Information. Cleaning the Screen Use a soft, clean, lint-free cloth. Cleaning the Outer Casing Notice...
Owner's Manual
Page 10
...trade secrets of the product. You further acknowledge that the Software in the normal operation of Garmin and/or its third-party providers. Appendix Software License Agreement BY USING THE ECHO 100 OR ECHO 150, YOU AGREE TO BE BOUND BY THE TERMS AND CONDITIONS OF THE FOLLOWING SOFTWARE LICENSE... AGREEMENT. and its subsidiaries ("Garmin") grant you a limited license to human readable form the Software or...
...trade secrets of the product. You further acknowledge that the Software in the normal operation of Garmin and/or its third-party providers. Appendix Software License Agreement BY USING THE ECHO 100 OR ECHO 150, YOU AGREE TO BE BOUND BY THE TERMS AND CONDITIONS OF THE FOLLOWING SOFTWARE LICENSE... AGREEMENT. and its subsidiaries ("Garmin") grant you a limited license to human readable form the Software or...


