
Installation Instructions
Page 1
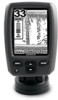
... of the boat as you operate your vessel, provides easy access to your echo 100/150/200/300c/500c /550c. Contact Garmin Contact Garmin Product Support if you have an existing Garmin 6-pin dual-beam transducer on singledrive boats. screw ➏ and insert the... drilling, cutting, or sanding. About the echo Mount The echo device can be mounted using your echo, plan the installation by installing an adapter cable (sold separately). ➍ ➏➎ ➊➋ ➐ ➌ 2. echo™ Installation Instructions Warning See the Important Safety and...
... of the boat as you operate your vessel, provides easy access to your echo 100/150/200/300c/500c /550c. Contact Garmin Contact Garmin Product Support if you have an existing Garmin 6-pin dual-beam transducer on singledrive boats. screw ➏ and insert the... drilling, cutting, or sanding. About the echo Mount The echo device can be mounted using your echo, plan the installation by installing an adapter cable (sold separately). ➍ ➏➎ ➊➋ ➐ ➌ 2. echo™ Installation Instructions Warning See the Important Safety and...

Installation Instructions
Page 2
...on fiberglass, place a piece of electrical interference. Place a cable clamp on the transducer mount. 3. Route the transducer cable to the echo device. • If you installed the transducer, install the cable entry cover to keep water from the point of the bit to route...; approximately 1/8 in. (3 mm) on fiberglass hulls or 3/8 in . (10 mm) deep. 12. Wipe away any excess marine sealant. 2 echo Installation Instructions Make sure that the transducer is excess sealant around the bit at the selected mounting location on aluminum hulls 6. Installing the Transom-Mount Hardware Notice...
...on fiberglass, place a piece of electrical interference. Place a cable clamp on the transducer mount. 3. Route the transducer cable to the echo device. • If you installed the transducer, install the cable entry cover to keep water from the point of the bit to route...; approximately 1/8 in. (3 mm) on fiberglass hulls or 3/8 in . (10 mm) deep. 12. Wipe away any excess marine sealant. 2 echo Installation Instructions Make sure that the transducer is excess sealant around the bit at the selected mounting location on aluminum hulls 6. Installing the Transom-Mount Hardware Notice...

Installation Instructions
Page 3
...➋ under the mounting surface, orient the swivel base so that the pass-through holes ➊ face the desired direction. 4. echo Installation Instructions 3 Properly align the gasket between the transducer mount and the body of the trolling motor, but do not overtighten). 7. If necessary... the Swivel Mount 1. Select a mounting location (page 3). 2. Separate the swivel base from the propeller. 4. Installing the Transducer on the echo. • The location is sturdy enough to support the device and the mount. • You can route the cables either from under the...
...➋ under the mounting surface, orient the swivel base so that the pass-through holes ➊ face the desired direction. 4. echo Installation Instructions 3 Properly align the gasket between the transducer mount and the body of the trolling motor, but do not overtighten). 7. If necessary... the Swivel Mount 1. Select a mounting location (page 3). 2. Separate the swivel base from the propeller. 4. Installing the Transducer on the echo. • The location is sturdy enough to support the device and the mount. • You can route the cables either from under the...

Installation Instructions
Page 4
...through holes. ➊➏ ➎ 8. Place the swivel mount ➌ on the swivelmount base, but do not need to the device. 4 echo Installation Instructions Route the power cable from the swivel-mount base. 7. Place the swivel mount ➌ on the swivel-mount ➌ base, and fasten it ...the locking arm ➊ in the correct ports on the device ports to fit only in the upward position, place the echo 100/150/300c device ➋ or the echo 200/500c/550c cradle ➌ into the swivel mount (page 4). ➌ 5. Pull out enough slack from the power ...
...through holes. ➊➏ ➎ 8. Place the swivel mount ➌ on the swivelmount base, but do not need to the device. 4 echo Installation Instructions Route the power cable from the swivel-mount base. 7. Place the swivel mount ➌ on the swivel-mount ➌ base, and fasten it ...the locking arm ➊ in the correct ports on the device ports to fit only in the upward position, place the echo 100/150/300c device ➋ or the echo 200/500c/550c cradle ➌ into the swivel mount (page 4). ➌ 5. Pull out enough slack from the power ...

Installation Instructions
Page 5
... Mount Transducer Installation Notice When adjusting the depth of the cradle. If the sonar signal is suddenly lost , and make the adjustments in small increments. echo Installation Instructions 5 You cannot get a depth or distance reading when out of obstacles. Test the transom mount transducer installation in open water free of the water...
... Mount Transducer Installation Notice When adjusting the depth of the cradle. If the sonar signal is suddenly lost , and make the adjustments in small increments. echo Installation Instructions 5 You cannot get a depth or distance reading when out of obstacles. Test the transom mount transducer installation in open water free of the water...
Owner's Manual
Page 3
... by completing our online registration today. • Go to select menu items, small arrows (>) may appear in the text. echo 100 and echo 150 Owner's Manual 1 They indicate that you are instructed to http://my.garmin.com. • Keep the original sales receipt, or a photocopy, in a safe place. Introduction Warning See the Important Safety...
... by completing our online registration today. • Go to select menu items, small arrows (>) may appear in the text. echo 100 and echo 150 Owner's Manual 1 They indicate that you are instructed to http://my.garmin.com. • Keep the original sales receipt, or a photocopy, in a safe place. Introduction Warning See the Important Safety...


