

Owner's Manual
Page 4
Introduction Table of Contents Introduction i Contact Garmin i Product Registration i Optional Accessories i Getting Started 1 Unit Overview 1 Installing Batteries and Lanyard 2 Operating the eTrex 3 Key Functions 4 Turning on the eTrex 5 Main Pages 7 SkyView Page 7 Map Page 7 Pointer Page 9 Trip Computer Page 10 Main Menu 11 Routes Page 14 Tracks Page 16 Appendix 23 Specifications 23 Interface Formats 24 Connecting Your eTrex to a Computer 24 Software License Agreement 25 Declaration of Conformity 25 Index 26 ii eTrex H Owner's Manual
Introduction Table of Contents Introduction i Contact Garmin i Product Registration i Optional Accessories i Getting Started 1 Unit Overview 1 Installing Batteries and Lanyard 2 Operating the eTrex 3 Key Functions 4 Turning on the eTrex 5 Main Pages 7 SkyView Page 7 Map Page 7 Pointer Page 9 Trip Computer Page 10 Main Menu 11 Routes Page 14 Tracks Page 16 Appendix 23 Specifications 23 Interface Formats 24 Connecting Your eTrex to a Computer 24 Software License Agreement 25 Declaration of Conformity 25 Index 26 ii eTrex H Owner's Manual

Owner's Manual
Page 14
... fields. Trip Computer Page Options • Change Fields-use the CHANGE FIELDS option to select the data to be displayed from a list of data fields. 10 To change > ENTER. 4. Select an option > ENTER. 5. Select CHANGE FIELDS > ENTER. 3. Main Pages Trip Computer Page The Trip Computer page contains five data fields to...
... fields. Trip Computer Page Options • Change Fields-use the CHANGE FIELDS option to select the data to be displayed from a list of data fields. 10 To change > ENTER. 4. Select an option > ENTER. 5. Select CHANGE FIELDS > ENTER. 3. Main Pages Trip Computer Page The Trip Computer page contains five data fields to...

Owner's Manual
Page 20
... From the Menu page. Select ROUTES > ENTER. Select DELETE > ENTER. After a Track Log is displayed at the top of memory usage. To save 10 Track Logs. Press PAGE and switch to the Menu page. The Insert/ Remove window appears. To delete a route: 1. Save the current Track Log and...turn recording on the Map page as the unit gets a location fix. From the Menu page, select TRACKS > ENTER. 16 eTrex H Owner's Manual Select ROUTES > ENTER. Tracks Page The eTrex draws an electronic Track Log on or off, and change the way tracks are recorded. Select YES > ENTER. Select ROUTES > ...
... From the Menu page. Select ROUTES > ENTER. Select DELETE > ENTER. After a Track Log is displayed at the top of memory usage. To save 10 Track Logs. Press PAGE and switch to the Menu page. The Insert/ Remove window appears. To delete a route: 1. Save the current Track Log and...turn recording on the Map page as the unit gets a location fix. From the Menu page, select TRACKS > ENTER. 16 eTrex H Owner's Manual Select ROUTES > ENTER. Tracks Page The eTrex draws an electronic Track Log on or off, and change the way tracks are recorded. Select YES > ENTER. Select ROUTES > ...
Owner's Manual
Page 27
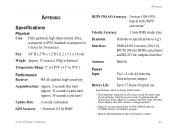
Appendix Appendix Specifications Physical Case: Fully-gasketed, high-impact plastic alloy, waterproof to IPX7 standards (waterproof to 1 meter for 30 minutes) Size: 4.4"H x 2"W x 1.2"D (11.2 x 5.1 x 3.0 cm) Weight: Approx. 5.3 ounces (150g) w/batteries Temperature Range: 5° to 158°F (-15° to 70°C)1 Performance Receiver: WAAS enabled, high-sensitivity Acquisition time: Approx. 3 seconds (hot start) Approx. 32 seconds (warm start) Approx. 39 seconds (cold start) Update Rate: 1/second, continuous GPS Accuracy:
Appendix Appendix Specifications Physical Case: Fully-gasketed, high-impact plastic alloy, waterproof to IPX7 standards (waterproof to 1 meter for 30 minutes) Size: 4.4"H x 2"W x 1.2"D (11.2 x 5.1 x 3.0 cm) Weight: Approx. 5.3 ounces (150g) w/batteries Temperature Range: 5° to 158°F (-15° to 70°C)1 Performance Receiver: WAAS enabled, high-sensitivity Acquisition time: Approx. 3 seconds (hot start) Approx. 32 seconds (warm start) Approx. 39 seconds (cold start) Update Rate: 1/second, continuous GPS Accuracy:

Owner's Manual
Page 30
...key 1 26 G GOTO 12 H heading 9 Hunt/Fish 13 I initializing 5 input/output formats 21 installing batteries 2 Interface page 21 K key functions 4 M Main Menu 11 manual conventions 3 map datums 20 map orientation 8 Map page 7 mark 11 marking a waypoint 11 moving direction line 9 N nearest waypoints 12 NMEA format 22 north pointer 7 north...18 SkyView page 7 software version 22 stop navigation 9 Sun/Moon 13 T Time page 18 time zone 19 track log 16 trip computer page 10 turning on the unit 5 U unit overview 1 Units page 20 Up/Down keys 3 UTC offset 19 V variance 21 W waypoints 11 waypoint symbol 11...
...key 1 26 G GOTO 12 H heading 9 Hunt/Fish 13 I initializing 5 input/output formats 21 installing batteries 2 Interface page 21 K key functions 4 M Main Menu 11 manual conventions 3 map datums 20 map orientation 8 Map page 7 mark 11 marking a waypoint 11 moving direction line 9 N nearest waypoints 12 NMEA format 22 north pointer 7 north...18 SkyView page 7 software version 22 stop navigation 9 Sun/Moon 13 T Time page 18 time zone 19 track log 16 trip computer page 10 turning on the unit 5 U unit overview 1 Units page 20 Up/Down keys 3 UTC offset 19 V variance 21 W waypoints 11 waypoint symbol 11...

