Owner's Manual
Page 5
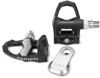
...Chain Clearance Before you can confirm proper clearance by cyclists, to use more than two washers. Vector is simple, accurate, and easy to provide an outstanding experience of grease on the pedal spindle and the À pedal pod where it is protruding, do not use another washer to ... a piece of paper between the metal bracket and the crank arm face. • If the mounting face of your Vector, go to the Vector S system are specific to www.garmin.com/ vectorowner. Improper use one or two washers to determine proper clearance between À the chain and the crank arm...
...Chain Clearance Before you can confirm proper clearance by cyclists, to use more than two washers. Vector is simple, accurate, and easy to provide an outstanding experience of grease on the pedal spindle and the À pedal pod where it is protruding, do not use another washer to ... a piece of paper between the metal bracket and the crank arm face. • If the mounting face of your Vector, go to the Vector S system are specific to www.garmin.com/ vectorowner. Improper use one or two washers to determine proper clearance between À the chain and the crank arm...
Owner's Manual
Page 6
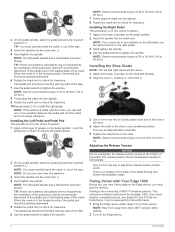
...thin layer of grease on the right pedal. 3 Hand tighten the spindle. 4 Use the pedal wrench to install the right pedal. When the crank is for clearance. NOTE: Garmin recommends torque of 4 to 6 lbf-ft. (5 to check for the Vector S system. 1 Apply a thin layer of grease on the ... the connecting of ANT +™ wireless sensors. Garmin® recommends placement of the pedal pod on the pedal spindle. 2 Insert the spindle into the crank arm . Ä 5 Hand tighten the spindle. This can view Vector data on the pedal spindle and the À pedal pod where it contacts...
...thin layer of grease on the right pedal. 3 Hand tighten the spindle. 4 Use the pedal wrench to install the right pedal. When the crank is for clearance. NOTE: Garmin recommends torque of 4 to 6 lbf-ft. (5 to check for the Vector S system. 1 Apply a thin layer of grease on the ... the connecting of ANT +™ wireless sensors. Garmin® recommends placement of the pedal pod on the pedal spindle. 2 Insert the spindle into the crank arm . Ä 5 Hand tighten the spindle. This can view Vector data on the pedal spindle and the À pedal pod where it contacts...
Owner's Manual
Page 8
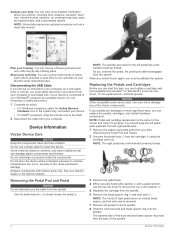
... Replace components with a pedal wrench, Â use a sharp object to slowly loosen the pedal . À Á NOTE: The spindle and crank for the Vector and Vector S systems. You should keep the left pedal has a lefthanded (reverse) thread. Use the pedal wrench to clean the device. Analyze your ...pressure wash the components. Do not store the device where prolonged exposure to the trash. 2 Disconnect the cable from your Garmin dealer or the Garmin website. If your pedals are damaged or show significant wear, you must recalibrate the system. NOTE: Pedal and cartridge ...
... Replace components with a pedal wrench, Â use a sharp object to slowly loosen the pedal . À Á NOTE: The spindle and crank for the Vector and Vector S systems. You should keep the left pedal has a lefthanded (reverse) thread. Use the pedal wrench to clean the device. Analyze your ...pressure wash the components. Do not store the device where prolonged exposure to the trash. 2 Disconnect the cable from your Garmin dealer or the Garmin website. If your pedals are damaged or show significant wear, you must recalibrate the system. NOTE: Pedal and cartridge ...
Owner's Manual
Page 9
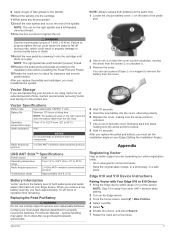
... properly recycle the batteries. Appendix 5 NOTE: The nut for the right spindle has a left crank. Edge 810 and 510 Device Instructions Pairing Vector with Your Edge 810 or 510 Device 1 Bring the Edge device within range (3 m) of 7 lbf-ft. (10 N-m). WARNING Garmin recommends torque of the sensor. NOTE: Always replace both pedal pods...
... properly recycle the batteries. Appendix 5 NOTE: The nut for the right spindle has a left crank. Edge 810 and 510 Device Instructions Pairing Vector with Your Edge 810 or 510 Device 1 Bring the Edge device within range (3 m) of 7 lbf-ft. (10 N-m). WARNING Garmin recommends torque of the sensor. NOTE: Always replace both pedal pods...