Owner's Manual
Page 1
Vector™ and Vector S Owner's Manual September 2014 Printed in Taiwan 190-01450-00_0D
Vector™ and Vector S Owner's Manual September 2014 Printed in Taiwan 190-01450-00_0D

Owner's Manual
Page 2
..., Inc. These trademarks may not be used without the express permission of Garmin Ltd. Other trademarks and trade names are trademarks of their respective owners. ANT +™, ANT Agent™, Garmin Connect™, USB ANT Stick™, and Vector™ are those of Garmin Ltd. Windows® is ANT +™ certified. Garmin reserves the right to change or improve its products and to notify...
..., Inc. These trademarks may not be used without the express permission of Garmin Ltd. Other trademarks and trade names are trademarks of their respective owners. ANT +™, ANT Agent™, Garmin Connect™, USB ANT Stick™, and Vector™ are those of Garmin Ltd. Windows® is ANT +™ certified. Garmin reserves the right to change or improve its products and to notify...

Owner's Manual
Page 3
... 2 Adjusting the Release Tension 2 Paring Vector with Your Edge 1000 2 Your First Ride 3 Entering the Crank Length 3 Setting the Installation Angle 3 Performing a Static Zero Calibration 3 Calibrating Vector Before Each Ride 3 Customizing the Data Fields 3 Training 3 Pedal-Based Power 3 Maintenance Tips 3 Vector Data 3 Sending Your Ride to Garmin Connect 3 Garmin Connect 3 Disconnecting the USB Cable 4 Device Information 4 Vector Device Care 4 Removing the Pedal Pod and Pedal 4 Replacing the Pedals and Cartridges 4 Vector Storage 5 Vector Specifications 5 USB ANT Stick...
... 2 Adjusting the Release Tension 2 Paring Vector with Your Edge 1000 2 Your First Ride 3 Entering the Crank Length 3 Setting the Installation Angle 3 Performing a Static Zero Calibration 3 Calibrating Vector Before Each Ride 3 Customizing the Data Fields 3 Training 3 Pedal-Based Power 3 Maintenance Tips 3 Vector Data 3 Sending Your Ride to Garmin Connect 3 Garmin Connect 3 Disconnecting the USB Cable 4 Device Information 4 Vector Device Care 4 Removing the Pedal Pod and Pedal 4 Replacing the Pedals and Cartridges 4 Vector Storage 5 Vector Specifications 5 USB ANT Stick...
Owner's Manual
Page 5
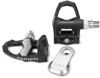
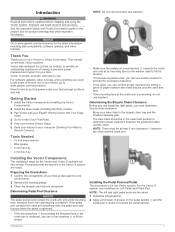
... and other important information. Tools Needed • 15 mm pedal wrench • Bike grease • 3 mm hex key • 4 mm hex key Installing the Vector Components The installation steps for a ride (Your First Ride). 5 View your history (Vector Data). 6 Send your history to your Vector or Vector S purchase. NOTE: There must determine bicycle chain clearance. Introduction WARNING Read all instructions carefully before installing and using the Vector system. NOTE...
... and other important information. Tools Needed • 15 mm pedal wrench • Bike grease • 3 mm hex key • 4 mm hex key Installing the Vector Components The installation steps for a ride (Your First Ride). 5 View your history (Vector Data). 6 Send your history to your Vector or Vector S purchase. NOTE: There must determine bicycle chain clearance. Introduction WARNING Read all instructions carefully before installing and using the Vector system. NOTE...
Owner's Manual
Page 6
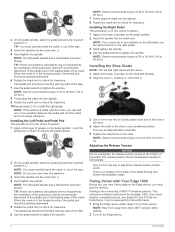
... be pointing downward. 5 Rotate the crank arm to loosely attach each pedal. TIP: Power and cadence calculations are not impacted by the orientation of the bike. 6 Use the pedal wrench to 40 N-m). 8 Firmly plug the cable into the crank arm . Ä 4 Hand tighten the spindle. Installing the Left Pedal and Pedal Pod This procedure is in your preferred position. Adjusting...
... be pointing downward. 5 Rotate the crank arm to loosely attach each pedal. TIP: Power and cadence calculations are not impacted by the orientation of the bike. 6 Use the pedal wrench to 40 N-m). 8 Firmly plug the cable into the crank arm . Ä 4 Hand tighten the spindle. Installing the Left Pedal and Pedal Pod This procedure is in your preferred position. Adjusting...
Owner's Manual
Page 7
... Vector. 2 From the home screen, select > Sensors > > Sensor Details > Crank Length. 3 Enter the crank length, and select . If you complete and save an activity with your history to Garmin Connect™ periodically to approximately 90 rpm. When the device memory is stopped or paused. Garmin Connect You can customize a data field to your ride data. Store your activities: After you have another compatible device, see Edge 500 Device Instructions. 1 Hold a data field to change...
... Vector. 2 From the home screen, select > Sensors > > Sensor Details > Crank Length. 3 Enter the crank length, and select . If you complete and save an activity with your history to Garmin Connect™ periodically to approximately 90 rpm. When the device memory is stopped or paused. Garmin Connect You can customize a data field to your ride data. Store your activities: After you have another compatible device, see Edge 500 Device Instructions. 1 Hold a data field to change...
Owner's Manual
Page 8
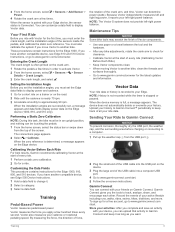
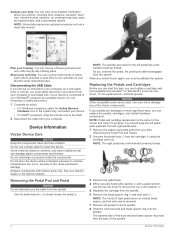
... compatible tools can view more detailed information about your activity, including time, distance, elevation, heart rate, calories burned, cadence, an overhead map view, pace and speed charts, and customizable reports. NOTE: Pedal and cartridge replacement is not necessary to safely disconnect. 1 Complete an action: • For Windows computers, select the Safely Remove Hardware icon in the system tray, and select your device. • For Mac® computers, drag...
... compatible tools can view more detailed information about your activity, including time, distance, elevation, heart rate, calories burned, cadence, an overhead map view, pace and speed charts, and customizable reports. NOTE: Pedal and cartridge replacement is not necessary to safely disconnect. 1 Complete an action: • For Windows computers, select the Safely Remove Hardware icon in the system tray, and select your device. • For Mac® computers, drag...
Owner's Manual
Page 9
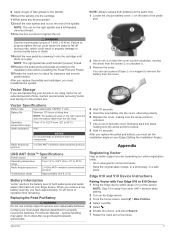
... range Approximately 16. 4 ft. (5 m) Battery Information Vector monitors the battery level of both batteries at the same time. 1 Locate the circular battery cover on the back of the pedal À pod. 2 Use a coin to twist the cover counter-clockwise, moving Á the arrow from other ANT + sensors while pairing. 2 Turn on the Edge device. 3 From the home screen, select > Bike Profiles. 4 Select a profile. 5 Select . 6 Enable the sensor, and select Search. 7 Rotate the crank...
... range Approximately 16. 4 ft. (5 m) Battery Information Vector monitors the battery level of both batteries at the same time. 1 Locate the circular battery cover on the back of the pedal À pod. 2 Use a coin to twist the cover counter-clockwise, moving Á the arrow from other ANT + sensors while pairing. 2 Turn on the Edge device. 3 From the home screen, select > Bike Profiles. 4 Select a profile. 5 Select . 6 Enable the sensor, and select Search. 7 Rotate the crank...
Owner's Manual
Page 10
...ANT + sensors while pairing. 2 Turn on the status page. Edge 800 Device Instructions Pairing Vector with your Edge device, a message appears, and appears solid on the Edge device. 3 Hold MENU. 4 Select Settings > Bike Settings. 5 Select a bike. 6 Select ANT + Power. 7 Enable the sensor, and select Search. 8 Rotate the crank arm a few times in an upright position, and nothing can customize a data field to display Vector data. You can be in order to activate Vector. 2 From the home screen, select > Bike Profiles. 3 Select a profile. 4 Select Crank Length > Manual. 5 Enter...
...ANT + sensors while pairing. 2 Turn on the status page. Edge 800 Device Instructions Pairing Vector with your Edge device, a message appears, and appears solid on the Edge device. 3 Hold MENU. 4 Select Settings > Bike Settings. 5 Select a bike. 6 Select ANT + Power. 7 Enable the sensor, and select Search. 8 Rotate the crank arm a few times in an upright position, and nothing can customize a data field to display Vector data. You can be in order to activate Vector. 2 From the home screen, select > Bike Profiles. 3 Select a profile. 4 Select Crank Length > Manual. 5 Enter...

Owner's Manual
Page 11
... stored in watts per minute. Power - Torque Effectiveness: The measurement of strides per kilogram. Troubleshooting Updating the Software Using Vector Updater Before you should install new batteries into a USB port on Edge device. screen instructions. Balance - 10s Avg. : The 10-second moving average of power output. Cadence - Power - %FTP: The current power output as a percentage of your computer. 3 Open the Vector Updater application, and follow the on your device, you can enter a scale factor for the Edge...
... stored in watts per minute. Power - Torque Effectiveness: The measurement of strides per kilogram. Troubleshooting Updating the Software Using Vector Updater Before you should install new batteries into a USB port on Edge device. screen instructions. Balance - 10s Avg. : The 10-second moving average of power output. Cadence - Power - %FTP: The current power output as a percentage of your computer. 3 Open the Vector Updater application, and follow the on your device, you can enter a scale factor for the Edge...
Owner's Manual
Page 12
Index B battery life 5 replacing 5 type 5 C calibrating 3, 6 cleaning the device 4 cleats 2 compatibility 7 customizing the device 3, 6 D data storing 3 transferring 3 data fields 3, 6 E Edge 2, 5, 6 G Garmin Connect 3 H history 3 sending to computer 3 I installing 1, 2 M memory 3 P pairing 2, 5, 6 pedal pods 1, 2, 4, 5 pedals 1-4 power 3 product registration 5 R registering the device 5 replacement parts 4 S software, updating 7 specifications 5 storing data 3 storing the device 4, 5 T tools 1 training 3 troubleshooting 7 U updates, software 7 USB, disconnecting 4 USB ANT Stick 5, 7 W water ...
Index B battery life 5 replacing 5 type 5 C calibrating 3, 6 cleaning the device 4 cleats 2 compatibility 7 customizing the device 3, 6 D data storing 3 transferring 3 data fields 3, 6 E Edge 2, 5, 6 G Garmin Connect 3 H history 3 sending to computer 3 I installing 1, 2 M memory 3 P pairing 2, 5, 6 pedal pods 1, 2, 4, 5 pedals 1-4 power 3 product registration 5 R registering the device 5 replacement parts 4 S software, updating 7 specifications 5 storing data 3 storing the device 4, 5 T tools 1 training 3 troubleshooting 7 U updates, software 7 USB, disconnecting 4 USB ANT Stick 5, 7 W water ...


