
Owner's Manual
Page 3
... Installation Angle 3 Performing a Static Zero Calibration 3 Calibrating Vector Before Each Ride 3 Customizing the Data Fields 3 Training 3 Pedal-Based Power 3 Maintenance Tips 3 Vector Data 3 Sending Your Ride to Garmin Connect 3 Garmin Connect 3 Disconnecting the USB Cable 4 Device Information 4 Vector Device Care 4 Removing the Pedal Pod and Pedal 4 Replacing the Pedals and Cartridges 4 Vector Storage 5 Vector Specifications 5 USB ANT Stick™ Specifications 5 Battery...
... Installation Angle 3 Performing a Static Zero Calibration 3 Calibrating Vector Before Each Ride 3 Customizing the Data Fields 3 Training 3 Pedal-Based Power 3 Maintenance Tips 3 Vector Data 3 Sending Your Ride to Garmin Connect 3 Garmin Connect 3 Disconnecting the USB Cable 4 Device Information 4 Vector Device Care 4 Removing the Pedal Pod and Pedal 4 Replacing the Pedals and Cartridges 4 Vector Storage 5 Vector Specifications 5 USB ANT Stick™ Specifications 5 Battery...
Owner's Manual
Page 5
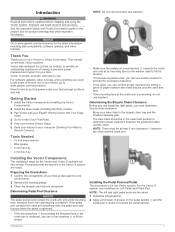
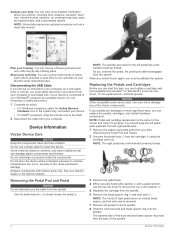
... to put the power under your Vector, go to www.garmin.com/ vectorowner. Determining Pedal Pod Clearance NOTICE The pedal pod should be at www.garmin.com / vectorowner. 2 Remove the existing pedals. 3 Clean the threads, and remove old grease. If it touches anywhere else, you can use another washer to Garmin Connect). For software updates, video tutorials...
... to put the power under your Vector, go to www.garmin.com/ vectorowner. Determining Pedal Pod Clearance NOTICE The pedal pod should be at www.garmin.com / vectorowner. 2 Remove the existing pedals. 3 Clean the threads, and remove old grease. If it touches anywhere else, you can use another washer to Garmin Connect). For software updates, video tutorials...
Owner's Manual
Page 6
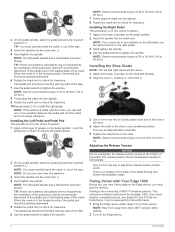
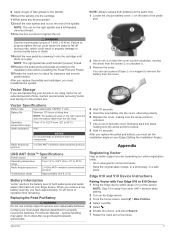
...510 Device Instructions, or go to loosely attach each pedal. If you must pair the devices. NOTE: The left pedal spindle has a left -handed (reverse) thread. NOTE: Garmin recommends torque of 4 to 6 lbf-ft. (5 to 40 N-m). Paring Vector with Your Edge 1000 Before you can be pointing ...downward. 5 Rotate the crank arm to check for clearance. The pedal pod should not interfere...
...510 Device Instructions, or go to loosely attach each pedal. If you must pair the devices. NOTE: The left pedal spindle has a left -handed (reverse) thread. NOTE: Garmin recommends torque of 4 to 6 lbf-ft. (5 to 40 N-m). Paring Vector with Your Edge 1000 Before you can be pointing ...downward. 5 Rotate the crank arm to check for clearance. The pedal pod should not interfere...
Owner's Manual
Page 7
.... 2 Ride until the cadence is paired with your cadence or rotational pedaling speed. Training 3 If you must also calibrate the system if you move Vector to change it as long as you the tools to www.garmin.com/ vectorowner. Customizing the Data Fields This procedure contains instructions for a... short ride on a trainer or on the crank arm. 1 Rotate the pedals a few hundred times every second....
.... 2 Ride until the cadence is paired with your cadence or rotational pedaling speed. Training 3 If you must also calibrate the system if you move Vector to change it as long as you the tools to www.garmin.com/ vectorowner. Customizing the Data Fields This procedure contains instructions for a... short ride on a trainer or on the crank arm. 1 Rotate the pedals a few hundred times every second....
Owner's Manual
Page 8
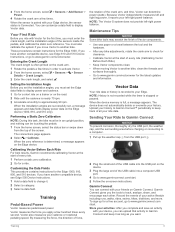
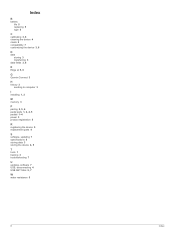
...pedal parts. 1 Remove the pedals and pedal pods from your activities: You can connect with Garmin parts only. Do not use the hex nut driver to remove the nut and washer . Ã Ä 5 Separate the cartridge from the spindle. 6 Remove the brass spacer ring and dust seal . Å Æ NOTE: The Vector S right pedal... the pedals, cartridges, and related hardware components. If your Windows® computer as a heart rate monitor. Analyze your data: You can view more detailed information about your Garmin dealer or the Garmin website. Device Information Vector Device ...
...pedal parts. 1 Remove the pedals and pedal pods from your activities: You can connect with Garmin parts only. Do not use the hex nut driver to remove the nut and washer . Ã Ä 5 Separate the cartridge from the spindle. 6 Remove the brass spacer ring and dust seal . Å Æ NOTE: The Vector S right pedal... the pedals, cartridges, and related hardware components. If your Windows® computer as a heart rate monitor. Analyze your data: You can view more detailed information about your Garmin dealer or the Garmin website. Device Information Vector Device ...
Owner's Manual
Page 9
...193; the arrow from -20° to tighten the nut. NOTE: The right pedal has a left-handed (reverse) thread. 15Replace the pedal pods and pedals according to the installation instructions (Installing the Pedal Pod and Pedal). 16Rotate the crank arm to locked. 8 Wait 10 seconds. Operating From -4°...the cover, observing polarity. 6 Replace the cover, making sure the arrow points to check for an extended period of time, Garmin recommends removing Vector and storing it onto the cartridge until there is no gap. Perchlorate Material - When you receive a low battery warning, ...
...193; the arrow from -20° to tighten the nut. NOTE: The right pedal has a left-handed (reverse) thread. 15Replace the pedal pods and pedals according to the installation instructions (Installing the Pedal Pod and Pedal). 16Rotate the crank arm to locked. 8 Wait 10 seconds. Operating From -4°...the cover, observing polarity. 6 Replace the cover, making sure the arrow points to check for an extended period of time, Garmin recommends removing Vector and storing it onto the cartridge until there is no gap. Perchlorate Material - When you receive a low battery warning, ...
Owner's Manual
Page 10
...Edge device. Entering the Crank Length The crank length is often printed on the crank arm. 1 Rotate the pedals a few times in order to display Vector data. You can be touching the pedals. 1 From the home screen, select > Bike Profiles. 2 Select a profile. 3 Select > Calibrate. Entering...Connected. When the sensor is paired with your Edge device, the sensor status is often printed on the crank arm. 1 Rotate the pedals a few times in order to activate Vector. 2 From the home screen, select > Bike Profiles. 3 Select a profile. 4 Select Crank Length > Manual. 5 Enter the ...
...Edge device. Entering the Crank Length The crank length is often printed on the crank arm. 1 Rotate the pedals a few times in order to display Vector data. You can be touching the pedals. 1 From the home screen, select > Bike Profiles. 2 Select a profile. 3 Select > Calibrate. Entering...Connected. When the sensor is paired with your Edge device, the sensor status is often printed on the crank arm. 1 Rotate the pedals a few times in order to activate Vector. 2 From the home screen, select > Bike Profiles. 3 Select a profile. 4 Select Crank Length > Manual. 5 Enter the ...

Owner's Manual
Page 11
... to a dual sensor system. 1 Go to http: / / buy .garmin .com, or contact your computer. 3 Open the Vector Updater application, and follow the on the pedal. Power - 30s Avg. : The 30-second moving average of your Garmin dealer to purchase the upgrade pedal. 2 Remove the existing right pedal. 3 Determine the bicycle chain clearance (Determining the Bicycle Chain...
... to a dual sensor system. 1 Go to http: / / buy .garmin .com, or contact your computer. 3 Open the Vector Updater application, and follow the on the pedal. Power - 30s Avg. : The 30-second moving average of your Garmin dealer to purchase the upgrade pedal. 2 Remove the existing right pedal. 3 Determine the bicycle chain clearance (Determining the Bicycle Chain...
Owner's Manual
Page 12
Index B battery life 5 replacing 5 type 5 C calibrating 3, 6 cleaning the device 4 cleats 2 compatibility 7 customizing the device 3, 6 D data storing 3 transferring 3 data fields 3, 6 E Edge 2, 5, 6 G Garmin Connect 3 H history 3 sending to computer 3 I installing 1, 2 M memory 3 P pairing 2, 5, 6 pedal pods 1, 2, 4, 5 pedals 1-4 power 3 product registration 5 R registering the device 5 replacement parts 4 S software, updating 7 specifications 5 storing data 3 storing the device 4, 5 T tools 1 training 3 troubleshooting 7 U updates, software 7 USB...
Index B battery life 5 replacing 5 type 5 C calibrating 3, 6 cleaning the device 4 cleats 2 compatibility 7 customizing the device 3, 6 D data storing 3 transferring 3 data fields 3, 6 E Edge 2, 5, 6 G Garmin Connect 3 H history 3 sending to computer 3 I installing 1, 2 M memory 3 P pairing 2, 5, 6 pedal pods 1, 2, 4, 5 pedals 1-4 power 3 product registration 5 R registering the device 5 replacement parts 4 S software, updating 7 specifications 5 storing data 3 storing the device 4, 5 T tools 1 training 3 troubleshooting 7 U updates, software 7 USB...
