
Owners Manual
Page 1
VIRB® X/XE Owner's Manual June 2015 Printed in Taiwan 190-01870-00_0B
VIRB® X/XE Owner's Manual June 2015 Printed in Taiwan 190-01870-00_0B

Owners Manual
Page 2
...; is a registered mark of Garmin. These trademarks may not be used without the written consent of Wi-Fi Alliance Corporation. Visit www.thisisant.com/directory for current updates and supplemental information concerning the use of SD-3C, LLC. Under the copyright laws, this product. or its subsidiaries, registered in part, without the express permission of this manual may not...
...; is a registered mark of Garmin. These trademarks may not be used without the written consent of Wi-Fi Alliance Corporation. Visit www.thisisant.com/directory for current updates and supplemental information concerning the use of SD-3C, LLC. Under the copyright laws, this product. or its subsidiaries, registered in part, without the express permission of this manual may not...
Owners Manual
Page 3
...7 Removing Paired Bluetooth Devices 7 Applications 7 Operating the Device Using Your Mobile Device 7 Wi‑Fi Modes 7 Wireless Settings 7 VIRB Edit 7 Remote Control 7 Controlling the Device Remotely 7 Controlling Multiple VIRB Devices Remotely 7 Device Information 8 System Settings 8 Inverting the Camera Orientation 8 Time and Date Settings 8 Erasing Your Memory Card 8 Device Care 8 Cleaning the Device 8 Connecting the Device to Your Computer 8 File Types 8 Specifications 8 Troubleshooting 9 My device does not turn on 9 My device display is hard to see 9 Some data is...
...7 Removing Paired Bluetooth Devices 7 Applications 7 Operating the Device Using Your Mobile Device 7 Wi‑Fi Modes 7 Wireless Settings 7 VIRB Edit 7 Remote Control 7 Controlling the Device Remotely 7 Controlling Multiple VIRB Devices Remotely 7 Device Information 8 System Settings 8 Inverting the Camera Orientation 8 Time and Date Settings 8 Erasing Your Memory Card 8 Device Care 8 Cleaning the Device 8 Connecting the Device to Your Computer 8 File Types 8 Specifications 8 Troubleshooting 9 My device does not turn on 9 My device display is hard to see 9 Some data is...
Owners Manual
Page 5
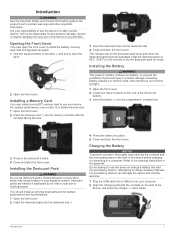
... device out of direct sunlight. 1 Open the front cover. 2 Locate the metal contacts on the end of personal injury or product damage caused by an infant or pet due to charge a battery that was not provided by Garmin can damage the device and void the warranty. 1 Plug the USB cable into the memory card slot with the contacts on the desiccant pack turns...
... device out of direct sunlight. 1 Open the front cover. 2 Locate the metal contacts on the end of personal injury or product damage caused by an infant or pet due to charge a battery that was not provided by Garmin can damage the device and void the warranty. 1 Plug the USB cable into the memory card slot with the contacts on the desiccant pack turns...
Owners Manual
Page 6
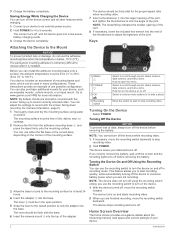
... power, battery charging mode. 3 Charge the device completely. The device stops recording and turns off . The screen turns off before removing the battery. Keys MENU À POWER Á OK Â Select to scroll through sensor status screens, data screens, and menu items. Hold to turn off the device screen and all other features while charging. 1 Connect your device to www.garmin.com/VIRB for your data and turns off . Turning On the Device Select POWER. Introduction The permanent mounting adhesive is installed. NOTE: The metal fitting indicates the smaller opening...
... power, battery charging mode. 3 Charge the device completely. The device stops recording and turns off . The screen turns off before removing the battery. Keys MENU À POWER Á OK Â Select to scroll through sensor status screens, data screens, and menu items. Hold to turn off the device screen and all other features while charging. 1 Connect your device to www.garmin.com/VIRB for your data and turns off . Turning On the Device Select POWER. Introduction The permanent mounting adhesive is installed. NOTE: The metal fitting indicates the smaller opening...

Owners Manual
Page 7
... adjustment for a signal. Pro Settings: Enables advanced video and photo settings (Pro Settings, page 4). Heart rate status Speed and cadence status Power status Temperature status Headset and audio status OBD-II status Video Recording a Video NOTE: If the battery power becomes very low while recording video, the device automatically stops recording, saves the video, and safely turns off , it turns on the selected mode. Field of View: Sets the zoom level (Field of the home screen. A flashing icon means the device...
... adjustment for a signal. Pro Settings: Enables advanced video and photo settings (Pro Settings, page 4). Heart rate status Speed and cadence status Power status Temperature status Headset and audio status OBD-II status Video Recording a Video NOTE: If the battery power becomes very low while recording video, the device automatically stops recording, saves the video, and safely turns off , it turns on the selected mode. Field of View: Sets the zoom level (Field of the home screen. A flashing icon means the device...
Owners Manual
Page 8
... in the system settings. EV Bias: Sets the exposure bias. Recording a Time-Lapse Video Time-lapse mode captures individual video frames at 30 frames per second. Tall: Enables you to capture high-speed action shots. 1080p works well as a default setting when you need highresolution shots. Hold MENU, and select Video > Field of sharpness. Ultra-Zoom: Captures a very focused view. You can use in your...
... in the system settings. EV Bias: Sets the exposure bias. Recording a Time-Lapse Video Time-lapse mode captures individual video frames at 30 frames per second. Tall: Enables you to capture high-speed action shots. 1080p works well as a default setting when you need highresolution shots. Hold MENU, and select Video > Field of sharpness. Ultra-Zoom: Captures a very focused view. You can use in your...
Owners Manual
Page 9
... recorder. Self Timer: Sets the timer to delay taking photos the entire time you to maximize battery life. Date Stamp: Adds a date stamp to save only the most recent footage is split into multiple files of people or objects in step 3. This mode is taken. 1 Hold . 2 Select Photos > Self Timer. 3 Select a delay time. 4 While on the memory card, up to the number of video to your external display. Ext. The VIRB X/XE device turns...
... recorder. Self Timer: Sets the timer to delay taking photos the entire time you to maximize battery life. Date Stamp: Adds a date stamp to save only the most recent footage is split into multiple files of people or objects in step 3. This mode is taken. 1 Hold . 2 Select Photos > Self Timer. 3 Select a delay time. 4 While on the memory card, up to the number of video to your external display. Ext. The VIRB X/XE device turns...
Owners Manual
Page 10
...; Bearing (when moving) • GPS location (coordinates) • Track shape and position • Lap times • Lap count • Heart rate (when connected to a compatible heart rate monitor) • Cadence (when connected to a compatible bicycle cadence sensor) Pairing Your ANT+ Sensors When you pair the first time, your Garmin device automatically recognizes the ANT+ accessory each time it is taken . Ã 7 Select to stop taking photos. Bluetooth Devices Connecting a Wireless External Microphone You can use the free Garmin VIRB mobile app or VIRB Edit software application...
...; Bearing (when moving) • GPS location (coordinates) • Track shape and position • Lap times • Lap count • Heart rate (when connected to a compatible heart rate monitor) • Cadence (when connected to a compatible bicycle cadence sensor) Pairing Your ANT+ Sensors When you pair the first time, your Garmin device automatically recognizes the ANT+ accessory each time it is taken . Ã 7 Select to stop taking photos. Bluetooth Devices Connecting a Wireless External Microphone You can use the free Garmin VIRB mobile app or VIRB Edit software application...
Owners Manual
Page 11
.... Selecting the key on Bluetooth wireless technology. 5 Select Add New. 6 Select the OBD-II device to slowly reduce battery life. Applications 7 After the OBD-II device is paired, the device status changes to your VIRB device. Password: Sets the password used to connect to Connected. You can start recording, stop recording, and take pictures on other devices. The main VIRB device passes commands received from the application store on your OBD-II device. TIP: See the owner's manual for more information. 1 Install the Garmin VIRB app...
.... Selecting the key on Bluetooth wireless technology. 5 Select Add New. 6 Select the OBD-II device to slowly reduce battery life. Applications 7 After the OBD-II device is paired, the device status changes to your VIRB device. Password: Sets the password used to connect to Connected. You can start recording, stop recording, and take pictures on other devices. The main VIRB device passes commands received from the application store on your OBD-II device. TIP: See the owner's manual for more information. 1 Install the Garmin VIRB app...
Owners Manual
Page 12
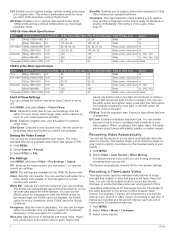
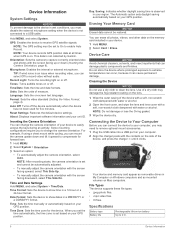
... your unit ID. Time Format: Sets the device to clean the lens. Erasing Your Memory Card NOTICE Erased data cannot be restored. NOTE: Your device records GPS position data at all photos, videos, and other data on your device. 1 Hold MENU. 2 Select Card > Erase. NOTE: Do not damage or lose the O-ring gasket. 3 Wipe the device dry. Specifications Battery type Battery life Rechargeable lithium-ion battery Up to 2 hr. 8 Device Information Format: Sets the video standard (Setting the Video Format, page 4). About: Displays important software information...
... your unit ID. Time Format: Sets the device to clean the lens. Erasing Your Memory Card NOTICE Erased data cannot be restored. NOTE: Your device records GPS position data at all photos, videos, and other data on your device. 1 Hold MENU. 2 Select Card > Erase. NOTE: Do not damage or lose the O-ring gasket. 3 Wipe the device dry. Specifications Battery type Battery life Rechargeable lithium-ion battery Up to 2 hr. 8 Device Information Format: Sets the video standard (Setting the Video Format, page 4). About: Displays important software information...

Owners Manual
Page 13
... light or go to an area with the EU directive 2002/96/EC on the Software. Location, speed, distance, and altitude data require a GPS signal. • Connect additional ANT+ sensors (Pairing Your ANT+ Sensors, page 6). My device turns off the device when it is installed correctly (Installing the Battery, page 1). • Fully charge the battery (Charging the Battery, page 1). Garmin Ltd. Symbol Definitions These symbols may appear on the device by turning off when I stop recording video If you turn...
... light or go to an area with the EU directive 2002/96/EC on the Software. Location, speed, distance, and altitude data require a GPS signal. • Connect additional ANT+ sensors (Pairing Your ANT+ Sensors, page 6). My device turns off the device when it is installed correctly (Installing the Battery, page 1). • Fully charge the battery (Charging the Battery, page 1). Garmin Ltd. Symbol Definitions These symbols may appear on the device by turning off when I stop recording video If you turn...
Owners Manual
Page 14
See memory card mounting the device 2 mounts, optional 2 P pairing 3 ANT+ sensors 6 photos settings 5 taking 5 power (force) 3, 6 power key 2 R remote control 7 S satellite signals 3 settings 8 software updating 7 version 8 software license agreement 9 specifications 8 speed 6 speed and cadence sensors 3 10 storing data 8 system settings 8 T temperature 6, 8 time settings 8 zones and formats 8 tones 8 tracks 6, 7 transferring, files 8 troubleshooting 9 U unit ID 8 USB mass storage mode 8 transferring files 8 V video 6 editing 7 loop 5 output 5 recording 2-5 settings 2-4 time lapse 4 W water ...
See memory card mounting the device 2 mounts, optional 2 P pairing 3 ANT+ sensors 6 photos settings 5 taking 5 power (force) 3, 6 power key 2 R remote control 7 S satellite signals 3 settings 8 software updating 7 version 8 software license agreement 9 specifications 8 speed 6 speed and cadence sensors 3 10 storing data 8 system settings 8 T temperature 6, 8 time settings 8 zones and formats 8 tones 8 tracks 6, 7 transferring, files 8 troubleshooting 9 U unit ID 8 USB mass storage mode 8 transferring files 8 V video 6 editing 7 loop 5 output 5 recording 2-5 settings 2-4 time lapse 4 W water ...


