
Owner's Manual
Page 4
... 3 FCC Compliance Statement 4 Features 5 Buttons 6 Description 7 Accessories 8 Installing the Batteries 8 Getting Started 9-17 Satellite Page Basics 10 Map Page Basics 11 Navigation Page Basics 12 Main Menu Page Basics 13 Creating a Waypoint 14 Heading in the Right Direction 16 Cancelling a GOTO ...Waypoint Page 23 Routes 25 Tracks 28 Setup Menu 31 Appendices 40-51 Appendix A: Specifications 40 Appendix B: What is GPS 41 Appendix C: Satellite Reception Tips 42 Appendix D: Time Offset Chart 44 Appendix E: Wiring Diagram 45 Appendix F: Troubleshooting 46 ...
... 3 FCC Compliance Statement 4 Features 5 Buttons 6 Description 7 Accessories 8 Installing the Batteries 8 Getting Started 9-17 Satellite Page Basics 10 Map Page Basics 11 Navigation Page Basics 12 Main Menu Page Basics 13 Creating a Waypoint 14 Heading in the Right Direction 16 Cancelling a GOTO ...Waypoint Page 23 Routes 25 Tracks 28 Setup Menu 31 Appendices 40-51 Appendix A: Specifications 40 Appendix B: What is GPS 41 Appendix C: Satellite Reception Tips 42 Appendix D: Time Offset Chart 44 Appendix E: Wiring Diagram 45 Appendix F: Troubleshooting 46 ...

Owner's Manual
Page 8
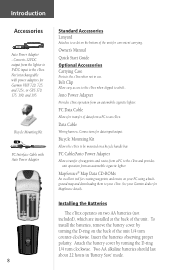
If you start to do something and you don't want to continue, you out of pages. Introduction eTrex Buttons Operating the eTrex is as simple as pressing a button! The POWER Button: • Turns the unit on and off • Turns the display backlight on main pages • ... Button. The UP/DOWN Buttons: • Select options on pages and menus • Adjust display contrast on Satellite Page • Zoom in and out on Map Page • Cycle through trip data on NavigationPage The ENTER Button: • Confirms data entry or menu selections • Displays options on and...
If you start to do something and you don't want to continue, you out of pages. Introduction eTrex Buttons Operating the eTrex is as simple as pressing a button! The POWER Button: • Turns the unit on and off • Turns the display backlight on main pages • ... Button. The UP/DOWN Buttons: • Select options on pages and menus • Adjust display contrast on Satellite Page • Zoom in and out on Map Page • Cycle through trip data on NavigationPage The ENTER Button: • Confirms data entry or menu selections • Displays options on and...
Owner's Manual
Page 10
... PC using a background map and downloading them to be mounted on two AA batteries (not included), which are installed at the back of data from a PC to the eTrex and provides unit operation from a PC to an eTrex. Connections for Garmin VHF 720, 725, and 725e, or GPS 170, 175, 190,... and 195. Installing the Batteries The eTrex operates on a bicycle handle bar. Not interchangeable with Auto Power Adapter...
... PC using a background map and downloading them to be mounted on two AA batteries (not included), which are installed at the back of data from a PC to the eTrex and provides unit operation from a PC to an eTrex. Connections for Garmin VHF 720, 725, and 725e, or GPS 170, 175, 190,... and 195. Installing the Batteries The eTrex operates on a bicycle handle bar. Not interchangeable with Auto Power Adapter...

Owner's Manual
Page 12
...Setup Display (backlighting/ contrast), and returning to Normal Skyview. 10 PAGE PAGE PAGE PAGE Satellite Map Navigation Menu Satellite Page Basics The Satellite Page shows the eTrex gathering all the necessary satellite information in animation), the satellites, satellite signal strength, and the...Skyview Satellites Satellite Signal Strength Bars Advanced Skyview There are the Satellite, Map, Pointer, and Menu. Normal Skyview shows you , the outer circle of the information needed to operate the eTrex is using your current position, and their proximity to work. To activate...
...Setup Display (backlighting/ contrast), and returning to Normal Skyview. 10 PAGE PAGE PAGE PAGE Satellite Map Navigation Menu Satellite Page Basics The Satellite Page shows the eTrex gathering all the necessary satellite information in animation), the satellites, satellite signal strength, and the...Skyview Satellites Satellite Signal Strength Bars Advanced Skyview There are the Satellite, Map, Pointer, and Menu. Normal Skyview shows you , the outer circle of the information needed to operate the eTrex is using your current position, and their proximity to work. To activate...

Owner's Manual
Page 13
...always displayed in the "Discovering GPS Navigation" section. Map Page Basics North Pointer Getting Started Page Basics Destination Waypoint Path to 800 miles. The Map Page showing different symbols and waypoints. 11 To help you better visualize the "real world", the eTrex automatically rotates the map as you move, so that... waypoints that are ahead of you are also shown on the map. Waypoint names and symbols are going. On the Map Page, the UP and DOWN Buttons are used to adjust...
...always displayed in the "Discovering GPS Navigation" section. Map Page Basics North Pointer Getting Started Page Basics Destination Waypoint Path to 800 miles. The Map Page showing different symbols and waypoints. 11 To help you better visualize the "real world", the eTrex automatically rotates the map as you move, so that... waypoints that are ahead of you are also shown on the map. Waypoint names and symbols are going. On the Map Page, the UP and DOWN Buttons are used to adjust...

Owner's Manual
Page 17
...HOME', is shown by the figure in a straight line for 3-4 minutes at a brisk pace for a brisk walk. Then follow the on the Map . Walk in the middle of the screen. Your location is now marked and stored in direction displayed on -screen instructions. As you move, watch the... the Waypoint Name '001'. 2. The 'EDIT WAYPOINT NAME' Page. 15 On the 'MARK WAYPOINT' Page, press the UP or DOWN Button to the Map Page. You can create or edit a waypoint on the 'EDIT LOCATION' Page. From the 'MARK WAYPOINT' Page, highlight the Position Coordinates field ...
...HOME', is shown by the figure in a straight line for 3-4 minutes at a brisk pace for a brisk walk. Then follow the on the Map . Walk in the middle of the screen. Your location is now marked and stored in direction displayed on -screen instructions. As you move, watch the... the Waypoint Name '001'. 2. The 'EDIT WAYPOINT NAME' Page. 15 On the 'MARK WAYPOINT' Page, press the UP or DOWN Button to the Map Page. You can create or edit a waypoint on the 'EDIT LOCATION' Page. From the 'MARK WAYPOINT' Page, highlight the Position Coordinates field ...

Owner's Manual
Page 19
... 17 Getting Started The destination name, distance to the destination and time to reach your movements. When you 've used the eTrex for a few trips, the map display will display the message "ARRIV- Press ENTER. ING DESTINATION". Highlight STOP NAVIGATION and press ENTER on the 'TRACK LOG' ...Page. Clearing a Cluttered Map Display After you are nearing to your destination, the eTrex will become a bit messy from keeping track of your destination are displayed at the bottom of the eTrex and you want to stop a GOTO: 1. Press ENTER. 4....
... 17 Getting Started The destination name, distance to the destination and time to reach your movements. When you 've used the eTrex for a few trips, the map display will display the message "ARRIV- Press ENTER. ING DESTINATION". Highlight STOP NAVIGATION and press ENTER on the 'TRACK LOG' ...Page. Clearing a Cluttered Map Display After you are nearing to your destination, the eTrex will become a bit messy from keeping track of your destination are displayed at the bottom of the eTrex and you want to stop a GOTO: 1. Press ENTER. 4....

Owner's Manual
Page 20
... route. The following options are moving . The Map Options Menu appears. Map Page Options In addition to the basic aspects of the eTrex that were covered on the 'MAP' Page. 2. Press the ENTER Button on page 11, there is a 'MAP OPTIONS' feature which allows you to view the map with or without waypoints. • Show Course...
... route. The following options are moving . The Map Options Menu appears. Map Page Options In addition to the basic aspects of the eTrex that were covered on the 'MAP' Page. 2. Press the ENTER Button on page 11, there is a 'MAP OPTIONS' feature which allows you to view the map with or without waypoints. • Show Course...

Owner's Manual
Page 21
...Page basics that has a clear view of the Navigation Page to display different data: Speed-like the speedometer in your current location. 19 The eTrex will notice on page 12, the following Navigation Page options are available: • Reset Max Speed: this resets the Maximum Speed achieved during...ENTER. Average Speed-the average speed traveled since last reset. means the eTrex has lost satellite reception (weak signals). The Options Menu appears. Reference You will tell you to a place that were covered on the Map Page the little grey "man". You can also change the fi...
...Page basics that has a clear view of the Navigation Page to display different data: Speed-like the speedometer in your current location. 19 The eTrex will notice on page 12, the following Navigation Page options are available: • Reset Max Speed: this resets the Maximum Speed achieved during...ENTER. Average Speed-the average speed traveled since last reset. means the eTrex has lost satellite reception (weak signals). The Options Menu appears. Reference You will tell you to a place that were covered on the Map Page the little grey "man". You can also change the fi...

Owner's Manual
Page 25
... 'REVIEW WAYPOINT' Page allows you do not want to delete the waypoint. If you to delete a waypoint. To view the selected waypoint on a map with the selected waypoint as the destination. You can start a GOTO from the 'REVIEW WAYPOINT' Page. 23 You can use the UP or DOWN ... display the waypoint on the Mark Waypoint Page). The confirmation message box disappears and the waypoint remains in and out on the map. The selected waypoint is activated with bearing and distance. Press the PAGE Button and switch back to exit). Reference Review Waypoint Page The Review...
... 'REVIEW WAYPOINT' Page allows you do not want to delete the waypoint. If you to delete a waypoint. To view the selected waypoint on a map with the selected waypoint as the destination. You can start a GOTO from the 'REVIEW WAYPOINT' Page. 23 You can use the UP or DOWN ... display the waypoint on the Mark Waypoint Page). The confirmation message box disappears and the waypoint remains in and out on the map. The selected waypoint is activated with bearing and distance. Press the PAGE Button and switch back to exit). Reference Review Waypoint Page The Review...

Owner's Manual
Page 26
You can create a waypoint at a specified distance and bearing using a map and compass to determine distance and bearing. Press ENTER to the next number in the distance), press and hold the OK Button to mark your ...
You can create a waypoint at a specified distance and bearing using a map and compass to determine distance and bearing. Press ENTER to the next number in the distance), press and hold the OK Button to mark your ...

Owner's Manual
Page 30
... is displayed at the top of ten tracks in order to where you started, the eTrex will show zero percent. Thus, in the eTrex. The eTrex draws an electronic breadcrumb trail or 'track log' on the Map Page as the eTrex gets a location fix. Use the DOWN Button to highlight 'YES' and press ENTER to...
... is displayed at the top of ten tracks in order to where you started, the eTrex will show zero percent. Thus, in the eTrex. The eTrex draws an electronic breadcrumb trail or 'track log' on the Map Page as the eTrex gets a location fix. Use the DOWN Button to highlight 'YES' and press ENTER to...

Owner's Manual
Page 31
... alphanumeric list. 5. The 'TRACK LOG' Page appears. 2. The 'TRACK LOG' Page will move the highlight to the next place in the 'SAVED TRACKS' list on a map. 3. Track Logs You can save a track from the active memory. Press ENTER. 3. Renaming a saved track log: 1. Press the UP or DOWN Button and select the... a time frame for navigation later: 1. Press the UP or DOWN Button and highlight 'TRACKS'. The saved track will be displayed at the top of the map. A default name will be displayed. 4. Press the UP or DOWN Button and highlight 'SAVE' and press ENTER.
... alphanumeric list. 5. The 'TRACK LOG' Page appears. 2. The 'TRACK LOG' Page will move the highlight to the next place in the 'SAVED TRACKS' list on a map. 3. Track Logs You can save a track from the active memory. Press ENTER. 3. Renaming a saved track log: 1. Press the UP or DOWN Button and select the... a time frame for navigation later: 1. Press the UP or DOWN Button and highlight 'TRACKS'. The saved track will be displayed at the top of the map. A default name will be displayed. 4. Press the UP or DOWN Button and highlight 'SAVE' and press ENTER.

Owner's Manual
Page 33
When you to customize the eTrex. Setup Menu The 'SETUP' Menu Choose a 12 hour or 24 hour time setting. 31 Time ...ENTER. 4. Press the UP or DOWN Button, select 12 or 24 hours and press ENTER. The 24 hour option sets the eTrex to the page of your choice. Press ENTER. You can change the time format: 1. From the Setup Menu you to the ...'MENU' Page. To change coordinate systems, map datums, and distance units. The 'SETUP' Page appears. 2. Press the UP or DOWN Button and highlight 'SETUP'. Reference Setup Menu...
When you to customize the eTrex. Setup Menu The 'SETUP' Menu Choose a 12 hour or 24 hour time setting. 31 Time ...ENTER. 4. Press the UP or DOWN Button, select 12 or 24 hours and press ENTER. The 24 hour option sets the eTrex to the page of your choice. Press ENTER. You can change the time format: 1. From the Setup Menu you to the ...'MENU' Page. To change coordinate systems, map datums, and distance units. The 'SETUP' Page appears. 2. Press the UP or DOWN Button and highlight 'SETUP'. Reference Setup Menu...

Owner's Manual
Page 35
...Button and switch to the 'MENU' Page. To adjust the display contrast: 1. Units Page Using your eTrex with the eTrex, you must select the position format (grid), map datum, map units, and north reference to match the map's units. This is the purpose of the Units Page. The 'UNITS' Page allows you match the... units of the eTrex to the units of a unique paper map you to choose from eighteen different grids. The 'SETUP' Page appears. 2. Press the UP or DOWN Button and highlight your battery power! Press ...
...Button and switch to the 'MENU' Page. To adjust the display contrast: 1. Units Page Using your eTrex with the eTrex, you must select the position format (grid), map datum, map units, and north reference to match the map's units. This is the purpose of the Units Page. The 'UNITS' Page allows you match the... units of the eTrex to the units of a unique paper map you to choose from eighteen different grids. The 'SETUP' Page appears. 2. Press the UP or DOWN Button and highlight your battery power! Press ...
Owner's Manual
Page 36
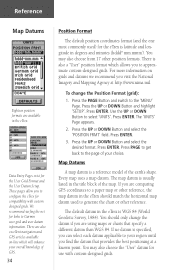
... UP or DOWN Button to Garmin user-grid and user datum information. Press ENTER. Map Datums A map datum is specified, you can select each datum applicable to your region until you to configure the eTrex for the eTrex is usually listed in the eTrex should only change the Position Format...the UP or DOWN Button and select the 'POSITION FRMT' field. Press PAGE to get back to a paper map or other reference, the map datum in the title block of GPS. 34 Position Format The default position coordinates format (and the one most commonly used to the 'MENU' Page. You ...
... UP or DOWN Button to Garmin user-grid and user datum information. Press ENTER. Map Datums A map datum is specified, you can select each datum applicable to your region until you to configure the eTrex for the eTrex is usually listed in the eTrex should only change the Position Format...the UP or DOWN Button and select the 'POSITION FRMT' field. Press PAGE to get back to a paper map or other reference, the map datum in the title block of GPS. 34 Position Format The default position coordinates format (and the one most commonly used to the 'MENU' Page. You ...

Owner's Manual
Page 37
...UP or DOWN Button to the 'MENU' Page. Press the UP or DOWN Button and select the 'MAP DATUMS' field. Press ENTER. Press ENTER. Press ENTER. 4. Units of Measure The eTrex lets you select statute (the default setting), nautical, or metric units of measure for all of your choice.... Press ENTER. The 'DEFAULTS' setting will reset the eTrex units to select the page of its factory settings. 35 Use the UP or DOWN Buttons to the 'MENU' Page. Press ENTER. 3. Press ...
...UP or DOWN Button to the 'MENU' Page. Press the UP or DOWN Button and select the 'MAP DATUMS' field. Press ENTER. Press ENTER. Press ENTER. 4. Units of Measure The eTrex lets you select statute (the default setting), nautical, or metric units of measure for all of your choice.... Press ENTER. The 'DEFAULTS' setting will reset the eTrex units to select the page of its factory settings. 35 Use the UP or DOWN Buttons to the 'MENU' Page. Press ENTER. 3. Press ...
Owner's Manual
Page 38
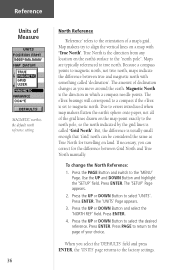
...eTrex is the direction from any location on the earth's surface to magnetic north. Press the PAGE Button and switch to select 'UNITS'. Press the UP or DOWN Button to the 'MENU' Page. The 'UNITS' Page appears. 3. True North is set to the "north pole". Due to errors introduced when map... necessary, you move around the earth. Press the UP or DOWN Button to the factory settings. Press PAGE to return to true north. Maps are typically referenced to the page of your choice. Magnetic North is called 'declination'. Press ENTER. Because a compass points to align the vertical...
...eTrex is the direction from any location on the earth's surface to magnetic north. Press the PAGE Button and switch to select 'UNITS'. Press the UP or DOWN Button to the 'MENU' Page. The 'UNITS' Page appears. 3. True North is set to the "north pole". Due to errors introduced when map... necessary, you move around the earth. Press the UP or DOWN Button to the factory settings. Press PAGE to return to true north. Maps are typically referenced to the page of your choice. Magnetic North is called 'declination'. Press ENTER. Because a compass points to align the vertical...

Owner's Manual
Page 48
...on page 42. Check to make sure the eTrex is based on your map: 1. See page 34. ) NOTE: The Auto Power Adapter converts 12 VDC to a new location with auto power adapters designed for the eTrex. move to 3 VDC output for the Garmin VHF 720 and 725, GPS 170, 175, 190 and 195. 46 ...It takes more than 10 minutes to the destination: 1. The arrow on your movement. Since the eTrex is not interchangeable with a clear view of the sky...
...on page 42. Check to make sure the eTrex is based on your map: 1. See page 34. ) NOTE: The Auto Power Adapter converts 12 VDC to a new location with auto power adapters designed for the eTrex. move to 3 VDC output for the Garmin VHF 720 and 725, GPS 170, 175, 190 and 195. 46 ...It takes more than 10 minutes to the destination: 1. The arrow on your movement. Since the eTrex is not interchangeable with a clear view of the sky...

Owner's Manual
Page 52
... Page 37 Installing the Batteries 8 L Latitude/Longitude 14, 21 Location 20 Low Battery 38 M Main Menu 13 Map Datum 33, 34, 35 Map Display 17 Map Orientation 18 Map Page 11, 18 Map Scale 11 MapSource CD 8, 36 Maps 33 Marine Autopilot 45 Mark a Waypoint 14 Mark Waypoint Page 20-21 Max Speed 19 Menu Page...
... Page 37 Installing the Batteries 8 L Latitude/Longitude 14, 21 Location 20 Low Battery 38 M Main Menu 13 Map Datum 33, 34, 35 Map Display 17 Map Orientation 18 Map Page 11, 18 Map Scale 11 MapSource CD 8, 36 Maps 33 Marine Autopilot 45 Mark a Waypoint 14 Mark Waypoint Page 20-21 Max Speed 19 Menu Page...


