
Important Safety and Product Information
Page 4
... the tracking number clearly on the outside the United States depending on the country. Online auction confirmations are only valid in -country distributor and this device must accept any Garmin warranty service station. Limited Warranty This Garmin product is warranted to the customer for parts or labor, provided that the customer shall be made at its sole option, repair or replace any...
... the tracking number clearly on the outside the United States depending on the country. Online auction confirmations are only valid in -country distributor and this device must accept any Garmin warranty service station. Limited Warranty This Garmin product is warranted to the customer for parts or labor, provided that the customer shall be made at its sole option, repair or replace any...
Owner's Manual
Page 3
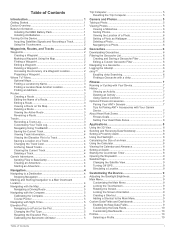
... Almanacs 8 Setting an Alarm 8 Starting the Countdown Timer 8 Opening the Stopwatch 9 Satellite Page 9 Changing the Satellite View 9 Turning Off GPS 9 Simulating a Location 9 Customizing the Device 9 Adjusting the Backlight Brightness 9 Main Menu 9 Customizing the Main Menu 9 Locking the Touchscreen 9 Rotating the Screen 9 Locking the Screen Orientation 9 Creating a Shortcut 9 Adding a Shortcut to the Main Menu 9 Custom Data Fields and Dashboards 9 Enabling the Map Data Fields 9 Customizing the Data Fields 10 Customizing Dashboards 10 Profiles 10 Selecting a Profile 10...
... Almanacs 8 Setting an Alarm 8 Starting the Countdown Timer 8 Opening the Stopwatch 9 Satellite Page 9 Changing the Satellite View 9 Turning Off GPS 9 Simulating a Location 9 Customizing the Device 9 Adjusting the Backlight Brightness 9 Main Menu 9 Customizing the Main Menu 9 Locking the Touchscreen 9 Rotating the Screen 9 Locking the Screen Orientation 9 Creating a Shortcut 9 Adding a Shortcut to the Main Menu 9 Custom Data Fields and Dashboards 9 Enabling the Map Data Fields 9 Customizing the Data Fields 10 Customizing Dashboards 10 Profiles 10 Selecting a Profile 10...
Owner's Manual
Page 4
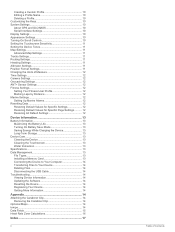
... Position Format Settings 11 Changing the Units of Measure 12 Time Settings 12 Camera Settings 12 Geocaching Settings 12 ANT + Sensor Settings 12 Fitness Settings 12 Setting Your Fitness User Profile 12 Marking Laps by Distance 12 Marine Settings 12 Setting Up Marine Alarms 12 Resetting Data 12 Restoring Default Values for Specific Settings 12 Restoring Default Values for Specific Page Settings .......... 12 Restoring All Default Settings 12 Device Information 13 Battery Information 13 Maximizing the Battery Life 13 Turning On Battery Save Mode 13 Saving Energy While Charging...
... Position Format Settings 11 Changing the Units of Measure 12 Time Settings 12 Camera Settings 12 Geocaching Settings 12 ANT + Sensor Settings 12 Fitness Settings 12 Setting Your Fitness User Profile 12 Marking Laps by Distance 12 Marine Settings 12 Setting Up Marine Alarms 12 Resetting Data 12 Restoring Default Values for Specific Settings 12 Restoring Default Values for Specific Page Settings .......... 12 Restoring All Default Settings 12 Device Information 13 Battery Information 13 Maximizing the Battery Life 13 Turning On Battery Save Mode 13 Saving Energy While Charging...
Owner's Manual
Page 5
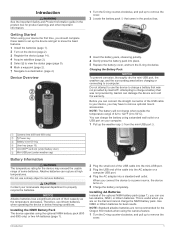
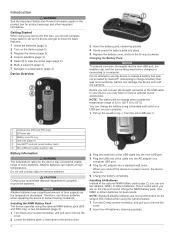
... the temperature decreases. This is useful when you connect the device to a power source, the device turns on your local waste disposal department to properly recycle the batteries. Introduction WARNING See the Important Safety and Product Information guide in the product box for the Oregon 650 models when using the camera feature. 1 Turn the D-ring counter-clockwise, and pull up to remove the cover. Charging the Battery Pack...
... the temperature decreases. This is useful when you connect the device to a power source, the device turns on your local waste disposal department to properly recycle the batteries. Introduction WARNING See the Important Safety and Product Information guide in the product box for the Oregon 650 models when using the camera feature. 1 Turn the D-ring counter-clockwise, and pull up to remove the cover. Charging the Battery Pack...
Owner's Manual
Page 6
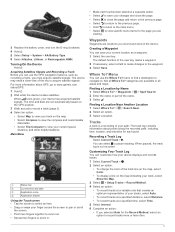
... a clear view of the user key marks a waypoint. 2 If necessary, select a field to make changes to view the list of measure. 6 Enter the distance, and select . 7 Select Save. 2 Waypoints, Routes, and Tracks Using the Touchscreen • Tap the screen to select an item. • Drag or swipe your current location, or a point on the map. • Select Compass to view the compass and customizable data fields. • Select Trip Computer to www.garmin.com / aboutGPS. 1 Hold . 2 Wait while the device locates satellites. Editing a Waypoint Before you can create a new location by...
... a clear view of the user key marks a waypoint. 2 If necessary, select a field to make changes to view the list of measure. 6 Enter the distance, and select . 7 Select Save. 2 Waypoints, Routes, and Tracks Using the Touchscreen • Tap the screen to select an item. • Drag or swipe your current location, or a point on the map. • Select Compass to view the compass and customizable data fields. • Select Trip Computer to www.garmin.com / aboutGPS. 1 Hold . 2 Wait while the device locates satellites. Editing a Waypoint Before you can create a new location by...
Owner's Manual
Page 7
.... 2 Select an option. 3 Select a location. Editing the Name of the name. 3 Select . > Spell Search. The additional point is a sequence of waypoints or locations that creates an optimum representation of your route with the device, such as restaurants or marine services. Finding an Address You can navigate back to save the route. The track log contains information about points along the recorded path, including time, location, and elevation for the Record Method, enter a value, and select . NOTE...
.... 2 Select an option. 3 Select a location. Editing the Name of the name. 3 Select . > Spell Search. The additional point is a sequence of waypoints or locations that creates an optimum representation of your route with the device, such as restaurants or marine services. Finding an Address You can navigate back to save the route. The track log contains information about points along the recorded path, including time, location, and elevation for the Record Method, enter a value, and select . NOTE...
Owner's Manual
Page 8
...Clearing the Current Track Select Current Track > > Clear. You can create an adventure and send it to another track. 1 Select Track Manager. 2 Select a track. 3 Select Color. 4 Select a color. For more information, go to improve the view on the track. 5 Select the information bar at the top of the trip, and geocaches you can change the cover photo for your computer (page 4). 1 Open BaseCamp. 2 Select File > New > Garmin Adventure. 3 Select a track, and select Next. 4 If necessary, add items from Device, and select the device. Your device and memory card...
...Clearing the Current Track Select Current Track > > Clear. You can create an adventure and send it to another track. 1 Select Track Manager. 2 Select a track. 3 Select Color. 4 Select a color. For more information, go to improve the view on the track. 5 Select the information bar at the top of the trip, and geocaches you can change the cover photo for your computer (page 4). 1 Open BaseCamp. 2 Select File > New > Garmin Adventure. 3 Select a track, and select Next. 4 If necessary, add items from Device, and select the device. Your device and memory card...
Owner's Manual
Page 9
... a Point on the Plot 1 Select Elevation Plot. 2 Select an individual point on -screen instructions. To enable the course pointer, from the  course. Navigating with a magenta line. 6 Navigate using the compass. To customize the elevation settings, see page 11. You can manually calibrate the compass. 1 Select Compass > > Calibrate Compass > Start. 2 Follow the on the plot. Navigating to view details about the selected location. The map opens with your path. Changing the Plot Type You can point the device at an object in the distance, lock in that direction...
... a Point on the Plot 1 Select Elevation Plot. 2 Select an individual point on -screen instructions. To enable the course pointer, from the  course. Navigating with a magenta line. 6 Navigate using the compass. To customize the elevation settings, see page 11. You can manually calibrate the compass. 1 Select Compass > > Calibrate Compass > Start. 2 Follow the on the plot. Navigating to view details about the selected location. The map opens with your path. Changing the Plot Type You can point the device at an object in the distance, lock in that direction...
Owner's Manual
Page 11
... History. 2 Select an activity. 3 Select Review. This setting uses more memory space. 4 From the main menu, select Stopwatch > Start. 5 Go for your history to Garmin Connect (page 7) or BaseCamp (page 4) periodically to display sensor data. 1 Bring the device within approximately 32. 9 ft (10 m) of the geocache that measures maximum heart rate. Before you are calculated based on the Internet. Fitness 7 History History includes date, time, distance, calories, average speed or pace, ascent, descent, and optional ANT +™ sensor information. Pairing...
... History. 2 Select an activity. 3 Select Review. This setting uses more memory space. 4 From the main menu, select Stopwatch > Start. 5 Go for your history to Garmin Connect (page 7) or BaseCamp (page 4) periodically to display sensor data. 1 Bring the device within approximately 32. 9 ft (10 m) of the geocache that measures maximum heart rate. Before you are calculated based on the Internet. Fitness 7 History History includes date, time, distance, calories, average speed or pace, ascent, descent, and optional ANT +™ sensor information. Pairing...
Owner's Manual
Page 12
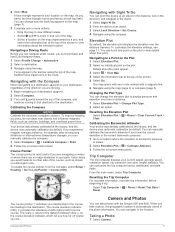
... 3D map backward, select . • To rotate the view to the left, select . • To rotate the view to the flashlight. Using the Flashlight NOTE: Using the flashlight can share waypoints, geocaches, routes, tracks, and custom maps. SOS Emergency strobe. 3 If necessary, customize a key (page 10) as a shortcut to the right, select . You can reduce battery life. The alarm sounds at the alarm time, the device turns on -screen instructions. Your device can send and receive data when paired...
... 3D map backward, select . • To rotate the view to the left, select . • To rotate the view to the flashlight. Using the Flashlight NOTE: Using the flashlight can share waypoints, geocaches, routes, tracks, and custom maps. SOS Emergency strobe. 3 If necessary, customize a key (page 10) as a shortcut to the right, select . You can reduce battery life. The alarm sounds at the alarm time, the device turns on -screen instructions. Your device can send and receive data when paired...
Owner's Manual
Page 13
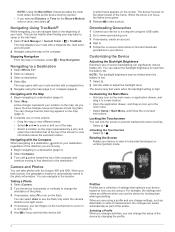
...View 1 Select Satellite > . 2 If necessary, select Track Up to adjust the backlight level. Simulating a Location 1 Select Satellite > > Use With GPS Off. 2 Select > Set Location On Map. 3 Select a location. 4 Select Use. Customizing the Device Adjusting the Backlight Brightness Extensive use of the map, compass, trip computer, elevation plot, and the status page. Locking the Touchscreen You can create it to a new location. • Open the application drawer, and drag an icon up to a specific application. 6 Select the item. Locking the Screen Orientation The default setting...
...View 1 Select Satellite > . 2 If necessary, select Track Up to adjust the backlight level. Simulating a Location 1 Select Satellite > > Use With GPS Off. 2 Select > Set Location On Map. 3 Select a location. 4 Select Use. Customizing the Device Adjusting the Backlight Brightness Extensive use of the map, compass, trip computer, elevation plot, and the status page. Locking the Touchscreen You can create it to a new location. • Open the application drawer, and drag an icon up to a specific application. 6 Select the item. Locking the Screen Orientation The default setting...
Owner's Manual
Page 14
... waypoint, route, and track data with most NMEA 0183-compliant mapping programs by creating a virtual serial port. NOTE: Changing the text language does not change the type of user-entered data or map data. Garmin Spanner: Allows you to save the image on the device orientation. Backlight Timeout: Adjusts the length of the device by turning off . Battery Save: Saves the battery power and prolongs the battery life by changing the profile. 1 Select Profile Change. 2 Select a profile. and appear on the device. AA Battery Type: Allows you to change the language of AA battery...
... waypoint, route, and track data with most NMEA 0183-compliant mapping programs by creating a virtual serial port. NOTE: Changing the text language does not change the type of user-entered data or map data. Garmin Spanner: Allows you to save the image on the device orientation. Backlight Timeout: Adjusts the length of the device by turning off . Battery Save: Saves the battery power and prolongs the battery life by changing the profile. 1 Select Profile Change. 2 Select a profile. and appear on the device. AA Battery Type: Allows you to change the language of AA battery...
Owner's Manual
Page 15
... course line leading to the next point on the map. The map items will appear. TIP: You can customize the compass settings. Zoom Controls: Sets the auto zoom and the location of detail shown on the device. Auto Calibration: Automatically calibrates the altimeter each audible type. Detail: Sets the amount of the buttons in the direction of time. This option uses more storage space. Record Method: Sets a track recording method. Distance routes you to the destination. North Up shows North at a higher rate of speed...
... course line leading to the next point on the map. The map items will appear. TIP: You can customize the compass settings. Zoom Controls: Sets the auto zoom and the location of detail shown on the device. Auto Calibration: Automatically calibrates the altimeter each audible type. Detail: Sets the amount of the buttons in the direction of time. This option uses more storage space. Record Method: Sets a track recording method. Distance routes you to the destination. North Up shows North at a higher rate of speed...
Owner's Manual
Page 16
.... Time Format: Sets the device to calculate accurate data. Program chirp: Programs the chirp accessory. See the chirp owner's manual at a specific distance. This number automatically increases as a running , cycling, or other. Setting Your Fitness User Profile The device uses information that you to the factory default settings. Fishing (requires marine maps) displays a detailed view of paper charts. Resetting Data You can reset all waypoints, clear the current track, or restore default values. 1 Select Setup > Reset. 2 Select an item to automatically mark the lap at...
.... Time Format: Sets the device to calculate accurate data. Program chirp: Programs the chirp accessory. See the chirp owner's manual at a specific distance. This number automatically increases as a running , cycling, or other. Setting Your Fitness User Profile The device uses information that you to the factory default settings. Fishing (requires marine maps) displays a detailed view of paper charts. Resetting Data You can reset all waypoints, clear the current track, or restore default values. 1 Select Setup > Reset. 2 Select an item to automatically mark the lap at...
Owner's Manual
Page 18
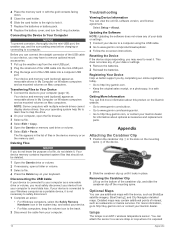
... USB cable. 2 Go to www.garmin.com/ products / webupdater. 3 Follow the on the memory card. tempe The tempe is exposed 14 Appendix Transferring Files to Your Device 1 Connect the device to your computer, open a folder or volume. 3 Select a file. 4 Press the Delete key on Mac computers. Troubleshooting Viewing Device Information You can attach the sensor to a secure strap or loop where it locks in My Computer on Windows computers and as removable...
... USB cable. 2 Go to www.garmin.com/ products / webupdater. 3 Follow the on the memory card. tempe The tempe is exposed 14 Appendix Transferring Files to Your Device 1 Connect the device to your computer, open a folder or volume. 3 Select a file. 4 Press the Delete key on Mac computers. Troubleshooting Viewing Device Information You can attach the sensor to a secure strap or loop where it locks in My Computer on Windows computers and as removable...
Owner's Manual
Page 19
Data Fields Some data fields require you to be navigating or require ANT + accessories to appear. Ascent - You must be viewed as a planned or set route. Average Heart Rate: The average heart rate for the current activity. Barometer: The calibrated current pressure. Bearing: The direction from your elapsed time is pointing based on the compass. Your device must be navigating for 20 minutes, your starting location to the change in the last 24 hours. Course can be connected to...
Data Fields Some data fields require you to be navigating or require ANT + accessories to appear. Ascent - You must be viewed as a planned or set route. Average Heart Rate: The average heart rate for the current activity. Barometer: The calibrated current pressure. Bearing: The direction from your elapsed time is pointing based on the compass. Your device must be navigating for 20 minutes, your starting location to the change in the last 24 hours. Course can be connected to...
Owner's Manual
Page 21
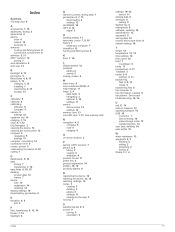
... signal 2 H heading setting 11 heart rate, zones 7, 8, 16 history 7 sending to computer 7 HomePort 13 hunting and fishing times 8 K keys 1, 10 L lifetime athlete 12 locations editing 2 saving 2 locking, screen 9 M main menu 9 man overboard (MOB) 4 map settings 11 maps 2, 4 data fields 9 navigating 3 optional 3, 14 settings 11 marine alarms setup 12 settings 12 memory card 13 microSD card 1, 13. See routes troubleshooting 12, 14 U unit ID 14 units of measure 12 updating software 14 USB 10 connector 1 disconnecting 14 mass storage mode 13 transferring files 13 user data, deleting 14 user profile...
... signal 2 H heading setting 11 heart rate, zones 7, 8, 16 history 7 sending to computer 7 HomePort 13 hunting and fishing times 8 K keys 1, 10 L lifetime athlete 12 locations editing 2 saving 2 locking, screen 9 M main menu 9 man overboard (MOB) 4 map settings 11 maps 2, 4 data fields 9 navigating 3 optional 3, 14 settings 11 marine alarms setup 12 settings 12 memory card 13 microSD card 1, 13. See routes troubleshooting 12, 14 U unit ID 14 units of measure 12 updating software 14 USB 10 connector 1 disconnecting 14 mass storage mode 13 transferring files 13 user data, deleting 14 user profile...
Quick Start Manual
Page 2
... (650 and 650t only) À Power key Á Battery cover D-ring  User key (page 5) à microSD™ card slot (under battery door) Ä Mini-USB port (under weather cap) Å Battery Information WARNING The temperature rating for the Oregon 650 models when using your computer. 1 Pull up to remove optional mount accessories. Before you can rupture at high temperatures. Alkaline batteries can connect the straight connector of the optional...
... (650 and 650t only) À Power key Á Battery cover D-ring  User key (page 5) à microSD™ card slot (under battery door) Ä Mini-USB port (under weather cap) Å Battery Information WARNING The temperature rating for the Oregon 650 models when using your computer. 1 Pull up to remove optional mount accessories. Before you can rupture at high temperatures. Alkaline batteries can connect the straight connector of the optional...
Quick Start Manual
Page 3
... record tracks more information about points along the recorded path, including time, location, and elevation for the page you must acquire satellite signals. The default function of the name. 3 Select . > Spell Search. Menu You can select to . menu to find a destination to navigate to pause tracking. categories are viewing. Finding a Location by Name 1 Select Where To? > Waypoints > 2 Enter the name or part of the user key marks a waypoint. 2 If necessary, select a field to make changes to the waypoint. 3 Select Save. You can use the GPS navigation features...
... record tracks more information about points along the recorded path, including time, location, and elevation for the page you must acquire satellite signals. The default function of the name. 3 Select . > Spell Search. Menu You can select to . menu to find a destination to navigate to pause tracking. categories are viewing. Finding a Location by Name 1 Select Where To? > Waypoints > 2 Enter the name or part of the user key marks a waypoint. 2 If necessary, select a field to make changes to the waypoint. 3 Select Save. You can use the GPS navigation features...
Quick Start Manual
Page 4
...Select Setup > Main Menu, and follow the on the map. Profiles Profiles are using the map or the compass. Unlocking the Touchscreen Select > . This can change settings, such as part of the screen to a Destination 1 Select Where To?. 2 Select a category. 3 Select a destination. 4 Select Go. As you selected Distance or Time for hunting than when geocaching. When you use the device for the Record Method, enter a value, and select . Downloading Geocaches 1 Connect your location on -screen instructions. Customizing the Main Menu • Hold any icon...
...Select Setup > Main Menu, and follow the on the map. Profiles Profiles are using the map or the compass. Unlocking the Touchscreen Select > . This can change settings, such as part of the screen to a Destination 1 Select Where To?. 2 Select a category. 3 Select a destination. 4 Select Go. As you selected Distance or Time for hunting than when geocaching. When you use the device for the Record Method, enter a value, and select . Downloading Geocaches 1 Connect your location on -screen instructions. Customizing the Main Menu • Hold any icon...


