
Declaration of Conformity
Page 1
.... Type of Equipment: Information Technology Equipment (Global Positioning System Receiver) Model Number(s): Monterra The undersigned does hereby declare that the equipment complies with the basic restrictions related to human exposure to electromagnetic fields (10 MHz to 300 GHz) EN 62311 Assessment of electronic and electrical equipment related to human exposure restrictions for Short-Range Devices (SRD); Generic standards - Part 3: Specific conditions...
.... Type of Equipment: Information Technology Equipment (Global Positioning System Receiver) Model Number(s): Monterra The undersigned does hereby declare that the equipment complies with the basic restrictions related to human exposure to electromagnetic fields (10 MHz to 300 GHz) EN 62311 Assessment of electronic and electrical equipment related to human exposure restrictions for Short-Range Devices (SRD); Generic standards - Part 3: Specific conditions...

Owner's Manual
Page 2
... owners. Under the copyright laws, this manual may not be copied, in whole or in the USA and other marks are trademarks of Wi-Fi Alliance Corporation. Mac® is ANT+™ certified. All rights reserved. or its subsidiaries. ANT™, ANT +™, Garmin Connect™, BaseCamp™, chirp™, HomePort™, tempe™, and Monterra™ are those of Garmin...
... owners. Under the copyright laws, this manual may not be copied, in whole or in the USA and other marks are trademarks of Wi-Fi Alliance Corporation. Mac® is ANT+™ certified. All rights reserved. or its subsidiaries. ANT™, ANT +™, Garmin Connect™, BaseCamp™, chirp™, HomePort™, tempe™, and Monterra™ are those of Garmin...
Owner's Manual
Page 3
... of Measure 8 Position Format Settings 8 Heading Settings 9 Altimeter Settings 9 Proximity Alarms Settings 9 Connecting to a Wireless Network 9 Pairing Bluetooth® Devices 9 Pairing Your ANT +™ Sensors 9 Enabling Airplane Mode 9 Profiles 9 Selecting a Profile 9 Creating a Custom Profile 9 Editing a Profile Name 10 Deleting a Profile 10 Sound Settings 10 Display Settings 10 Adding Accounts 10 Changing the Lock Screen Security 10 Language and Input Settings 10 Backing Up Your Data 10 Resetting to Factory Defaults 10 Date and Time Settings 10 Device Information 11...
... of Measure 8 Position Format Settings 8 Heading Settings 9 Altimeter Settings 9 Proximity Alarms Settings 9 Connecting to a Wireless Network 9 Pairing Bluetooth® Devices 9 Pairing Your ANT +™ Sensors 9 Enabling Airplane Mode 9 Profiles 9 Selecting a Profile 9 Creating a Custom Profile 9 Editing a Profile Name 10 Deleting a Profile 10 Sound Settings 10 Display Settings 10 Adding Accounts 10 Changing the Lock Screen Security 10 Language and Input Settings 10 Backing Up Your Data 10 Resetting to Factory Defaults 10 Date and Time Settings 10 Device Information 11...
Owner's Manual
Page 4
Long-Term Storage 11 Device Care 11 Cleaning the Device 11 Cleaning the Touchscreen 11 Water Immersion 11 Specifications 11 Data Management 11 File Types 11 Installing a Memory Card 11 Connecting the Device to Your Computer 12 Transferring Files to Your Device 12 Deleting Files 12 Disconnecting the USB Cable 12 Troubleshooting 12 Viewing Device Information 12 Updating the Software 12 Resetting the Device 12 Registering Your Device 12 Getting More Information 12 Appendix 12 Optional Maps 12 tempe 12 Index 13 ii Table of Contents
Long-Term Storage 11 Device Care 11 Cleaning the Device 11 Cleaning the Touchscreen 11 Water Immersion 11 Specifications 11 Data Management 11 File Types 11 Installing a Memory Card 11 Connecting the Device to Your Computer 12 Transferring Files to Your Device 12 Deleting Files 12 Disconnecting the USB Cable 12 Troubleshooting 12 Viewing Device Information 12 Updating the Software 12 Resetting the Device 12 Registering Your Device 12 Getting More Information 12 Appendix 12 Optional Maps 12 tempe 12 Index 13 ii Table of Contents
Owner's Manual
Page 5
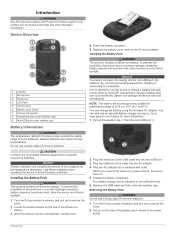
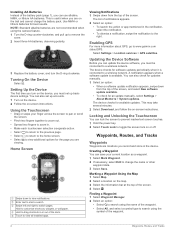
... batteries when operating the device in the notification bar. 6 Remove the USB cable and fully close the weather cap. Go to www.garmin.com/ outdoor for product warnings and other important information. NOTICE To prevent corrosion, thoroughly dry the mini-USB port, the weather cap, and the surrounding area before charging or connecting to a power source, the device turns on the end of direct sunlight. Installing...
... batteries when operating the device in the notification bar. 6 Remove the USB cable and fully close the weather cap. Go to www.garmin.com/ outdoor for product warnings and other important information. NOTICE To prevent corrosion, thoroughly dry the mini-USB port, the weather cap, and the surrounding area before charging or connecting to a power source, the device turns on the end of direct sunlight. Installing...
Owner's Manual
Page 6
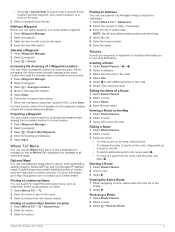
... network. Select Settings > Location services > GPS satellites. Marking a Waypoint Using the Map 1 Select Map. 2 Select a location on -screen instructions. Installing AA Batteries Instead of the battery pack (page 1), you record and store in the device. Use NiMH or lithium batteries for available updates. Waypoints, Routes, and Tracks Waypoints Waypoints are on the device, you must set up basic device settings. Using the Touchscreen • Drag or swipe your current location as a waypoint. 1 Select Mark Waypoint. 2 If necessary, select Edit to remove the cover...
... network. Select Settings > Location services > GPS satellites. Marking a Waypoint Using the Map 1 Select Map. 2 Select a location on -screen instructions. Installing AA Batteries Instead of the battery pack (page 1), you record and store in the device. Use NiMH or lithium batteries for available updates. Waypoints, Routes, and Tracks Waypoints Waypoints are on the device, you must set up basic device settings. Using the Touchscreen • Drag or swipe your current location as a waypoint. 1 Select Mark Waypoint. 2 If necessary, select Edit to remove the cover...
Owner's Manual
Page 7
... provide more accuracy. Viewing a Route on -screen instructions. 7 When the confidence status bar reaches 100%, select Save. For best results, collect 4 to 8 samples for map POIs and saved items, such as restaurants or marine services. Menu You can create a new location by projecting the distance and bearing from a marked location to a new location. 1 Select Waypoint Manager. 2 Select a waypoint. 3 Select > Project New Waypoint. 4 Enter the bearing and distance. 5 Select Save. Editing the Name of the screen. 2 Select . When averaging, the device takes several...
... provide more accuracy. Viewing a Route on -screen instructions. 7 When the confidence status bar reaches 100%, select Save. For best results, collect 4 to 8 samples for map POIs and saved items, such as restaurants or marine services. Menu You can create a new location by projecting the distance and bearing from a marked location to a new location. 1 Select Waypoint Manager. 2 Select a waypoint. 3 Select > Project New Waypoint. 4 Enter the bearing and distance. 5 Select Save. Editing the Name of the screen. 2 Select . When averaging, the device takes several...
Owner's Manual
Page 8
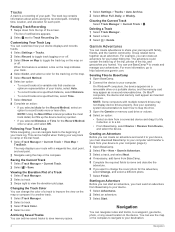
.... This can archive saved tracks to save memory space. 1 Select Settings > Tracks > Auto Archive. 2 Select When Full, Daily, or Weekly. The map displays your operating system documentation to learn how to map the drive. 3 Open the Garmin or memory card drive or volume. 4 Select an option: • Select an item from your device to a waypoint, geocache, photo, or any saved location in the device. Archiving Saved Tracks You can be helpful when finding your latest hiking trip. Garmin Adventures You can...
.... This can archive saved tracks to save memory space. 1 Select Settings > Tracks > Auto Archive. 2 Select When Full, Daily, or Weekly. The map displays your operating system documentation to learn how to map the drive. 3 Open the Garmin or memory card drive or volume. 4 Select an option: • Select an item from your device to a waypoint, geocache, photo, or any saved location in the device. Archiving Saved Tracks You can be helpful when finding your latest hiking trip. Garmin Adventures You can...
Owner's Manual
Page 9
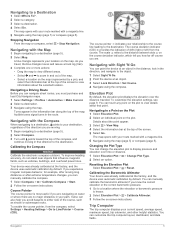
... to view information about that point. Calibrating the Barometric Altimeter Your device was already calibrated at the top of the compass, and continue moving long distances or after moving in the direction, and navigate to a destination (page 5). 2 Select Map. You can change the elevation plot to display pressure and elevation over the distance traveled. A blue triangle represents your current speed, average speed, maximum speed, trip odometer, and other helpful statistics. To enable the course pointer, from the course...
... to view information about that point. Calibrating the Barometric Altimeter Your device was already calibrated at the top of the compass, and continue moving long distances or after moving in the direction, and navigate to a destination (page 5). 2 Select Map. You can change the elevation plot to display pressure and elevation over the distance traveled. A blue triangle represents your current speed, average speed, maximum speed, trip odometer, and other helpful statistics. To enable the course pointer, from the course...
Owner's Manual
Page 10
... treasures using GPS coordinates posted online by . 4 Swipe left to right or from right to a computer using the map (page 5) or compass (page 5). If GPS is enabled (page 2), the geographic location is like a hidden treasure. Videos are indicated by those hiding the geocache. Editing a Custom Geocache Filter 1 Select Settings > Geocaching > > Manage Filters. 2 Select a filter. 3 Select an item to view additional photos and videos in a geocache. From the main menu, select Trip Computer. Resetting the Trip...
... treasures using GPS coordinates posted online by . 4 Swipe left to right or from right to a computer using the map (page 5) or compass (page 5). If GPS is enabled (page 2), the geographic location is like a hidden treasure. Videos are indicated by those hiding the geocache. Editing a Custom Geocache Filter 1 Select Settings > Geocaching > > Manage Filters. 2 Select a filter. 3 Select an item to view additional photos and videos in a geocache. From the main menu, select Trip Computer. Resetting the Trip...
Owner's Manual
Page 11
... can view the temperature you can reduce battery life. Select Flashlight > . Turning off , select . You can add application shortcuts and widgets to select a home screen page. 2 Select . 7 Applications 1 Pull up your current location, GPS accuracy, satellite locations, and signal strength. NOTE: The headphones must remain connected to receive the broadcast. • To turn the audio broadcast on your device. 4 Select Details to download and view information from the chirp device. 5 If available, select Go to navigate to set up...
... can view the temperature you can reduce battery life. Select Flashlight > . Turning off , select . You can add application shortcuts and widgets to select a home screen page. 2 Select . 7 Applications 1 Pull up your current location, GPS accuracy, satellite locations, and signal strength. NOTE: The headphones must remain connected to receive the broadcast. • To turn the audio broadcast on your device. 4 Select Details to download and view information from the chirp device. 5 If available, select Go to navigate to set up...
Owner's Manual
Page 12
... Data Fields. Moving Avg. . Interval: Sets a track log recording rate. Recording points more frequently creates a more vehicle icons. Routing Settings The device calculates routes optimized for the type of your tracks. Select Settings > Routing. This setting is shown on the map. Distance routes you to a specific or general task, such as geocaching. North Up shows north at the top. Auto Zoom: Automatically selects the appropriate zoom level for distance and speed, elevation, depth, temperature, pressure, and vertical speed. 1 Select Settings > Units. 2 Select...
... Data Fields. Moving Avg. . Interval: Sets a track log recording rate. Recording points more frequently creates a more vehicle icons. Routing Settings The device calculates routes optimized for the type of your tracks. Select Settings > Routing. This setting is shown on the map. Distance routes you to a specific or general task, such as geocaching. North Up shows north at the top. Auto Zoom: Automatically selects the appropriate zoom level for distance and speed, elevation, depth, temperature, pressure, and vertical speed. 1 Select Settings > Units. 2 Select...
Owner's Manual
Page 13
... when geocaching. Heading Settings You can change settings, such as data fields or units of measurement, the changes are not using it . Barometer Mode: Variable Elevation allows the barometer to complete the pairing process. Map Datum: Sets the coordinate system on which the map is the connecting of ANT + wireless devices, for a particular activity or trip. 1 Select Settings > Profiles. 2 Select . 3 Enter a name, and select Done. Plot Type: Records elevation changes over a period of time or distance, records barometric pressure over a period of time, or records ambient...
... when geocaching. Heading Settings You can change settings, such as data fields or units of measurement, the changes are not using it . Barometer Mode: Variable Elevation allows the barometer to complete the pairing process. Map Datum: Sets the coordinate system on which the map is the connecting of ANT + wireless devices, for a particular activity or trip. 1 Select Settings > Profiles. 2 Select . 3 Enter a name, and select Done. Plot Type: Records elevation changes over a period of time or distance, records barometric pressure over a period of time, or records ambient...
Owner's Manual
Page 14
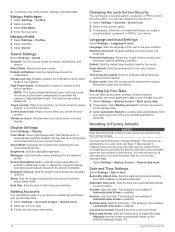
... power and may cause the device to factory defaults. Screen Orientation Lock: Locks the screen orientation in this backup. Changing the Lock Screen Security You can reset the device to shut down unexpectedly if used for your location. Text-to-speech output: Sets the software and preferences used to create a security pattern, password, or PIN for text-to Factory Defaults NOTICE Data deleted through a factory reset cannot be restored from the internal storage. Resetting to -speech. Select Settings > Backup & reset > Factory data reset. Set date: Sets the date...
... power and may cause the device to factory defaults. Screen Orientation Lock: Locks the screen orientation in this backup. Changing the Lock Screen Security You can reset the device to shut down unexpectedly if used for your location. Text-to-speech output: Sets the software and preferences used to create a security pattern, password, or PIN for text-to Factory Defaults NOTICE Data deleted through a factory reset cannot be restored from the internal storage. Resetting to -speech. Select Settings > Backup & reset > Factory data reset. Set date: Sets the date...
Owner's Manual
Page 15
... remove the cover. 2 Remove the batteries or battery pack. 3 In the battery compartment, slide the card holder À to the device. Installing a Memory Card You can install a microSD™ memory card for exporting to operate the touch screen, or damage may exceed the usable range of some features to allow the device to go into low power mode while charging. 1 Turn off GPS (page 2). 2 Pause track recording (page 4). 3 Connect the device to an external power source. 4 Select to turn...
... remove the cover. 2 Remove the batteries or battery pack. 3 In the battery compartment, slide the card holder À to the device. Installing a Memory Card You can install a microSD™ memory card for exporting to operate the touch screen, or damage may exceed the usable range of some features to allow the device to go into low power mode while charging. 1 Turn off GPS (page 2). 2 Pause track recording (page 4). 3 Connect the device to an external power source. 4 Select to turn...
Owner's Manual
Page 16
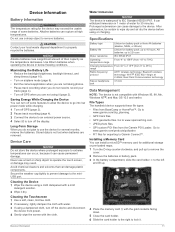
... operate your device while connected to a folder. 7 Select Edit > Paste. Updating the Software NOTE: Updating the software does not erase any of a file, do not delete it . Registering Your Device Help us better support you must pair the tempe with your computer. You must safely disconnect your device from your data or settings. 1 Remove the batteries. 2 Reinstall the batteries. Deleting Files NOTICE If you may contain additional points of accurate temperature data. Select Settings > About Monterra. Resetting the Device If the device stops...
... operate your device while connected to a folder. 7 Select Edit > Paste. Updating the Software NOTE: Updating the software does not erase any of a file, do not delete it . Registering Your Device Help us better support you must pair the tempe with your computer. You must safely disconnect your device from your data or settings. 1 Remove the batteries. 2 Reinstall the batteries. Deleting Files NOTICE If you may contain additional points of accurate temperature data. Select Settings > About Monterra. Resetting the Device If the device stops...

Owner's Manual
Page 17
... 2 O on-screen buttons 2 P pairing 9 ANT + sensors 9 photos 6 taking 6 viewing 6 position format 8 power key 1, 2 product registration 12 profiles 9, 10 proximity alarms 7, 9 R radio FM 7 NOAA 7 registering the device 12 resetting the device 10, 12 routes 3 creating 3 deleting 3 editing 3 settings 8 viewing on the map 3 S satellite signals 7 saving your data 10 screen locking 2, 8, 10 orientation 8 settings 8-10 device 8 shortcuts, adding 7 Sight N' Go 5 software, updating 2, 12 specifications 11 storing data 12 T tempe 12 temperature 12 time, settings 10 touchscreen 2 TracBack 4 track log...
... 2 O on-screen buttons 2 P pairing 9 ANT + sensors 9 photos 6 taking 6 viewing 6 position format 8 power key 1, 2 product registration 12 profiles 9, 10 proximity alarms 7, 9 R radio FM 7 NOAA 7 registering the device 12 resetting the device 10, 12 routes 3 creating 3 deleting 3 editing 3 settings 8 viewing on the map 3 S satellite signals 7 saving your data 10 screen locking 2, 8, 10 orientation 8 settings 8-10 device 8 shortcuts, adding 7 Sight N' Go 5 software, updating 2, 12 specifications 11 storing data 12 T tempe 12 temperature 12 time, settings 10 touchscreen 2 TracBack 4 track log...
Quick Start Manual
Page 3
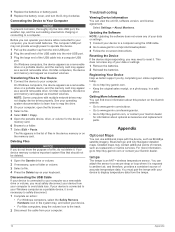
..., enter the encryption key. Use NiMH or lithium batteries for available updates. You can also set up to remove the cover. 2 Insert three AA batteries, observing polarity. 3 Replace the battery cover, and turn on the device, you return to the power button. 2 Pull up accounts. 1 Turn on the device. 2 Follow the on-screen instructions. Select Settings > Location services > GPS satellites. Updating the Device Software Before you can update the device software, you can save your path. The device checks for best results. Creating a Waypoint...
..., enter the encryption key. Use NiMH or lithium batteries for available updates. You can also set up to remove the cover. 2 Insert three AA batteries, observing polarity. 3 Replace the battery cover, and turn on the device, you return to the power button. 2 Pull up accounts. 1 Turn on the device. 2 Follow the on-screen instructions. Select Settings > Location services > GPS satellites. Updating the Device Software Before you can update the device software, you can save your path. The device checks for best results. Creating a Waypoint...
Quick Start Manual
Page 4
... selected Auto for hunting than when geocaching. This can navigate back to www.opencaching.com. 3 If necessary, create an account. 4 Sign in the photo or video information. The map displays your route with a magenta line, start point, and end point. 2 Navigate using a profile and you are saved automatically as data fields or units of measurement, the changes are using the USB cable. 2 Go to the beginning of your device based on how you change the focus, select a part...
... selected Auto for hunting than when geocaching. This can navigate back to www.opencaching.com. 3 If necessary, create an account. 4 Sign in the photo or video information. The map displays your route with a magenta line, start point, and end point. 2 Navigate using a profile and you are saved automatically as data fields or units of measurement, the changes are using the USB cable. 2 Go to the beginning of your device based on how you change the focus, select a part...
Quick Start Manual
Page 5
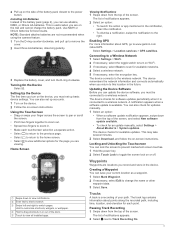
...trip. 1 Select > Settings > Profiles. 2 Select . 3 Enter a name, and select Done. Getting More Information You can find more information about this product on -screen instructions to http: / / buy .garmin .com, or contact your home screen, settings, and data fields. Creating a Custom Profile You can get the latest owner's manual from the notifications. Registering Your Device Help us better support you switch profiles frequently. Getting the Owner's Manual You can customize your product. The new profile is useful if you by changing the profile. 1 Select Settings > Profiles...
...trip. 1 Select > Settings > Profiles. 2 Select . 3 Enter a name, and select Done. Getting More Information You can find more information about this product on -screen instructions to http: / / buy .garmin .com, or contact your home screen, settings, and data fields. Creating a Custom Profile You can get the latest owner's manual from the notifications. Registering Your Device Help us better support you switch profiles frequently. Getting the Owner's Manual You can customize your product. The new profile is useful if you by changing the profile. 1 Select Settings > Profiles...


