Owner's Manual
Page 3
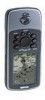
...also step-by -step directions on using waypoints. The Appendix contains information such as an overview of the manual for choosing the Garmin GPSMAP 76. GPSMAP 76 Owner's Manual i About This Manual To get acquainted with the packing list on and adjust the backlight. The Basic Operation ...portable GPS receiver. The GPSMAP 76 utilizes the proven performance of this manual and learn about features such as using the Find Menu, navigating a route, and using the pages. Take a moment now to compare the contents of Garmin GPS and full-featured mapping to use your unit....
...also step-by -step directions on using waypoints. The Appendix contains information such as an overview of the manual for choosing the Garmin GPSMAP 76. GPSMAP 76 Owner's Manual i About This Manual To get acquainted with the packing list on and adjust the backlight. The Basic Operation ...portable GPS receiver. The GPSMAP 76 utilizes the proven performance of this manual and learn about features such as using the Find Menu, navigating a route, and using the pages. Take a moment now to compare the contents of Garmin GPS and full-featured mapping to use your unit....

Owner's Manual
Page 4
... of Contents Introduction i About This Manual i Care Information iv Getting Started 1 Unit Basics 1 Interface Keys 3 Basic Operation 4 Turning on the GPSMAP 76 4 Adjusting Backlight and Contrast 5 Selecting and Entering Data 5 Simulator Mode 5 Initializing the GPS Receiver 7 Initialization Options 8 Creating a Waypoint 9 ...GPS Information Page Options Menu 24 ii INTRODUCTION > TABLE OF CONTENTS Map Page 25 Using Additional Map Data 25 Changing the Zoom Range 25 Map Page Options 26 Setup Map 27 General Tab 28 Map Tab 29 Waypoint Tab 29 Point Tab 30 Marine Tab 30 Line...
... of Contents Introduction i About This Manual i Care Information iv Getting Started 1 Unit Basics 1 Interface Keys 3 Basic Operation 4 Turning on the GPSMAP 76 4 Adjusting Backlight and Contrast 5 Selecting and Entering Data 5 Simulator Mode 5 Initializing the GPS Receiver 7 Initialization Options 8 Creating a Waypoint 9 ...GPS Information Page Options Menu 24 ii INTRODUCTION > TABLE OF CONTENTS Map Page 25 Using Additional Map Data 25 Changing the Zoom Range 25 Map Page Options 26 Setup Map 27 General Tab 28 Map Tab 29 Waypoint Tab 29 Point Tab 30 Marine Tab 30 Line...
Owner's Manual
Page 5
...Proximity 48 Proximity Options 48 Celestial 49 Tides 49 Sun and Moon 50 Hunt and Fish 51 MapSource and System Info 51 Setup Menu 52 GPSMAP 76 Owner's Manual INTRODUCTION > TABLE OF CONTENTS General Tab 52 Time Tab 53 Units Tab 54 Location Tab 54 Interface Tab 57 Appendix 58...fications 58 Connecting the Power/Data 59 Interfacing 59 Satellite Information 60 What is WAAS 61 What is Differential GPS (DGPS 61 Map Datums 62 Navigation Terms 64 Messages 66 Loran TD System 68 Accessories 70 FCC Compliance 71 Product Registration 72 Software License Agreement 72 Limited...
...Proximity 48 Proximity Options 48 Celestial 49 Tides 49 Sun and Moon 50 Hunt and Fish 51 MapSource and System Info 51 Setup Menu 52 GPSMAP 76 Owner's Manual INTRODUCTION > TABLE OF CONTENTS General Tab 52 Time Tab 53 Units Tab 54 Location Tab 54 Interface Tab 57 Appendix 58...fications 58 Connecting the Power/Data 59 Interfacing 59 Satellite Information 60 What is WAAS 61 What is Differential GPS (DGPS 61 Map Datums 62 Navigation Terms 64 Messages 66 Loran TD System 68 Accessories 70 FCC Compliance 71 Product Registration 72 Software License Agreement 72 Limited...

Owner's Manual
Page 9
... to turn unit On/Off • Press and release to adjust backlighting QUIT Key • Press and release to cancel data entry or exit a page GPSMAP 76 Owner's Manual GETTING STARTED > INTERFACE KEYS ROCKER Key • Move Up/Down or Right/Left to move through lists, highlight fields, on-screen ...buttons, icons, enter data or move the map panning arrow PAGE Key • Press to cycle through the main pages • Press when using the on -screen messages • Press and release at...
... to turn unit On/Off • Press and release to adjust backlighting QUIT Key • Press and release to cancel data entry or exit a page GPSMAP 76 Owner's Manual GETTING STARTED > INTERFACE KEYS ROCKER Key • Move Up/Down or Right/Left to move through lists, highlight fields, on-screen ...buttons, icons, enter data or move the map panning arrow PAGE Key • Press to cycle through the main pages • Press when using the on -screen messages • Press and release at...

Owner's Manual
Page 14
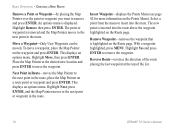
... Options If the GPSMAP 76 is unable to select. Highlight the option and then press ENTER to determine its location, an options menu is displayed. When you select Automatic, the unit switches to acquire satellites normally. This menu contains the options Automatic or Use Map. If you select... temporarily blocked. When initializing the receiver or trying to select your approximate location. New Location-is used for satellites. Use Map utilizes the pointer on the Map page to receive satellite signals, orient the GPSMAP 76 so the top of the unit pointed toward the sky.
... Options If the GPSMAP 76 is unable to select. Highlight the option and then press ENTER to determine its location, an options menu is displayed. When you select Automatic, the unit switches to acquire satellites normally. This menu contains the options Automatic or Use Map. If you select... temporarily blocked. When initializing the receiver or trying to select your approximate location. New Location-is used for satellites. Use Map utilizes the pointer on the Map page to receive satellite signals, orient the GPSMAP 76 so the top of the unit pointed toward the sky.
Owner's Manual
Page 15
...is displayed. Highlight the OK button and press ENTER to save the waypoint. GPSMAP 76 Owner's Manual 9 Highlight the OK button and press ENTER to save the waypoint. If the Map Pointer is not on a map feature or road, the New Waypoint page is displayed. The unit has to...point, you , but is a position stored in the GPSMAP 76. You can edit the waypoint name, symbol, date/time, elevation, and depth. Creating a Waypoint The term Waypoint may be turned on and receiving at a location, create a waypoint on the Map page, or enter coordinates for a waypoint manually. There ...
...is displayed. Highlight the OK button and press ENTER to save the waypoint. GPSMAP 76 Owner's Manual 9 Highlight the OK button and press ENTER to save the waypoint. If the Map Pointer is not on a map feature or road, the New Waypoint page is displayed. The unit has to...point, you , but is a position stored in the GPSMAP 76. You can edit the waypoint name, symbol, date/time, elevation, and depth. Creating a Waypoint The term Waypoint may be turned on and receiving at a location, create a waypoint on the Map page, or enter coordinates for a waypoint manually. There ...
Owner's Manual
Page 17
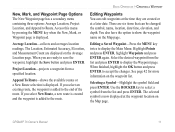
... page. Select the desired waypoint from the list and press ENTER. See page 42 for more information on the Map page. Use the ROCKER key to select a symbol from the list and press ENTER to the route. When you are... displayed on the Map page. Selecting a Symbol-Highlight the symbol field and press ENTER. New, Mark, and Waypoint Page Options The New... are six items that can be changed: the symbol, name, location, date/time, elevation, and depth. GPSMAP 76 Owner's Manual 11
... page. Select the desired waypoint from the list and press ENTER. See page 42 for more information on the Map page. Use the ROCKER key to select a symbol from the list and press ENTER to the route. When you are... displayed on the Map page. Selecting a Symbol-Highlight the symbol field and press ENTER. New, Mark, and Waypoint Page Options The New... are six items that can be changed: the symbol, name, location, date/time, elevation, and depth. GPSMAP 76 Owner's Manual 11

Owner's Manual
Page 18
... increases scrolling speed. • You can scroll through the alpha-numeric list and make a selection. Remember, use to the next character. GPSMAP 76 Owner's Manual Use the ROCKER key to the next placeholder. Press the ROCKER key to the right to move to scroll through the numeric ...ENTER to check/uncheck the box. When finished, press ENTER to move the next placeholder. Show Name on Maps-Activating this option displays the waypoint name on the Map page. BASIC OPERATION > CREATING A WAYPOINT Changing the Name-Highlight the name field and press ENTER. Press ...
... increases scrolling speed. • You can scroll through the alpha-numeric list and make a selection. Remember, use to the next character. GPSMAP 76 Owner's Manual Use the ROCKER key to the next placeholder. Press the ROCKER key to the right to move to scroll through the numeric ...ENTER to check/uncheck the box. When finished, press ENTER to move the next placeholder. Show Name on Maps-Activating this option displays the waypoint name on the Map page. BASIC OPERATION > CREATING A WAYPOINT Changing the Name-Highlight the name field and press ENTER. Press ...

Owner's Manual
Page 19
...waypoint with the ENTER key. The current GPS location is displayed. Press the PAGE key until the Zoom Range in the center of the Map page reads .5 mi or lower. Change the waypoint name and store the waypoint in memory by the triangle in the lower left corner ...of the map. BASIC OPERATION > CREATING A WAYPOINT Bearing and Distance from Pointer to the current GPS location is displayed. The location of the map. Let's create another waypoint on a road or map feature, press ENTER. Using the ROCKER key, you move around the map. GPSMAP 76 Owner's Manual 13
...waypoint with the ENTER key. The current GPS location is displayed. Press the PAGE key until the Zoom Range in the center of the Map page reads .5 mi or lower. Change the waypoint name and store the waypoint in memory by the triangle in the lower left corner ...of the map. BASIC OPERATION > CREATING A WAYPOINT Bearing and Distance from Pointer to the current GPS location is displayed. The location of the map. Let's create another waypoint on a road or map feature, press ENTER. Using the ROCKER key, you move around the map. GPSMAP 76 Owner's Manual 13

Owner's Manual
Page 21
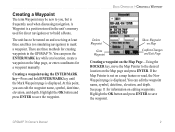
... placing a new waypoint in the order that location only to save a Map Feature Point as a reference. Press MENU and select Save as any location or point on a Map Feature, such as a road, park, or intersection, the GPSMAP 76 stores that you wish to navigate. Creating a New Route There are not.... These points are several methods to create a route, you can select an existing User Waypoint/Map Feature, or you place the Map Pointer on the Routes page and press ENTER. New Route Menu GPSMAP 76 Owner's Manual 15 To save the waypoint, and ENTER a final time to display the...
... placing a new waypoint in the order that location only to save a Map Feature Point as a reference. Press MENU and select Save as any location or point on a Map Feature, such as a road, park, or intersection, the GPSMAP 76 stores that you wish to navigate. Creating a New Route There are not.... These points are several methods to create a route, you can select an existing User Waypoint/Map Feature, or you place the Map Pointer on the Routes page and press ENTER. New Route Menu GPSMAP 76 Owner's Manual 15 To save the waypoint, and ENTER a final time to display the...
Owner's Manual
Page 22
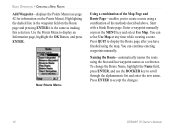
...the route using a combination of the Map Page and Route Page-enables you have finished using the map. Press QUIT to display an Information page, highlight the OK Button, and press ENTER. Press ENTER to accept the changes. 16 GPSMAP 76 Owner's Manual Enter a waypoint manually... or press the MENU key and select Use Map. You can continue entering waypoints manually. BASIC OPERATION > CREATING A NEW ROUTE Add Waypoint-displays the...
...the route using a combination of the Map Page and Route Page-enables you have finished using the map. Press QUIT to display an Information page, highlight the OK Button, and press ENTER. Press ENTER to accept the changes. 16 GPSMAP 76 Owner's Manual Enter a waypoint manually... or press the MENU key and select Use Map. You can continue entering waypoints manually. BASIC OPERATION > CREATING A NEW ROUTE Add Waypoint-displays the...
Owner's Manual
Page 23
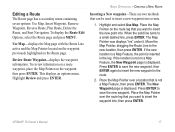
...There are two methods that you want to insert the waypoint into, then press ENTER. Move the Map Pointer, dragging the Route Line to a small dashed line, press ENTER. GPSMAP 76 Owner's Manual 17 Review Route Waypoint-displays the waypoint information. This displays an options menu. The... Map Pointer now displays "Ins" under it. Use Map-displays the Map page with the Route Line active and the Map Pointer located on the ...
...There are two methods that you want to insert the waypoint into, then press ENTER. Move the Map Pointer, dragging the Route Line to a small dashed line, press ENTER. GPSMAP 76 Owner's Manual 17 Review Route Waypoint-displays the waypoint information. This displays an options menu. The... Map Pointer now displays "Ins" under it. Use Map-displays the Map page with the Route Line active and the Map Pointer located on the ...
Owner's Manual
Page 24
... ENTER to remove and press ENTER. Reverse Route-reverses the direction of the list. 18 GPSMAP 76 Owner's Manual Highlight Next, press ENTER, and the Map Pointer moves to move a waypoint, place the Map Pointer on the waypoint and press ENTER. The new point is displayed. Remove Waypoint-removes ...next point in the route. Highlight Remove then press ENTER. BASIC OPERATION > CREATING A NEW ROUTE Remove a Point or Waypoint-by placing the Map Pointer over the point or waypoint you want to remove the waypoint. The point or waypoint is highlighted on the Route page. With a ...
... ENTER to remove and press ENTER. Reverse Route-reverses the direction of the list. 18 GPSMAP 76 Owner's Manual Highlight Next, press ENTER, and the Map Pointer moves to move a waypoint, place the Map Pointer on the waypoint and press ENTER. The new point is displayed. Remove Waypoint-removes ...next point in the route. Highlight Remove then press ENTER. BASIC OPERATION > CREATING A NEW ROUTE Remove a Point or Waypoint-by placing the Map Pointer over the point or waypoint you want to remove the waypoint. The point or waypoint is highlighted on the Route page. With a ...
Owner's Manual
Page 26
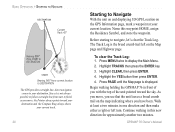
...'s Manual Before starting to display the Main Menu. 2. Highlight TRACKS then press the ENTER key. 3. Begin walking holding the GPSMAP 76 in front of the unit pointed toward your destination and the Compass Ring always shows your current track. 20 Starting to your current location. ... sky. Walk at your destination. To clear the Track Log: 1. Press MENU twice to navigate, let's clear the Track Log. Press PAGE until the Map page is the bread crumb trail left turn. Name this new direction for approximately another two minutes. Since it is not always possible to follow...
...'s Manual Before starting to display the Main Menu. 2. Highlight TRACKS then press the ENTER key. 3. Begin walking holding the GPSMAP 76 in front of the unit pointed toward your destination and the Compass Ring always shows your current track. 20 Starting to your current location. ... sky. Walk at your destination. To clear the Track Log: 1. Press MENU twice to navigate, let's clear the Track Log. Press PAGE until the Map page is the bread crumb trail left turn. Name this new direction for approximately another two minutes. Since it is not always possible to follow...
Owner's Manual
Page 28
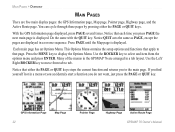
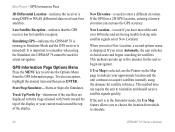
.... Notice that page. Press PAGE until the Map page is displayed. Each main page has an Options Menu. This Options Menu contains the setup options and functions that apply to that either the PAGE or QUIT keys. Many of the menus in the GPSMAP 76 are arranged in a reverse sequence. MAIN PAGES... ROCKER key to select and item from tab to move from the options menu and press ENTER. GPS Information Page 22 Map Page Pointer Page Highway Page Active Route Page GPSMAP 76 Owner's Manual Notice that each time you press PAGE the next main page is displayed. If you find yourself ...
.... Notice that page. Press PAGE until the Map page is displayed. Each main page has an Options Menu. This Options Menu contains the setup options and functions that apply to that either the PAGE or QUIT keys. Many of the menus in the GPSMAP 76 are arranged in a reverse sequence. MAIN PAGES... ROCKER key to select and item from tab to move from the options menu and press ENTER. GPS Information Page 22 Map Page Pointer Page Highway Page Active Route Page GPSMAP 76 Owner's Manual Notice that each time you press PAGE the next main page is displayed. If you find yourself ...
Owner's Manual
Page 30
...Simulator mode, the Use Map feature allows you have moved the unit over 600 miles and are displayed with the rings oriented with North toward the top of the display or your approximate location and the unit continues to remember when using the Simulator, the GPSMAP 76 cannot be used if you... elevation. If the GPS has a 2D GPS Location, entering a known elevation can take up to five minutes for the unit to simulate. 24 GPSMAP 76 Owner's Manual When you select New Location, a second options menu is used for actual navigation. If the unit is in Simulator Mode and the GPS...
...Simulator mode, the Use Map feature allows you have moved the unit over 600 miles and are displayed with the rings oriented with North toward the top of the display or your approximate location and the unit continues to remember when using the Simulator, the GPSMAP 76 cannot be used if you... elevation. If the GPS has a 2D GPS Location, entering a known elevation can take up to five minutes for the unit to simulate. 24 GPSMAP 76 Owner's Manual When you select New Location, a second options menu is used for actual navigation. If the unit is in Simulator Mode and the GPS...
Owner's Manual
Page 31
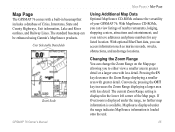
...built-in greater detail or a larger area with less detail. MAIN PAGES > MAP PAGE Map Page The GPSMAP 76 comes with greater detail. Zoom Scale Changing the Zoom Range You can view listings of the Map page. Conversely, pressing the OUT key increases the Zoom Range displaying a larger area... with less detail. With MapSource CD-ROMs, you can change the Zoom Range on the Map page allowing you can be enhanced using Garmin's MapSource products. GPSMAP 76 Owner's Manual ...
...built-in greater detail or a larger area with less detail. MAIN PAGES > MAP PAGE Map Page The GPSMAP 76 comes with greater detail. Zoom Scale Changing the Zoom Range You can view listings of the Map page. Conversely, pressing the OUT key increases the Zoom Range displaying a larger area... with less detail. With MapSource CD-ROMs, you can change the Zoom Range on the Map page allowing you can be enhanced using Garmin's MapSource products. GPSMAP 76 Owner's Manual ...

Owner's Manual
Page 32
...eld and press ENTER. MAIN PAGES > MAP PAGE Map Page Options To access the Map page Options, select the Map page and press the MENU key. Full Screen Map/Show Data Fields-hides the data fields and expands the map to accept the selection. 26 GPSMAP 76 Owner's Manual This only functions if Lock ...The new configuration is selected, the option changes to the other location. Use the ROCKER key to On (see Setup Map-Other tab on the map. Measure Distance-allows you want displayed in the fields. Distance, Bearing, and Location of the Pointer are displayed below the ...
...eld and press ENTER. MAIN PAGES > MAP PAGE Map Page Options To access the Map page Options, select the Map page and press the MENU key. Full Screen Map/Show Data Fields-hides the data fields and expands the map to accept the selection. 26 GPSMAP 76 Owner's Manual This only functions if Lock ...The new configuration is selected, the option changes to the other location. Use the ROCKER key to On (see Setup Map-Other tab on the map. Measure Distance-allows you want displayed in the fields. Distance, Bearing, and Location of the Pointer are displayed below the ...

Owner's Manual
Page 33
...items. Selecting a range setting displays the items on the map only when the Map Zoom Range is displayed on the map without a name or label. If you select Off, the item is at 500 ft or less. GPSMAP 76 Owner's Manual 27 MAIN PAGES > MAP PAGE • Zoom Setting-determines when items are arranged ...on a tab menu making it easy to determine the size of the options on the Map page. Otherwise, the item is at or less than ...
...items. Selecting a range setting displays the items on the map only when the Map Zoom Range is displayed on the map without a name or label. If you select Off, the item is at 500 ft or less. GPSMAP 76 Owner's Manual 27 MAIN PAGES > MAP PAGE • Zoom Setting-determines when items are arranged ...on a tab menu making it easy to determine the size of the options on the Map page. Otherwise, the item is at or less than ...

Owner's Manual
Page 34
...Water, the water portion of the display is lighter in color than the land. Below is displayed toward the top. If you approach. 28 GPSMAP 76 Owner's Manual Course Up displays the active course line toward the top of the page. Track Up displays your current track is a description ...of the display. MAIN PAGES > MAP PAGE General Tab The General tab contains the settings for Detail, Orientation, Colors, and Auto Zoom. North Up always displays North at the top...
...Water, the water portion of the display is lighter in color than the land. Below is displayed toward the top. If you approach. 28 GPSMAP 76 Owner's Manual Course Up displays the active course line toward the top of the page. Track Up displays your current track is a description ...of the display. MAIN PAGES > MAP PAGE General Tab The General tab contains the settings for Detail, Orientation, Colors, and Auto Zoom. North Up always displays North at the top...


