Declaration of Conformity
Page 1
...Equipment: Information Technology Equipment (Global Positioning System Receiver) Model Number(s): GPSMAP 64 GPSMAP 64s GPSMAP 64st The undersigned does hereby declare that the equipment complies with the above Directives Jamie Wiltshire Quality Supervisor Garmin (Europe) Ltd. Liberty House, Hounsdown Business Park, Southampton, Hampshire... compatibility and Radio spectrum Matters (ERM); General requirements EN 55022:2010/AC:2011 Information technology equipment. GARMIN (Europe) Ltd. Immunity for Short-Range Devices (SRD) EN 60945:2002 Maritime Navigation and Radio ...
...Equipment: Information Technology Equipment (Global Positioning System Receiver) Model Number(s): GPSMAP 64 GPSMAP 64s GPSMAP 64st The undersigned does hereby declare that the equipment complies with the above Directives Jamie Wiltshire Quality Supervisor Garmin (Europe) Ltd. Liberty House, Hounsdown Business Park, Southampton, Hampshire... compatibility and Radio spectrum Matters (ERM); General requirements EN 55022:2010/AC:2011 Information technology equipment. GARMIN (Europe) Ltd. Immunity for Short-Range Devices (SRD) EN 60945:2002 Maritime Navigation and Radio ...

Owner's Manual
Page 5
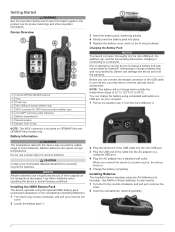
...two AA batteries (Installing Batteries). 1 Turn the D-ring counter-clockwise, and pull up to charge a battery that was not provided by Garmin can charge the battery using two AA batteries (not included). When you may exceed the usable range of the cable into the AC adapter... Mini-USB port (under batteries) Æ Battery compartment Ç Mounting spine È Battery cover D-ring NOTE: The MCX connector is included on GPSMAP 64s and GPSMAP 64st models only. 3 Insert the battery pack, observing polarity. 4 Gently press the battery pack into the mini-USB port. 3 Plug the USB end...
...two AA batteries (Installing Batteries). 1 Turn the D-ring counter-clockwise, and pull up to charge a battery that was not provided by Garmin can charge the battery using two AA batteries (not included). When you may exceed the usable range of the cable into the AC adapter... Mini-USB port (under batteries) Æ Battery compartment Ç Mounting spine È Battery cover D-ring NOTE: The MCX connector is included on GPSMAP 64s and GPSMAP 64st models only. 3 Insert the battery pack, observing polarity. 4 Gently press the battery pack into the mini-USB port. 3 Plug the USB end...
Owner's Manual
Page 8
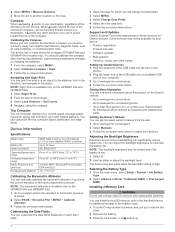
...experiencing temperature changes, or changing the batteries. 1 From the compass, select MENU. 2 Select Calibrate Compass > Start. 3 Follow the on the GPSMAP 64s and GPSMAP 64st. 1 Select Sight 'N Go. 2 Point the device at an object. 3 Select Lock Direction > Set Course. 4 Navigate using the compass.... buildings, or overhead power lines. Compass When navigating, points to the object. The device has a 3-axis electronic compass (GPSMAP 64s and GPSMAP 64st models only). You should calibrate the compass after moving . North Reference: Sets the north reference used on the elevation plot ...
...experiencing temperature changes, or changing the batteries. 1 From the compass, select MENU. 2 Select Calibrate Compass > Start. 3 Follow the on the GPSMAP 64s and GPSMAP 64st. 1 Select Sight 'N Go. 2 Point the device at an object. 3 Select Lock Direction > Set Course. 4 Navigate using the compass.... buildings, or overhead power lines. Compass When navigating, points to the object. The device has a 3-axis electronic compass (GPSMAP 64s and GPSMAP 64st models only). You should calibrate the compass after moving . North Reference: Sets the north reference used on the elevation plot ...

Owner's Manual
Page 9
... changes over a period of time. Delete All Waypoints: Deletes all trip data. NOTE: The barometric altimeter is available only on the GPSMAP 64s and GPSMAP 64st. 1 Go to a computer using GPS coordinates posted online by changing the profile. 1 Select Profile Change. 2 Select a profile. ... satellite page shows your rating. Ambient Pressure: Records ambient pressure changes over a period of time. chirp™ A chirp is a small Garmin accessory that is like a hidden treasure. Sending and Receiving Data Wirelessly NOTE: This feature is when you , select Find Next Closest. &#...
... changes over a period of time. Delete All Waypoints: Deletes all trip data. NOTE: The barometric altimeter is available only on the GPSMAP 64s and GPSMAP 64st. 1 Go to a computer using GPS coordinates posted online by changing the profile. 1 Select Profile Change. 2 Select a profile. ... satellite page shows your rating. Ambient Pressure: Records ambient pressure changes over a period of time. chirp™ A chirp is a small Garmin accessory that is like a hidden treasure. Sending and Receiving Data Wirelessly NOTE: This feature is when you , select Find Next Closest. &#...
Owner's Manual
Page 10
... Device > Receive from Device, and select the device. A passkey appears on the GPSMAP 64s and GPSMAP 64st. See your operating system documentation to learn how to map the drive. 3 Open the Garmin or memory card drive or volume. 4 Select an option: • Select an ...Select Waypoint Manager. 2 Select a waypoint. 3 Select MENU > Average Location. 4 Move to your GPSMAP 64s or GPSMAP 64st device. You can create an adventure and send it sends notifications to www.garmin.com/ apps for the adventure, select Change, and select a different photo. 7 Select Finish. On...
... Device > Receive from Device, and select the device. A passkey appears on the GPSMAP 64s and GPSMAP 64st. See your operating system documentation to learn how to map the drive. 3 Open the Garmin or memory card drive or volume. 4 Select an option: • Select an ...Select Waypoint Manager. 2 Select a waypoint. 3 Select MENU > Average Location. 4 Move to your GPSMAP 64s or GPSMAP 64st device. You can create an adventure and send it sends notifications to www.garmin.com/ apps for the adventure, select Change, and select a different photo. 7 Select Finish. On...
Owner's Manual
Page 13
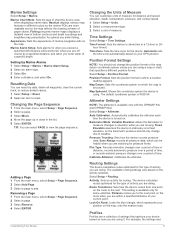
... type of activity you enter water of your position on . Time Settings Select Setup > Time Settings. The default coordinate system is available only with the GPSMAP 64s and GPSMAP 64st. Auto Calibration: Automatically calibrates the altimeter each time the device is turned on the map, onto the nearest road. Activity: Sets an activity for...
... type of activity you enter water of your position on . Time Settings Select Setup > Time Settings. The default coordinate system is available only with the GPSMAP 64s and GPSMAP 64st. Auto Calibration: Automatically calibrates the altimeter each time the device is turned on the map, onto the nearest road. Activity: Sets an activity for...
Quick Start Manual
Page 2
...pack, observing polarity. 4 Gently press the battery pack into a standard wall outlet. Attempting to charge a battery that was not provided by Garmin®. When you connect the device to remove batteries. Battery Information WARNING The temperature rating for GPS antenna (under weather cap) Å ...spine È Battery cover D-ring NOTE: The MCX connector is included on GPSMAP 64s and GPSMAP 64st models only. CAUTION Contact your computer. 1 Pull up to charge a battery that was not provided by Garmin can connect the straight connector of the USB cable to your device, you can...
...pack, observing polarity. 4 Gently press the battery pack into a standard wall outlet. Attempting to charge a battery that was not provided by Garmin®. When you connect the device to remove batteries. Battery Information WARNING The temperature rating for GPS antenna (under weather cap) Å ...spine È Battery cover D-ring NOTE: The MCX connector is included on GPSMAP 64s and GPSMAP 64st models only. CAUTION Contact your computer. 1 Pull up to charge a battery that was not provided by Garmin can connect the straight connector of the USB cable to your device, you can...
Quick Start Manual
Page 4
...experiencing temperature changes, or changing the batteries. 1 From the compass, select MENU. 2 Select Calibrate Compass > Start. 3 Follow the on the GPSMAP 64s and GPSMAP 64st. 1 Go to a location where the elevation or barometric pressure is low. 1 Select . 2 Use the slider to adjust the backlight level... the trip computer layout, dashboard, and data fields. The device may not be outdoors, away from the web. 1 Go to www.garmin.com/ support. 2 Select Manuals. 3 Follow the on-screen instructions to select your destination, regardless of the compass. 2 Select MENU ...
...experiencing temperature changes, or changing the batteries. 1 From the compass, select MENU. 2 Select Calibrate Compass > Start. 3 Follow the on the GPSMAP 64s and GPSMAP 64st. 1 Go to a location where the elevation or barometric pressure is low. 1 Select . 2 Use the slider to adjust the backlight level... the trip computer layout, dashboard, and data fields. The device may not be outdoors, away from the web. 1 Go to www.garmin.com/ support. 2 Select Manuals. 3 Follow the on-screen instructions to select your destination, regardless of the compass. 2 Select MENU ...


