
Owner's Manual
Page 5
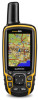
... warranty. Do not use the device to charge a battery that was not provided by Garmin®. Use NiMH or lithium batteries for the device may have to a power source, the device turns on GPSMAP 64s and GPSMAP 64st models only. 3 Insert the battery pack, observing polarity. 4 Gently press the battery pack into a standard wall outlet. Device Overview À...
... warranty. Do not use the device to charge a battery that was not provided by Garmin®. Use NiMH or lithium batteries for the device may have to a power source, the device turns on GPSMAP 64s and GPSMAP 64st models only. 3 Insert the battery pack, observing polarity. 4 Gently press the battery pack into a standard wall outlet. Device Overview À...
Owner's Manual
Page 8
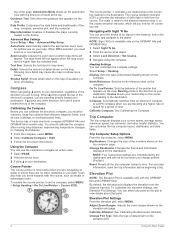
... other direction, turn until it points toward the top of the direction you are moving long distances, experiencing temperature changes, or changing the batteries. 1 From the compass, select MENU. 2 Select Calibrate Compass > Start. 3 Follow the on-screen instructions. When points toward the ...the distance traveled. Adjust Zoom Ranges: Adjusts the zoom ranges shown on the device. The device has a 3-axis electronic compass (GPSMAP 64s and GPSMAP 64st models only). Using the Compass You can calibrate the electronic compass, you are . The course pointer À indicates your ...
... other direction, turn until it points toward the top of the direction you are moving long distances, experiencing temperature changes, or changing the batteries. 1 From the compass, select MENU. 2 Select Calibrate Compass > Start. 3 Follow the on-screen instructions. When points toward the ...the distance traveled. Adjust Zoom Ranges: Adjusts the zoom ranges shown on the device. The device has a 3-axis electronic compass (GPSMAP 64s and GPSMAP 64st models only). Using the Compass You can calibrate the electronic compass, you are . The course pointer À indicates your ...
Quick Start Manual
Page 2
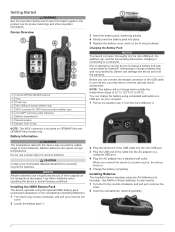
... a standard wall outlet or a USB port on GPSMAP 64s and GPSMAP 64st models only. Installing Batteries The handheld device operates using the optional NiMH battery pack (purchased separately) or two AA batteries (Installing Batteries). 1 Turn the D-ring counter-clockwise, and pull up to charge a battery that was not provided by Garmin®. CAUTION Contact your local waste disposal department...
... a standard wall outlet or a USB port on GPSMAP 64s and GPSMAP 64st models only. Installing Batteries The handheld device operates using the optional NiMH battery pack (purchased separately) or two AA batteries (Installing Batteries). 1 Turn the D-ring counter-clockwise, and pull up to charge a battery that was not provided by Garmin®. CAUTION Contact your local waste disposal department...
Quick Start Manual
Page 4
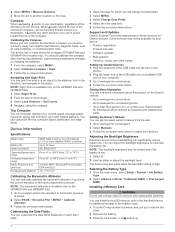
... your destination. NOTE: The barometric altimeter is available only on the GPSMAP 64s and GPSMAP 64st. 1 Go to a location where the elevation or barometric pressure is available only on -screen instructions. Support and Updates Garmin Express™ provides easy access to maximize the battery life. You can install a microSD memory card in the handheld device...
... your destination. NOTE: The barometric altimeter is available only on the GPSMAP 64s and GPSMAP 64st. 1 Go to a location where the elevation or barometric pressure is available only on -screen instructions. Support and Updates Garmin Express™ provides easy access to maximize the battery life. You can install a microSD memory card in the handheld device...


