Owner's Manual
Page 3
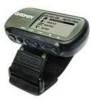
... first. Thank you with some direction on how to familiarize you for choosing the Garmin Foretrex 201. The Main Pages section provides information on which they appear. Introduction About This Manual Standard Package Contents: 1 Foretrex 201 Unit 1 Strap Extension 1 Wrist Strap 1 Owner's Manual 1 Quick Start Guide 1 Cradle for each of the operating features. The Overview section...
... first. Thank you with some direction on how to familiarize you for choosing the Garmin Foretrex 201. The Main Pages section provides information on which they appear. Introduction About This Manual Standard Package Contents: 1 Foretrex 201 Unit 1 Strap Extension 1 Wrist Strap 1 Owner's Manual 1 Quick Start Guide 1 Cradle for each of the operating features. The Overview section...
Owner's Manual
Page 5
... our on the Software. You further acknowledge that the Software is the property of Garmin and is protected under the wrist strap Serial Number: NOTE: If you have previously registered a Garmin product purchase, we invite you by our new product registration system are valuable trade secrets... valuable trade secret of the Software are now being automated and re-registering your Foretrex 201 handy and connect to record your original sales receipt in Garmin. Software License Agreement BY USING THE Foretrex 201, YOU AGREE TO BE BOUND BY THE TERMS AND CONDITIONS OF THE FOLLOWING SOFTWARE...
... our on the Software. You further acknowledge that the Software is the property of Garmin and is protected under the wrist strap Serial Number: NOTE: If you have previously registered a Garmin product purchase, we invite you by our new product registration system are valuable trade secrets... valuable trade secret of the Software are now being automated and re-registering your Foretrex 201 handy and connect to record your original sales receipt in Garmin. Software License Agreement BY USING THE Foretrex 201, YOU AGREE TO BE BOUND BY THE TERMS AND CONDITIONS OF THE FOLLOWING SOFTWARE...
Owner's Manual
Page 10
... the Unit and Wrist Strap The Foretrex 201 is waterproof to MapSource). It can cause damage to temperature extremes may damage plastic components. viii Avoid chemical cleaners and solvents that cannot be hand washed with a mild detergent solution and then wipe dry. Clean the unit using this guide, contact Garmin Product Support in the...
... the Unit and Wrist Strap The Foretrex 201 is waterproof to MapSource). It can cause damage to temperature extremes may damage plastic components. viii Avoid chemical cleaners and solvents that cannot be hand washed with a mild detergent solution and then wipe dry. Clean the unit using this guide, contact Garmin Product Support in the...
Owner's Manual
Page 11
... Immersing the Unit in Water.......... viii Table of Contents ix Overview 1-7 Getting Started 1 Foretrex 201 Overview 1 Using the Buttons 2 Using the Wrist Strap 3 Charging the Battery 5 Connecting the Foretrex 201 to your Computer 5 Turning on the Foretrex 201 6 Using the Main Pages 7 Switching Between the Main Pages.... 7 Main Pages 8-53 Satellite Page 8 Using the Satellite Page 8 Using... Software License Agreement iii Product Registration iii Limited Warranty iv Safety Information vi Warnings and Precautions vi Care Information viii Cleaning the Unit and Wrist Strap..
... Immersing the Unit in Water.......... viii Table of Contents ix Overview 1-7 Getting Started 1 Foretrex 201 Overview 1 Using the Buttons 2 Using the Wrist Strap 3 Charging the Battery 5 Connecting the Foretrex 201 to your Computer 5 Turning on the Foretrex 201 6 Using the Main Pages 7 Switching Between the Main Pages.... 7 Main Pages 8-53 Satellite Page 8 Using the Satellite Page 8 Using... Software License Agreement iii Product Registration iii Limited Warranty iv Safety Information vi Warnings and Precautions vi Care Information viii Cleaning the Unit and Wrist Strap..
Owner's Manual
Page 13
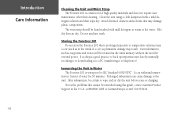
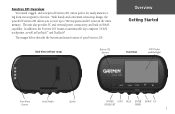
... external power connectivity, and built-in GPS Antenna Overview Getting Started Front View LCD Display (with Backlight) Power/Data Contacts Serial Number Speaker POWER GOTO PAGE ENTER DOWN UP BACKLIGHT MARK 1 Back View (without strap) Built-in WAAS capability. Foretrex 201 Overview Your small, rugged, and waterproof Foretrex 201 unit is perfect for easily maneuver- The...
... external power connectivity, and built-in GPS Antenna Overview Getting Started Front View LCD Display (with Backlight) Power/Data Contacts Serial Number Speaker POWER GOTO PAGE ENTER DOWN UP BACKLIGHT MARK 1 Back View (without strap) Built-in WAAS capability. Foretrex 201 Overview Your small, rugged, and waterproof Foretrex 201 unit is perfect for easily maneuver- The...
Owner's Manual
Page 15
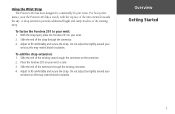
...connector. 4. Do not adjust too tightly around your wrist. 2. Place the Foretrex 201 on your wrist/arm as this may restrict blood circulation. Adjust to the existing strap. For best perfor- Using the Wrist Strap The Foretrex 201 has been designed to comfortably fit your wrist: 1. Do not adjust too... or arm. 3. Slide the end of the extension through the connector on the extension. 2. mance, wear the Foretrex 201 like a watch, with the top face of the strap through the connector. 3. Slide the end of the unit oriented towards the sky. Adjust to your wrist. To ...
...connector. 4. Do not adjust too tightly around your wrist. 2. Place the Foretrex 201 on your wrist/arm as this may restrict blood circulation. Adjust to the existing strap. For best perfor- Using the Wrist Strap The Foretrex 201 has been designed to comfortably fit your wrist: 1. Do not adjust too... or arm. 3. Slide the end of the extension through the connector on the extension. 2. mance, wear the Foretrex 201 like a watch, with the top face of the strap through the connector. 3. Slide the end of the unit oriented towards the sky. Adjust to your wrist. To ...
Owner's Manual
Page 16
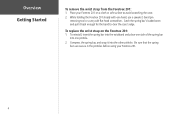
... and place one side of the spring bar into the other pinhole. Overview Getting Started To remove the wrist strap from the Foretrex 201: 1. While holding the Foretrex 201 steady with one pinhole. 2. To replace the wrist strap on a cloth or soft surface to clear the case's edge. Compress the spring bar, and snap it back...
... and place one side of the spring bar into the other pinhole. Overview Getting Started To remove the wrist strap from the Foretrex 201: 1. While holding the Foretrex 201 steady with one pinhole. 2. To replace the wrist strap on a cloth or soft surface to clear the case's edge. Compress the spring bar, and snap it back...
Owner's Manual
Page 71
... 15, 41 Specifications 54 Speed 56 Start the TImer 17 Stop Navigation 11, 13 Stop the Timer 17 Stop Time 56 Storage viii Strap 3 Strap Extension 3 Sunrise 28, 56 Sunset 28, 56 Sun and Moon Information 28 Synchronize Timer 17 System 52 T Temperature 5, 54 Text Out 51 Time 56 Timer... Project 26 Waypoints 1, 10, 18, 19, 20, 21, 22, 23, 24, 25, 26, 27, 28, 30, 34, 38, 40 Wrap When Full Tracks 31 Wrist Strap 3, 4, viii Z Zoom 10, 11 59
... 15, 41 Specifications 54 Speed 56 Start the TImer 17 Stop Navigation 11, 13 Stop the Timer 17 Stop Time 56 Storage viii Strap 3 Strap Extension 3 Sunrise 28, 56 Sunset 28, 56 Sun and Moon Information 28 Synchronize Timer 17 System 52 T Temperature 5, 54 Text Out 51 Time 56 Timer... Project 26 Waypoints 1, 10, 18, 19, 20, 21, 22, 23, 24, 25, 26, 27, 28, 30, 34, 38, 40 Wrap When Full Tracks 31 Wrist Strap 3, 4, viii Z Zoom 10, 11 59
Quick Start Guide
Page 2
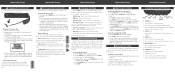
... Time Zone. Timer Page (if enabled) - When the Foretrex has established a GPS fix, U.S. To change the Time Zone, use it is completely charged, at -aglance-status of the Foretrex: battery and satellite dish icon. Press ENTER when done....The current date and time is charging. 5. To add the strap extension: 1. Connect the AC Charging Cable to select 'TIME ZONE' and press ENTER. 5. Foretrex 201 Setup Foretrex 201 Setup Foretrex 201 Setup Foretrex 201 Setup Foretrex 201 Buttons 1 Charging the Foretrex 201 The Foretrex operates on your wrist or arm. 3. To change the Time...
... Time Zone. Timer Page (if enabled) - When the Foretrex has established a GPS fix, U.S. To change the Time Zone, use it is completely charged, at -aglance-status of the Foretrex: battery and satellite dish icon. Press ENTER when done....The current date and time is charging. 5. To add the strap extension: 1. Connect the AC Charging Cable to select 'TIME ZONE' and press ENTER. 5. Foretrex 201 Setup Foretrex 201 Setup Foretrex 201 Setup Foretrex 201 Setup Foretrex 201 Buttons 1 Charging the Foretrex 201 The Foretrex operates on your wrist or arm. 3. To change the Time...


