Owner's Manual
Page 3
Table of Contents Introduction 1 Getting Started 1 Charging the Device 1 About the Battery 1 Installing the Standard Mount 1 Installing the Out-Front Mount 1 Releasing the Edge 2 Turning On the Device 2 Keys 2 Acquiring Satellite Signals 2 Training 3 Going for a Ride 3 Alerts 3 ... Your ANT + Sensors 7 Using the Weight Scale 7 History 7 Viewing Your Ride 7 Viewing Data Totals 7 Sending Your Ride to Garmin Connect 7 Garmin Connect 7 Connected Features 8 Deleting History 8 Data Recording 8 Changing the Data Storage Location 8 Installing a Memory Card 8 Data Management...
Table of Contents Introduction 1 Getting Started 1 Charging the Device 1 About the Battery 1 Installing the Standard Mount 1 Installing the Out-Front Mount 1 Releasing the Edge 2 Turning On the Device 2 Keys 2 Acquiring Satellite Signals 2 Training 3 Going for a Ride 3 Alerts 3 ... Your ANT + Sensors 7 Using the Weight Scale 7 History 7 Viewing Your Ride 7 Viewing Data Totals 7 Sending Your Ride to Garmin Connect 7 Garmin Connect 7 Connected Features 8 Deleting History 8 Data Recording 8 Changing the Data Storage Location 8 Installing a Memory Card 8 Data Management...
Owner's Manual
Page 5
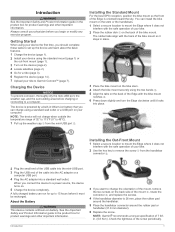
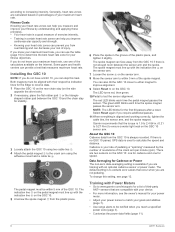
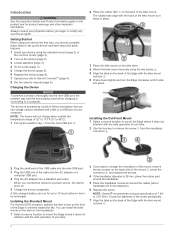
... weather cap, and the surrounding area before you should complete these tasks to Garmin Connect™ (page 7). Installing the Standard Mount For the best GPS reception, position the bike mount so the front of the Edge is powered by a built-in lithium-ion battery that you can charge using... location to remove the screw À from the mini-USB port Á. Always consult your bike. 2 Use the hex key to mount the Edge where it must be recharged. Introduction WARNING See the Important Safety and Product Information guide in the product box for product warnings and other ...
... weather cap, and the surrounding area before you should complete these tasks to Garmin Connect™ (page 7). Installing the Standard Mount For the best GPS reception, position the bike mount so the front of the Edge is powered by a built-in lithium-ion battery that you can charge using... location to remove the screw À from the mini-USB port Á. Always consult your bike. 2 Use the hex key to mount the Edge where it must be recharged. Introduction WARNING See the Important Safety and Product Information guide in the product box for product warnings and other ...
Owner's Manual
Page 6
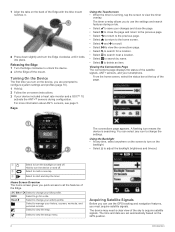
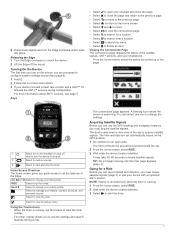
...acquire satellite signals. The device may need a clear view of the sky to all the features of the Edge. 7 Align the tabs on the back of the Edge with the bike mount notches Ä. 8 Press down slightly and turn the backlight on and off. The time and date are...8226; Select to search for a ride. Select to configure system settings and profiles (page 10). 1 Hold . 2 Follow the on and off the mount. Turning On the Device The first time you are set automatically based on the backlight. • Select to adjust the backlight brightness and timeout. À...
...acquire satellite signals. The device may need a clear view of the sky to all the features of the Edge. 7 Align the tabs on the back of the Edge with the bike mount notches Ä. 8 Press down slightly and turn the backlight on and off. The time and date are...8226; Select to search for a ride. Select to configure system settings and profiles (page 10). 1 Hold . 2 Follow the on and off the mount. Turning On the Device The first time you are set automatically based on the backlight. • Select to adjust the backlight brightness and timeout. À...
Owner's Manual
Page 10
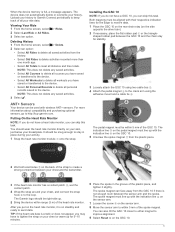
... also tilt the GSC 10 closer to either magnet to the crank arm using the adhesive mount and a cable tie Ã. according to test the sensor alignment. The indication line &#... heart rate, use the table (page 16) to determine the best heart rate zone for the Edge to match your fitness objectives. Select Reset again if you reach a specified power zone (page 3).... and one of the calculators available on percentages of the crank arm per minute (rpm). Garmin recommends that measures maximum heart rate. The pedal magnet must line up with their respective indication...
... also tilt the GSC 10 closer to either magnet to the crank arm using the adhesive mount and a cable tie Ã. according to test the sensor alignment. The indication line &#... heart rate, use the table (page 16) to determine the best heart rate zone for the Edge to match your fitness objectives. Select Reset again if you reach a specified power zone (page 3).... and one of the calculators available on percentages of the crank arm per minute (rpm). Garmin recommends that measures maximum heart rate. The pedal magnet must line up with their respective indication...
Owner's Manual
Page 12
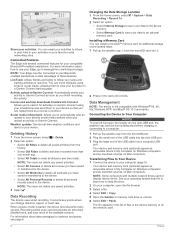
...to save your data to your device. Your device and memory card (optional) appear as removable drives in real time. Connected Features The Edge has several connected features for cadence and power, see page 6. You can invite followers using your smartphone and send them to your device... Files to Your Device 1 Connect the device to follow your races and training activities in My Computer on Windows computers and as mounted volumes on Garmin Connect using email or social media, allowing them as you upload an activity to take advantage of the USB cable into a computer...
...to save your data to your device. Your device and memory card (optional) appear as removable drives in real time. Connected Features The Edge has several connected features for cadence and power, see page 6. You can invite followers using your smartphone and send them to your device... Files to Your Device 1 Connect the device to follow your races and training activities in My Computer on Windows computers and as mounted volumes on Garmin Connect using email or social media, allowing them as you upload an activity to take advantage of the USB cable into a computer...
Owner's Manual
Page 17
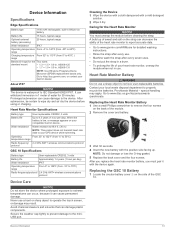
...battery, you must unsnap the module before using or charging. Device Information Specifications Edge Specifications Battery type 1100 mAh rechargable, built-in lithium-ion battery Battery life ...to 113ºF (from 0º to 45ºC ) range Bands (O-rings) for the Two sizes: standard mount • 1. 3 × 1. 5 × 0. 9 in . About IPX7 NOTICE The device is low... wireless communications protocol Device Care NOTICE Do not store the device where prolonged exposure to www.garmin.com/ HRMcare for detailed washing instructions. • Rinse the strap after every use a ...
...battery, you must unsnap the module before using or charging. Device Information Specifications Edge Specifications Battery type 1100 mAh rechargable, built-in lithium-ion battery Battery life ...to 113ºF (from 0º to 45ºC ) range Bands (O-rings) for the Two sizes: standard mount • 1. 3 × 1. 5 × 0. 9 in . About IPX7 NOTICE The device is low... wireless communications protocol Device Care NOTICE Do not store the device where prolonged exposure to www.garmin.com/ HRMcare for detailed washing instructions. • Rinse the strap after every use a ...
Owner's Manual
Page 21
See memory card mounting the device 1 N navigation 9 back to start 9 stopping 9 O O-rings (bands) 13 on-screen buttons 2 P pairing 2 pairing ANT + sensors 7 personal records 5, 8 restoring 5 points of interest (POI) 10 ... 8 device care 13 registration 14 resetting 14 display settings 12 distance, alerts 3 E elevation 12 F files, transferring 8 finding locations 10 addresses 10 near your location 10 G Garmin Connect 3, 7 storing data 7 GPS satellite page 12 signal 2 stopping 12 GSC 10 6, 13 H heart rate alerts 3 zones 5, 6, 16 heart rate monitor 5, 13 history 3, 7 deleting 8 sending...
See memory card mounting the device 1 N navigation 9 back to start 9 stopping 9 O O-rings (bands) 13 on-screen buttons 2 P pairing 2 pairing ANT + sensors 7 personal records 5, 8 restoring 5 points of interest (POI) 10 ... 8 device care 13 registration 14 resetting 14 display settings 12 distance, alerts 3 E elevation 12 F files, transferring 8 finding locations 10 addresses 10 near your location 10 G Garmin Connect 3, 7 storing data 7 GPS satellite page 12 signal 2 stopping 12 GSC 10 6, 13 H heart rate alerts 3 zones 5, 6, 16 heart rate monitor 5, 13 history 3, 7 deleting 8 sending...
Quick Start Manual
Page 2
... cable into the mini-USB port. 3 Plug the USB end of the bike mount so it locks into a standard wall outlet. NOTE: Garmin® recommends a torque specification of the Edge is oriented toward the sky. When you begin or modify any exercise program. Introduction...page 6). 7 Upload your ride to Garmin Connect™ (page 4). 8 Get the owner's manual (page 6). Installing the Standard Mount For the best GPS reception, position the bike mount so the front of 7 lbfin. (0. 8 N-m). Installing the Out-Front Mount 1 Select a secure location to mount the Edge where it must be recharged. A fully...
... cable into the mini-USB port. 3 Plug the USB end of the bike mount so it locks into a standard wall outlet. NOTE: Garmin® recommends a torque specification of the Edge is oriented toward the sky. When you begin or modify any exercise program. Introduction...page 6). 7 Upload your ride to Garmin Connect™ (page 4). 8 Get the owner's manual (page 6). Installing the Standard Mount For the best GPS reception, position the bike mount so the front of 7 lbfin. (0. 8 N-m). Installing the Out-Front Mount 1 Select a secure location to mount the Edge where it must be recharged. A fully...
Quick Start Manual
Page 3
Hold to turn the device on and off the mount. Road Select to manage your activity profile. Select to change your history, courses, workouts, and personal records. The timer overlay allows you to all the features of the Edge. You can record speed and distance, you quick ...From the home screen, select RIDE. 2 Wait while the device locates satellites. 3 Select to delete an item. 8 Press down slightly and turn the Edge clockwise until the timer page appears (page 3). A flashing icon means the device is searching. Select to view the setup menu. Turning On the Device...
Hold to turn the device on and off the mount. Road Select to manage your activity profile. Select to change your history, courses, workouts, and personal records. The timer overlay allows you to all the features of the Edge. You can record speed and distance, you quick ...From the home screen, select RIDE. 2 Wait while the device locates satellites. 3 Select to delete an item. 8 Press down slightly and turn the Edge clockwise until the timer page appears (page 3). A flashing icon means the device is searching. Select to view the setup menu. Turning On the Device...
Quick Start Manual
Page 5
... patch Â, wet the contact patch. 4 Wrap the strap around your history. For more than one month ago. • Select All Totals to http: / / buy .garmin .com. It should wear the heart rate monitor directly on your skin, just below your activity. 1 Snap the heart rate monitor module À onto the... magnet must be within 5 mm of the strap to create a strong connection between the GSC 10 and the chain stay for the Edge to the crank arm using the adhesive mount and a cable tie Ã. When the device memory is not enough room between the sensor arm and the spoke. Installing the...
... patch Â, wet the contact patch. 4 Wrap the strap around your history. For more than one month ago. • Select All Totals to http: / / buy .garmin .com. It should wear the heart rate monitor directly on your skin, just below your activity. 1 Snap the heart rate monitor module À onto the... magnet must be within 5 mm of the strap to create a strong connection between the GSC 10 and the chain stay for the Edge to the crank arm using the adhesive mount and a cable tie Ã. When the device memory is not enough room between the sensor arm and the spoke. Installing the...


