Owner's Manual
Page 3
Table of Contents Introduction 1 Getting Started 1 Charging the Device 1 About the Battery 1 Installing the Standard Mount 1 Installing the Out-Front Mount 1 Releasing the Edge 2 Turning On the Device 2 Keys 2 Acquiring Satellite Signals 2 Training 3 Going for a Ride 3 Alerts 3 ... Your ANT + Sensors 7 Using the Weight Scale 7 History 7 Viewing Your Ride 7 Viewing Data Totals 7 Sending Your Ride to Garmin Connect 7 Garmin Connect 7 Connected Features 8 Deleting History 8 Data Recording 8 Changing the Data Storage Location 8 Installing a Memory Card 8 Data Management...
Table of Contents Introduction 1 Getting Started 1 Charging the Device 1 About the Battery 1 Installing the Standard Mount 1 Installing the Out-Front Mount 1 Releasing the Edge 2 Turning On the Device 2 Keys 2 Acquiring Satellite Signals 2 Training 3 Going for a Ride 3 Alerts 3 ... Your ANT + Sensors 7 Using the Weight Scale 7 History 7 Viewing Your Ride 7 Viewing Data Totals 7 Sending Your Ride to Garmin Connect 7 Garmin Connect 7 Connected Features 8 Deleting History 8 Data Recording 8 Changing the Data Storage Location 8 Installing a Memory Card 8 Data Management...
Owner's Manual
Page 5
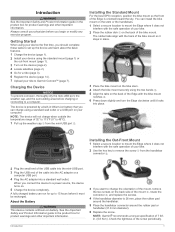
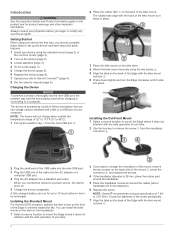
... with the bike mount notches Â. 6 Press down slightly and turn the Edge clockwise until it locks into a standard wall outlet. The device is powered by a built-in lithium-ion battery that you connect the device to 15 hours before it does not interfere with ...the connector Ã, and replace the screws. 4 If the handlebar diameter is oriented toward the sky. NOTE: Garmin® recommends a torque specification of your bike. 2 Use the hex key to Garmin Connect™ (page 7). Introduction 1 Always consult your ride to remove the screw À from the mini-...
... with the bike mount notches Â. 6 Press down slightly and turn the Edge clockwise until it locks into a standard wall outlet. The device is powered by a built-in lithium-ion battery that you connect the device to 15 hours before it does not interfere with ...the connector Ã, and replace the screws. 4 If the handlebar diameter is oriented toward the sky. NOTE: Garmin® recommends a torque specification of your bike. 2 Use the hex key to Garmin Connect™ (page 7). Introduction 1 Always consult your ride to remove the screw À from the mini-...
Owner's Manual
Page 16
...necessary, customize the lap data fields (page 11). This feature is off when you can select Auto to allow the device to www.garmin.com / aboutGPS. Record To: Sets the data storage location (page 8). Changing the Configuration Settings You can use Auto Lap to ... you change the amount of day. Recording Interval: Controls how the device records activity data. Smart records key points where you to save battery life. Data Averaging: Controls whether the device includes zero values for distance and speed, elevation, temperature, weight, position format, and time ...
...necessary, customize the lap data fields (page 11). This feature is off when you can select Auto to allow the device to www.garmin.com / aboutGPS. Record To: Sets the data storage location (page 8). Changing the Configuration Settings You can use Auto Lap to ... you change the amount of day. Recording Interval: Controls how the device records activity data. Smart records key points where you to save battery life. Data Averaging: Controls whether the device includes zero values for distance and speed, elevation, temperature, weight, position format, and time ...
Owner's Manual
Page 17
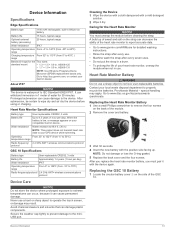
... GSC 10 Specifications Battery type User-replaceable CR2032, 3 volts Battery life Approximately 1. 4 years (1 hour per day). Device Information Specifications Edge Specifications Battery type 1100 mAh rechargable, built-in lithium-ion battery Battery life 15 hours, typical usage Optional external battery (accessory) 20 ...for the Two sizes: standard mount • 1. 3 × 1. 5 × 0. 9 in . When the battery is waterproof to http: / / buy .garmin .com, or contact your heart rate monitor, unsnap the module when not in 1 meter of the heart rate monitor to...
... GSC 10 Specifications Battery type User-replaceable CR2032, 3 volts Battery life Approximately 1. 4 years (1 hour per day). Device Information Specifications Edge Specifications Battery type 1100 mAh rechargable, built-in lithium-ion battery Battery life 15 hours, typical usage Optional external battery (accessory) 20 ...for the Two sizes: standard mount • 1. 3 × 1. 5 × 0. 9 in . When the battery is waterproof to http: / / buy .garmin .com, or contact your heart rate monitor, unsnap the module when not in 1 meter of the heart rate monitor to...
Owner's Manual
Page 18
....garmin .com, or contact your Garmin dealer for one second to turn on the device. From the home screen, select > System > About. Balance: The current left /right power balance. Balance - 30s Avg. : The 30-second moving average of left / right power balance. Maximizing Battery ...significant changes in temperature. Unlocking the Touchscreen 1 Select . 2 Select . Getting More Information You can decrease the backlight timeout to maximize the battery life. 1 Select > Backlight Timeout. 2 Select an option. Balance - 10s Avg. : The 10-second moving average of the touchscreen....
....garmin .com, or contact your Garmin dealer for one second to turn on the device. From the home screen, select > System > About. Balance: The current left /right power balance. Balance - 30s Avg. : The 30-second moving average of left / right power balance. Maximizing Battery ...significant changes in temperature. Unlocking the Touchscreen 1 Select . 2 Select . Getting More Information You can decrease the backlight timeout to maximize the battery life. 1 Select > Backlight Timeout. 2 Select an option. Balance - 10s Avg. : The 10-second moving average of the touchscreen....
Owner's Manual
Page 19
Battery Level: The remaining battery power. Lap: The average cadence for the last completed lap. Requires a New Leaf® assessment. to Dest. : The remaining distance to 5). Dist. Elevation: The altitude ...
Battery Level: The remaining battery power. Lap: The average cadence for the last completed lap. Requires a New Leaf® assessment. to Dest. : The remaining distance to 5). Dist. Elevation: The altitude ...
Owner's Manual
Page 21
...2 pairing 7 ANT+ sensors 5 applications 8 Auto Lap 11, 12 Auto Pause 11 auto scroll 12 B back to start 9 backlight 2, 12, 14 battery charging 1 maximizing 14 replacing 13 type 1 Bluetooth technology 8, 11 brightness 14 C cadence 6 alerts 3 calibrating power meter 7 touchscreen 14 calorie, alerts 3 ... registration 14 resetting 14 display settings 12 distance, alerts 3 E elevation 12 F files, transferring 8 finding locations 10 addresses 10 near your location 10 G Garmin Connect 3, 7 storing data 7 GPS satellite page 12 signal 2 stopping 12 GSC 10 6, 13 H heart rate alerts 3 zones 5, 6, 16 heart ...
...2 pairing 7 ANT+ sensors 5 applications 8 Auto Lap 11, 12 Auto Pause 11 auto scroll 12 B back to start 9 backlight 2, 12, 14 battery charging 1 maximizing 14 replacing 13 type 1 Bluetooth technology 8, 11 brightness 14 C cadence 6 alerts 3 calibrating power meter 7 touchscreen 14 calorie, alerts 3 ... registration 14 resetting 14 display settings 12 distance, alerts 3 E elevation 12 F files, transferring 8 finding locations 10 addresses 10 near your location 10 G Garmin Connect 3, 7 storing data 7 GPS satellite page 12 signal 2 stopping 12 GSC 10 6, 13 H heart rate alerts 3 zones 5, 6, 16 heart ...
Quick Start Manual
Page 2
...tabs on your computer. Installing the Out-Front Mount 1 Select a secure location to mount the Edge where it must be recharged. NOTE: Garmin® recommends a torque specification of the Edge with the bike mount notches Ä. 2 Always consult your physician before you connect the device ...(page 6). You can run for product warnings and other important information. When you begin or modify any exercise program. A fully charged battery can install the bike mount on the stem or the handlebars. 1 Select a secure location to a computer. Installing the Standard Mount ...
...tabs on your computer. Installing the Out-Front Mount 1 Select a secure location to mount the Edge where it must be recharged. NOTE: Garmin® recommends a torque specification of the Edge with the bike mount notches Ä. 2 Always consult your physician before you connect the device ...(page 6). You can run for product warnings and other important information. When you begin or modify any exercise program. A fully charged battery can install the bike mount on the stem or the handlebars. 1 Select a secure location to a computer. Installing the Standard Mount ...


