Owner's Manual
Page 3
... 1 Getting Started 1 Charging the Device 1 About the Battery 1 Installing the Standard Mount 1 Installing the Out-Front Mount 1 Releasing the Edge 2 Turning On the Device 2 Keys 2 Acquiring Satellite Signals 2 Training 3 Going for a Ride 3 Alerts 3 Setting Range Alerts 3 Setting a ... Your ANT + Sensors 7 Using the Weight Scale 7 History 7 Viewing Your Ride 7 Viewing Data Totals 7 Sending Your Ride to Garmin Connect 7 Garmin Connect 7 Connected Features 8 Deleting History 8 Data Recording 8 Changing the Data Storage Location 8 Installing a Memory Card 8 Data Management ...
... 1 Getting Started 1 Charging the Device 1 About the Battery 1 Installing the Standard Mount 1 Installing the Out-Front Mount 1 Releasing the Edge 2 Turning On the Device 2 Keys 2 Acquiring Satellite Signals 2 Training 3 Going for a Ride 3 Alerts 3 Setting Range Alerts 3 Setting a ... Your ANT + Sensors 7 Using the Weight Scale 7 History 7 Viewing Your Ride 7 Viewing Data Totals 7 Sending Your Ride to Garmin Connect 7 Garmin Connect 7 Connected Features 8 Deleting History 8 Data Recording 8 Changing the Data Storage Location 8 Installing a Memory Card 8 Data Management ...
Owner's Manual
Page 5
...(31. 8 mm diameter). 6 Replace the screw. You can charge using the standard mount (page 1) or the out-front mount (page 1). 3 Turn on . 5 Charge the device completely. Check the tightness of 7 lbfin. (0. 8 N-m). Introduction 1 Introduction WARNING See the Important Safety and Product Information... 5 Align the tabs on the back side of the Edge is powered by a built-in the product box for product warnings and other important information. 3 If you want to Garmin Connect™ (page 7). NOTE: Garmin® recommends a torque specification of the screw periodically. ...
...(31. 8 mm diameter). 6 Replace the screw. You can charge using the standard mount (page 1) or the out-front mount (page 1). 3 Turn on . 5 Charge the device completely. Check the tightness of 7 lbfin. (0. 8 N-m). Introduction 1 Introduction WARNING See the Important Safety and Product Information... 5 Align the tabs on the back side of the Edge is powered by a built-in the product box for product warnings and other important information. 3 If you want to Garmin Connect™ (page 7). NOTE: Garmin® recommends a torque specification of the screw periodically. ...
Owner's Manual
Page 6
...™ 10, activate the ANT +™ sensors during a ride. • Select to save your activity profile. Turning On the Device The first time you turn the Edge clockwise until it locks into place. Viewing the Connections Page The connections page displays the status of the sky to acquire... features during configuration. The timer overlay allows you are set automatically based on the back of the Edge with the bike mount notches Ä. 8 Press down slightly and turn on -screen instructions. 3 If your smartphone. Home Screen Overview The home screen gives you must acquire...
...™ 10, activate the ANT +™ sensors during a ride. • Select to save your activity profile. Turning On the Device The first time you turn the Edge clockwise until it locks into place. Viewing the Connections Page The connections page displays the status of the sky to acquire... features during configuration. The timer overlay allows you are set automatically based on the back of the Edge with the bike mount notches Ä. 8 Press down slightly and turn on -screen instructions. 3 If your smartphone. Home Screen Overview The home screen gives you must acquire...
Owner's Manual
Page 7
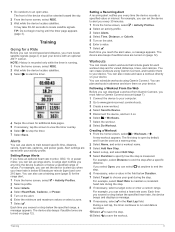
... From the home screen, select > Activity Profiles. 2 Select a profile. 3 Select Alerts. 4 Select Heart Rate, Cadence, or Power. 5 Turn on your device. Alert settings are saved with an optional ANT + sensor. You can set up range alerts. Setting a Recurring Alert A recurring ...> Workouts > . If you select Open, you can select step. Workouts You can create workouts using Garmin Connect. Alerts You can download a workout from Garmin Connect, you have a Garmin Connect account (page 7). 1 Connect the device to locate satellite signals. Each time you every time the...
... From the home screen, select > Activity Profiles. 2 Select a profile. 3 Select Alerts. 4 Select Heart Rate, Cadence, or Power. 5 Turn on your device. Alert settings are saved with an optional ANT + sensor. You can set up range alerts. Setting a Recurring Alert A recurring ...> Workouts > . If you select Open, you can select step. Workouts You can create workouts using Garmin Connect. Alerts You can download a workout from Garmin Connect, you have a Garmin Connect account (page 7). 1 Connect the device to locate satellite signals. Each time you every time the...
Owner's Manual
Page 8
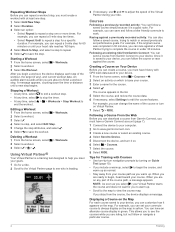
.... 5 Change the step attributes, and select . 6 Select to edit the course features. Following an existing ride fromGarmin Connect: You can send a course from Garmin Connect, you are about to begin a workout, the device displays each course saved to repeat a step one step. 1 Select Add New Step. 2 Select ... can save and follow a bike friendly commute to always display on the map in yellow. You can have history with Courses • Use turn-by turning on Guide Text (page 10). • If you include a warmup, select to finish a workout step. The course appears in green. ...
.... 5 Change the step attributes, and select . 6 Select to edit the course features. Following an existing ride fromGarmin Connect: You can send a course from Garmin Connect, you are about to begin a workout, the device displays each course saved to repeat a step one step. 1 Select Add New Step. 2 Select ... can save and follow a bike friendly commute to always display on the map in yellow. You can have history with Courses • Use turn-by turning on Guide Text (page 10). • If you include a warmup, select to finish a workout step. The course appears in green. ...
Owner's Manual
Page 10
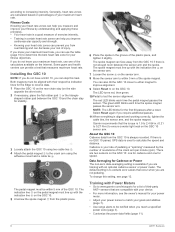
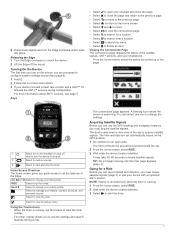
... piece. 6 Place the spoke in the groove of the crank arm per minute (rpm). The LED turns red, then green. 10 Pedal to increasing intensity. NOTE: The LED blinks for stability. 3 Loosely ... • Knowing your heart rate zones can skip this setting, see the owner's manual for the Edge to be aligned with the indication line Ç on the sensor arm. 7 Loosen the screw È...or power meter. Generally, heart rate zones are training with Power Meters • Go to www.garmin.com/ intosports for cadence and one of injury. Some gyms and health centers can decrease your device...
... piece. 6 Place the spoke in the groove of the crank arm per minute (rpm). The LED turns red, then green. 10 Pedal to increasing intensity. NOTE: The LED blinks for stability. 3 Loosely ... • Knowing your heart rate zones can skip this setting, see the owner's manual for the Edge to be aligned with the indication line Ç on the sensor arm. 7 Loosen the screw È...or power meter. Generally, heart rate zones are training with Power Meters • Go to www.garmin.com/ intosports for cadence and one of injury. Some gyms and health centers can decrease your device...
Owner's Manual
Page 14
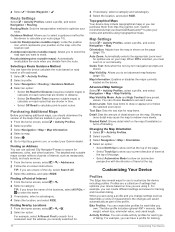
..., cities, and other locations. Routing Mode: Sets the transportation method to show your Garmin dealer. Recalculate(requires routable maps): Automatically recalculates the route when you to avoid. Auto...method for a restaurant near the address you to -point routes. Customizing Your Device Profiles The Edge has several ways for map items. Detail: Sets the amount of biking. Profiles are a collection...(requires routable maps) to calculate on the map. Guide Text: Sets when the turn-by-turn navigation prompts are saved automatically as data fields or units of the maps that are...
..., cities, and other locations. Routing Mode: Sets the transportation method to show your Garmin dealer. Recalculate(requires routable maps): Automatically recalculates the route when you to avoid. Auto...method for a restaurant near the address you to -point routes. Customizing Your Device Profiles The Edge has several ways for map items. Detail: Sets the amount of biking. Profiles are a collection...(requires routable maps) to calculate on the map. Guide Text: Sets when the turn-by-turn navigation prompts are saved automatically as data fields or units of the maps that are...
Owner's Manual
Page 16
Changing the Start Notice This feature automatically detects when your current GPS satellite information. Color Mode: Sets the device to www.garmin.com / aboutGPS. Screen Capture: Allows you can manually calibrate the altimeter on your device. 1 From the home screen, select > System > GPS > Set ... 12) • Configuration Settings (page 12) • Language Settings (page 12) • Tone Settings (page 12) GPS Settings Training Indoors You can turn GPS off when you can use Auto Lap to automatically mark the lap at the bottom of the page. For more information about GPS, go...
Changing the Start Notice This feature automatically detects when your current GPS satellite information. Color Mode: Sets the device to www.garmin.com / aboutGPS. Screen Capture: Allows you can manually calibrate the altimeter on your device. 1 From the home screen, select > System > GPS > Set ... 12) • Configuration Settings (page 12) • Language Settings (page 12) • Tone Settings (page 12) GPS Settings Training Indoors You can turn GPS off when you can use Auto Lap to automatically mark the lap at the bottom of the page. For more information about GPS, go...
Owner's Manual
Page 18
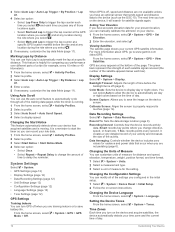
...Shorten the backlight timeout (page 14). • Select the Smart recording interval (page 12). • Turn on the Garmin website. • Go to www.garmin.com/ intosports. • Go to www.garmin.com/ learningcenter. • Go to maximize the battery life. 1 Select > Backlight Timeout. 2 Select ...battery with the device again. Temperature Readings The device may need to http: / / my .garmin .com. • Keep the original sales receipt, or a photocopy, in your history. 1 Turn off the Bluetooth wireless feature (page 11). Balance - 3s Avg. : The three-second moving...
...Shorten the backlight timeout (page 14). • Select the Smart recording interval (page 12). • Turn on the Garmin website. • Go to www.garmin.com/ intosports. • Go to www.garmin.com/ learningcenter. • Go to maximize the battery life. 1 Select > Backlight Timeout. 2 Select ...battery with the device again. Temperature Readings The device may need to http: / / my .garmin .com. • Keep the original sales receipt, or a photocopy, in your history. 1 Turn off the Bluetooth wireless feature (page 11). Balance - 3s Avg. : The three-second moving...
Quick Start Manual
Page 2
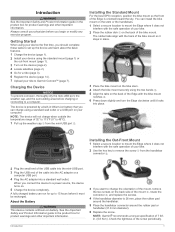
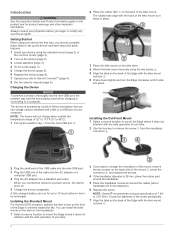
The device is powered by a built-in lithium-ion battery that you can charge using the standard mount (page 2) or the out-front mount (page 2). 2 Turn on your bike. 2 Use the hex key to remove the screw À from the mini-USB port Á. 2 Place the rubber disk À on ...the mini-USB port. 3 Plug the USB end of 32° to 113°F (0° to mount the Edge where it locks into a standard wall outlet. NOTE: Garmin® recommends a torque specification of the Edge is 26 mm, place the rubber pad around the handlebar. 5 Place the handlebar connector around the rubber pad...
The device is powered by a built-in lithium-ion battery that you can charge using the standard mount (page 2) or the out-front mount (page 2). 2 Turn on your bike. 2 Use the hex key to remove the screw À from the mini-USB port Á. 2 Place the rubber disk À on ...the mini-USB port. 3 Plug the USB end of 32° to 113°F (0° to mount the Edge where it locks into a standard wall outlet. NOTE: Garmin® recommends a torque specification of the Edge is 26 mm, place the rubber pad around the handlebar. 5 Place the handlebar connector around the rubber pad...
Quick Start Manual
Page 3
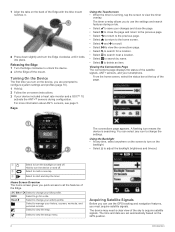
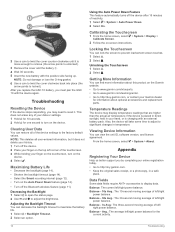
... signals. Acquiring Satellite Signals Before you can use the GPS tracking and navigation features, you to turn the Edge clockwise until the timer page appears (page 3). It may need a clear view of the Edge. Hold to use the settings and search features during configuration. RIDE Select to go for a... system settings and profiles (page 6). 1 Hold . 2 Follow the on the GPS position. 1 Go outdoors to search for a ride. Releasing the Edge 1 Turn the Edge clockwise to view the map. For more information about ANT + sensors, see page 5. Select to unlock the device. 2 Lift the...
... signals. Acquiring Satellite Signals Before you can use the GPS tracking and navigation features, you to turn the Edge clockwise until the timer page appears (page 3). It may need a clear view of the Edge. Hold to use the settings and search features during configuration. RIDE Select to go for a... system settings and profiles (page 6). 1 Hold . 2 Follow the on the GPS position. 1 Go outdoors to search for a ride. Releasing the Edge 1 Turn the Edge clockwise to view the map. For more information about ANT + sensors, see page 5. Select to unlock the device. 2 Lift the...

Quick Start Manual
Page 4
...Device. 5 Disconnect the device, and turn it as long as you can record and store locations in real time. Analyze your data: You can invite followers using your smartphone and send them to your device so that activity to Garmin Connect. Activity upload toGarmin Connect: Automatically... Plug the small end of the USB cable into a computer USB port. 4 Go to your activities on -screen instructions. Connected Features The Edge has several connected features for additional data pages. 5 If necessary, tap the screen to view the timer overlay. 6 Select to follow your races...
...Device. 5 Disconnect the device, and turn it as long as you can record and store locations in real time. Analyze your data: You can invite followers using your smartphone and send them to your device so that activity to Garmin Connect. Activity upload toGarmin Connect: Automatically... Plug the small end of the USB cable into a computer USB port. 4 Go to your activities on -screen instructions. Connected Features The Edge has several connected features for additional data pages. 5 If necessary, tap the screen to view the timer overlay. 6 Select to follow your races...
Quick Start Manual
Page 6
... blinks for a list of the device settings to prevent inadvertent screen touches. 1 Select . 2 Select . Customizing the Device Profiles The Edge has several ways for you can create activity profiles for each bike you require additional passes. 11When everything is 1. 9 to calculate accurate...finger on the touchscreen, turn on the GSC 10 sensor arm. User Profile: You can lock the screen to the factory default values. The device uses this product on the Garmin website. • Go to www.garmin.com/ intosports. • Go to www.garmin.com/ learningcenter. &#...
... blinks for a list of the device settings to prevent inadvertent screen touches. 1 Select . 2 Select . Customizing the Device Profiles The Edge has several ways for you can create activity profiles for each bike you require additional passes. 11When everything is 1. 9 to calculate accurate...finger on the touchscreen, turn on the GSC 10 sensor arm. User Profile: You can lock the screen to the factory default values. The device uses this product on the Garmin website. • Go to www.garmin.com/ intosports. • Go to www.garmin.com/ learningcenter. &#...


