Owner's Manual
Page 3
... 7 Pairing Your ANT + Sensors 7 Using the Weight Scale 7 History 7 Viewing Your Ride 7 Viewing Data Totals 7 Sending Your Ride to Garmin Connect 7 Garmin Connect 7 Connected Features 8 Deleting History 8 Data Recording 8 Changing the Data Storage Location 8 Installing a Memory Card 8 Data Management 8 Connecting ... Edge Specifications 13 Heart Rate Monitor Specifications 13 GSC 10 Specifications 13 Device Care 13 Cleaning the Device 13 Caring for the Heart Rate Monitor 13 Heart Rate Monitor Battery 13 Replacing the Heart Rate Monitor Battery 13 Replacing the GSC 10 Battery...
... 7 Pairing Your ANT + Sensors 7 Using the Weight Scale 7 History 7 Viewing Your Ride 7 Viewing Data Totals 7 Sending Your Ride to Garmin Connect 7 Garmin Connect 7 Connected Features 8 Deleting History 8 Data Recording 8 Changing the Data Storage Location 8 Installing a Memory Card 8 Data Management 8 Connecting ... Edge Specifications 13 Heart Rate Monitor Specifications 13 GSC 10 Specifications 13 Device Care 13 Cleaning the Device 13 Caring for the Heart Rate Monitor 13 Heart Rate Monitor Battery 13 Replacing the Heart Rate Monitor Battery 13 Replacing the GSC 10 Battery...
Owner's Manual
Page 5
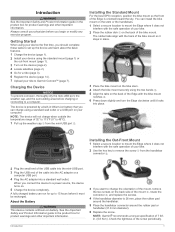
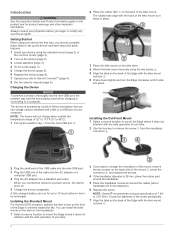
...113°F (0° to 45°C). 1 Pull up to Garmin Connect™ (page 7). About the Battery WARNING This device contains a lithium-ion battery. See the Important Safety and Product Information guide in the product ...5 Place the handlebar connector around the rubber pad or handlebar (31. 8 mm diameter). 6 Replace the screw. Installing the Standard Mount For the best GPS reception, position the bike mount so ...cable into the mini-USB port. 3 Plug the USB end of the Edge is powered by a built-in lithium-ion battery that you can install the bike mount on the back of your computer....
...113°F (0° to 45°C). 1 Pull up to Garmin Connect™ (page 7). About the Battery WARNING This device contains a lithium-ion battery. See the Important Safety and Product Information guide in the product ...5 Place the handlebar connector around the rubber pad or handlebar (31. 8 mm diameter). 6 Replace the screw. Installing the Standard Mount For the best GPS reception, position the bike mount so ...cable into the mini-USB port. 3 Plug the USB end of the Edge is powered by a built-in lithium-ion battery that you can install the bike mount on the back of your computer....
Owner's Manual
Page 17
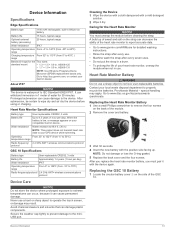
.... 5 Replace the back cover and the four screws. After you replace the heart rate monitor battery, you must unsnap the module before using or charging. Replacing the GSC 10 Battery 1 Locate the circular battery cover À on your compatible Garmin device. ...• 1. 3 × 1. 5 × 0. 9 in. Device Information Specifications Edge Specifications Battery type 1100 mAh rechargable, built-in lithium-ion battery Battery life 15 hours, typical usage Optional external battery (accessory) 20 hours, typical usage Water resistance IPX7 Operating temperature From -4º to 140...
.... 5 Replace the back cover and the four screws. After you replace the heart rate monitor battery, you must unsnap the module before using or charging. Replacing the GSC 10 Battery 1 Locate the circular battery cover À on your compatible Garmin device. ...• 1. 3 × 1. 5 × 0. 9 in. Device Information Specifications Edge Specifications Battery type 1100 mAh rechargable, built-in lithium-ion battery Battery life 15 hours, typical usage Optional external battery (accessory) 20 hours, typical usage Water resistance IPX7 Operating temperature From -4º to 140...
Owner's Manual
Page 18
...Use a coin to twist the cover counter-clockwise until it is charging with an external battery pack. Temperature Readings The device may need to display data. After you replace the GSC 10 battery, you by completing our online registration today. • Go to locked). Clearing User ...Data You can restore all user-entered information, but it does not delete your history. 1 Turn off the device after 15 minutes of the touchscreen. 3 While holding your Garmin...
...Use a coin to twist the cover counter-clockwise until it is charging with an external battery pack. Temperature Readings The device may need to display data. After you replace the GSC 10 battery, you by completing our online registration today. • Go to locked). Clearing User ...Data You can restore all user-entered information, but it does not delete your history. 1 Turn off the device after 15 minutes of the touchscreen. 3 While holding your Garmin...
Owner's Manual
Page 21
... 13 registration 14 resetting 14 display settings 12 distance, alerts 3 E elevation 12 F files, transferring 8 finding locations 10 addresses 10 near your location 10 G Garmin Connect 3, 7 storing data 7 GPS satellite page 12 signal 2 stopping 12 GSC 10 6, 13 H heart rate alerts 3 zones 5, 6, 16 heart rate...power meter 6, 7 power meters 6 power save 14 product registration 14 profiles 10, 11 bike 11 user 11 R registering the device 14 replacing battery 13 resetting the device 14 restoring, settings 14 routes, settings 10 S satellite page 12 satellite signals 2 saving activities 3 screen. 12 ...
... 13 registration 14 resetting 14 display settings 12 distance, alerts 3 E elevation 12 F files, transferring 8 finding locations 10 addresses 10 near your location 10 G Garmin Connect 3, 7 storing data 7 GPS satellite page 12 signal 2 stopping 12 GSC 10 6, 13 H heart rate alerts 3 zones 5, 6, 16 heart rate...power meter 6, 7 power meters 6 power save 14 product registration 14 profiles 10, 11 bike 11 user 11 R registering the device 14 replacing battery 13 resetting the device 14 restoring, settings 14 routes, settings 10 S satellite page 12 satellite signals 2 saving activities 3 screen. 12 ...
Quick Start Manual
Page 2
...the back of the bike mount so it locks into place. A fully charged battery can install the bike mount on the stem or the handlebars. 1 Select a secure location to mount the Edge where it must be recharged. The device is oriented toward the sky. Charging the... pad or handlebar (31. 8 mm diameter). 6 Replace the screw. NOTE: Garmin® recommends a torque specification of the Edge with the bike mount notches Â. 6 Press down slightly and turn the Edge clockwise until it stays in lithium-ion battery that you begin or modify any exercise program. Check ...
...the back of the bike mount so it locks into place. A fully charged battery can install the bike mount on the stem or the handlebars. 1 Select a secure location to mount the Edge where it must be recharged. The device is oriented toward the sky. Charging the... pad or handlebar (31. 8 mm diameter). 6 Replace the screw. NOTE: Garmin® recommends a torque specification of the Edge with the bike mount notches Â. 6 Press down slightly and turn the Edge clockwise until it stays in lithium-ion battery that you begin or modify any exercise program. Check ...


