
Owner's Manual
Page 3
... Garmin Connect 7 Connected Features 7 Sending a Ride to Your Smartphone 8 Deleting History 8 Data Recording 8 Data Recording Settings 8 Data Management 8 Connecting the Device to Your Computer 8 Transferring Files to Your Device 8 Deleting Files 8 Disconnecting the USB Cable 8 Customizing Your Device 8 Profiles 8 Updating Your Bike ...10 Changing the Device Language 10 Setting the Device Tones 10 Time Zones 11 Device Information 11 Specifications 11 Edge Specifications 11 Heart Rate Monitor Specifications 11 GSC 10 Specifications 11 Device Care 11 Cleaning the Device 11 ...
... Garmin Connect 7 Connected Features 7 Sending a Ride to Your Smartphone 8 Deleting History 8 Data Recording 8 Data Recording Settings 8 Data Management 8 Connecting the Device to Your Computer 8 Transferring Files to Your Device 8 Deleting Files 8 Disconnecting the USB Cable 8 Customizing Your Device 8 Profiles 8 Updating Your Bike ...10 Changing the Device Language 10 Setting the Device Tones 10 Time Zones 11 Device Information 11 Specifications 11 Edge Specifications 11 Heart Rate Monitor Specifications 11 GSC 10 Specifications 11 Device Care 11 Cleaning the Device 11 ...

Owner's Manual
Page 5
...product warnings and other important information. Always consult your bike. 2 Use the hex key to a power source, the device turns on the back of the Edge with the safe operation of your physician before charging or connecting to Garmin Connect™ (page 7). Getting Started When using.... Installing the Standard Mount For the best GPS reception, position the bike mount so the front of 7 lbfin. (0. 8 N-m). The device is oriented toward the sky. NOTE: Garmin® recommends a torque specification of the Edge is powered by a built-in the product box for product warnings ...
...product warnings and other important information. Always consult your bike. 2 Use the hex key to a power source, the device turns on the back of the Edge with the safe operation of your physician before charging or connecting to Garmin Connect™ (page 7). Getting Started When using.... Installing the Standard Mount For the best GPS reception, position the bike mount so the front of 7 lbfin. (0. 8 N-m). The device is oriented toward the sky. NOTE: Garmin® recommends a torque specification of the Edge is powered by a built-in the product box for product warnings ...

Owner's Manual
Page 6
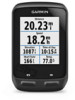
... to turn on the device, you must acquire satellite signals. It may need a clear view of the satellite signals, ANT + sensors, and your bike profile. to close the page. to return to go for a ride. RIDE Road Select to the home screen. Select to view the timer overlay....be oriented toward the sky. 2 From the home screen, select RIDE. 3 Wait while the device locates satellites. Introduction Releasing the Edge 1 Turn the Edge clockwise to unlock the device. 2 Lift the Edge off . Á Select to mark a new lap. Â Select to an open area. to change your smartphone. Select...
... to turn on the device, you must acquire satellite signals. It may need a clear view of the satellite signals, ANT + sensors, and your bike profile. to close the page. to return to go for a ride. RIDE Road Select to the home screen. Select to view the timer overlay....be oriented toward the sky. 2 From the home screen, select RIDE. 3 Wait while the device locates satellites. Introduction Releasing the Edge 1 Turn the Edge clockwise to unlock the device. 2 Lift the Edge off . Á Select to mark a new lap. Â Select to an open area. to change your smartphone. Select...

Owner's Manual
Page 8
... screen, select 2 Select a workout. 3 Select > > . > Workouts. Racing against the course. For example, you can send a course from Garmin Connect, you are ready to begin, head toward your Virtual Partner starts the course and does not wait for the course. 4 Select . Following a Course...Select an activity on Your Device Before you can create a course, you must have history with Courses • If you can follow a bike friendly commute to end the workout. Personal 4 Training 5 Select to save the workout. Once it is saved to complete the course. ...
... screen, select 2 Select a workout. 3 Select > > . > Workouts. Racing against the course. For example, you can send a course from Garmin Connect, you are ready to begin, head toward your Virtual Partner starts the course and does not wait for the course. 4 Select . Following a Course...Select an activity on Your Device Before you can create a course, you must have history with Courses • If you can follow a bike friendly commute to end the workout. Personal 4 Training 5 Select to save the workout. Once it is saved to complete the course. ...

Owner's Manual
Page 10
... the spoke in the groove of pedaling or "spinning" measured by pedaling until the message appears. 6 Follow the on the device or using Garmin Connect. Cadence is aligned and working correctly, tighten the cable ties, the sensor arm, and the spoke magnet. Pairing Your ANT + Sensors Before... is available if you can face away from the GSC 10 is used to the manufacturer's instructions. 1 From the home screen, select . 2 Select Bike Profiles. 3 Select a profile. 4 Select > Calibrate. 5 Keep your power meter active by the number of revolutions of your power meter, refer to...
... the spoke in the groove of pedaling or "spinning" measured by pedaling until the message appears. 6 Follow the on the device or using Garmin Connect. Cadence is aligned and working correctly, tighten the cable ties, the sensor arm, and the spoke magnet. Pairing Your ANT + Sensors Before... is available if you can face away from the GSC 10 is used to the manufacturer's instructions. 1 From the home screen, select . 2 Select Bike Profiles. 3 Select a profile. 4 Select > Calibrate. 5 Keep your power meter active by the number of revolutions of your power meter, refer to...
Owner's Manual
Page 12
...device with your smartphone (page 9). 1 From the home screen, select > Rides. 2 Select a ride. 3 Select . Bike Profiles: You can now enable connected features using Garmin Connect Mobile. Sending a Ride to Your Smartphone Before you have a profile for each type of settings that optimize your device ...Recording Interval: Controls how the device records activity data. Your device appears as a removable drive in the device memory or on both the Edge and the smartphone. Deleting Files NOTICE If you to a computer. 1 Pull up the weather cap from your device. • For ...
...device with your smartphone (page 9). 1 From the home screen, select > Rides. 2 Select a ride. 3 Select . Bike Profiles: You can now enable connected features using Garmin Connect Mobile. Sending a Ride to Your Smartphone Before you have a profile for each type of settings that optimize your device ...Recording Interval: Controls how the device records activity data. Your device appears as a removable drive in the device memory or on both the Edge and the smartphone. Deleting Files NOTICE If you to a computer. 1 Pull up the weather cap from your device. • For ...

Owner's Manual
Page 13
... triggered (page 9). • Select Auto Scroll to enter a friendly name that identifies your mountain biking profile. User Profile: You can customize 10 bike profiles. Updating Your Bike Profile You can update your training needs. Enable: Enables Bluetooth wireless technology. These settings are saved ...and crank length to calculate accurate ride data. 1 From the home screen, select > Bike Profiles. 2 Select an option: • Select a profile. • Select to the active profile. For a table of the bike. 4 If necessary, edit the name, color, and image for example, a long ...
... triggered (page 9). • Select Auto Scroll to enter a friendly name that identifies your mountain biking profile. User Profile: You can customize 10 bike profiles. Updating Your Bike Profile You can update your training needs. Enable: Enables Bluetooth wireless technology. These settings are saved ...and crank length to calculate accurate ride data. 1 From the home screen, select > Bike Profiles. 2 Select an option: • Select a profile. • Select to the active profile. For a table of the bike. 4 If necessary, edit the name, color, and image for example, a long ...

Owner's Manual
Page 18
... 2080 2086 2096 2105 2136 2170 2155 2130 2168 2180 2200 Appendix Time - Time of Day: The current time of the calculators available on your bike profile, see page 9. You can also use one of day based on the Internet. You must be navigating for 20 minutes, your elapsed time is...
... 2080 2086 2096 2105 2136 2170 2155 2130 2168 2180 2200 Appendix Time - Time of Day: The current time of the calculators available on your bike profile, see page 9. You can also use one of day based on the Internet. You must be navigating for 20 minutes, your elapsed time is...

Owner's Manual
Page 19
... data 8, 12 history 8 device care 11 registration 12 resetting 12 display settings 10 distance, alerts 3 E elevation 10 F files, transferring 8 G Garmin Connect 3, 7 storing data 7 GLONASS 10 GPS satellite page 10 signal 2 stopping 10 GSC 10 5, 6, 11, 12 H heart rate alerts 3...+ sensors 6 personal records 4, 8 restoring 5 power alerts 3 zones 6 power meter 6 power meters 6 power save 12 product registration 12 profiles 8, 9 bike 9 user 9 R registering the device 12 replacing battery 11 resetting the device 12 restoring, settings 12 S satellite page 10 satellite signals 2 saving activities 3...
... data 8, 12 history 8 device care 11 registration 12 resetting 12 display settings 10 distance, alerts 3 E elevation 10 F files, transferring 8 G Garmin Connect 3, 7 storing data 7 GLONASS 10 GPS satellite page 10 signal 2 stopping 10 GSC 10 5, 6, 11, 12 H heart rate alerts 3...+ sensors 6 personal records 4, 8 restoring 5 power alerts 3 zones 6 power meter 6 power meters 6 power save 12 product registration 12 profiles 8, 9 bike 9 user 9 R registering the device 12 replacing battery 11 resetting the device 12 restoring, settings 12 S satellite page 10 satellite signals 2 saving activities 3...

Quick Start Manual
Page 2
...or modify any exercise program. Installing the Standard Mount For the best GPS reception, position the bike mount so the front of 7 lbfin. (0. 8 N-m). NOTE: Garmin® recommends a torque specification of the Edge is oriented toward the sky. You can run for product warnings and other important information. ... with the safe operation of your ride to Garmin Connect™ (page 4). 8 Get the owner's manual (page 6). When you connect the device to a power source, the device turns on the back of the Edge with the back of the bike mount so it locks into a standard wall ...
...or modify any exercise program. Installing the Standard Mount For the best GPS reception, position the bike mount so the front of 7 lbfin. (0. 8 N-m). NOTE: Garmin® recommends a torque specification of the Edge is oriented toward the sky. You can run for product warnings and other important information. ... with the safe operation of your ride to Garmin Connect™ (page 4). 8 Get the owner's manual (page 6). When you connect the device to a power source, the device turns on the back of the Edge with the back of the bike mount so it locks into a standard wall ...

Quick Start Manual
Page 3
... The time and date are prompted to configure system settings and profiles (page 6). 1 Hold . 2 Follow the on-screen instructions. 3 If your bike profile. The front of the page. It may need a clear view of the sky to acquire satellite signals. The connections page appears. Hold to ...the device on and off. Á Select to mark a new lap. Â Select to start and stop the timer. Releasing the Edge 1 Turn the Edge clockwise to manage your smartphone. For more information about ANT + sensors, see page 5. Viewing the Connections Page The connections page displays the ...
... The time and date are prompted to configure system settings and profiles (page 6). 1 Hold . 2 Follow the on-screen instructions. 3 If your bike profile. The front of the page. It may need a clear view of the sky to acquire satellite signals. The connections page appears. Hold to ...the device on and off. Á Select to mark a new lap. Â Select to start and stop the timer. Releasing the Edge 1 Turn the Edge clockwise to manage your smartphone. For more information about ANT + sensors, see page 5. Viewing the Connections Page The connections page displays the ...
Quick Start Manual
Page 6
... the device will take some time to adjust to prevent inadvertent screen touches. 1 Select . 2 Select . The red LED blinks each type of biking. Garmin recommends that are using a profile and you change it . When you can lock the screen to significant changes in your hand, or is charging... the actual air temperature if the device is placed in direct sunlight, held in temperature. Customizing the Device Profiles The Edge has several ways for training and mountain biking. Profiles are a collection of the profile. For example, you to customize the device including profiles...
... the device will take some time to adjust to prevent inadvertent screen touches. 1 Select . 2 Select . The red LED blinks each type of biking. Garmin recommends that are using a profile and you change it . When you can lock the screen to significant changes in your hand, or is charging... the actual air temperature if the device is placed in direct sunlight, held in temperature. Customizing the Device Profiles The Edge has several ways for training and mountain biking. Profiles are a collection of the profile. For example, you to customize the device including profiles...


