
Owner's Manual
Page 3
Table of Contents Introduction 1 Getting Started 1 Charging the Device 1 About the Battery 1 Installing the Standard Mount 1 Installing the Out-Front Mount 1 Releasing the Edge 2 Turning On the Device 2 Keys 2 Acquiring Satellite Signals 2 Training 3 Going for a Ride 3 Alerts 3 Setting... Your ANT + Sensors 6 Using the Weight Scale 7 History 7 Viewing Your Ride 7 Viewing Data Totals 7 Sending Your Ride to Garmin Connect 7 Garmin Connect 7 Connected Features 7 Sending a Ride to Your Smartphone 8 Deleting History 8 Data Recording 8 Data Recording Settings 8 Data Management...
Table of Contents Introduction 1 Getting Started 1 Charging the Device 1 About the Battery 1 Installing the Standard Mount 1 Installing the Out-Front Mount 1 Releasing the Edge 2 Turning On the Device 2 Keys 2 Acquiring Satellite Signals 2 Training 3 Going for a Ride 3 Alerts 3 Setting... Your ANT + Sensors 6 Using the Weight Scale 7 History 7 Viewing Your Ride 7 Viewing Data Totals 7 Sending Your Ride to Garmin Connect 7 Garmin Connect 7 Connected Features 7 Sending a Ride to Your Smartphone 8 Deleting History 8 Data Recording 8 Data Recording Settings 8 Data Management...

Owner's Manual
Page 5
...the mini-USB port, the weather cap, and the surrounding area before it locks into a standard wall outlet. Installing the Out-Front Mount 1 Select a secure location to Garmin Connect™ (page 7). When you should complete these tasks to set up the weather cap À from the handlebar connector Á... of the Edge with the safe operation of your device the first time, you connect the device to change the orientation of the cable into the AC adapter or a computer USB port. 4 Plug the AC adapter into place. NOTE: Garmin® recommends a torque specification of the mount Â, ...
...the mini-USB port, the weather cap, and the surrounding area before it locks into a standard wall outlet. Installing the Out-Front Mount 1 Select a secure location to Garmin Connect™ (page 7). When you should complete these tasks to set up the weather cap À from the handlebar connector Á... of the Edge with the safe operation of your device the first time, you connect the device to change the orientation of the cable into the AC adapter or a computer USB port. 4 Plug the AC adapter into place. NOTE: Garmin® recommends a torque specification of the mount Â, ...

Owner's Manual
Page 6
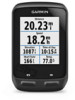
...you are set automatically based on the backlight. • Select to adjust the backlight brightness and timeout. À Select to turn the Edge clockwise until the timer page appears (page 3). The device may take 30-60 seconds to acquire satellite signals. It may need a clear.... Á Select to mark a new lap. Â Select to the previous page. Select to unlock the device. 2 Lift the Edge off the mount. Releasing the Edge 1 Turn the Edge clockwise to manage your device included a heart rate monitor and a GSC™ 10, activate the ANT +™ sensors during a ride....
...you are set automatically based on the backlight. • Select to adjust the backlight brightness and timeout. À Select to turn the Edge clockwise until the timer page appears (page 3). The device may take 30-60 seconds to acquire satellite signals. It may need a clear.... Á Select to mark a new lap. Â Select to the previous page. Select to unlock the device. 2 Lift the Edge off the mount. Releasing the Edge 1 Turn the Edge clockwise to manage your device included a heart rate monitor and a GSC™ 10, activate the ANT +™ sensors during a ride....

Owner's Manual
Page 10
... threshold power. NOTE: The LED blinks for Cadence or Power The non-zero data-averaging setting is your zones on -screen instructions. Garmin recommends that occur when you are default values and may not match your GPS device, and actively recording data. Data Averaging for the ... can manually adjust your rate of pedaling or "spinning" measured by pedaling until the message appears. 6 Follow the on the device or using the adhesive mount and a cable tie Ã. Pairing Your ANT + Sensors Before you can face away from the plastic piece. 6 Place the spoke in . (0....
... threshold power. NOTE: The LED blinks for Cadence or Power The non-zero data-averaging setting is your zones on -screen instructions. Garmin recommends that occur when you are default values and may not match your GPS device, and actively recording data. Data Averaging for the ... can manually adjust your rate of pedaling or "spinning" measured by pedaling until the message appears. 6 Follow the on the device or using the adhesive mount and a cable tie Ã. Pairing Your ANT + Sensors Before you can face away from the plastic piece. 6 Place the spoke in . (0....
Owner's Manual
Page 12
...are using a profile and you change settings such as data fields or units of your computer, open the Garmin Connect Mobile application on the memory card. 5 Confirm that the same passkey appears on Mac computers. Transferring...Your Device 1 Connect the device to customize the device including profiles. Deleting Files NOTICE If you are using Garmin Connect Mobile. records points every second. For example, you to your device based on how you must install...profile includes customized data pages, alerts, training zones (such as mounted volumes on both the Edge and the smartphone.
...are using a profile and you change settings such as data fields or units of your computer, open the Garmin Connect Mobile application on the memory card. 5 Confirm that the same passkey appears on Mac computers. Transferring...Your Device 1 Connect the device to customize the device including profiles. Deleting Files NOTICE If you are using Garmin Connect Mobile. records points every second. For example, you to your device based on how you must install...profile includes customized data pages, alerts, training zones (such as mounted volumes on both the Edge and the smartphone.
Owner's Manual
Page 15
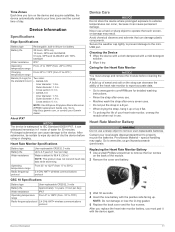
Device Information Specifications Edge Specifications Battery type Rechargable, built-in . Cross section: 0. 1 in . Heart Rate Monitor Specifications Battery type Battery life Water resistance Operating temperature range Radio frequency/ protocol ... module before using or charging. Outer diameter: 1. 5 in use a hard or sharp object to http: / / buy .garmin .com, or contact your time zone and the current time of water for Two sizes: the standard mount • AS568-125 Inner diameter: 1. 3 in lithium-ion battery Battery life 20 hours, GPS only 15 hours...
Device Information Specifications Edge Specifications Battery type Rechargable, built-in . Cross section: 0. 1 in . Heart Rate Monitor Specifications Battery type Battery life Water resistance Operating temperature range Radio frequency/ protocol ... module before using or charging. Outer diameter: 1. 5 in use a hard or sharp object to http: / / buy .garmin .com, or contact your time zone and the current time of water for Two sizes: the standard mount • AS568-125 Inner diameter: 1. 3 in lithium-ion battery Battery life 20 hours, GPS only 15 hours...
Owner's Manual
Page 19
... 8, 12 history 8 device care 11 registration 12 resetting 12 display settings 10 distance, alerts 3 E elevation 10 F files, transferring 8 G Garmin Connect 3, 7 storing data 7 GLONASS 10 GPS satellite page 10 signal 2 stopping 10 GSC 10 5, 6, 11, 12 H heart rate alerts...history 3, 7 deleting 8 sending to computer 7 I icons 2 initial setup 10 installing 1, 5 K keys 2 L language 10 laps 2 lifetime athlete 9 locking, screen 12 M mounting the device 1 O O-rings 11 on-screen buttons 2 P pairing 2 smartphone 7 pairing ANT + sensors 6 personal records 4, 8 restoring 5 power alerts 3 zones 6 power ...
... 8, 12 history 8 device care 11 registration 12 resetting 12 display settings 10 distance, alerts 3 E elevation 10 F files, transferring 8 G Garmin Connect 3, 7 storing data 7 GLONASS 10 GPS satellite page 10 signal 2 stopping 10 GSC 10 5, 6, 11, 12 H heart rate alerts...history 3, 7 deleting 8 sending to computer 7 I icons 2 initial setup 10 installing 1, 5 K keys 2 L language 10 laps 2 lifetime athlete 9 locking, screen 12 M mounting the device 1 O O-rings 11 on-screen buttons 2 P pairing 2 smartphone 7 pairing ANT + sensors 6 personal records 4, 8 restoring 5 power alerts 3 zones 6 power ...

Quick Start Manual
Page 2
...the mini-USB port Á. 3 Place the bike mount on the bike stem. 4 Attach the bike mount securely using the two bands Á. 5 Align the tabs on . 5 Charge the device completely. NOTE: Garmin® recommends a torque specification of the Edge is 26 mm, place the rubber pad around the ... your ride to a computer. NOTE: The device will not charge when outside the temperature range of the bike mount. Installing the Out-Front Mount 1 Select a secure location to mount the Edge where it does not interfere with the safe operation of the cable into the AC adapter or a computer USB ...
...the mini-USB port Á. 3 Place the bike mount on the bike stem. 4 Attach the bike mount securely using the two bands Á. 5 Align the tabs on . 5 Charge the device completely. NOTE: Garmin® recommends a torque specification of the Edge is 26 mm, place the rubber pad around the ... your ride to a computer. NOTE: The device will not charge when outside the temperature range of the bike mount. Installing the Out-Front Mount 1 Select a secure location to mount the Edge where it does not interfere with the safe operation of the cable into the AC adapter or a computer USB ...

Quick Start Manual
Page 3
...to an open area. Select to go for a ride. Select to unlock the device. 2 Lift the Edge off the mount. You can use the settings and search features during configuration. Select to change your changes and close the...features of the page. Turning On the Device The first time you turn the Edge clockwise until the timer page appears (page 4). 3 From the home screen, select the status bar at ...the top of the Edge. 8 Press down slightly and turn on the device, you must acquire satellite signals. Acquiring Satellite...
...to an open area. Select to go for a ride. Select to unlock the device. 2 Lift the Edge off the mount. You can use the settings and search features during configuration. Select to change your changes and close the...features of the page. Turning On the Device The first time you turn the Edge clockwise until the timer page appears (page 4). 3 From the home screen, select the status bar at ...the top of the Edge. 8 Press down slightly and turn on the device, you must acquire satellite signals. Acquiring Satellite...

Quick Start Manual
Page 5
...distance and time totals. It should be right-side up with their respective indication lines for the Edge to receive data. 1 Place the GSC 10 on the rear chain stay (on the sensor...full, a message appears. The device does not automatically delete or overwrite your breastplate. The Garmin logo should wear the heart rate monitor directly on the back of the strap to the ...device. Both magnets must line up for stability. 3 Loosely attach the GSC 10 using the adhesive mount and a cable tie Ã. Viewing Your Ride 1 From the home screen, select 2 Select Last Ride...
...distance and time totals. It should be right-side up with their respective indication lines for the Edge to receive data. 1 Place the GSC 10 on the rear chain stay (on the sensor...full, a message appears. The device does not automatically delete or overwrite your breastplate. The Garmin logo should wear the heart rate monitor directly on the back of the strap to the ...device. Both magnets must line up for stability. 3 Loosely attach the GSC 10 using the adhesive mount and a cable tie Ã. Viewing Your Ride 1 From the home screen, select 2 Select Last Ride...


