
T4220 BIOS Guide
Page 2
LifeBook T Series BIOS T Series BIOS BIOS SETUP UTILITY The BIOS Setup Utility is executed. ... for each menu in the BIOS to the following (or use the cursor keys: [ ], [ ]. 3. Pressing the [F10] key saves the current configuration and exits the BIOS Setup Utility. You will invoke the screen, information, or action described....submenu, use the TrustedCore Menu, as passwords. To activate a submenu press the [Enter] key. 5. Press [F2] once the Fujitsu logo appears on the screen. To go to review or alter the current settings. Pressing the Enter key again will appear. To ...
LifeBook T Series BIOS T Series BIOS BIOS SETUP UTILITY The BIOS Setup Utility is executed. ... for each menu in the BIOS to the following (or use the cursor keys: [ ], [ ]. 3. Pressing the [F10] key saves the current configuration and exits the BIOS Setup Utility. You will invoke the screen, information, or action described....submenu, use the TrustedCore Menu, as passwords. To activate a submenu press the [Enter] key. 5. Press [F2] once the Fujitsu logo appears on the screen. To go to review or alter the current settings. Pressing the Enter key again will appear. To ...
T4220 BIOS Guide
Page 4
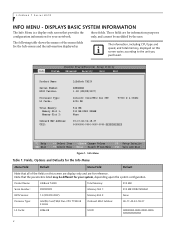
... are for your system, depending upon the system configuration. Product Name: Serial Number:: BIOS Version: Processor Type: L2 Cache: LifeBook T4220 XXXXXXXX 1.0 (XX/XX/2007) Intel(R) Core(TM)2 Duo CPU T7300 @ 2.0GHz 4096 KB Total Memory: Memory Slot 1:...: BIOS Version: Processor Type: L2 Cache: Total Memory: Memory Slot 1: Memory Slot 2: Onboard MAC Address: UUID: LifeBook T4220 XXXXXXXX 1.0X (XX/XX/2007) Intel(R) Core(TM)2 Duo CPU 4096 KB T7300 @ 2.00GHz 512 MB 512 MB...F9 Setup Defaults ▲ Select Menu Enter Select Sub-Menu F10 Save and Exit Figure 1. those fields.
... are for your system, depending upon the system configuration. Product Name: Serial Number:: BIOS Version: Processor Type: L2 Cache: LifeBook T4220 XXXXXXXX 1.0 (XX/XX/2007) Intel(R) Core(TM)2 Duo CPU T7300 @ 2.0GHz 4096 KB Total Memory: Memory Slot 1:...: BIOS Version: Processor Type: L2 Cache: Total Memory: Memory Slot 1: Memory Slot 2: Onboard MAC Address: UUID: LifeBook T4220 XXXXXXXX 1.0X (XX/XX/2007) Intel(R) Core(TM)2 Duo CPU 4096 KB T7300 @ 2.00GHz 512 MB 512 MB...F9 Setup Defaults ▲ Select Menu Enter Select Sub-Menu F10 Save and Exit Figure 1. those fields.

T4220 BIOS Guide
Page 5
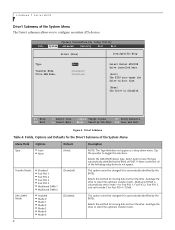
...TrustedCore(tm) Setup Utility Info System Advanced Security Boot Exit System Time: System Date: [14:57:01] [06/01/2007] Drive0 Drive1 Language: [FUJITSU MHW2060BH] [None] [English (US)] Item Specific Help Adjust calendar clock. , , or selects field. ▲ ▲▲ F1 Help ESC Exit... Select Item -/Space Change Values F9 Setup Defaults Select Menu Enter Select Sub-Menu F10 Save and Exit Figure 2. Menu Field System Time: Options -- Default -- -- You may change each field, the default settings and a description ...
...TrustedCore(tm) Setup Utility Info System Advanced Security Boot Exit System Time: System Date: [14:57:01] [06/01/2007] Drive0 Drive1 Language: [FUJITSU MHW2060BH] [None] [English (US)] Item Specific Help Adjust calendar clock. , , or selects field. ▲ ▲▲ F1 Help ESC Exit... Select Item -/Space Change Values F9 Setup Defaults Select Menu Enter Select Sub-Menu F10 Save and Exit Figure 2. Menu Field System Time: Options -- Default -- -- You may change each field, the default settings and a description ...

T4220 BIOS Guide
Page 7
...disk Maximum --- F1 Help ESC Exit Select Item -/Space Change Values F9 Setup Defaults ▲ Select Menu Enter Select Sub-Menu F10 Save and Exit Figure 3. Drive0 Master Submenu Table 3: Fields, Options and Defaults for the Drive0 Submenu of the System Menu The ...Drive0 submenu identifies what ATA devices are installed. Phoenix TrustedCore(tm) Setup Utility Info System Advanced Security Boot Exit Drive0 [FUJITSU MHW2120BH] Item Specific Help Type: Total Sectors: Maximum Capacity: [Auto]] LBA Format 117210240 60012MB SATA1 Select Serial ATA/IDE drive installed...
...disk Maximum --- F1 Help ESC Exit Select Item -/Space Change Values F9 Setup Defaults ▲ Select Menu Enter Select Sub-Menu F10 Save and Exit Figure 3. Drive0 Master Submenu Table 3: Fields, Options and Defaults for the Drive0 Submenu of the System Menu The ...Drive0 submenu identifies what ATA devices are installed. Phoenix TrustedCore(tm) Setup Utility Info System Advanced Security Boot Exit Drive0 [FUJITSU MHW2120BH] Item Specific Help Type: Total Sectors: Maximum Capacity: [Auto]] LBA Format 117210240 60012MB SATA1 Select Serial ATA/IDE drive installed...
T4220 BIOS Guide
Page 8
Selects the ATA/ATAPI device type. This option cannot be changed (it is automatically identified by the BIOS). LifeBook T Series BIOS Drive1 Submenu of the System Menu The Drive1 submenu allows you to toggle the selections. Tap the spacebar to configure secondary ATA devices...type automatically identified by the BIOS). F1 Help ESC Exit Select Item -/Space Change Values F9 Setup Defaults ▲ Select Menu Enter Select Sub-Menu F10 Save and Exit Figure 4. Select Auto to select the optimum transfer mode. Multi-word DMA is automatically identified by the BIOS at POST. Selects ...
Selects the ATA/ATAPI device type. This option cannot be changed (it is automatically identified by the BIOS). LifeBook T Series BIOS Drive1 Submenu of the System Menu The Drive1 submenu allows you to toggle the selections. Tap the spacebar to configure secondary ATA devices...type automatically identified by the BIOS). F1 Help ESC Exit Select Item -/Space Change Values F9 Setup Defaults ▲ Select Menu Enter Select Sub-Menu F10 Save and Exit Figure 4. Select Auto to select the optimum transfer mode. Multi-word DMA is automatically identified by the BIOS at POST. Selects ...
T4220 BIOS Guide
Page 10
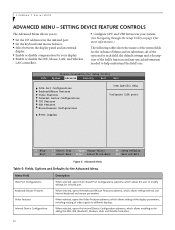
.../Mouse Features Video Features Internal Device Configurations When selected, opens the Infrared Port Configurations submenu which allows setting external and internal keyboard and mouse parameters. LifeBook T Series BIOS ADVANCED MENU - When selected, opens the Video Features submenu, which allows enabling or disabling the ATA, IDE, Bluetooth, Modem, LAN, and WLAN Controllers... user to help understand the field's use. F1 Help ESC Exit Select Item -/Space Change Values F9 Setup Defaults Select Menu Enter Select Sub-Menu F10 Save and Exit Figure 5.
.../Mouse Features Video Features Internal Device Configurations When selected, opens the Infrared Port Configurations submenu which allows setting external and internal keyboard and mouse parameters. LifeBook T Series BIOS ADVANCED MENU - When selected, opens the Video Features submenu, which allows enabling or disabling the ATA, IDE, Bluetooth, Modem, LAN, and WLAN Controllers... user to help understand the field's use. F1 Help ESC Exit Select Item -/Space Change Values F9 Setup Defaults Select Menu Enter Select Sub-Menu F10 Save and Exit Figure 5.
T4220 BIOS Guide
Page 12
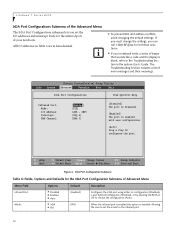
... the display is blank, refer to the Troubleshooting Section in hexadecimal. ■ To prevent IRQ and address conflicts, avoid changing the default settings. LifeBook T Series BIOS IrDA Port Configurations Submenu of the Advanced Menu The IrDA Port Configuratiosn submenu lets you can call 1-800-8Fujitsu for technical assistance. ... their meanings. F1 Help ESC Exit Select Item -/Space Change Values F9 Setup Defaults ▲ Select Menu Enter Select Sub-Menu F10 Save and Exit Figure 6. IrDA Port Configuration Submenu Table 6: Fields, Options and Defaults for the infrared port. 12
... the display is blank, refer to the Troubleshooting Section in hexadecimal. ■ To prevent IRQ and address conflicts, avoid changing the default settings. LifeBook T Series BIOS IrDA Port Configurations Submenu of the Advanced Menu The IrDA Port Configuratiosn submenu lets you can call 1-800-8Fujitsu for technical assistance. ... their meanings. F1 Help ESC Exit Select Item -/Space Change Values F9 Setup Defaults ▲ Select Menu Enter Select Sub-Menu F10 Save and Exit Figure 6. IrDA Port Configuration Submenu Table 6: Fields, Options and Defaults for the infrared port. 12
T4220 BIOS Guide
Page 14
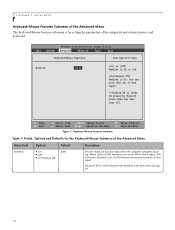
... with [Fn] for 10-key input. F1 Help ESC Exit Select Item -/Space Change Values F9 Setup Defaults ▲ Select Menu Enter Select Sub-Menu F10 Save and Exit Figure 7. When [On] or [Off], Numlock is On, but [Fn] key must be pressed used for 10-key input. * Windows XP ... computer completes booting. Keyboard/Mouse Features Submenu Table 7: Fields, Options and Defaults for setting the parameters of the integrated and external mouse and keyboard. LifeBook T Series BIOS Keyboard/Mouse Features Submenu of the Advanced Menu The Keyboard/Mouse Features submenu is on or off .
... with [Fn] for 10-key input. F1 Help ESC Exit Select Item -/Space Change Values F9 Setup Defaults ▲ Select Menu Enter Select Sub-Menu F10 Save and Exit Figure 7. When [On] or [Off], Numlock is On, but [Fn] key must be pressed used for 10-key input. * Windows XP ... computer completes booting. Keyboard/Mouse Features Submenu Table 7: Fields, Options and Defaults for setting the parameters of the integrated and external mouse and keyboard. LifeBook T Series BIOS Keyboard/Mouse Features Submenu of the Advanced Menu The Keyboard/Mouse Features submenu is on or off .

T4220 BIOS Guide
Page 15
... not effective after Windows starts up . F1 Help ESC Exit Select Item -/Space Change Values F9 Setup Defaults ▲ Select Menu Enter Select Sub-Menu F10 Save and Exit Figure 8.
... not effective after Windows starts up . F1 Help ESC Exit Select Item -/Space Change Values F9 Setup Defaults ▲ Select Menu Enter Select Sub-Menu F10 Save and Exit Figure 8.

T4220 BIOS Guide
Page 16
.... F1 Help ESC Exit Select Item -/Space Change Values F9 Setup Defaults ▲ Select Menu Enter Select Sub-Menu F10 Save and Exit Figure 9. Enables or disables the Wireless LAN controller. 16 LifeBook T Series BIOS Internal Device Configurations Submenu of the Advanced Menu Menu Field Serial ATA Controller: AHCI Configuration: IDE Controller...
.... F1 Help ESC Exit Select Item -/Space Change Values F9 Setup Defaults ▲ Select Menu Enter Select Sub-Menu F10 Save and Exit Figure 9. Enables or disables the Wireless LAN controller. 16 LifeBook T Series BIOS Internal Device Configurations Submenu of the Advanced Menu Menu Field Serial ATA Controller: AHCI Configuration: IDE Controller...
T4220 BIOS Guide
Page 17
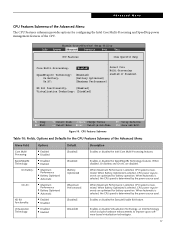
... Bit functionality: [Enabled] Virtualization Technology: [Disabled] F1 Help ESC Exit Select Item -/Space Change Values F9 Setup Defaults ▲ Select Menu Enter Select Sub-Menu F10 Save and Exit Figure 10. Enables or disables Virtualization Technology, an Intel technology which includes hardware enhancements to improve upon software-based virtualization technologies. 17...
... Bit functionality: [Enabled] Virtualization Technology: [Disabled] F1 Help ESC Exit Select Item -/Space Change Values F9 Setup Defaults ▲ Select Menu Enter Select Sub-Menu F10 Save and Exit Figure 10. Enables or disables Virtualization Technology, an Intel technology which includes hardware enhancements to improve upon software-based virtualization technologies. 17...
T4220 BIOS Guide
Page 18
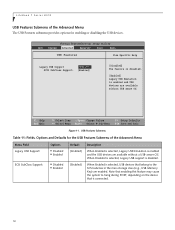
... ESC Exit Select Item -/Space Change Values F9 Setup Defaults ▲ Select Menu Enter Select Sub-Menu F10 Save and Exit Figure 11. When Enabled is selected, USB devices that is connected. 18 LifeBook T Series BIOS USB Features Submenu of the Advanced Menu The USB Features submenu provides options for the USB...
... ESC Exit Select Item -/Space Change Values F9 Setup Defaults ▲ Select Menu Enter Select Sub-Menu F10 Save and Exit Figure 11. When Enabled is selected, USB devices that is connected. 18 LifeBook T Series BIOS USB Features Submenu of the Advanced Menu The USB Features submenu provides options for the USB...

T4220 BIOS Guide
Page 19
... the volume and video memory size. F1 Help ESC Exit Select Item -/Space Change Values F9 Setup Defaults ▲ Select Menu Enter Select Sub-Menu F10 Save and Exit Figure 12. Advanced Menu Miscellaneous Configurations Submenu of the Advanced Menu The Miscellaneous Configurations submenu provides options for the Miscellaneous Configurations Submenu...
... the volume and video memory size. F1 Help ESC Exit Select Item -/Space Change Values F9 Setup Defaults ▲ Select Menu Enter Select Sub-Menu F10 Save and Exit Figure 12. Advanced Menu Miscellaneous Configurations Submenu of the Advanced Menu The Miscellaneous Configurations submenu provides options for the Miscellaneous Configurations Submenu...

T4220 BIOS Guide
Page 20
...content of the event log. F1 Help ESC Exit Select Item -/Space Change Values F9 Setup Defaults ▲ Select Menu Enter Select Sub-Menu F10 Save and Exit Figure 13. Turns event logging on and off for DMI events. When set to [Yes] all events currently in the ...Available Valid [Enter] [Enabled] [Disabled] [No] [Enter] Display only Display only Allows you mark all event logs will be cleared at next boot. LifeBook T Series BIOS Event Logging Submenu of the Advanced Menu The Event Logging submenu configures event logging features for DMI system boot events. Event Logging Submenu...
...content of the event log. F1 Help ESC Exit Select Item -/Space Change Values F9 Setup Defaults ▲ Select Menu Enter Select Sub-Menu F10 Save and Exit Figure 13. Turns event logging on and off for DMI events. When set to [Yes] all events currently in the ...Available Valid [Enter] [Enabled] [Disabled] [No] [Enter] Display only Display only Allows you mark all event logs will be cleared at next boot. LifeBook T Series BIOS Event Logging Submenu of the Advanced Menu The Event Logging submenu configures event logging features for DMI system boot events. Event Logging Submenu...
T4220 BIOS Guide
Page 21
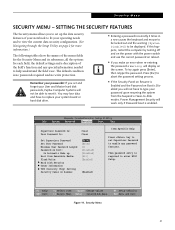
..., all the options for each field, the default settings and a description of your notebook to fit your User and Master hard disk passwords, Fujitsu Computer Systems will work only if Password boot is no passwords required and no write protection. Power Management Security will not be able to be... the Setup Utility on the screen. F1 Help ESC Exit Select Item -/Space Change Values Select Menu Enter Select Sub-Menu F9 Setup Defaults F10 Save and Exit Figure 14. Remember your password upon resuming the system from Removable Media: Flash Write: Hard Disk Security Owner Information TPM (...
..., all the options for each field, the default settings and a description of your notebook to fit your User and Master hard disk passwords, Fujitsu Computer Systems will work only if Password boot is no passwords required and no write protection. Power Management Security will not be able to be... the Setup Utility on the screen. F1 Help ESC Exit Select Item -/Space Change Values Select Menu Enter Select Sub-Menu F9 Setup Defaults F10 Save and Exit Figure 14. Remember your password upon resuming the system from Removable Media: Flash Write: Hard Disk Security Owner Information TPM (...

T4220 BIOS Guide
Page 23
...] [Enter] Password Entry on Boot: [Enabled] F1 Help ESC Exit Select Item -/Space Change Values F9 Setup Defaults ▲ Select Menu Enter Select Sub-Menu F10 Save and Exit Figure 15. Hard Disk Security Submenu Table 15: Fields, Options and Defaults for configuring hard disk security features. Sets, changes or cancels...
...] [Enter] Password Entry on Boot: [Enabled] F1 Help ESC Exit Select Item -/Space Change Values F9 Setup Defaults ▲ Select Menu Enter Select Sub-Menu F10 Save and Exit Figure 15. Hard Disk Security Submenu Table 15: Fields, Options and Defaults for configuring hard disk security features. Sets, changes or cancels...

T4220 BIOS Guide
Page 25
...] Foreground Color: Background Color: [Gray] [Black] F1 Help ESC Exit Select Item -/Space Change Values F9 Setup Defaults ▲ Select Menu Enter Select Sub-Menu F10 Save and Exit Figure 16.
...] Foreground Color: Background Color: [Gray] [Black] F1 Help ESC Exit Select Item -/Space Change Values F9 Setup Defaults ▲ Select Menu Enter Select Sub-Menu F10 Save and Exit Figure 16.
T4220 BIOS Guide
Page 26
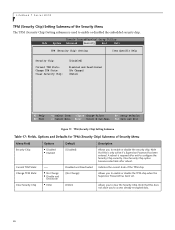
...] [Enter] F1 Help ESC Exit Select Item -/Space Change Values F9 Setup Defaults ▲ Select Menu Enter Select Sub-Menu F10 Save and Exit Figure 17. A reboot is required after reboot. LifeBook T Series BIOS TPM (Security Chip) Setting Submenu of the Security Menu The TPM (Security Chip) Setting submenu is used to...
...] [Enter] F1 Help ESC Exit Select Item -/Space Change Values F9 Setup Defaults ▲ Select Menu Enter Select Sub-Menu F10 Save and Exit Figure 17. A reboot is required after reboot. LifeBook T Series BIOS TPM (Security Chip) Setting Submenu of the Security Menu The TPM (Security Chip) Setting submenu is used to...

T4220 BIOS Guide
Page 27
... ■ Enabled - See "The Boot Device Priority Submenu" in which the BIOS searches sources for each field, the default settings and a description of Fujitsu logo screen during boot. ▲ ▲ F1 Help ESC Exit Select Item -/Space Change Values F9 Setup Defaults Select Menu Enter Select Sub-Menu... F10 Save and Exit Figure 18. Turns on and off display of test results instead of the field's function and any changes. (See Navigating ...
... ■ Enabled - See "The Boot Device Priority Submenu" in which the BIOS searches sources for each field, the default settings and a description of Fujitsu logo screen during boot. ▲ ▲ F1 Help ESC Exit Select Item -/Space Change Values F9 Setup Defaults Select Menu Enter Select Sub-Menu... F10 Save and Exit Figure 18. Turns on and off display of test results instead of the field's function and any changes. (See Navigating ...
T4220 BIOS Guide
Page 28
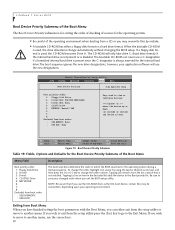
... press the [Esc] key to go to another menu, use the new designations. LifeBook T Series BIOS Boot Device Priority Submenu of the Boot Menu The Boot Device Priority ...Advanced Security Boot Exit Boot Device Priority Item Specific Help Boot priority order: 1: Floppy Disk Drive 2: Drive0 HDD: FUJITSU MHW2060BH 3: Drive1 HDD: None 4: CD/DVD Drive 5: NETWORK: Marvell LAN 6: 7: 8: Excluded from boot order... Select Item -/Space Change Values F9 Setup Defaults ▲ Select Menu Enter Select Sub-Menu F10 Save and Exit Figure 19. If you use a C: designation if a formatted internal hard ...
... press the [Esc] key to go to another menu, use the new designations. LifeBook T Series BIOS Boot Device Priority Submenu of the Boot Menu The Boot Device Priority ...Advanced Security Boot Exit Boot Device Priority Item Specific Help Boot priority order: 1: Floppy Disk Drive 2: Drive0 HDD: FUJITSU MHW2060BH 3: Drive1 HDD: None 4: CD/DVD Drive 5: NETWORK: Marvell LAN 6: 7: 8: Excluded from boot order... Select Item -/Space Change Values F9 Setup Defaults ▲ Select Menu Enter Select Sub-Menu F10 Save and Exit Figure 19. If you use a C: designation if a formatted internal hard ...