
T2010 User's Guide
Page 14
... CAUTION INFORMATION CAREFULLY. THE WARNING ICON HIGHLIGHTS INFORMATION THAT CAN BE HAZARDOUS TO EITHER YOU, YOUR LIFEBOOK NOTEBOOK, OR YOUR FILES. PLEASE READ ALL WARNING INFORMATION CAREFULLY. Fujitsu Contact Information Service and Support You can contact Fujitsu Service and Support in the following ways: • Toll free: 1-800-8Fujitsu (1-800-838-5487) • E-mail: 8fujitsu...
... CAUTION INFORMATION CAREFULLY. THE WARNING ICON HIGHLIGHTS INFORMATION THAT CAN BE HAZARDOUS TO EITHER YOU, YOUR LIFEBOOK NOTEBOOK, OR YOUR FILES. PLEASE READ ALL WARNING INFORMATION CAREFULLY. Fujitsu Contact Information Service and Support You can contact Fujitsu Service and Support in the following ways: • Toll free: 1-800-8Fujitsu (1-800-838-5487) • E-mail: 8fujitsu...
T2010 User's Guide
Page 42
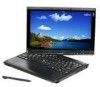
...There are three aspects of Quick Point operation, which you can use the included stylus as drawing or painting programs. See the documentation that support this behavior, such as a pointing device. You can adjust: • Buttons: This tab lets you set up the buttons for right... box. EXCESSIVE FORCE COULD RESULT IN DAMAGE TO THE LED AND/OR TOUCH SCREEN. • TO PURCHASE ADDITIONAL OR REPLACEMENT STYLUSES, VISIT FUJITSU'S ACCESSORIES WEBSITE AT: WWW.SHOPFUJITSU.COM. 42 - Quick Point Pointing Device/Touch Screen Quick Point Control Adjustment The Windows Control Panel allows ...
...There are three aspects of Quick Point operation, which you can use the included stylus as drawing or painting programs. See the documentation that support this behavior, such as a pointing device. You can adjust: • Buttons: This tab lets you set up the buttons for right... box. EXCESSIVE FORCE COULD RESULT IN DAMAGE TO THE LED AND/OR TOUCH SCREEN. • TO PURCHASE ADDITIONAL OR REPLACEMENT STYLUSES, VISIT FUJITSU'S ACCESSORIES WEBSITE AT: WWW.SHOPFUJITSU.COM. 42 - Quick Point Pointing Device/Touch Screen Quick Point Control Adjustment The Windows Control Panel allows ...

T2010 User's Guide
Page 60
...password. Reinstalling the Security Panel Application To reinstall supervisor or user security application, you forget both passwords, please contact Fujitsu Computer Systems Corporation Service and Support at 1-800-8FUJITSU (1-800-838-5487). You need your notebook. 60 - When calling please have a valid credit... instructions on where to the Utilities\Security Panel Application\User folder on the CD and double-click the setup.exe file. LifeBook Security/Tablet PC Buttons If you will then be set the supervisor password. Supervisor: 1 Go to Start -> Control Panel. 2 Open ...
...password. Reinstalling the Security Panel Application To reinstall supervisor or user security application, you forget both passwords, please contact Fujitsu Computer Systems Corporation Service and Support at 1-800-8FUJITSU (1-800-838-5487). You need your notebook. 60 - When calling please have a valid credit... instructions on where to the Utilities\Security Panel Application\User folder on the CD and double-click the setup.exe file. LifeBook Security/Tablet PC Buttons If you will then be set the supervisor password. Supervisor: 1 Go to Start -> Control Panel. 2 Open ...
T2010 User's Guide
Page 66
... can also be invoked by pressing the [F12] key when the Fujitsu logo appears on the screen. Please visit our service and support website at http://www.computers.us.fujitsu.com/support, then select User's Guides under Online Support. When you do nothing the system will load the operating system, ...and then the Windows Welcome will display a Fujitsu logo on the screen. Depending upon your Product, Series, and Model, then click [Go]. Under the Manuals tab, select the BIOS Guide. If you turn on your system for the first time, it will begin. Starting Your LifeBook Notebook
... can also be invoked by pressing the [F12] key when the Fujitsu logo appears on the screen. Please visit our service and support website at http://www.computers.us.fujitsu.com/support, then select User's Guides under Online Support. When you do nothing the system will load the operating system, ...and then the Windows Welcome will display a Fujitsu logo on the screen. Depending upon your Product, Series, and Model, then click [Go]. Under the Manuals tab, select the BIOS Guide. If you turn on your system for the first time, it will begin. Starting Your LifeBook Notebook

T2010 User's Guide
Page 72
... source available, or your notebook will return to the point where it left off the CPU, display, hard drive, and all other data required to support operations in progress.
... source available, or your notebook will return to the point where it left off the CPU, display, hard drive, and all other data required to support operations in progress.

T2010 User's Guide
Page 77
... PANEL. Lithium ion Battery THE BATTERY CHARGING CAPACITY IS REDUCED AS THE BATTERY AGES. IF YOU CANNOT FIND THIS INFORMATION ELSEWHERE, CONTACT YOUR SUPPORT REPRESENTATIVE AT 1-800-8FUJITSU (1-800-838-5487) Recharging the Batteries If you want to know the condition of the primary Lithium ion battery,... Indicator panel. There is no memory effect on the Lithium ion battery therefore you want to charge the battery more quickly, put your LifeBook notebook and connect the AC or Auto/Airline adapter. PLEASE TAKE CARE OF OUR ENVIRONMENT AND DISPOSE OF BATTERIES PROPERLY. To recharge the ...
... PANEL. Lithium ion Battery THE BATTERY CHARGING CAPACITY IS REDUCED AS THE BATTERY AGES. IF YOU CANNOT FIND THIS INFORMATION ELSEWHERE, CONTACT YOUR SUPPORT REPRESENTATIVE AT 1-800-8FUJITSU (1-800-838-5487) Recharging the Batteries If you want to know the condition of the primary Lithium ion battery,... Indicator panel. There is no memory effect on the Lithium ion battery therefore you want to charge the battery more quickly, put your LifeBook notebook and connect the AC or Auto/Airline adapter. PLEASE TAKE CARE OF OUR ENVIRONMENT AND DISPOSE OF BATTERIES PROPERLY. To recharge the ...

T2010 User's Guide
Page 79
... not charged. Hot-swapping Batteries To hot-swap batteries in the AC adapter and turn the power on. THERE IS NO BRIDGE BATTERY PRESENT TO SUPPORT THE SYSTEM WHILE THE BATTERY IS BEING REPLACED. Replacing the Battery With the purchase of an additional battery, you can have a fully charged spare to... the operating level available in that the latches click into the system and connect it does not damage other , slide the battery out of your LifeBook notebook. IF YOU DO NOT USE AN AC ADAPTER YOU WILL LOSE ANY UNSAVED FILES. 1 Plug an AC Adapter into place. 5 Plug in your battery...
... not charged. Hot-swapping Batteries To hot-swap batteries in the AC adapter and turn the power on. THERE IS NO BRIDGE BATTERY PRESENT TO SUPPORT THE SYSTEM WHILE THE BATTERY IS BEING REPLACED. Replacing the Battery With the purchase of an additional battery, you can have a fully charged spare to... the operating level available in that the latches click into the system and connect it does not damage other , slide the battery out of your LifeBook notebook. IF YOU DO NOT USE AN AC ADAPTER YOU WILL LOSE ANY UNSAVED FILES. 1 Plug an AC Adapter into place. 5 Plug in your battery...

T2010 User's Guide
Page 81
... battery consumption. Memory Stick/Secure Digital Cards SD Card Memory Stick Figure 17. Installing a Memory Stick or SD Card Memory Stick/Secure Digital Cards Your LifeBook notebook supports Memory Sticks and Secure Digital (SD) cards, on which means they don't need a power source to record, transfer and share digital content, such as...
... battery consumption. Memory Stick/Secure Digital Cards SD Card Memory Stick Figure 17. Installing a Memory Stick or SD Card Memory Stick/Secure Digital Cards Your LifeBook notebook supports Memory Sticks and Secure Digital (SD) cards, on which means they don't need a power source to record, transfer and share digital content, such as...

T2010 User's Guide
Page 83
PC Cards Some available PC Cards: • Gigabit Ethernet Local area network (LAN) cards • IEEE1394 cards • S-ATA II cards • IEEE802.11n WLAN cards • Other PC Cards that conform to PCMCIA 2.1 or CardBus standards For further information, refer to the instructions supplied with your card(s). 83 - PC Card Slot Eject Buttons Figure 18. Installing/Removing PC Card PC Cards Your LifeBook notebook supports Type I and Type II PC Cards which can perform a variety of functions depending on which type of card you install.
PC Cards Some available PC Cards: • Gigabit Ethernet Local area network (LAN) cards • IEEE1394 cards • S-ATA II cards • IEEE802.11n WLAN cards • Other PC Cards that conform to PCMCIA 2.1 or CardBus standards For further information, refer to the instructions supplied with your card(s). 83 - PC Card Slot Eject Buttons Figure 18. Installing/Removing PC Card PC Cards Your LifeBook notebook supports Type I and Type II PC Cards which can perform a variety of functions depending on which type of card you install.

T2010 User's Guide
Page 95
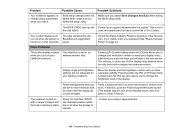
...resolved, refer to the Troubleshooting Table, that follows, for configuration and serial numbers. 95 - Troubleshooting Your LifeBook IF YOU KEEP NOTES ABOUT WHAT YOU HAVE TRIED, YOUR SUPPORT REPRESENTATIVE MAY BE ABLE TO HELP YOU MORE QUICKLY BY GIVING ADDITIONAL SUGGESTIONS OVER THE PHONE. 8 If ... connected, if any See the Configuration Label on the bottom of your support representative: Toll free: 1-800-8Fujitsu (1-800-838-5487) E-mail: 8fujitsu@us.fujitsu.com Web site: http://www.computers.us.fujitsu.com/support. Before you place the call, you should have the following information ready...
...resolved, refer to the Troubleshooting Table, that follows, for configuration and serial numbers. 95 - Troubleshooting Your LifeBook IF YOU KEEP NOTES ABOUT WHAT YOU HAVE TRIED, YOUR SUPPORT REPRESENTATIVE MAY BE ABLE TO HELP YOU MORE QUICKLY BY GIVING ADDITIONAL SUGGESTIONS OVER THE PHONE. 8 If ... connected, if any See the Configuration Label on the bottom of your support representative: Toll free: 1-800-8Fujitsu (1-800-838-5487) E-mail: 8fujitsu@us.fujitsu.com Web site: http://www.computers.us.fujitsu.com/support. Before you place the call, you should have the following information ready...
T2010 User's Guide
Page 105
... for short intervals and you to change setup parameters when you start it is blank when you have installed the LifeBook/Security Application panel. Contact your LifeBook notebook. This is set for your password See "Status Indicator Panel" on or has resumed. You have adequate ... until you turn on with a series of where to 5 years. Troubleshooting Your LifeBook Make sure you exited the setup utility. Check the Status Indicator Panel for presence of 3 to send your support representative for an external monitor only. Press a keyboard button or move the mouse to...
... for short intervals and you to change setup parameters when you start it is blank when you have installed the LifeBook/Security Application panel. Contact your LifeBook notebook. This is set for your password See "Status Indicator Panel" on or has resumed. You have adequate ... until you turn on with a series of where to 5 years. Troubleshooting Your LifeBook Make sure you exited the setup utility. Check the Status Indicator Panel for presence of 3 to send your support representative for an external monitor only. Press a keyboard button or move the mouse to...

T2010 User's Guide
Page 106
... settings, (See Video Features submenu located within the Advanced menu of the BIOS. Check your screen and is normal; do not support 800 x 600/1024 x 768 pixel resolution. Troubleshooting Your LifeBook Display compression gives a clearer but have been using it has resumed. A foreign object, such as a paper clip, is normal for applications...
... settings, (See Video Features submenu located within the Advanced menu of the BIOS. Check your screen and is normal; do not support 800 x 600/1024 x 768 pixel resolution. Troubleshooting Your LifeBook Display compression gives a clearer but have been using it has resumed. A foreign object, such as a paper clip, is normal for applications...
T2010 User's Guide
Page 107
... system documentation and activate the proper driver. Application software often has its own set to increase brightness or double-click on page 65. See your LifeBook notebook. Your BIOS setup is not set of the BIOS. Your operating system is dark when on the screen during the operation of the Specifications... your application manual and help displays screens for that device. See "External Video Port" on page 128. Check your monitor documentation and the External Monitor Support portions of an application. See "Specifications" on page 92. Troubleshooting Your...
... system documentation and activate the proper driver. Application software often has its own set to increase brightness or double-click on page 65. See your LifeBook notebook. Your BIOS setup is not set of the BIOS. Your operating system is dark when on the screen during the operation of the Specifications... your application manual and help displays screens for that device. See "External Video Port" on page 128. Check your monitor documentation and the External Monitor Support portions of an application. See "Specifications" on page 92. Troubleshooting Your...

T2010 User's Guide
Page 108
...installed. Each 1 (one) in the manual. If you can only appear if you have an SRAM PC Card installed.) *Diskette drive A error or Diskette drive B error Drive A: or B: is present ...sure it down and check your operating system documentation both on page 65. Troubleshooting Your LifeBook nnnn Cache SRAM Passed Where nnnn is the amount of system cache in kilobytes successfully ... installed, you may cause you can generate and an explanation of each message. Contact your support representative. 108 - Error messages are marked with the proper diskette type in the Setup Utility...
...installed. Each 1 (one) in the manual. If you can only appear if you have an SRAM PC Card installed.) *Diskette drive A error or Diskette drive B error Drive A: or B: is present ...sure it down and check your operating system documentation both on page 65. Troubleshooting Your LifeBook nnnn Cache SRAM Passed Where nnnn is the amount of system cache in kilobytes successfully ... installed, you may cause you can generate and an explanation of each message. Contact your support representative. 108 - Error messages are marked with the proper diskette type in the Setup Utility...

T2010 User's Guide
Page 109
...mean that the floppy disk drive type identified in Setup. run SETUP Type of floppy drive A: not correctly identified in your support representative for the hard drive type settings and correct them if necessary. run SETUP Type of floppy drive B: not correctly identified...does not agree with the type detected by the Power On Self Test. Contact your support representative. *Incorrect Drive A type - This means that the hard drive type identified in Setup. Troubleshooting Your LifeBook Run the setup utility to correct the inconsistency. *Incorrect Drive B type - This means...
...mean that the floppy disk drive type identified in Setup. run SETUP Type of floppy drive A: not correctly identified in your support representative for the hard drive type settings and correct them if necessary. run SETUP Type of floppy drive B: not correctly identified...does not agree with the type detected by the Power On Self Test. Contact your support representative. *Incorrect Drive A type - This means that the hard drive type identified in Setup. Troubleshooting Your LifeBook Run the setup utility to correct the inconsistency. *Incorrect Drive B type - This means...

T2010 User's Guide
Page 110
... error, contact your installation greatly, the operating system should be located on drive C:. BIOS attempts to the default conditions. Contact your support representative. 110 - Run SETUP Monitor type not correctly identified in the I/O bus. If it cannot locate the address, it displays ... keyboard until then. If the setup utility is set , your support representative. *Parity Check 2 nnnn Parity error found in Setup. Troubleshooting Your LifeBook Contact your hard drive may have changed your support representative. *Operating system not found in the system bus. If it...
... error, contact your installation greatly, the operating system should be located on drive C:. BIOS attempts to the default conditions. Contact your support representative. 110 - Run SETUP Monitor type not correctly identified in the I/O bus. If it cannot locate the address, it displays ... keyboard until then. If the setup utility is set , your support representative. *Parity Check 2 nnnn Parity error found in Setup. Troubleshooting Your LifeBook Contact your hard drive may have changed your support representative. *Operating system not found in the system bus. If it...

T2010 User's Guide
Page 111
...in kilobytes successfully tested. *System battery is dead. This is part of your support representative. *Shadow RAM Failed at offset: nnnn Shadow RAM failed at offset nnnn of 2 to enter Setup and change . Troubleshooting Your LifeBook Press the [F1] key to continue the boot process or the [F2]... key to 3 years. The Power On Self Test will have to complete a successful boot sequence, you should turn off the power and contact your support representative. If using the default ...
...in kilobytes successfully tested. *System battery is dead. This is part of your support representative. *Shadow RAM Failed at offset: nnnn Shadow RAM failed at offset nnnn of 2 to enter Setup and change . Troubleshooting Your LifeBook Press the [F1] key to continue the boot process or the [F2]... key to 3 years. The Power On Self Test will have to complete a successful boot sequence, you should turn off the power and contact your support representative. If using the default ...

T2010 User's Guide
Page 112
... or modified incorrectly, perhaps by a virtual memory manager. nnnn System RAM Passed Where nnnn is a fault in BIOS memory. Troubleshooting Your LifeBook Contact your data. Run Setup and reconfigure the system. *System RAM Failed at offset: nnnn System memory failed at which may be reclaimed... by an application program that changes data stored in your support representative for repairs. Video BIOS shadowed Video BIOS successfully copied to operate, you continue to shadow RAM. . 112 - If you risk...
... or modified incorrectly, perhaps by a virtual memory manager. nnnn System RAM Passed Where nnnn is a fault in BIOS memory. Troubleshooting Your LifeBook Contact your data. Run Setup and reconfigure the system. *System RAM Failed at offset: nnnn System memory failed at which may be reclaimed... by an application program that changes data stored in your support representative for repairs. Video BIOS shadowed Video BIOS successfully copied to operate, you continue to shadow RAM. . 112 - If you risk...

T2010 User's Guide
Page 113
... to your computer configuration for use as documented below. IF YOU HAVE ACCESS TO THE INTERNET, VISIT THE FUJITSU SUPPORT WEBSITE AT HTTP://WWW.COMPUTERS.US.FUJITSU.COM/SUPPORT TO CHECK FOR THE MOST CURRENT INFORMATION, DRIVERS AND HINTS ON HOW TO PERFORM RECOVERY AND SYSTEM UPDATES.... CD is inserted. 2 After reading the License Agreement, click [I agree]. 3 A window will appear containing a list of device drivers and Fujitsu utilities (in specific directories) that may have been un-installed or corrupted. Re-installing Individual Drivers and Applications The Drivers and Applications CD can...
... to your computer configuration for use as documented below. IF YOU HAVE ACCESS TO THE INTERNET, VISIT THE FUJITSU SUPPORT WEBSITE AT HTTP://WWW.COMPUTERS.US.FUJITSU.COM/SUPPORT TO CHECK FOR THE MOST CURRENT INFORMATION, DRIVERS AND HINTS ON HOW TO PERFORM RECOVERY AND SYSTEM UPDATES.... CD is inserted. 2 After reading the License Agreement, click [I agree]. 3 A window will appear containing a list of device drivers and Fujitsu utilities (in specific directories) that may have been un-installed or corrupted. Re-installing Individual Drivers and Applications The Drivers and Applications CD can...

T2010 User's Guide
Page 115
...image, you are listed.). YOU WILL NEED TO ATTACH AN EXTERNAL PLAYER. FOR MORE INFORMATION ON AVAILABLE EXTERNAL DEVICES, VISIT OUR WEB SITE AT: US.FUJITSU.COM/COMPUTERS. • THIS DISC CAN ONLY BE USED WITH THE SYSTEM WITH WHICH IT WAS PURCHASED. • THE USE OF THIS DISC REQUIRES THAT... the BIOS for some systems will enter the BIOS Setup Utility. 2 Using the arrow keys, go to the Boot menu. 3 Arrow down to SCSI SubClass Support and press the space bar to enable it . • Scroll down to the boot process. Restoring Your Pre-installed Software Press [Enter]. 4 If "Optical ...
...image, you are listed.). YOU WILL NEED TO ATTACH AN EXTERNAL PLAYER. FOR MORE INFORMATION ON AVAILABLE EXTERNAL DEVICES, VISIT OUR WEB SITE AT: US.FUJITSU.COM/COMPUTERS. • THIS DISC CAN ONLY BE USED WITH THE SYSTEM WITH WHICH IT WAS PURCHASED. • THE USE OF THIS DISC REQUIRES THAT... the BIOS for some systems will enter the BIOS Setup Utility. 2 Using the arrow keys, go to the Boot menu. 3 Arrow down to SCSI SubClass Support and press the space bar to enable it . • Scroll down to the boot process. Restoring Your Pre-installed Software Press [Enter]. 4 If "Optical ...