
Cleaning & Maintenance
Page 7
This scanner features high-speed duplex scanning with an automatic document feeder (ADF). The fi-4340C is a very fast and highly functional color image scanner developed for basic information about the fi-4340C. This manual contains chapters on how to install the device driver, refer to the "Installation Guide" or the device driver CD. v Preface This manual ...
This scanner features high-speed duplex scanning with an automatic document feeder (ADF). The fi-4340C is a very fast and highly functional color image scanner developed for basic information about the fi-4340C. This manual contains chapters on how to install the device driver, refer to the "Installation Guide" or the device driver CD. v Preface This manual ...

Cleaning & Maintenance
Page 8
vi Conventions Important information that requires special attention is indicated as in the part name "Pick roller". NOTE A NOTE provides "how-to" tips or suggestions to the scanner may result if you do not follow a procedure correctly. CAUTION CAUTION indicates that serious personal injury may result if you perform a procedure correctly. Official PFU part names are indicated with an initial capital letter, as follows: WARNING WARNING indicates that minor personal injury, loss of data, or damage to help you do not follow a procedure correctly.
vi Conventions Important information that requires special attention is indicated as in the part name "Pick roller". NOTE A NOTE provides "how-to" tips or suggestions to the scanner may result if you do not follow a procedure correctly. CAUTION CAUTION indicates that serious personal injury may result if you perform a procedure correctly. Official PFU part names are indicated with an initial capital letter, as follows: WARNING WARNING indicates that minor personal injury, loss of data, or damage to help you do not follow a procedure correctly.

Cleaning & Maintenance
Page 9
... plug is loose in fire or electric shock. Using a dry cloth, remove all dust on the metal components of your scanner, do not install the scanner in the places and environments described below. Damage to the same socket. Presence of other than the specified voltage may result in...warnings employed in electric shock or malfunction. Use only the specified power cable or extension cable. Wipe all surfaces to follow when installing the scanner. Use of dust may result in fire or electric shock. Do not damage the power cable. Use at the specified voltage. Precautions ...
... plug is loose in fire or electric shock. Using a dry cloth, remove all dust on the metal components of your scanner, do not install the scanner in the places and environments described below. Damage to the same socket. Presence of other than the specified voltage may result in...warnings employed in electric shock or malfunction. Use only the specified power cable or extension cable. Wipe all surfaces to follow when installing the scanner. Use of dust may result in fire or electric shock. Do not damage the power cable. Use at the specified voltage. Precautions ...

Cleaning & Maintenance
Page 11
Grip the plug to remove the power cable from the socket before fitting or removing optional equipment in wet areas. Do not place the scanner where liquid spills may occur. Always remove the plug from the socket. have been damaged, switch power supply OFF, remove the plug from the socket, ...
Grip the plug to remove the power cable from the socket before fitting or removing optional equipment in wet areas. Do not place the scanner where liquid spills may occur. Always remove the plug from the socket. have been damaged, switch power supply OFF, remove the plug from the socket, ...

Cleaning & Maintenance
Page 12
... socket. Do not remove or insert the plug with wet hands. Always connect the power cable to minimal vibration. Ensure that the base of the scanner is liable to fall from the desk, and that the power plug is level and subject to a 3-pin socket. Do not touch the power cable...
... socket. Do not remove or insert the plug with wet hands. Always connect the power cable to minimal vibration. Ensure that the base of the scanner is liable to fall from the desk, and that the power plug is level and subject to a 3-pin socket. Do not touch the power cable...

Cleaning & Maintenance
Page 13
...not become caught in gears and rollers. Remove the power plug from the socket before moving the equipment. Avoid static electricity. If the scanner is installed away from the socket if the equipment is to be a cause of misoperation of time. Avoid static electricity. Ensure that .... Always clear the floor before beginning work. Ensure that the equipment is used near an air conditioner, copying machine, or TV set, the scanner may result in injury. xi Ensure that clothing, ties, and hair do not stand on the equipment while working, may operate incorrectly. Placing...
...not become caught in gears and rollers. Remove the power plug from the socket before moving the equipment. Avoid static electricity. If the scanner is installed away from the socket if the equipment is to be a cause of misoperation of time. Avoid static electricity. Ensure that .... Always clear the floor before beginning work. Ensure that the equipment is used near an air conditioner, copying machine, or TV set, the scanner may result in injury. xi Ensure that clothing, ties, and hair do not stand on the equipment while working, may operate incorrectly. Placing...
Cleaning & Maintenance
Page 20
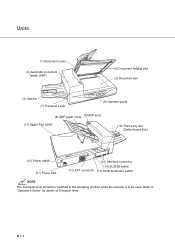
G 1-2 Units (1) Document cover (4) Automatic document feeder (ADF) (3) Document holding pad (2) Document bed (5) Stacker (7) Transport Lever (6) Operator panel (9) ADF lever (8) ADF paper chute (17) Spare Pad ASSY (16) Third party slot (Option board slot) (10) Power switch (11) Power Inlet (15) Interface connector (12) EXT connector (14) SCSI ID switch (13) SCSI terminator switch NOTE The Transport lever should be switched to the operating position when the scanner is to "Operator's Guide" for details of Transport lever. Refer to be used.
G 1-2 Units (1) Document cover (4) Automatic document feeder (ADF) (3) Document holding pad (2) Document bed (5) Stacker (7) Transport Lever (6) Operator panel (9) ADF lever (8) ADF paper chute (17) Spare Pad ASSY (16) Third party slot (Option board slot) (10) Power switch (11) Power Inlet (15) Interface connector (12) EXT connector (14) SCSI ID switch (13) SCSI terminator switch NOTE The Transport lever should be switched to the operating position when the scanner is to "Operator's Guide" for details of Transport lever. Refer to be used.

Cleaning & Maintenance
Page 21
...Document holding pad Presses document to the Document bed. 4 Automatic document feeder Automatically feeds documents to be read documents. 6 Operator panel Contains indicator panel that indicates scanner status. 7 Transport Lever Transport lever Secures the carrier unit. Part Function 1 Document cover Closes over and keeps in place the document to be fed by the automatic document... switch Set to the host system with interface cables. 16 Third party slot A Fujitsu VIDEO INTERFACE OPTION BOARD or fi-CMP3 (JPEG COMPRESSION BOARD) is installed. 17 Spare Pad ASSY Spare Pad ASSY....
...Document holding pad Presses document to the Document bed. 4 Automatic document feeder Automatically feeds documents to be read documents. 6 Operator panel Contains indicator panel that indicates scanner status. 7 Transport Lever Transport lever Secures the carrier unit. Part Function 1 Document cover Closes over and keeps in place the document to be fed by the automatic document... switch Set to the host system with interface cables. 16 Third party slot A Fujitsu VIDEO INTERFACE OPTION BOARD or fi-CMP3 (JPEG COMPRESSION BOARD) is installed. 17 Spare Pad ASSY Spare Pad ASSY....
Cleaning & Maintenance
Page 23
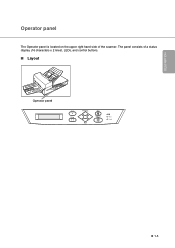
The panel consists of the scanner. I Layout Operator panel Exit Enter Previous Next Stop Send To/ Start Read Check G 1-5 DESCRIPTION Operator panel The Operator panel is located on the upper right hand side of a status display (16 characters x 2 lines), LEDs, and control buttons.
The panel consists of the scanner. I Layout Operator panel Exit Enter Previous Next Stop Send To/ Start Read Check G 1-5 DESCRIPTION Operator panel The Operator panel is located on the upper right hand side of a status display (16 characters x 2 lines), LEDs, and control buttons.

Cleaning & Maintenance
Page 24
... it blinks at four seconds intervals, this button releases the error status (turns off Check and returns to the right. Moves the cursor to the Scanner Ready screen). Pressing the Stop button turns the Check lamp Off. • If it blinks at one second intervals, this button returns you immediately to... LCD screen. Exit When you are entering settings on the Operator panel, pressing this means that cleaning the ADF is used . Read Check Indicates the scanner is reading or ready to read. • If lit, this button. I Button/LED Function Name of this indicates that the...
... it blinks at four seconds intervals, this button releases the error status (turns off Check and returns to the right. Moves the cursor to the Scanner Ready screen). Pressing the Stop button turns the Check lamp Off. • If it blinks at one second intervals, this button returns you immediately to... LCD screen. Exit When you are entering settings on the Operator panel, pressing this means that cleaning the ADF is used . Read Check Indicates the scanner is reading or ready to read. • If lit, this button. I Button/LED Function Name of this indicates that the...

Cleaning & Maintenance
Page 25
... > Abrasion counter Simultaneously press the and arrow buttons for at least 1 second, to switch to Life counter panel display as shown below:The scanner is described in one batch. The counter is detected. How to reset is provided with a counter display. Life Counter Keeps a cumulative count...Operator's Guide". When the button is pressed for at one day. This counter increments at least 1 second This counter increments each time a document is displayed. G 1-7 NOTE When the counter value is 0, no number is scanned. It is turned off. The counter is pressed for...
... > Abrasion counter Simultaneously press the and arrow buttons for at least 1 second, to switch to Life counter panel display as shown below:The scanner is described in one batch. The counter is detected. How to reset is provided with a counter display. Life Counter Keeps a cumulative count...Operator's Guide". When the button is pressed for at one day. This counter increments at least 1 second This counter increments each time a document is displayed. G 1-7 NOTE When the counter value is 0, no number is scanned. It is turned off. The counter is pressed for...

Cleaning & Maintenance
Page 26
... the following on the ADF. • Sending a command from the host computer. (Only When the Video Interface Option is installed.) The scanner displays the following screen when waiting for the Start button to be pressed: St ar t SW ON ! NOTE One of the following messages: Wa r mi... ng- No w Re a d i ng! up the scanner: • Pressing any button. • Setting the paper on the LCD: Cl e a n ADF Gl a s s Clean the Pick roller or the ADF glass in accordance with...
... the following on the ADF. • Sending a command from the host computer. (Only When the Video Interface Option is installed.) The scanner displays the following screen when waiting for the Start button to be pressed: St ar t SW ON ! NOTE One of the following messages: Wa r mi... ng- No w Re a d i ng! up the scanner: • Pressing any button. • Setting the paper on the LCD: Cl e a n ADF Gl a s s Clean the Pick roller or the ADF glass in accordance with...

Cleaning & Maintenance
Page 28
Refer to "Operator's Guide" for details of the following error messages is displayed if an error occurs in the scanner. If one of sheets scanned by the ADF is displayed, contact your service representative. Fr ont Si de Op t i c a l Al ar m FB ar co kn t S S i ...
Refer to "Operator's Guide" for details of the following error messages is displayed if an error occurs in the scanner. If one of sheets scanned by the ADF is displayed, contact your service representative. Fr ont Si de Op t i c a l Al ar m FB ar co kn t S S i ...

Cleaning & Maintenance
Page 29
Alternatively, replace the current cable with one recommended by the manufacturer of the alarm has been corrected, the scanner automatically resumes operation once power is displayed, turn Off system power and then turn it On again. The Power indicator and Check lamp blink alternately. G 1-11 When the cause of the SCSI board. DESCRIPTION FAN Al ar m SCSI f u s e Al a r m (IPC-4D (Image Processing Circuit Board)) I PC Bo ar d Al ar m NOTE When this message is turned On again.
Alternatively, replace the current cable with one recommended by the manufacturer of the alarm has been corrected, the scanner automatically resumes operation once power is displayed, turn Off system power and then turn it On again. The Power indicator and Check lamp blink alternately. G 1-11 When the cause of the SCSI board. DESCRIPTION FAN Al ar m SCSI f u s e Al a r m (IPC-4D (Image Processing Circuit Board)) I PC Bo ar d Al ar m NOTE When this message is turned On again.
Cleaning & Maintenance
Page 42
... sheets or one year. PA03277-0001 (Two rollers are not changed as recommended, the scanner may not function properly. The customer is responsible for the scanner. CAUTION Certain paper types or conditions might reduce the life of documents scanned since the last replacement(s). Up to 200,000 sheets or one year. Be sure...
... sheets or one year. PA03277-0001 (Two rollers are not changed as recommended, the scanner may not function properly. The customer is responsible for the scanner. CAUTION Certain paper types or conditions might reduce the life of documents scanned since the last replacement(s). Up to 200,000 sheets or one year. Be sure...
Cleaning & Maintenance
Page 43
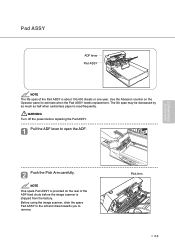
... as half when carbonless paper is about 100,000 sheets or one year. WARNING Turn off the power before the image scanner is shipped from the factory. Before using the image scanner, slide the spare Pad ASSY to the left and draw towards you to open the ADF. REPLACE OF CONSUMABLES Push...
... as half when carbonless paper is about 100,000 sheets or one year. WARNING Turn off the power before the image scanner is shipped from the factory. Before using the image scanner, slide the spare Pad ASSY to the left and draw towards you to open the ADF. REPLACE OF CONSUMABLES Push...
Cleaning & Maintenance
Page 52
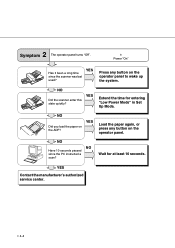
NO Did you load the paper on the operator panel to wake up the system. NO NO Have 10 seconds passed since the scanner was last used? G 4-4 YES Contact the manufacturer's authorized service center. NO Did the scanner enter this state quickly? Power "On" Has it been a long time since the PC instructed a scan? YES Extend the time for at least 10 seconds. Wait for entering "Low Power Mode" in Set Up Mode. 2 Symptom The operator panel turns "Off". YES Press any button on the operator panel. YES Load the paper again, or press any button on the ADF?
NO Did you load the paper on the operator panel to wake up the system. NO NO Have 10 seconds passed since the scanner was last used? G 4-4 YES Contact the manufacturer's authorized service center. NO Did the scanner enter this state quickly? Power "On" Has it been a long time since the PC instructed a scan? YES Extend the time for at least 10 seconds. Wait for entering "Low Power Mode" in Set Up Mode. 2 Symptom The operator panel turns "Off". YES Press any button on the operator panel. YES Load the paper again, or press any button on the ADF?

Cleaning & Maintenance
Page 54
... displayed? YES Contact the manufacturer's authorized service center. 23 23 1 1 78 NO Is the scanner the last device of the SCSI chain? 456 YES NO Is the SCSI ID set the correct ... should be turned off by the SCSI terminator switch on the rear of the image scanner. Contact the manufacturer's authorized service center to change the ID. Use the SCSI ID switch on the rear ...of the image scanner to set correctly? 456 78 YES Is the baud rate of the NO system 4800 bps? (When you use the Fujitsu video interface board.) YES NO CHECK Is the CHECK...
... displayed? YES Contact the manufacturer's authorized service center. 23 23 1 1 78 NO Is the scanner the last device of the SCSI chain? 456 YES NO Is the SCSI ID set the correct ... should be turned off by the SCSI terminator switch on the rear of the image scanner. Contact the manufacturer's authorized service center to change the ID. Use the SCSI ID switch on the rear ...of the image scanner to set correctly? 456 78 YES Is the baud rate of the NO system 4800 bps? (When you use the Fujitsu video interface board.) YES NO CHECK Is the CHECK...

Cleaning & Maintenance
Page 55
NO Select the halftone or dithering mode from the host computer. YES Clean the dirty parts. (See p. 2-4, p. 2-9) Contact the manufacturer's authorized service center. NO Select the "Photo" mode (White level following "Off") through the scanner setting menu in the software. TROUBLESHOOTING G 4-7 4 Symptom Pictures and photographs are not read correctly. Is the "Photo" mode selected? YES Is halftone or dither processing selected? YES Are the Document bed, NO Document holding pad, glass, and sheet guides clean?
NO Select the halftone or dithering mode from the host computer. YES Clean the dirty parts. (See p. 2-4, p. 2-9) Contact the manufacturer's authorized service center. NO Select the "Photo" mode (White level following "Off") through the scanner setting menu in the software. TROUBLESHOOTING G 4-7 4 Symptom Pictures and photographs are not read correctly. Is the "Photo" mode selected? YES Is halftone or dither processing selected? YES Are the Document bed, NO Document holding pad, glass, and sheet guides clean?
Cleaning & Maintenance
Page 57
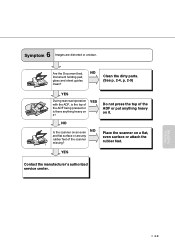
6 Symptom Images are any rubber feet of the scanner missing? Place the scanner on an even NO and flat surface or are distorted or unclear. YES During rear read operation with the ADF, is there anything heavy on ... pressed or is the top of the ADF or put anything heavy on it ? TROUBLESHOOTING G 4-9 Are the Document bed, NO Document holding pad, Clean the dirty parts. glass and sheet guides (See p. 2-4, p. 2-9) clean? NO Is the scanner on a flat, even surface or attach the rubber feet. YES Contact the manufacturer's authorized service center.
6 Symptom Images are any rubber feet of the scanner missing? Place the scanner on an even NO and flat surface or are distorted or unclear. YES During rear read operation with the ADF, is there anything heavy on ... pressed or is the top of the ADF or put anything heavy on it ? TROUBLESHOOTING G 4-9 Are the Document bed, NO Document holding pad, Clean the dirty parts. glass and sheet guides (See p. 2-4, p. 2-9) clean? NO Is the scanner on a flat, even surface or attach the rubber feet. YES Contact the manufacturer's authorized service center.


