
Operator Manual
Page 9
... product names are either registered trademarks of Adobe Systems Incorporated in the scanner lamps. Windows XP Microsoft® Windows® XP Professional operating system, Microsoft® Windows® XP Home Edition operating system. About the Use of Mercury ...) 540-4538 All Rights Reserved, Copyright© PFU LIMITED 2004 fi-4120C2 Image Scanner Operator's Guide vii Windows Me Microsoft® Windows® Millennium Edition operating system. Trademarks Microsoft, Windows, and Windows NT are registered trademarks of Microsoft Corporation in the United States. ...
... product names are either registered trademarks of Adobe Systems Incorporated in the scanner lamps. Windows XP Microsoft® Windows® XP Professional operating system, Microsoft® Windows® XP Home Edition operating system. About the Use of Mercury ...) 540-4538 All Rights Reserved, Copyright© PFU LIMITED 2004 fi-4120C2 Image Scanner Operator's Guide vii Windows Me Microsoft® Windows® Millennium Edition operating system. Trademarks Microsoft, Windows, and Windows NT are registered trademarks of Microsoft Corporation in the United States. ...

Operator Manual
Page 17
Also, when FUJITSU TWAIN32 or FUJITSU ISIS is updated the screens and operations noted in this chapter Windows XP screenshots are using is other than Windows XP. The screens and operations may differ slightly if the OS that you are illustrated. Chapter 1 BASIC SCANNER OPERATIONS 1 This chapter describes basic scanner operations. In this chapter will differ slightly. 1.1 Turning the Scanner ON 2 1.2 Loading Documents on the ADF for Scanning 3 1.3 Scanning Documents 7 1.4 How to Use the Scanner Driver 9 fi-4120C2 Image Scanner Operator's Guide 1
Also, when FUJITSU TWAIN32 or FUJITSU ISIS is updated the screens and operations noted in this chapter Windows XP screenshots are using is other than Windows XP. The screens and operations may differ slightly if the OS that you are illustrated. Chapter 1 BASIC SCANNER OPERATIONS 1 This chapter describes basic scanner operations. In this chapter will differ slightly. 1.1 Turning the Scanner ON 2 1.2 Loading Documents on the ADF for Scanning 3 1.3 Scanning Documents 7 1.4 How to Use the Scanner Driver 9 fi-4120C2 Image Scanner Operator's Guide 1
Operator Manual
Page 21
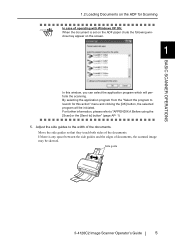
... [Send to launch for Scanning In case of operating with Windows XP OS: When the document is any space between the side guides and the edges of documents, the scanned image may appear on the screen. 1 BASIC SCANNER OPERATIONS In this action" menu and clicking the [OK] ...button, the selected program will perform the scanning. By selecting the application program from the "Select the program to ] button" (page AP- 1) 5. Side guide fi-4120C2 Image Scanner ...
... [Send to launch for Scanning In case of operating with Windows XP OS: When the document is any space between the side guides and the edges of documents, the scanned image may appear on the screen. 1 BASIC SCANNER OPERATIONS In this action" menu and clicking the [OK] ...button, the selected program will perform the scanning. By selecting the application program from the "Select the program to ] button" (page AP- 1) 5. Side guide fi-4120C2 Image Scanner ...

Operator Manual
Page 23
... bar. ⇒ The [TWAIN Driver] dialog box (screen for Microsoft Windows] - [ScandAll 21]. ⇒ This starts up ScandAll 21. BASIC SCANNER OPERATIONS ⇒ The [Select Source] dialog box appears. Select "FUJITSU fi-4120C2dj" (for Scan- 1.3 Scanning Documents 1.3 Scanning Documents 1. For details on the ADF for Windows 95 and WindowsNT 4.0, select "FUJITSU TWAIN 32") and click the [Select] button. 4.
... bar. ⇒ The [TWAIN Driver] dialog box (screen for Microsoft Windows] - [ScandAll 21]. ⇒ This starts up ScandAll 21. BASIC SCANNER OPERATIONS ⇒ The [Select Source] dialog box appears. Select "FUJITSU fi-4120C2dj" (for Scan- 1.3 Scanning Documents 1.3 Scanning Documents 1. For details on the ADF for Windows 95 and WindowsNT 4.0, select "FUJITSU TWAIN 32") and click the [Select] button. 4.

Operator Manual
Page 25
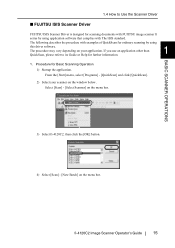
... Operation 1) Startup the application. BASIC SCANNER OPERATIONS 3) Select the scanner to Use the Scanner Driver ■ FUJITSU TWAIN32 Scanner Driver FUJITSU TWAIN32 Scanner Driver is designed for scanning documents with FUJITSU image scanner fi series by using application software that complies with the TWAIN standard. 1 The following describes the procedure with examples of ScandAll 21 for Scanning" (page. 3). fi-4120C2 Image Scanner Operator's Guide 9
... Operation 1) Startup the application. BASIC SCANNER OPERATIONS 3) Select the scanner to Use the Scanner Driver ■ FUJITSU TWAIN32 Scanner Driver FUJITSU TWAIN32 Scanner Driver is designed for scanning documents with FUJITSU image scanner fi series by using application software that complies with the TWAIN standard. 1 The following describes the procedure with examples of ScandAll 21 for Scanning" (page. 3). fi-4120C2 Image Scanner Operator's Guide 9
Operator Manual
Page 27
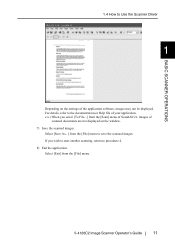
... the scanned images. fi-4120C2 Image Scanner Operator's Guide 11 If you select [To File...] from the [Scan] menu of ScandAll 21, images of scanned documents are not displayed on the settings of your application. Select [Save As...] from the [File] menu. BASIC SCANNER OPERATIONS 1.4 How to Use the Scanner Driver 1 Depending on the window. 7) Save the...
... the scanned images. fi-4120C2 Image Scanner Operator's Guide 11 If you select [To File...] from the [Scan] menu of ScandAll 21, images of scanned documents are not displayed on the settings of your application. Select [Save As...] from the [File] menu. BASIC SCANNER OPERATIONS 1.4 How to Use the Scanner Driver 1 Depending on the window. 7) Save the...
Operator Manual
Page 29
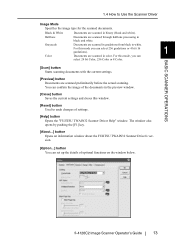
... an information window about the FUJITSU TWAIN32 Scanner Driver's version. [Option...] button You can select 24 bit Color, 256 Color or 8 Color. fi-4120C2 Image Scanner Operator's Guide 13 1.4 How to white. For this mode you can set up the details of the documents in binary (black and white). BASIC SCANNER OPERATIONS [Scan] button Starts scanning documents with the...
... an information window about the FUJITSU TWAIN32 Scanner Driver's version. [Option...] button You can select 24 bit Color, 256 Color or 8 Color. fi-4120C2 Image Scanner Operator's Guide 13 1.4 How to white. For this mode you can set up the details of the documents in binary (black and white). BASIC SCANNER OPERATIONS [Scan] button Starts scanning documents with the...
Operator Manual
Page 31
...application other than 1 QuickScan, please refer to Use the Scanner Driver ■ FUJITSU ISIS Scanner Driver FUJITSU ISIS Scanner Driver is designed for scanning documents with FUJITSU image scanner fi series by using application software that complies with examples of ...SCANNER OPERATIONS 3) Select fi-4120C2, then click the [OK] button. 4) Select [Scan] - [New Batch] on the menu bar. 1.4 How to its Guide or Help for Basic Scanning Operation 1) Startup the application. fi-4120C2 Image Scanner Operator's Guide 15 The procedure may vary depending on your scanner on the window...
...application other than 1 QuickScan, please refer to Use the Scanner Driver ■ FUJITSU ISIS Scanner Driver FUJITSU ISIS Scanner Driver is designed for scanning documents with FUJITSU image scanner fi series by using application software that complies with examples of ...SCANNER OPERATIONS 3) Select fi-4120C2, then click the [OK] button. 4) Select [Scan] - [New Batch] on the menu bar. 1.4 How to its Guide or Help for Basic Scanning Operation 1) Startup the application. fi-4120C2 Image Scanner Operator's Guide 15 The procedure may vary depending on your scanner on the window...

Operator Manual
Page 33
... to return to [New batch] dialog. 9) Load the documents on the scanner. 10) Click the [Scan] button. ⇒ Scanned images are displayed on this dialog box, refer to "Configuration Window of FUJITSU ISIS Scanner Driver" (page. 18). 8) The [Profile Editor] window appears. BASIC SCANNER OPERATIONS 1.4 How to Use the Scanner Driver 7) Configure settings for further information on functions...
... to return to [New batch] dialog. 9) Load the documents on the scanner. 10) Click the [Scan] button. ⇒ Scanned images are displayed on this dialog box, refer to "Configuration Window of FUJITSU ISIS Scanner Driver" (page. 18). 8) The [Profile Editor] window appears. BASIC SCANNER OPERATIONS 1.4 How to Use the Scanner Driver 7) Configure settings for further information on functions...

Operator Manual
Page 37
...the variance based on the brightness of the image. fi-4120C2 Image Scanner Operator's Guide 21 Backing With this function, the outside of contour extraction. 1.4 How to the document length. Overscan This function makes the scanned images ...document paper becomes black / white by adding margins. Gamma Specifies Gamma correction. When any page shorter than the original documents by selecting [black] / [white] background. Low, Mid, High Emphasizes contour of the documents and outputs data adjusted to Use the Scanner Driver [More...] button Opens [More Settings] window...
...the variance based on the brightness of the image. fi-4120C2 Image Scanner Operator's Guide 21 Backing With this function, the outside of contour extraction. 1.4 How to the document length. Overscan This function makes the scanned images ...document paper becomes black / white by adding margins. Gamma Specifies Gamma correction. When any page shorter than the original documents by selecting [black] / [white] background. Low, Mid, High Emphasizes contour of the documents and outputs data adjusted to Use the Scanner Driver [More...] button Opens [More Settings] window...

Operator Manual
Page 39
... slightly. 2.1 Scanning Double Sided Documents 24 2.2 Scanning Different-width Documents 26 2.3 Scanning Documents longer than Windows XP. In this chapter Windows XP screenshots are using is updated the screens and operations noted in the Image (dropout color 36 2.6 Skipping blank pages 37 2.7 Detecting Multi Feeds 39 2.8 Correcting skewed documents 41 fi-4120C2 Image Scanner Operator's Guide 23 Chapter 2 SCANNING...
... slightly. 2.1 Scanning Double Sided Documents 24 2.2 Scanning Different-width Documents 26 2.3 Scanning Documents longer than Windows XP. In this chapter Windows XP screenshots are using is updated the screens and operations noted in the Image (dropout color 36 2.6 Skipping blank pages 37 2.7 Detecting Multi Feeds 39 2.8 Correcting skewed documents 41 fi-4120C2 Image Scanner Operator's Guide 23 Chapter 2 SCANNING...
Operator Manual
Page 40
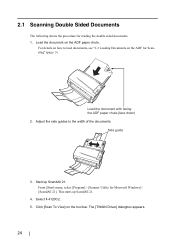
... following shows the procedure for Scanning" (page. 3). Adjust the side guides to load documents, see "1.2 Loading Documents on how to the width of the documents. This starts up ScandAll 21. Select fi-4120C2. 5. Click [Scan To View] on the ADF paper chute. Side guide 3. The .... 24 For details on the ADF for reading the double sided documents. 1. Load the document with facing the ADF paper chute.(face down) 2. Load the document on the tool bar. Start up ScandAll 21. 4. From [Start] menu, select [Program] - [Scanner Utility for Microsoft Windows] [ScandAll 21].
... following shows the procedure for Scanning" (page. 3). Adjust the side guides to load documents, see "1.2 Loading Documents on how to the width of the documents. This starts up ScandAll 21. Select fi-4120C2. 5. Click [Scan To View] on the ADF paper chute. Side guide 3. The .... 24 For details on the ADF for reading the double sided documents. 1. Load the document with facing the ADF paper chute.(face down) 2. Load the document on the tool bar. Start up ScandAll 21. 4. From [Start] menu, select [Program] - [Scanner Utility for Microsoft Windows] [ScandAll 21].
Operator Manual
Page 43
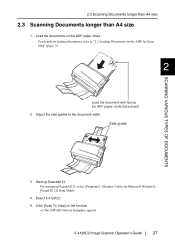
... Documents on loading documents, refer to the document width. Select fi-4120C2. 5. Side guide 3. Click [Scan To View] on the ADF paper chute. SCANNING VARIOUS TYPES OF DOCUMENTS A 2.3 Scanning Documents longer than A4 size 2.3 Scanning Documents longer than A4 size 1. For details on the ADF for Microsoft Windows] [ScandAll 21] from [Start]. 4. For starting up ScandAll 21. fi-4120C2 Image Scanner Operator...
... Documents on loading documents, refer to the document width. Select fi-4120C2. 5. Side guide 3. Click [Scan To View] on the ADF paper chute. SCANNING VARIOUS TYPES OF DOCUMENTS A 2.3 Scanning Documents longer than A4 size 2.3 Scanning Documents longer than A4 size 1. For details on the ADF for Microsoft Windows] [ScandAll 21] from [Start]. 4. For starting up ScandAll 21. fi-4120C2 Image Scanner Operator...
Operator Manual
Page 45
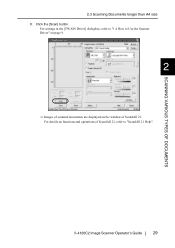
For settings in the [TWAIN Driver] dialogbox, refer to "1.4 How to Use the Scanner Driver" on page 9. 2 ⇒ Images of scanned documents are displayed on functions and operations of ScandAll 21. For details on the window of ScandAll 21, refer to "ScandAll 21 Help". Click the [Scan] button. SCANNING VARIOUS TYPES OF DOCUMENTS fi-4120C2 Image Scanner Operator's Guide 29 2.3 Scanning Documents longer than A4 size 8.
For settings in the [TWAIN Driver] dialogbox, refer to "1.4 How to Use the Scanner Driver" on page 9. 2 ⇒ Images of scanned documents are displayed on functions and operations of ScandAll 21. For details on the window of ScandAll 21, refer to "ScandAll 21 Help". Click the [Scan] button. SCANNING VARIOUS TYPES OF DOCUMENTS fi-4120C2 Image Scanner Operator's Guide 29 2.3 Scanning Documents longer than A4 size 8.

Operator Manual
Page 65
... Cycle 50 4.2 Replacing the Pad ASSY 55 4.3 Replacing the Pick Roller 58 fi-4120C2 Image Scanner Operator's Guide 49 Also, when FUJITSU TWAIN32 or FUJITSU ISIS is updated the screens and operations noted in this chapter Windows XP screenshots are using is not Windows XP. The screens and operations may differ slightly if the OS that you...
... Cycle 50 4.2 Replacing the Pad ASSY 55 4.3 Replacing the Pick Roller 58 fi-4120C2 Image Scanner Operator's Guide 49 Also, when FUJITSU TWAIN32 or FUJITSU ISIS is updated the screens and operations noted in this chapter Windows XP screenshots are using is not Windows XP. The screens and operations may differ slightly if the OS that you...

Operator Manual
Page 67
... Cameras] screen is displayed. In the [Printer and Other Hardware] screen, double click the "Scanners and Cameras" icon. fi-4120C2 Image Scanner Operator's Guide 51 Refer to "2.2 Connecting the Scanner to a PC" in fi-4120C2 Getting Started on the operator panel of the host computer. 4 ⇒ The [Printer and ...product, you can learn how many times the consumables are used so that the scanner is connected to the PC. When turning on the power, check that you can estimate the right timing for the replacement. • For Windows 98 / Windows Me / Windows 2000 / Windows XP 1.
... Cameras] screen is displayed. In the [Printer and Other Hardware] screen, double click the "Scanners and Cameras" icon. fi-4120C2 Image Scanner Operator's Guide 51 Refer to "2.2 Connecting the Scanner to a PC" in fi-4120C2 Getting Started on the operator panel of the host computer. 4 ⇒ The [Printer and ...product, you can learn how many times the consumables are used so that the scanner is connected to the PC. When turning on the power, check that you can estimate the right timing for the replacement. • For Windows 98 / Windows Me / Windows 2000 / Windows XP 1.
Operator Manual
Page 68
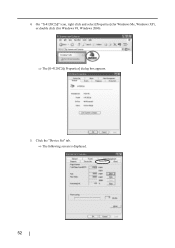
Click the "Device Set" tab. ⇒ The following screen is displayed. 52 On "fi-4120C2dj" icon, right click and select [Properties] (for Windows Me, Windows XP), or double click (for Windows 98, Windows 2000). ⇒ The [fi-4120C2dj Properties] dialog box appears. 5. 4.
Click the "Device Set" tab. ⇒ The following screen is displayed. 52 On "fi-4120C2dj" icon, right click and select [Properties] (for Windows Me, Windows XP), or double click (for Windows 98, Windows 2000). ⇒ The [fi-4120C2dj Properties] dialog box appears. 5. 4.
Operator Manual
Page 69
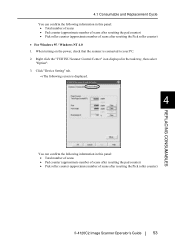
... scans after resetting the pad counter) • Pick roller counter (approximate number of scans after resetting the Pick roller counter) REPLACING CONSUMABLES fi-4120C2 Image Scanner Operator's Guide 53 Right click the "FUJITSU Scanner Control Center" icon displayed in the task tray, then select "Option". 3. 4.1 Consumable and Replacement Cycle You can confirm the following information...(approximate number of scans after resetting the pad counter) • Pick roller counter (approximate number of scans after resetting the Pick roller counter) • For Windows 95 / Windows NT 4.0 1.
... scans after resetting the pad counter) • Pick roller counter (approximate number of scans after resetting the Pick roller counter) REPLACING CONSUMABLES fi-4120C2 Image Scanner Operator's Guide 53 Right click the "FUJITSU Scanner Control Center" icon displayed in the task tray, then select "Option". 3. 4.1 Consumable and Replacement Cycle You can confirm the following information...(approximate number of scans after resetting the pad counter) • Pick roller counter (approximate number of scans after resetting the Pick roller counter) • For Windows 95 / Windows NT 4.0 1.

Operator Manual
Page 72
Reset the pad counter. • For Windows 98 / Windows Me / Windows 2000 / Windows XP 1) When turning on the center of [fi-4120C2dj] from the control panel of your PC. 3) Open the [Properties] of the ADF to your PC. 2) Open the [Scanners and Cameras] from the [Scanners and Cameras]. 4) The [fi-4120C2dj Properties] dialogbox appears. 5) Click the "Device Set" tab...
Reset the pad counter. • For Windows 98 / Windows Me / Windows 2000 / Windows XP 1) When turning on the center of [fi-4120C2dj] from the control panel of your PC. 3) Open the [Properties] of the ADF to your PC. 2) Open the [Scanners and Cameras] from the [Scanners and Cameras]. 4) The [fi-4120C2dj Properties] dialogbox appears. 5) Click the "Device Set" tab...

Operator Manual
Page 73
... screen is displayed. Click the [OK] button. fi-4120C2 Image Scanner Operator's Guide 57 This returns the pad counter to "0". • For Windows 95 / Windows NT 4.0 1) When turning on the power, check that the scanner is connected to "0". The Pad counter returns to your PC. 2) Right click the "FUJITSU Scanner Control Center" icon displayed in the task tray...
... screen is displayed. Click the [OK] button. fi-4120C2 Image Scanner Operator's Guide 57 This returns the pad counter to "0". • For Windows 95 / Windows NT 4.0 1) When turning on the power, check that the scanner is connected to "0". The Pad counter returns to your PC. 2) Right click the "FUJITSU Scanner Control Center" icon displayed in the task tray...


