
Operator Manual
Page 23
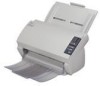
... the scanner to load documents, see "1.2 Loading Documents on how to be used. 1.3 Scanning Documents 1.3 Scanning Documents 1. Start up ScandAll 21. 3. fi-4120C2 Image Scanner Operator's Guide 7 BASIC SCANNER OPERATIONS ⇒ The [Select Source] dialog box appears. Select "FUJITSU fi-4120C2dj" (for Microsoft Windows] - [ScandAll 21]. ⇒ This starts up ScandAll 21. Select [Start] - [Program] - [Scanner Utility for Windows 95 and WindowsNT 4.0, select "FUJITSU...
... the scanner to load documents, see "1.2 Loading Documents on how to be used. 1.3 Scanning Documents 1.3 Scanning Documents 1. Start up ScandAll 21. 3. fi-4120C2 Image Scanner Operator's Guide 7 BASIC SCANNER OPERATIONS ⇒ The [Select Source] dialog box appears. Select "FUJITSU fi-4120C2dj" (for Microsoft Windows] - [ScandAll 21]. ⇒ This starts up ScandAll 21. Select [Start] - [Program] - [Scanner Utility for Windows 95 and WindowsNT 4.0, select "FUJITSU...

Operator Manual
Page 25
..., then click the [Select] button. fi-4120C2 Image Scanner Operator's Guide 9 Select • [FUJITSU fi-4120C2dj] for FUJITSU TWAIN32 V9 • [FUJITSU TWAIN32] for ordinary scanning by using this driver software. 1. 1.4 How to Use the Scanner Driver 1.4 How to Use the Scanner Driver ■ FUJITSU TWAIN32 Scanner Driver FUJITSU TWAIN32 Scanner Driver is designed for scanning documents with FUJITSU image scanner fi series by using application software that...
..., then click the [Select] button. fi-4120C2 Image Scanner Operator's Guide 9 Select • [FUJITSU fi-4120C2dj] for FUJITSU TWAIN32 V9 • [FUJITSU TWAIN32] for ordinary scanning by using this driver software. 1. 1.4 How to Use the Scanner Driver 1.4 How to Use the Scanner Driver ■ FUJITSU TWAIN32 Scanner Driver FUJITSU TWAIN32 Scanner Driver is designed for scanning documents with FUJITSU image scanner fi series by using application software that...

Operator Manual
Page 48
Select [FUJITSU fi-4120C2dj] ([FUJITSU TWAIN 32] for WindowsNT 4.0) at [Device] and click [Scan] button. ⇒ [TWAIN driver] dialog box is displayed. 32 Start up Adobe Acrobat 6.0. 3. Select [Program] - [Adobe Acrobat 6.0] from the [Start] menu. From the [File] menu select [Create PDF] - [From Scanner]. ⇒ [Create PDF From Scanner] dialog box appears. 4. This starts up Adobe Acrobat 6.0. ■ Using Adobe Acrobat 6.0 1. Load the documents on the ADF paper chute. 2.
Select [FUJITSU fi-4120C2dj] ([FUJITSU TWAIN 32] for WindowsNT 4.0) at [Device] and click [Scan] button. ⇒ [TWAIN driver] dialog box is displayed. 32 Start up Adobe Acrobat 6.0. 3. Select [Program] - [Adobe Acrobat 6.0] from the [Start] menu. From the [File] menu select [Create PDF] - [From Scanner]. ⇒ [Create PDF From Scanner] dialog box appears. 4. This starts up Adobe Acrobat 6.0. ■ Using Adobe Acrobat 6.0 1. Load the documents on the ADF paper chute. 2.
Operator Manual
Page 68
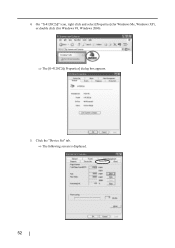
On "fi-4120C2dj" icon, right click and select [Properties] (for Windows Me, Windows XP), or double click (for Windows 98, Windows 2000). ⇒ The [fi-4120C2dj Properties] dialog box appears. 5. 4. Click the "Device Set" tab. ⇒ The following screen is displayed. 52
On "fi-4120C2dj" icon, right click and select [Properties] (for Windows Me, Windows XP), or double click (for Windows 98, Windows 2000). ⇒ The [fi-4120C2dj Properties] dialog box appears. 5. 4. Click the "Device Set" tab. ⇒ The following screen is displayed. 52

Operator Manual
Page 72
Press down on the power, check that the scanner is connected to your PC. 2) Open the [Scanners and Cameras] from the control panel of your PC. 3) Open the [Properties] of the ADF to return it into its original position and lock the ...ADF button. 5. Reset the pad counter. • For Windows 98 / Windows Me / Windows 2000 / Windows XP 1) When turning on the center of [fi-4120C2dj] from the [Scanners and Cameras]. 4) The [fi-4120C2dj Properties] dialogbox appears. 5) Click the "Device Set" tab. ⇒ The following screen is displayed. 6) After clicking the [Clear] button beside "Pad" in...
Press down on the power, check that the scanner is connected to your PC. 2) Open the [Scanners and Cameras] from the control panel of your PC. 3) Open the [Properties] of the ADF to return it into its original position and lock the ...ADF button. 5. Reset the pad counter. • For Windows 98 / Windows Me / Windows 2000 / Windows XP 1) When turning on the center of [fi-4120C2dj] from the [Scanners and Cameras]. 4) The [fi-4120C2dj Properties] dialogbox appears. 5) Click the "Device Set" tab. ⇒ The following screen is displayed. 6) After clicking the [Clear] button beside "Pad" in...
Operator Manual
Page 79
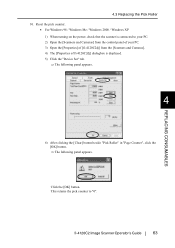
...counter to your PC. 2) Open the [Scanners and Cameras] from the control panel of your PC. 3) Open the [Properties] of [fi-4120C2dj] from the [Scanners and Cameras]. 4) The [Properties of fi-4120C2dj] dialogbox is displayed. 5) Click the ..."Device Set" tab. ⇒ The following panel appears. 4 REPLACING CONSUMABLES 6) After clicking the [Clear] button beside "Pick Roller" in "Page Counter", click the [OK] button. ⇒ The following panel appears. fi-4120C2 Image Scanner...
...counter to your PC. 2) Open the [Scanners and Cameras] from the control panel of your PC. 3) Open the [Properties] of [fi-4120C2dj] from the [Scanners and Cameras]. 4) The [Properties of fi-4120C2dj] dialogbox is displayed. 5) Click the ..."Device Set" tab. ⇒ The following panel appears. 4 REPLACING CONSUMABLES 6) After clicking the [Clear] button beside "Pick Roller" in "Page Counter", click the [OK] button. ⇒ The following panel appears. fi-4120C2 Image Scanner...


