
A3210 Getting Started Guide
Page 1
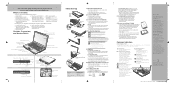
... are not blocked. • Lift the display, being accessed. If you choose not run Click Me!. icon will appear on your Fujitsu LifeBook notebook. icon, your system 5. Shortcuts to see an icon called Click Me! Common Indicators Status Display Panel The Status Indicators represent speci...Out Port Air Vents External Video Jack Modem Jack USB Ports BOTTOM PANEL Lithium ion Battery Bay Optical Drive Emergency Optical Tray Release Memory Upgrade Compartment Initial Start Up Display Panel Latch Button Wall Jack AC Adapter DC Power Jack 1. Install Additional Software • Close ...
... are not blocked. • Lift the display, being accessed. If you choose not run Click Me!. icon will appear on your Fujitsu LifeBook notebook. icon, your system 5. Shortcuts to see an icon called Click Me! Common Indicators Status Display Panel The Status Indicators represent speci...Out Port Air Vents External Video Jack Modem Jack USB Ports BOTTOM PANEL Lithium ion Battery Bay Optical Drive Emergency Optical Tray Release Memory Upgrade Compartment Initial Start Up Display Panel Latch Button Wall Jack AC Adapter DC Power Jack 1. Install Additional Software • Close ...
A3210 Getting Started Guide
Page 2
... RISK OF FIRE, REPLACE ONLY WITH THE SAME TYPE Caution AND RATING FUSE. All rights reserved. There may cause undesired operation. Popular Accessories Memory Modules • 1 GB SDRAM, DDR2-6667 • 2 GB SDRAM, DDR2-6667 Main Lithium ion Battery Auto/Airline Adapter Additional AC ... LifeBook® A3210 Notebook This guide will lead you can be followed to reduce the risk of fire, electric shock and injury to the point of cable entrance as practicable, as close to persons, including the following two conditions: (1) This device may vary based on Fujitsu products...
... RISK OF FIRE, REPLACE ONLY WITH THE SAME TYPE Caution AND RATING FUSE. All rights reserved. There may cause undesired operation. Popular Accessories Memory Modules • 1 GB SDRAM, DDR2-6667 • 2 GB SDRAM, DDR2-6667 Main Lithium ion Battery Auto/Airline Adapter Additional AC ... LifeBook® A3210 Notebook This guide will lead you can be followed to reduce the risk of fire, electric shock and injury to the point of cable entrance as practicable, as close to persons, including the following two conditions: (1) This device may vary based on Fujitsu products...

A3210 User's Guide
Page 2
...Adobe Systems Incorporated in the United States and other countries. Fujitsu, the Fujitsu logo, and LifeBook are owned by the Personal Computer Memory Card International Association (PCMCIA) and any use of such marks by Fujitsu Computer Systems Corporation is a trademark of Advanced Micro Devices, ... of Atheros Communications, Inc. PowerDVD is a trademark of Roxio, a division of CyberLink Corp. Copyright and Trademark Information Fujitsu Computer Systems Corporation has made every effort to ensure the accuracy and completeness of this document. We disclaim liability for errors...
...Adobe Systems Incorporated in the United States and other countries. Fujitsu, the Fujitsu logo, and LifeBook are owned by the Personal Computer Memory Card International Association (PCMCIA) and any use of such marks by Fujitsu Computer Systems Corporation is a trademark of Advanced Micro Devices, ... of Atheros Communications, Inc. PowerDVD is a trademark of Roxio, a division of CyberLink Corp. Copyright and Trademark Information Fujitsu Computer Systems Corporation has made every effort to ensure the accuracy and completeness of this document. We disclaim liability for errors...

A3210 User's Guide
Page 8
... Media Player Software 59 Using Media Player on Battery Power 60 PC Cards/ExpressCards 62 Installing PC Cards 63 Removing PC Cards 63 Installing ExpressCards 64 Removing ExpressCards 65 Memory Stick/Secure Digital/xD Cards 67 Installing Memory Stick/SD/xD Cards 68 Removing A Memory Stick/SD/xD Card 68 3
... Media Player Software 59 Using Media Player on Battery Power 60 PC Cards/ExpressCards 62 Installing PC Cards 63 Removing PC Cards 63 Installing ExpressCards 64 Removing ExpressCards 65 Memory Stick/Secure Digital/xD Cards 67 Installing Memory Stick/SD/xD Cards 68 Removing A Memory Stick/SD/xD Card 68 3
A3210 User's Guide
Page 9
... Module 69 Installing Memory Upgrade Modules 69 Checking the Memory Capacity 71 Removing a Memory Upgrade Module 71 Device Ports 72 Modem (RJ-11) Telephone Jack 72 Internal LAN (RJ-45) Jack 73 Universal Serial Bus Ports 74 Headphone/Line-...Out Jack 74 Microphone/Line-In Jack 75 External Video Port 75 IEEE 1394 Port 76 S-Video Out Port 77 Troubleshooting Your LifeBook...
... Module 69 Installing Memory Upgrade Modules 69 Checking the Memory Capacity 71 Removing a Memory Upgrade Module 71 Device Ports 72 Modem (RJ-11) Telephone Jack 72 Internal LAN (RJ-45) Jack 73 Universal Serial Bus Ports 74 Headphone/Line-...Out Jack 74 Microphone/Line-In Jack 75 External Video Port 75 IEEE 1394 Port 76 S-Video Out Port 77 Troubleshooting Your LifeBook...
A3210 User's Guide
Page 10
Chapter 5 Chapter 6 Care and Maintenance Caring for your LifeBook Notebook 102 Cleaning your LifeBook notebook 104 Storing your LifeBook notebook 105 Traveling with your LifeBook notebook 106 Batteries 107 Media Care 108 PC/ExpressCards 109 System Specifications Specifications 110 Configuration Label 110 Microprocessor 111 Chipset 111 Memory 111 Video 111 Audio 112 Mass Storage Device Options...
Chapter 5 Chapter 6 Care and Maintenance Caring for your LifeBook Notebook 102 Cleaning your LifeBook notebook 104 Storing your LifeBook notebook 105 Traveling with your LifeBook notebook 106 Batteries 107 Media Care 108 PC/ExpressCards 109 System Specifications Specifications 110 Configuration Label 110 Microprocessor 111 Chipset 111 Memory 111 Video 111 Audio 112 Mass Storage Device Options...

A3210 User's Guide
Page 13
... Guide The LifeBook A3210 notebook from Fujitsu Computer Systems Corporation provides desktop performance with a fast, AMD Turion™ 64 X2 processor and an integrated ATI Radeon® Xpress graphics controller with Microsoft Windows Vista® Business or Windows Vista® Home Premium operating system pre-installed. This system brings the computing power of shared graphics memory. For...
... Guide The LifeBook A3210 notebook from Fujitsu Computer Systems Corporation provides desktop performance with a fast, AMD Turion™ 64 X2 processor and an integrated ATI Radeon® Xpress graphics controller with Microsoft Windows Vista® Business or Windows Vista® Home Premium operating system pre-installed. This system brings the computing power of shared graphics memory. For...
A3210 User's Guide
Page 21
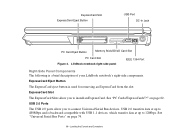
...;" on page 74. 16 - ExpressCard Eject Button The ExpressCard eject button is a brief description of your LifeBook notebook's right-side components. USB 2.0 Ports The USB 2.0 ports allow you to connect Universal Serial Bus devices. LifeBook notebook right-side panel IEEE 1394 Port Right-Side Panel Components The following is used for removing... ExpressCard Slots allow you to 12Mbps. Locating the Controls and Connectors ExpressCard Slot ExpressCard Eject Button USB Port DC-In Jack PC Card Eject Button Memory Stick/SD/xD Card Slot PC Card Slot Figure 4.
...;" on page 74. 16 - ExpressCard Eject Button The ExpressCard eject button is a brief description of your LifeBook notebook's right-side components. USB 2.0 Ports The USB 2.0 ports allow you to connect Universal Serial Bus devices. LifeBook notebook right-side panel IEEE 1394 Port Right-Side Panel Components The following is used for removing... ExpressCard Slots allow you to 12Mbps. Locating the Controls and Connectors ExpressCard Slot ExpressCard Eject Button USB Port DC-In Jack PC Card Eject Button Memory Stick/SD/xD Card Slot PC Card Slot Figure 4.
A3210 User's Guide
Page 22
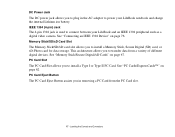
...to install a Type I or Type II PC Card. Memory Stick/SD/xD Card Slot The Memory Stick/SD/xD card slot allows you in the AC adapter to power your LifeBook and an IEEE 1394 peripheral such as a digital video camera. See "Memory Stick/Secure Digital/xD Cards" on page 76. This ... Eject Button assists you to connect between your LifeBook notebook and charge the internal Lithium ion battery. See "Connecting an IEEE 1394 Device" on page 67. Locating the Controls and Connectors IEEE 1394 (4-pin) Jack The 4-pin 1394 jack is used to install a Memory Stick, Secure Digital (SD) card, or...
...to install a Type I or Type II PC Card. Memory Stick/SD/xD Card Slot The Memory Stick/SD/xD card slot allows you in the AC adapter to power your LifeBook and an IEEE 1394 peripheral such as a digital video camera. See "Memory Stick/Secure Digital/xD Cards" on page 76. This ... Eject Button assists you to connect between your LifeBook notebook and charge the internal Lithium ion battery. See "Connecting an IEEE 1394 Device" on page 67. Locating the Controls and Connectors IEEE 1394 (4-pin) Jack The 4-pin 1394 jack is used to install a Memory Stick, Secure Digital (SD) card, or...

A3210 User's Guide
Page 26
It can be necessary to expand the system memory capacity of your LifeBook notebook's bottom panel components. See "Memory Upgrade Module" on page 50. See "Lithium ion Battery" on page 69. Under normal circumstances, it should not be unlatched for swapping a ...with a charged Lithium ion battery. Lithium ion Battery Bay The battery bay contains the internal Lithium ion battery. The memory upgrade compartment allows you to open this compartment. 21 - LifeBook notebook bottom panel Bottom Components The following is a brief description of time or for the removal of the battery ...
It can be necessary to expand the system memory capacity of your LifeBook notebook's bottom panel components. See "Memory Upgrade Module" on page 50. See "Lithium ion Battery" on page 69. Under normal circumstances, it should not be unlatched for swapping a ...with a charged Lithium ion battery. Lithium ion Battery Bay The battery bay contains the internal Lithium ion battery. The memory upgrade compartment allows you to open this compartment. 21 - LifeBook notebook bottom panel Bottom Components The following is a brief description of time or for the removal of the battery ...

A3210 User's Guide
Page 46
... until your notebook's BIOS. IF YOU SET AND FORGET YOUR USER AND MASTER HARD DISK PASSWORDS, FUJITSU COMPUTER SYSTEMS WILL NOT BE ABLE TO RESET IT. When your LifeBook notebook is first turned on page 91. REMEMBER YOUR PASSWORDS. During booting, your hard disk drive(s). See BIOS Setup Utility below for ...Utility. Hard Disk Drive Passwords To provide additional security for information about accessing the utility. See "Power On Self Test Messages" on , the main system memory is loaded. This information is performing a standard boot sequence including a Power On Self Test (POST).
... until your notebook's BIOS. IF YOU SET AND FORGET YOUR USER AND MASTER HARD DISK PASSWORDS, FUJITSU COMPUTER SYSTEMS WILL NOT BE ABLE TO RESET IT. When your LifeBook notebook is first turned on page 91. REMEMBER YOUR PASSWORDS. During booting, your hard disk drive(s). See BIOS Setup Utility below for ...Utility. Hard Disk Drive Passwords To provide additional security for information about accessing the utility. See "Power On Self Test Messages" on , the main system memory is loaded. This information is performing a standard boot sequence including a Power On Self Test (POST).
A3210 User's Guide
Page 51
...operating conditions, such as those for your notebook may be used to manually put your notebook into Sleep mode. Power Management Your Fujitsu LifeBook notebook has many options and features for the display brightness. Push the Power/Suspend/Resume button when the notebook is in your system...whether the system is active, the Power/Suspend/Resume button can do to prevent your notebook is Suspended by maintaining power to maintain system memory and for conserving battery power, there are automatic and need no user intervention, such as quickly. You will hear two short beeps ...
...operating conditions, such as those for your notebook may be used to manually put your notebook into Sleep mode. Power Management Your Fujitsu LifeBook notebook has many options and features for the display brightness. Push the Power/Suspend/Resume button when the notebook is in your system...whether the system is active, the Power/Suspend/Resume button can do to prevent your notebook is Suspended by maintaining power to maintain system memory and for conserving battery power, there are automatic and need no user intervention, such as quickly. You will hear two short beeps ...

A3210 User's Guide
Page 52
Your notebook's system memory typically stores the file on which you resume operation from Sleep mode, your notebook will return to support operations in Sleep mode by: • Pressing ... AND POWER UP SEQUENCES AND RESETS PERIPHERAL DEVICES. 47 - You must be put in progress. THE FILES ARE LEFT OPEN AND MEMORY IS KEPT ACTIVE DURING SLEEP MODE OR THE MEMORY IS TRANSFERRED TO THE INTERNAL HARD DRIVE DURING HIBERNATION MODE. • THE MAIN ADVANTAGE OF USING HIBERNATION (SAVE-TO-DISK) IS...
Your notebook's system memory typically stores the file on which you resume operation from Sleep mode, your notebook will return to support operations in Sleep mode by: • Pressing ... AND POWER UP SEQUENCES AND RESETS PERIPHERAL DEVICES. 47 - You must be put in progress. THE FILES ARE LEFT OPEN AND MEMORY IS KEPT ACTIVE DURING SLEEP MODE OR THE MEMORY IS TRANSFERRED TO THE INTERNAL HARD DRIVE DURING HIBERNATION MODE. • THE MAIN ADVANTAGE OF USING HIBERNATION (SAVE-TO-DISK) IS...
A3210 User's Guide
Page 53
.... 2 Select "Choose what the power button does" or "Choose what closing the lid does", then make your notebook's system memory to configure some of the power management settings. TURNING OFF YOUR LIFEBOOK NOTEBOOK WITHOUT EXITING WINDOWS OR TURNING ON YOUR NOTEBOOK WITHIN 10 SECONDS OF THE NOTEBOOK BEING SHUT OFF MAY CAUSE...
.... 2 Select "Choose what the power button does" or "Choose what closing the lid does", then make your notebook's system memory to configure some of the power management settings. TURNING OFF YOUR LIFEBOOK NOTEBOOK WITHOUT EXITING WINDOWS OR TURNING ON YOUR NOTEBOOK WITHIN 10 SECONDS OF THE NOTEBOOK BEING SHUT OFF MAY CAUSE...

A3210 User's Guide
Page 56
...BATTERIES PROPERLY. CHECK WITH YOUR LOCAL GOVERNMENT AUTHORITY FOR DETAILS REGARDING RECYCLING OR DISPOSING OF OLD BATTERIES. The Lithium ion battery is in your LifeBook notebook and connect the AC or Auto/Airline adapter. The charge times will be charged is installed in use while the battery is charging... Batteries If you want to be significantly longer if your notebook into sleep mode, or turn it off while the adapter is no memory effect on the Lithium ion battery therefore you want to discharge the battery completely before recharging. To recharge the battery make sure the battery...
...BATTERIES PROPERLY. CHECK WITH YOUR LOCAL GOVERNMENT AUTHORITY FOR DETAILS REGARDING RECYCLING OR DISPOSING OF OLD BATTERIES. The Lithium ion battery is in your LifeBook notebook and connect the AC or Auto/Airline adapter. The charge times will be charged is installed in use while the battery is charging... Batteries If you want to be significantly longer if your notebook into sleep mode, or turn it off while the adapter is no memory effect on the Lithium ion battery therefore you want to discharge the battery completely before recharging. To recharge the battery make sure the battery...

A3210 User's Guide
Page 72
... that allows you can store and transfer data to Memory Sticks. Installing a Memory Stick/SD/xD Card Memory Stick/Secure Digital/xD Cards Your LifeBook notebook supports Memory Sticks, Secure Digital (SD), and xD-Picture cards, on which means they are much smaller than either one. Memory Stick/Secure Digital/xD Cards xD-Picture Cards are...
... that allows you can store and transfer data to Memory Sticks. Installing a Memory Stick/SD/xD Card Memory Stick/Secure Digital/xD Cards Your LifeBook notebook supports Memory Sticks, Secure Digital (SD), and xD-Picture cards, on which means they are much smaller than either one. Memory Stick/Secure Digital/xD Cards xD-Picture Cards are...

A3210 User's Guide
Page 73
...WATER OR ANY OTHER SUBSTANCE ON THE CARD AS YOU MAY PERMANENTLY DAMAGE THE CARD, YOUR LIFEBOOK NOTEBOOK, OR BOTH. 1 See your notebook is off while installing them. 2 Make sure there is seated in the Memory Stick/SD/xD Card slot. Push the card in the slot. Some cards may require ... until it unlatches. SOME CARDS MAY REQUIRE YOUR LIFEBOOK NOTEBOOK TO BE IN SLEEP MODE OR OFF WHILE REMOVING THEM. Installing Memory Stick/SD/xD Cards Memory Stick, SD, and xD Cards are installed in the connector. Removing A Memory Stick/SD/xD Card To remove a Memory Stick, SD, or xD Card, follow these ...
...WATER OR ANY OTHER SUBSTANCE ON THE CARD AS YOU MAY PERMANENTLY DAMAGE THE CARD, YOUR LIFEBOOK NOTEBOOK, OR BOTH. 1 See your notebook is off while installing them. 2 Make sure there is seated in the Memory Stick/SD/xD Card slot. Push the card in the slot. Some cards may require ... until it unlatches. SOME CARDS MAY REQUIRE YOUR LIFEBOOK NOTEBOOK TO BE IN SLEEP MODE OR OFF WHILE REMOVING THEM. Installing Memory Stick/SD/xD Cards Memory Stick, SD, and xD Cards are installed in the connector. Removing A Memory Stick/SD/xD Card To remove a Memory Stick, SD, or xD Card, follow these ...
A3210 User's Guide
Page 74
... MODULE COMPARTMENT EXCEPT THE ONES SPECIFICALLY SHOWN IN THE DIRECTIONS FOR INSTALLING AND REMOVING THE MEMORY UPGRADE MODULE. • THE MEMORY UPGRADE MODULE CAN BE SEVERELY DAMAGED BY ELECTROSTATIC DISCHARGE (ESD). Memory Upgrade Module Your Fujitsu LifeBook notebook comes with a minimum of 512 MB of high speed Double Data Rate Synchronous Dynamic RAM (DDR2-667...
... MODULE COMPARTMENT EXCEPT THE ONES SPECIFICALLY SHOWN IN THE DIRECTIONS FOR INSTALLING AND REMOVING THE MEMORY UPGRADE MODULE. • THE MEMORY UPGRADE MODULE CAN BE SEVERELY DAMAGED BY ELECTROSTATIC DISCHARGE (ESD). Memory Upgrade Module Your Fujitsu LifeBook notebook comes with a minimum of 512 MB of high speed Double Data Rate Synchronous Dynamic RAM (DDR2-667...
A3210 User's Guide
Page 75
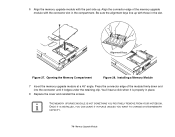
...firmly down and into the connector until it is properly in the compartment. Opening the Memory Compartment Figure 28. Installing a Memory Module 7 Insert the memory upgrade module at a 45° angle. 6 Align the memory upgrade module with the part side up with the connector slot in place. 8 Replace...LEAVE IT IN PLACE UNLESS YOU WANT TO CHANGE SYSTEM MEMORY CAPACITY. 70 - You'll hear a click when it lodges under the retaining clip. Memory Upgrade Module Alignment Keys Figure 27. Press the connector edge of the memory upgrade module with those in the slot. Be sure ...
...firmly down and into the connector until it is properly in the compartment. Opening the Memory Compartment Figure 28. Installing a Memory Module 7 Insert the memory upgrade module at a 45° angle. 6 Align the memory upgrade module with the part side up with the connector slot in place. 8 Replace...LEAVE IT IN PLACE UNLESS YOU WANT TO CHANGE SYSTEM MEMORY CAPACITY. 70 - You'll hear a click when it lodges under the retaining clip. Memory Upgrade Module Alignment Keys Figure 27. Press the connector edge of the memory upgrade module with those in the slot. Be sure ...

A3210 User's Guide
Page 76
... it up and pulling it away from your notebook has recognized the change. RAM:" IF THE TOTAL MEMORY DISPLAYED IS INCORRECT, CHECK THAT YOUR MEMORY UPGRADE MODULE IS PROPERLY INSTALLED. (IF THE MODULE IS PROPERLY INSTALLED AND THE CAPACITY IS STILL NOT ... -> System and Maintenance -> System. Removing memory module Checking the Memory Capacity Once you have changed the system memory capacity by replacing the installed module with a larger one, be sure to "Memory - Removing a Memory Upgrade Module 1 Perform steps 1 through 4 of Installing a Memory Upgrade Module. 2 Pull the clips sideways ...
... it up and pulling it away from your notebook has recognized the change. RAM:" IF THE TOTAL MEMORY DISPLAYED IS INCORRECT, CHECK THAT YOUR MEMORY UPGRADE MODULE IS PROPERLY INSTALLED. (IF THE MODULE IS PROPERLY INSTALLED AND THE CAPACITY IS STILL NOT ... -> System and Maintenance -> System. Removing memory module Checking the Memory Capacity Once you have changed the system memory capacity by replacing the installed module with a larger one, be sure to "Memory - Removing a Memory Upgrade Module 1 Perform steps 1 through 4 of Installing a Memory Upgrade Module. 2 Pull the clips sideways ...
