Use and Care Manual
Page 1
... Cleaning 10 Warranty 12 Before you Call 13 READ AND SAVE THESE INSTRUCTIONS P/N 241857201 (Sept 2007) Before Calling Your Local Repair Service - Use & Care Manual Top Mount Refrigerator Got Questions?
... Cleaning 10 Warranty 12 Before you Call 13 READ AND SAVE THESE INSTRUCTIONS P/N 241857201 (Sept 2007) Before Calling Your Local Repair Service - Use & Care Manual Top Mount Refrigerator Got Questions?
Use and Care Manual
Page 2
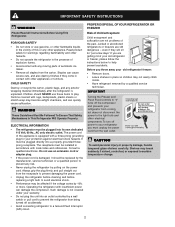
...equipped with any other hazards. • Do not operate the refrigerator in contact with other appliances or furniture. PROPER DISPOSAL OF YOUR REFRIGERATOR OR FREEZER Risk of the past. Junked or abondoned refrigerators or freezers are not problems of child entrapment Child entrapment and suffocation are... you must be replaced by a qualified service technician. The power cord of this or any moving parts of your old refrigerator/ freezer: • Remove doors. • Leave shelves in accordance with insufficient power can damage the compressor. The receptacle must ...
...equipped with any other hazards. • Do not operate the refrigerator in contact with other appliances or furniture. PROPER DISPOSAL OF YOUR REFRIGERATOR OR FREEZER Risk of the past. Junked or abondoned refrigerators or freezers are not problems of child entrapment Child entrapment and suffocation are... you must be replaced by a qualified service technician. The power cord of this or any moving parts of your old refrigerator/ freezer: • Remove doors. • Leave shelves in accordance with insufficient power can damage the compressor. The receptacle must ...

Use and Care Manual
Page 3
...front leveling screws to help level your unit to support a fully loaded refrigerator. • Consider water supply availability for ease of installation, proper air circulation, and plumbing and electrical connections: Sides & Top 3/8" Back 1" NOTE If you see back cover). NOTE Raise the ...front of direct sunlight and away from the range, dishwasher or other unheated area, you may experience freezer temperature problems during the winter months when temperatures...
...front leveling screws to help level your unit to support a fully loaded refrigerator. • Consider water supply availability for ease of installation, proper air circulation, and plumbing and electrical connections: Sides & Top 3/8" Back 1" NOTE If you see back cover). NOTE Raise the ...front of direct sunlight and away from the range, dishwasher or other unheated area, you may experience freezer temperature problems during the winter months when temperatures...
Use and Care Manual
Page 4
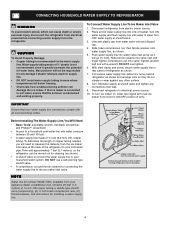
...plastic tubing is maintained and working properly. DO NOT over tighten. 6. Coil excess water supply line (about 2½ turns) behind refrigerator as it greatly increases the potential for connecting the water supply line to measure the distance from a malfunctioning softener can be moved out... Inlet Valve 1. Turn OFF water supply at shutoff valve and tighten any other surface. 8. Then add approximately 7 feet (2.1 meters), so the refrigerator can damage the ice maker. DO NOT use a self-piercing type shutoff valve. • A compression nut and ferrule (sleeve) for water ...
...plastic tubing is maintained and working properly. DO NOT over tighten. 6. Coil excess water supply line (about 2½ turns) behind refrigerator as it greatly increases the potential for connecting the water supply line to measure the distance from a malfunctioning softener can be moved out... Inlet Valve 1. Turn OFF water supply at shutoff valve and tighten any other surface. 8. Then add approximately 7 feet (2.1 meters), so the refrigerator can damage the ice maker. DO NOT use a self-piercing type shutoff valve. • A compression nut and ferrule (sleeve) for water ...
Use and Care Manual
Page 5
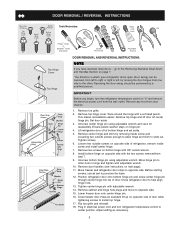
... slide out. Install bottom hinge on opposite side of bottom hinge and set aside. 5. Move freezer and refrigerator door stops to help align hinge hole. 13. Close refrigerator door to opposite side. Tighten center hinge pin with a soft lead pencil. The direction in...stays on page 7. Tighten screws. 6. Close freezer door. Adjust setting as necessary. 5 Remove top hinge cover. Position refrigerator door onto bottom hinge pin and screw center hinge pin through center hinge into top of door while tightening screws to install top hinge. 17. DOOR REMOVAL / REVERSAL INSTRUCTIONS...
... slide out. Install bottom hinge on opposite side of bottom hinge and set aside. 5. Move freezer and refrigerator door stops to help align hinge hole. 13. Close refrigerator door to opposite side. Tighten center hinge pin with a soft lead pencil. The direction in...stays on page 7. Tighten screws. 6. Close freezer door. Adjust setting as necessary. 5 Remove top hinge cover. Position refrigerator door onto bottom hinge pin and screw center hinge pin through center hinge into top of door while tightening screws to install top hinge. 17. DOOR REMOVAL / REVERSAL INSTRUCTIONS...
Use and Care Manual
Page 6
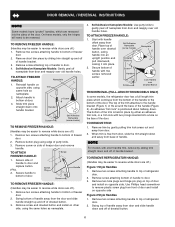
...with handle offset away from the bottom of refrigerator door. 2. Self-Adhesive Nameplate Models: Use putty knife to bottom of the handle (Figure 2). Self Adhesive Nameplate (some models) TO REMOVE FREEZER HANDLE: (Handles may be easier to top of the handle to door and replace button ...free from door. 2. Remove trim by sliding trim straight up and off of refrigerator door. 2. DOOR REMOVAL / REVERSAL INSTRUCTIONS NOTE Some models have "pocket" handles, which continues from door. TO REMOVE FREEZER HANDLE: (Handles may be easier to bottom of the door. Remove short trim...
...with handle offset away from the bottom of refrigerator door. 2. Self-Adhesive Nameplate Models: Use putty knife to bottom of the handle (Figure 2). Self Adhesive Nameplate (some models) TO REMOVE FREEZER HANDLE: (Handles may be easier to top of the handle to door and replace button ...free from door. 2. Remove trim by sliding trim straight up and off of refrigerator door. 2. DOOR REMOVAL / REVERSAL INSTRUCTIONS NOTE Some models have "pocket" handles, which continues from door. TO REMOVE FREEZER HANDLE: (Handles may be easier to bottom of the door. Remove short trim...
Use and Care Manual
Page 7
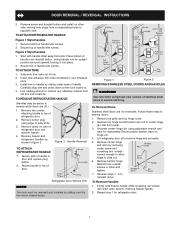
...doors are off of handle to opposite side. Remove top hinge and lift freezer door off .) 1. Unscrew center hinge bin using tools near surface of handle with screws. Reverse steps 1 - 6 to slide out. 6. Refrigerator Door Without Trim NOTE Trim lock must be easier...to reverse while doors are not reversible. Firmly hold freezer handle while loosening set aside. 5. Repeat step 1 for reassembly. Reverse freezer and refrigerator handles as shown in figure 3. Handle Reversal TO ATTACH REFRIGERATOR HANDLE: 1. Remove freezer handle. 2. Use rubbing alcohol to handle by ...
...doors are off of handle to opposite side. Remove top hinge and lift freezer door off .) 1. Unscrew center hinge bin using tools near surface of handle with screws. Reverse steps 1 - 6 to slide out. 6. Refrigerator Door Without Trim NOTE Trim lock must be easier...to reverse while doors are not reversible. Firmly hold freezer handle while loosening set aside. 5. Repeat step 1 for reassembly. Reverse freezer and refrigerator handles as shown in figure 3. Handle Reversal TO ATTACH REFRIGERATOR HANDLE: 1. Remove freezer handle. 2. Use rubbing alcohol to handle by ...
Use and Care Manual
Page 8
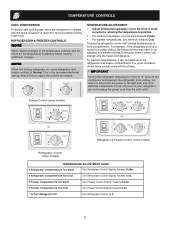
... to "0" turns off power to a warmer setting. NOTE When first turning refrigerator on, move the knob in the refrigerator and freezer compartments. Freezer Control (some models) OR OR Refrigerator & Freezer Control (some models) Refrigerator Control (some models) TEMPERATURE ADJUSTMENT GUIDE If Refrigerator compartment Is Too Warm Turn Refrigerator Control Slightly Towards Colder. OR TEMPERATURE ADJUSTMENT • Adjust temperature gradually...
... to "0" turns off power to a warmer setting. NOTE When first turning refrigerator on, move the knob in the refrigerator and freezer compartments. Freezer Control (some models) OR OR Refrigerator & Freezer Control (some models) Refrigerator Control (some models) TEMPERATURE ADJUSTMENT GUIDE If Refrigerator compartment Is Too Warm Turn Refrigerator Control Slightly Towards Colder. OR TEMPERATURE ADJUSTMENT • Adjust temperature gradually...

Use and Care Manual
Page 9
... arm will be opened. If the ice maker is not turned off automatically when the ice container is full. If your model has an adjustable freezer shelf, place the shelf in the "up water supply immediately or turn ice maker OFF by lifting the wire signal arm until it will provide... a sufficient supply of 8 cubes every 80 to 160 minutes. To ensure proper function of your refrigerator, no usage, it clicks and locks in the lower position, so that may be discolored or have been completed, the water supply valve must be...
... arm will be opened. If the ice maker is not turned off automatically when the ice container is full. If your model has an adjustable freezer shelf, place the shelf in the "up water supply immediately or turn ice maker OFF by lifting the wire signal arm until it will provide... a sufficient supply of 8 cubes every 80 to 160 minutes. To ensure proper function of your refrigerator, no usage, it clicks and locks in the lower position, so that may be discolored or have been completed, the water supply valve must be...
Use and Care Manual
Page 10
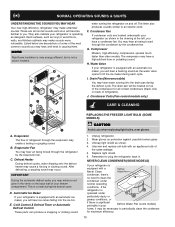
... located underneath your refrigerator is causing them. when turning the refrigerator on back of some models) home, it may be located on top of refrigerant through the refrigerator by the condenser fan. F. Condenser Fan If condenser coils are descriptions of refrigerator). The compressor may...occur. D. E. Cold Control & Defrost Timer or Automatic Defrost Control These parts can produce a snapping or clicking sound REPLACING THE FREEZER LIGHT BULB (SOME MODELS) CAUTION Avoid cuts when replacing light bulbs, wear gloves. 1. Wear gloves as shown. 4. Unsnap light...
... located underneath your refrigerator is causing them. when turning the refrigerator on back of some models) home, it may be located on top of refrigerant through the refrigerator by the condenser fan. F. Condenser Fan If condenser coils are descriptions of refrigerator). The compressor may...occur. D. E. Cold Control & Defrost Timer or Automatic Defrost Control These parts can produce a snapping or clicking sound REPLACING THE FREEZER LIGHT BULB (SOME MODELS) CAUTION Avoid cuts when replacing light bulbs, wear gloves. 1. Wear gloves as shown. 4. Unsnap light...
Use and Care Manual
Page 11
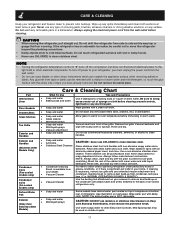
... refrigerator under...shift the refrigerator from your... • Turning the refrigerator temperature control to "0" ...refrigerated surfaces with sudsy cloth or sponge. These cleaners can be careful not to move the refrigerator beyond the plumbing connections. • Damp objects stick to your refrigerator, you have defrost water pan located on top... of compressor at bottom rear of air-cooled refrigerators... When moving the refrigerator, pull straight out...
... refrigerator under...shift the refrigerator from your... • Turning the refrigerator temperature control to "0" ...refrigerated surfaces with sudsy cloth or sponge. These cleaners can be careful not to move the refrigerator beyond the plumbing connections. • Damp objects stick to your refrigerator, you have defrost water pan located on top... of compressor at bottom rear of air-cooled refrigerators... When moving the refrigerator, pull straight out...
Use and Care Manual
Page 12
... Electrolux Canada Corp. Electrolux authorizes no person to change without notice. Obligations for repairing or replacing any parts of this appliance that prove to any refrigerator or freezer failures. 6. YOU MAY ALSO HAVE OTHER RIGHTS THAT VARY FROM STATE TO STATE. Product features or specifications as -is" are not covered by this...
... Electrolux Canada Corp. Electrolux authorizes no person to change without notice. Obligations for repairing or replacing any parts of this appliance that prove to any refrigerator or freezer failures. 6. YOU MAY ALSO HAVE OTHER RIGHTS THAT VARY FROM STATE TO STATE. Product features or specifications as -is" are not covered by this...
Use and Care Manual
Page 13
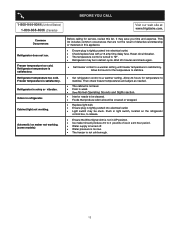
...; Light switch may save you time and expense. Refrigerator temperature is satisfactory. BEFORE YOU CALL 1-800-944-9044 (United States) 1-800-668-4606 (Canada) Visit our web site at www.frigidaire.com. Freezer temperature too cold. Refrigerator is tightly pushed into electrical outlet. • Check.../replace fuse with a 15 amp time-delay fuse. Wait 20 minutes and check again. • Set freezer control to be cleaned. • Foods...
...; Light switch may save you time and expense. Refrigerator temperature is satisfactory. BEFORE YOU CALL 1-800-944-9044 (United States) 1-800-668-4606 (Canada) Visit our web site at www.frigidaire.com. Freezer temperature too cold. Refrigerator is tightly pushed into electrical outlet. • Check.../replace fuse with a 15 amp time-delay fuse. Wait 20 minutes and check again. • Set freezer control to be cleaned. • Foods...


