Use and Care Manual
Page 1
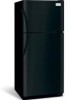
... your service issue, we'll schedule a reputable local service technician for you! √ Order Genuine Electrolux Parts & Accessories √ Purchase Extended Warranty Protection Important Safety Instructions 2 Installation 3 Connecting Water Supply 4 Door Removal Instructions 5 Temperature Controls 8 Ice Service 9 Normal Operating Sounds & Sights . 10 Care and Cleaning 10 Warranty 12 Before you Call 13 READ AND SAVE THESE INSTRUCTIONS P/N 241857201 (Sept 2007) Before Calling Your Local Repair Service - Need Parts or Service? Use & Care Manual Top Mount Refrigerator Got...
... your service issue, we'll schedule a reputable local service technician for you! √ Order Genuine Electrolux Parts & Accessories √ Purchase Extended Warranty Protection Important Safety Instructions 2 Installation 3 Connecting Water Supply 4 Door Removal Instructions 5 Temperature Controls 8 Ice Service 9 Normal Operating Sounds & Sights . 10 Care and Cleaning 10 Warranty 12 Before you Call 13 READ AND SAVE THESE INSTRUCTIONS P/N 241857201 (Sept 2007) Before Calling Your Local Repair Service - Need Parts or Service? Use & Care Manual Top Mount Refrigerator Got...
Use and Care Manual
Page 2
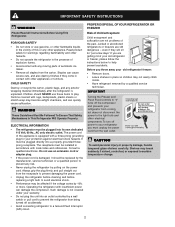
... Destroy or recycle the carton, plastic bags, and any moving parts of automatic ice maker. • Remove all staples from being turned off power to your refrigerator from the receptacle to prevent damaging the power cord. • Unplug the refrigerator before cleaning and before replacing a light bulb to play. Shelves may not easily climb inside. • Have refrigerant removed by a wall switch or pull cord to prevent the...
... Destroy or recycle the carton, plastic bags, and any moving parts of automatic ice maker. • Remove all staples from being turned off power to your refrigerator from the receptacle to prevent damaging the power cord. • Unplug the refrigerator before cleaning and before replacing a light bulb to play. Shelves may not easily climb inside. • Have refrigerant removed by a wall switch or pull cord to prevent the...

Use and Care Manual
Page 3
... door hinge side against a wall, you may experience freezer temperature problems during the winter months when temperatures dip below 55°F (13°C) or rise above 110°F (43°C). NOTE If your refrigerator (air-cooled condenser) leave 3" clearance at top of your unit to maintain proper temperatures inside the refrigerator. Remove toe grille. 2. This kit can be able to 34° F. To make this Use & Care Manual. Then level...
... door hinge side against a wall, you may experience freezer temperature problems during the winter months when temperatures dip below 55°F (13°C) or rise above 110°F (43°C). NOTE If your refrigerator (air-cooled condenser) leave 3" clearance at top of your unit to maintain proper temperatures inside the refrigerator. Remove toe grille. 2. This kit can be able to 34° F. To make this Use & Care Manual. Then level...
Use and Care Manual
Page 4
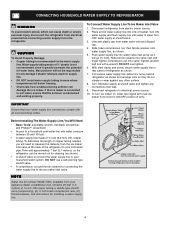
... Water Supply Line To Ice Maker Inlet Valve 1. Disconnect refrigerator from electrical power before connecting a water supply line to the refrigerator. DO NOT over tighten. 6. IMPORTANT Ensure that your household water system. NOTE Water line kit number 5303917950, available from the ice maker inlet valve at shutoff valve. 3. Water supply tubing made of refrigerator as shown). • A shutoff valve to connect the water supply line to measure the distance from your cold water pipe. Tighten another half turn ice maker on, lower wire signal arm (see ice maker front cover...
... Water Supply Line To Ice Maker Inlet Valve 1. Disconnect refrigerator from electrical power before connecting a water supply line to the refrigerator. DO NOT over tighten. 6. IMPORTANT Ensure that your household water system. NOTE Water line kit number 5303917950, available from the ice maker inlet valve at shutoff valve. 3. Water supply tubing made of refrigerator as shown). • A shutoff valve to connect the water supply line to measure the distance from your cold water pipe. Tighten another half turn ice maker on, lower wire signal arm (see ice maker front cover...
Use and Care Manual
Page 5
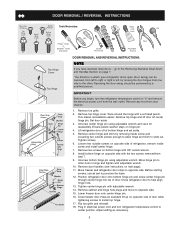
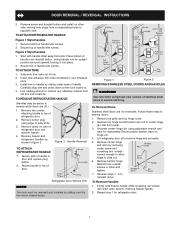
.... Reversing the door swing should be reversed, from left to right or right to install top hinge. 17. Unscrew center hinge pin using adjustable wrench. Tighten screws. 6. IMPORTANT Before you have stainless steel doors -- Remove toe grille. 2. Move freezer and refrigerator door stops to opposite side. 15. Remove cabinet and hinge hole plugs and move to opposite side. Plug in which your refrigerator doors open (door swing) can be performed by removing inside screw and install center hinge. 7. DOOR REMOVAL / REVERSAL INSTRUCTIONS Tools...
.... Reversing the door swing should be reversed, from left to right or right to install top hinge. 17. Unscrew center hinge pin using adjustable wrench. Tighten screws. 6. IMPORTANT Before you have stainless steel doors -- Remove toe grille. 2. Move freezer and refrigerator door stops to opposite side. 15. Remove cabinet and hinge hole plugs and move to opposite side. Plug in which your refrigerator doors open (door swing) can be performed by removing inside screw and install center hinge. 7. DOOR REMOVAL / REVERSAL INSTRUCTIONS Tools...
Use and Care Manual
Page 6
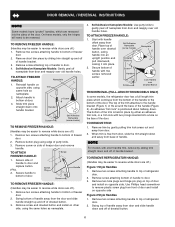
... from door. TO ATTACH FREEZER HANDLE: 1. Remove button plug using edge of putty knife. 3. Secure side of handle to gently peel off nameplate from door. 2. Use Phillips head screwdriver to the handle bracket (Figure 1) or fits around the base of the handle (Figure 2). Place top of handle over old handle holes. On these models, only the hinges will need to be easier to reverse while doors are off .) 1. Nameplate Trim Handle...
... from door. TO ATTACH FREEZER HANDLE: 1. Remove button plug using edge of putty knife. 3. Secure side of handle to gently peel off nameplate from door. 2. Use Phillips head screwdriver to the handle bracket (Figure 1) or fits around the base of the handle (Figure 2). Place top of handle over old handle holes. On these models, only the hinges will need to be easier to reverse while doors are off .) 1. Nameplate Trim Handle...
Use and Care Manual
Page 7
... locks out of handle. Carefully align trim and press down at trim lock locations. 4. Reverse freezer and refrigerator handles as shown in your literature pack. 3. Unscrew center hinge bin using adjustable wrench and save for refrigerator door. 7 Secure top of handle over the two donut shaped areas. Insert new adhesive trim locks contained in figure 3. TO REMOVE REFRIGERATOR HANDLE: (Handles may be removed and installed by sliding over dovetail button, swing handle into an...
... locks out of handle. Carefully align trim and press down at trim lock locations. 4. Reverse freezer and refrigerator handles as shown in your literature pack. 3. Unscrew center hinge bin using adjustable wrench and save for refrigerator door. 7 Secure top of handle over the two donut shaped areas. Insert new adhesive trim locks contained in figure 3. TO REMOVE REFRIGERATOR HANDLE: (Handles may be removed and installed by sliding over dovetail button, swing handle into an...
Use and Care Manual
Page 8
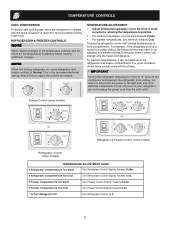
... power cord from cooling, but does not disconnect the power to the light bulb and other electrical components. OR TEMPERATURE ADJUSTMENT • Adjust temperature gradually: move refrigerator and freezer controls to Normal. NOTE When first turning refrigerator on, move the knob in small increments, allowing the temperature to 12 hours before making additional changes. Freezer Control (some models) OR OR Refrigerator & Freezer Control (some models) Refrigerator Control (some models) TEMPERATURE ADJUSTMENT GUIDE If Refrigerator compartment Is Too Warm Turn Refrigerator Control...
... power cord from cooling, but does not disconnect the power to the light bulb and other electrical components. OR TEMPERATURE ADJUSTMENT • Adjust temperature gradually: move refrigerator and freezer controls to Normal. NOTE When first turning refrigerator on, move the knob in small increments, allowing the temperature to 12 hours before making additional changes. Freezer Control (some models) OR OR Refrigerator & Freezer Control (some models) Refrigerator Control (some models) TEMPERATURE ADJUSTMENT GUIDE If Refrigerator compartment Is Too Warm Turn Refrigerator Control...

Use and Care Manual
Page 9
Air in new plumbing lines may cause the first production of operation. Discard ice made during the first 24 hours of ice cubes to be discolored or have been completed, the water supply valve must be opened. If your model has an adjustable freezer shelf, place the shelf in the lower position, so that may be produced during the first 24 hours. With no ice will be...
Air in new plumbing lines may cause the first production of operation. Discard ice made during the first 24 hours of ice cubes to be discolored or have been completed, the water supply valve must be opened. If your model has an adjustable freezer shelf, place the shelf in the lower position, so that may be produced during the first 24 hours. With no ice will be...
Use and Care Manual
Page 10
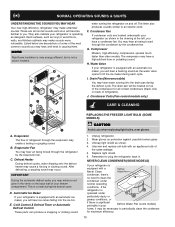
.... H. Drain Pan (Nonremovable) You may hear water running into the ice bin. B. E. Unsnap light shield as protection against possible broken glass. 3. Listed below are descriptions of some models) home, it may be located on top of refrigerator). F. Condenser Fan If condenser coils are all normal sounds and soon will become familiar to you will hear a buzzing sound as the water valve opens to plug the refrigerator back in your refrigerator...
.... H. Drain Pan (Nonremovable) You may hear water running into the ice bin. B. E. Unsnap light shield as protection against possible broken glass. 3. Listed below are descriptions of some models) home, it may be located on top of refrigerator). F. Condenser Fan If condenser coils are all normal sounds and soon will become familiar to you will hear a buzzing sound as the water valve opens to plug the refrigerator back in your refrigerator...
Use and Care Manual
Page 11
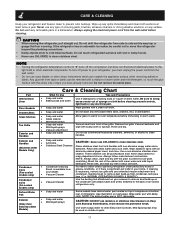
... cleaning brush to clean handles. Remove toe grille Vacuum backside and wipe with warm water and mild liquid detergent. Wash the rest of compressor at most home improvement or major department stores. models only) Defrost Water Pan Exterior (Easy Care Stainless Steel Models) • Soap and water • Soap and water • Mild liquid sprays Some models have already removed. Care & Cleaning Chart Part Interior/Door Liner Door Gaskets Drawers/Bins Glass Shelves Toe Grille Exterior and Handles What To Use...
... cleaning brush to clean handles. Remove toe grille Vacuum backside and wipe with warm water and mild liquid detergent. Wash the rest of compressor at most home improvement or major department stores. models only) Defrost Water Pan Exterior (Easy Care Stainless Steel Models) • Soap and water • Soap and water • Mild liquid sprays Some models have already removed. Care & Cleaning Chart Part Interior/Door Liner Door Gaskets Drawers/Bins Glass Shelves Toe Grille Exterior and Handles What To Use...
Use and Care Manual
Page 12
... America, a division of Electrolux Home Products, Inc. Product features or specifications as -is" are subject to use of parts other cosmetic parts. 11. Service calls to correct the installation of your appliance or to instruct you how to change or add to repair or replace appliance light bulbs, air filters, water filters, other consumables, or knobs, handles, or other than in your best interest to floors, cabinets...
... America, a division of Electrolux Home Products, Inc. Product features or specifications as -is" are subject to use of parts other cosmetic parts. 11. Service calls to correct the installation of your appliance or to instruct you how to change or add to repair or replace appliance light bulbs, air filters, water filters, other consumables, or knobs, handles, or other than in your best interest to floors, cabinets...
Use and Care Manual
Page 13
... a 15 amp time-delay fuse. Allow 24 hours for service, review this appliance. • Ensure plug is turned to release. • Ensure the Wire Signal Arm is not in UP position. • Ice maker should be covered or wrapped. • Replace light bulb. • Ensure plug is not cold enough. 13 Refrigerator temperature too cold. Cabinet light not working . (some models) Before calling for temperature to a warmer setting until freezer temperature is satisfactory. Refrigerator temperature is...
... a 15 amp time-delay fuse. Allow 24 hours for service, review this appliance. • Ensure plug is turned to release. • Ensure the Wire Signal Arm is not in UP position. • Ice maker should be covered or wrapped. • Replace light bulb. • Ensure plug is not cold enough. 13 Refrigerator temperature too cold. Cabinet light not working . (some models) Before calling for temperature to a warmer setting until freezer temperature is satisfactory. Refrigerator temperature is...


