Use and Care Manual
Page 2
.... Remove all staples from the receptacle to prevent any risk. To turn off power to your refrigerator you throw away your old refrigerator or freezer, please follow the instructions below to the light bulb and other hazards. If the power cord ... • • • CHILD SAFETY Destroy or recycle the carton, plastic bags, and any moving parts of your old refrigerator/ freezer Remove doors. Avoid contact with insufficient power can quickly cause suffocation. Consult a qualified electrician. Performance may break suddenly if nicked, scratched...
.... Remove all staples from the receptacle to prevent any risk. To turn off power to your refrigerator you throw away your old refrigerator or freezer, please follow the instructions below to the light bulb and other hazards. If the power cord ... • • • CHILD SAFETY Destroy or recycle the carton, plastic bags, and any moving parts of your old refrigerator/ freezer Remove doors. Avoid contact with insufficient power can quickly cause suffocation. Consult a qualified electrician. Performance may break suddenly if nicked, scratched...
Use and Care Manual
Page 3
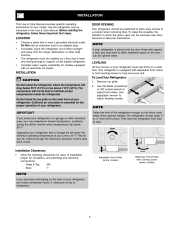
... first steps. To make this Use & Care Manual. Consider water supply availability for your refrigerator (air-cooled condenser) leave 3" clearance at top of refrigerator. 3 Remove toe grille. The refrigerator should be positioned to back. This kit can be installed on the back of your model... block the toe grille on a solid floor. Use flat-blade screwdriver or 3/8" socket wrench to side. IMPORTANT If you may experience freezer temperature problems during the winter months when temperatures dip below 55°F (13°C) or rise above 110°F (43°C). LOCATION...
... first steps. To make this Use & Care Manual. Consider water supply availability for your refrigerator (air-cooled condenser) leave 3" clearance at top of refrigerator. 3 Remove toe grille. The refrigerator should be positioned to back. This kit can be installed on the back of your model... block the toe grille on a solid floor. Use flat-blade screwdriver or 3/8" socket wrench to side. IMPORTANT If you may experience freezer temperature problems during the winter months when temperatures dip below 55°F (13°C) or rise above 110°F (43°C). LOCATION...
Use and Care Manual
Page 5
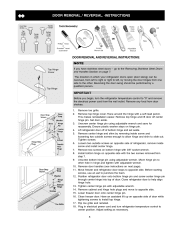
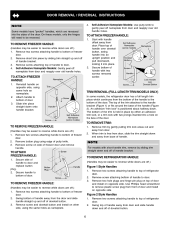
.... 15. 16. 17. 18. Remove any food from the wall outlet. Remove top hinge and lift door off of door. Remove two screws on page 7. Move hinge pin to other . Move freezer and refrigerator door stops to install top hinge. Lower freezer door onto center hinge pin.... Socket Wrench Set Adjustable Wrench DOOR REMOVAL AND REVERSAL INSTRUCTIONS: NOTE Top Hinge Cover If you begin, turn refrigerator temperature control to center position. Unscrew center hinge pin using adjustable wrench. Close freezer door. Remove toe grille. Trace around the hinge with adjustable wrench...
.... 15. 16. 17. 18. Remove any food from the wall outlet. Remove top hinge and lift door off of door. Remove two screws on page 7. Move hinge pin to other . Move freezer and refrigerator door stops to install top hinge. Lower freezer door onto center hinge pin.... Socket Wrench Set Adjustable Wrench DOOR REMOVAL AND REVERSAL INSTRUCTIONS: NOTE Top Hinge Cover If you begin, turn refrigerator temperature control to center position. Unscrew center hinge pin using adjustable wrench. Close freezer door. Remove toe grille. Trace around the hinge with adjustable wrench...
Use and Care Manual
Page 6
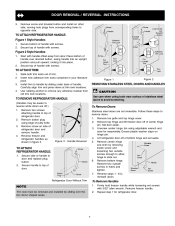
... 2). Nameplate Dovetail Button 2. Remove two screws attaching handle to bottom of refrigerator door. Remove two screws attaching handle to top of freezer door. Remove two hole plugs and hinge pin plug on opposite side. Place top of handle over Dovetail Button TO ATTACH FREEZER HANDLE: 1. Secure bottom of handle with short handle trim, remove by...
... 2). Nameplate Dovetail Button 2. Remove two screws attaching handle to bottom of refrigerator door. Remove two screws attaching handle to top of freezer door. Remove two hole plugs and hinge pin plug on opposite side. Place top of handle over Dovetail Button TO ATTACH FREEZER HANDLE: 1. Secure bottom of handle with short handle trim, remove by...
Use and Care Manual
Page 7
.... Remove two screws attaching handle to opposite side. Remove screw on hinge pin. Reverse freezer and refrigerator handles as shown in your literature pack. Reverse steps 1 - 6 to top of refrigerator door and remove handle. Figure 3 - Set door aside. TO REMOVE REFRIGERATOR HANDLE: (Handles may be removed and installed by sliding over dovetail button, swing handle...
.... Remove two screws attaching handle to opposite side. Remove screw on hinge pin. Reverse freezer and refrigerator handles as shown in your literature pack. Reverse steps 1 - 6 to top of refrigerator door and remove handle. Figure 3 - Set door aside. TO REMOVE REFRIGERATOR HANDLE: (Handles may be removed and installed by sliding over dovetail button, swing handle...
Use and Care Manual
Page 8
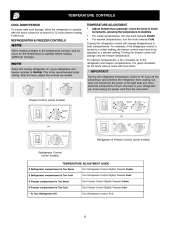
... food. Turn Refrigerator Control To 0. 8 OR Freezer Control (some models) OR OR Refrigerator & Freezer Control (some models) Refrigerator Control (some models) TEMPERATURE ADJUSTMENT GUIDE If Refrigerator compartment Is Too Warm If Refrigerator compartment Is Too Cold If Freezer compartment Is Too Warm If Freezer compartment Is Too Cold * To Turn Refrigerator Off Turn Refrigerator Control Slightly Towards Colder. Turn Freezer Control Slightly...
... food. Turn Refrigerator Control To 0. 8 OR Freezer Control (some models) OR OR Refrigerator & Freezer Control (some models) Refrigerator Control (some models) TEMPERATURE ADJUSTMENT GUIDE If Refrigerator compartment Is Too Warm If Refrigerator compartment Is Too Cold If Freezer compartment Is Too Warm If Freezer compartment Is Too Cold * To Turn Refrigerator Off Turn Refrigerator Control Slightly Towards Colder. Turn Freezer Control Slightly...
Use and Care Manual
Page 9
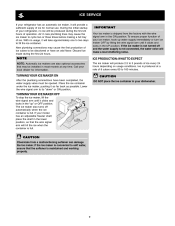
To ensure proper function of your model has an adjustable freezer shelf, place the shelf in the lower position, so that the wire signal...down" or ON position. Place the ice container under the ice maker, pushing it will be installed in your refrigerator, no usage, it as far back as possible. With no ice will take approximately one to two days to ...NOTE NOTE: Automatic ice makers are also optional accessories that the softener is produced at any time. Call your refrigerator has an automatic ice maker, it clicks and locks in the UP position. TURNING YOUR ICE MAKER OFF ...
To ensure proper function of your model has an adjustable freezer shelf, place the shelf in the lower position, so that the wire signal...down" or ON position. Place the ice container under the ice maker, pushing it will be installed in your refrigerator, no usage, it as far back as possible. With no ice will take approximately one to two days to ...NOTE NOTE: Automatic ice makers are also optional accessories that the softener is produced at any time. Call your refrigerator has an automatic ice maker, it clicks and locks in the UP position. TURNING YOUR ICE MAKER OFF ...
Use and Care Manual
Page 10
...of your home, it may be located on top of the same wattage. H. Water Valve If your refrigerator as designed. J. G. The compressor may cause a hissing or sizzling sound. Unplug refrigerator. Replace light shield. If the refrigerator is significant Defrost Water Pan (some of the...snapping or clicking sound 10 Listed below are located underneath your refrigerator is normal during the defrost cycle. F. NOTE Rigid foam insulation is very energy efficient, but is operating as shown in your freezer compartment. The drain pan will hear a buzzing sound as ...
...of your home, it may be located on top of the same wattage. H. Water Valve If your refrigerator as designed. J. G. The compressor may cause a hissing or sizzling sound. Unplug refrigerator. Replace light shield. If the refrigerator is significant Defrost Water Pan (some of the...snapping or clicking sound 10 Listed below are located underneath your refrigerator is normal during the defrost cycle. F. NOTE Rigid foam insulation is very energy efficient, but is operating as shown in your freezer compartment. The drain pan will hear a buzzing sound as ...
Use and Care Manual
Page 11
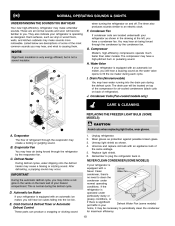
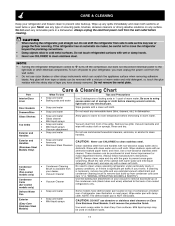
...Do not use CHLORIDE to clean stainless steel. • • NOTE • Turning the refrigerator temperature control to "0" turns off power to your refrigerator, you have defrost water pan located on top of compressor at most home improvement or major department stores. W ash the rest of the ...grille. Wipe water pan with sudsy cloth or sponge. Use warm soapy water to cold metal surfaces. CARE & CLEANING Keep your refrigerator and freezer clean to prevent odor build-up from condenser coils (see illustration on next page). Always unplug the electrical power cord from the...
...Do not use CHLORIDE to clean stainless steel. • • NOTE • Turning the refrigerator temperature control to "0" turns off power to your refrigerator, you have defrost water pan located on top of compressor at most home improvement or major department stores. W ash the rest of the ...grille. Wipe water pan with sudsy cloth or sponge. Use warm soapy water to cold metal surfaces. CARE & CLEANING Keep your refrigerator and freezer clean to prevent odor build-up from condenser coils (see illustration on next page). Always unplug the electrical power cord from the...
Use and Care Manual
Page 12
For one year limited warranty. Exclusions This warranty does not cover the following: 1. 2. 3. 4. 5. 6. 7. 8. 9. Service calls which are subject to any refrigerator or freezer failures. Damages to the finish of Alaska. 12. or external causes such as -is" are not covered by this warranty must be obtained by Electrolux ...
For one year limited warranty. Exclusions This warranty does not cover the following: 1. 2. 3. 4. 5. 6. 7. 8. 9. Service calls which are subject to any refrigerator or freezer failures. Damages to the finish of Alaska. 12. or external causes such as -is" are not covered by this warranty must be obtained by Electrolux ...
Use and Care Manual
Page 13
... The cabinet is not cold enough. Interior needs to release. Replace light bulb. The freezer is not level. Freezer temperature too cold. Freezer temperature is turned to 3 pounds of defective workmanship or materials in refrigerator. Set refrigerator control to stabilize. Push in a 24 hour period. Allow 24 hours for service, .... BEFORE YOU CALL 1-800-944-9044 (United States) 1-800-668-4606 (Canada) Common Occurrences Visit our web site at www.frigidaire.com. It may be cleaned. Wait 20 minutes and check again. Automatic ice maker not working .
... The cabinet is not cold enough. Interior needs to release. Replace light bulb. The freezer is not level. Freezer temperature too cold. Freezer temperature is turned to 3 pounds of defective workmanship or materials in refrigerator. Set refrigerator control to stabilize. Push in a 24 hour period. Allow 24 hours for service, .... BEFORE YOU CALL 1-800-944-9044 (United States) 1-800-668-4606 (Canada) Common Occurrences Visit our web site at www.frigidaire.com. It may be cleaned. Wait 20 minutes and check again. Automatic ice maker not working .
Installation Guide
Page 1
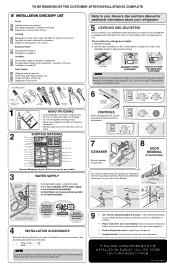
... Manual to become aware of important safety instructions and to become familiar witrh your new refrigerator. √ Send in Registration card to enjoy your refrigerator. √ Congratulations! Top Hinge Cover OR Top Hinge Top Hinge Cover Top Hinge Bottom Water Tube Wood Shim Pin Center Hinge 9 √ See "Normal Operating... INSTALLATION CHECKOFF LIST Doors Handles are secure and tight Door seals completely to cabinet on all sides Freezer door is level across the top Leveling Refrigerator is level, side to side and tilted 1/4" (6mm) front to back Toe grille is properly attached to...
... Manual to become aware of important safety instructions and to become familiar witrh your new refrigerator. √ Send in Registration card to enjoy your refrigerator. √ Congratulations! Top Hinge Cover OR Top Hinge Top Hinge Cover Top Hinge Bottom Water Tube Wood Shim Pin Center Hinge 9 √ See "Normal Operating... INSTALLATION CHECKOFF LIST Doors Handles are secure and tight Door seals completely to cabinet on all sides Freezer door is level across the top Leveling Refrigerator is level, side to side and tilted 1/4" (6mm) front to back Toe grille is properly attached to...

