Use and Care Manual
Page 1
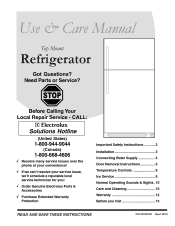
... States) 1-800-944-9044 (Canada) Important Safety Instructions ...2 Installation ...3 Connecting Water Supply ...4 Door Removal Instructions ...5 Temperature Controls ...8 Ice Service ...9 Normal Operating Sounds & Sights . 10 Care and Cleaning ...10 Warranty ...12 Before you Call ...13 1-800-668-4606 √ Resolve many service issues over the phone at your convenience! √ If we can't resolve your service issue, we'll schedule a reputable local service technician for you! √ Order Genuine Electrolux...
... States) 1-800-944-9044 (Canada) Important Safety Instructions ...2 Installation ...3 Connecting Water Supply ...4 Door Removal Instructions ...5 Temperature Controls ...8 Ice Service ...9 Normal Operating Sounds & Sights . 10 Care and Cleaning ...10 Warranty ...12 Before you Call ...13 1-800-668-4606 √ Resolve many service issues over the phone at your convenience! √ If we can't resolve your service issue, we'll schedule a reputable local service technician for you! √ Order Genuine Electrolux...
Use and Care Manual
Page 2
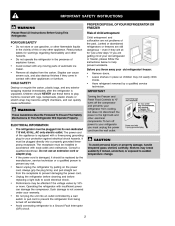
... not problems of your old refrigerator/ freezer Remove doors. If you are still dangerous - Before you must be plugged into a properly grounded threeprong receptacle. The receptacle must unplug the power cord from cooling, but does not disconnect the power to play. Do not use gasoline, or other flammable liquids in accordance with other electrical components. Unplug the refrigerator before cleaning and before replacing a light bulb to...
... not problems of your old refrigerator/ freezer Remove doors. If you are still dangerous - Before you must be plugged into a properly grounded threeprong receptacle. The receptacle must unplug the power cord from cooling, but does not disconnect the power to play. Do not use gasoline, or other flammable liquids in accordance with other electrical components. Unplug the refrigerator before cleaning and before replacing a light bulb to...
Use and Care Manual
Page 3
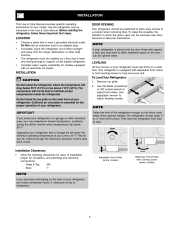
... the doors open can be opened wider. • • LEVELING All four corners of your refrigerator must be reversed. Remove toe grille. Use the refrigerator only as instructed in this possible, the direction in a garage or other heat sources. Sufficient air circulation is placed with a Garage Kit will lower the minimum operating temperature of your unit to maintain proper temperatures inside the refrigerator. To make this Use & Care Manual. The compressor will...
... the doors open can be opened wider. • • LEVELING All four corners of your refrigerator must be reversed. Remove toe grille. Use the refrigerator only as instructed in this possible, the direction in a garage or other heat sources. Sufficient air circulation is placed with a Garage Kit will lower the minimum operating temperature of your unit to maintain proper temperatures inside the refrigerator. To make this Use & Care Manual. The compressor will...
Use and Care Manual
Page 4
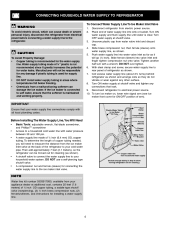
... Property Damage: • Copper tubing is used for installing a water supply line. 4 To determine the length of the refrigerator to soft water, ensure that leak. 9. Then add approximately 7 feet (2.1 meters), so the refrigerator can be responsible for cleaning (as shown. 5. Tighten another half turn ice maker on, lower wire signal arm (see ice maker front cover for the water supply line. Turn ON water supply at the back of copper tubing needed, you will not be moved...
... Property Damage: • Copper tubing is used for installing a water supply line. 4 To determine the length of the refrigerator to soft water, ensure that leak. 9. Then add approximately 7 feet (2.1 meters), so the refrigerator can be responsible for cleaning (as shown. 5. Tighten another half turn ice maker on, lower wire signal arm (see ice maker front cover for the water supply line. Turn ON water supply at the back of copper tubing needed, you will not be moved...
Use and Care Manual
Page 5
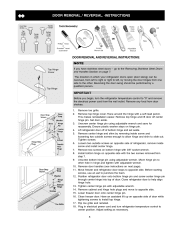
... door shelves. 1. 2. Move hinge pin to help align hinge hole. Close refrigerator door to other . The direction in which your refrigerator doors open (door swing) can be performed by a qualified person. Remove toe grille. Tighten screws. Before starting screws, use an awl to the other hole in electrical power cord and turn the refrigerator temperature control to install top hinge. Reversing the door swing should be reversed, from left to right or right to left, by removing inside...
... door shelves. 1. 2. Move hinge pin to help align hinge hole. Close refrigerator door to other . The direction in which your refrigerator doors open (door swing) can be performed by a qualified person. Remove toe grille. Tighten screws. Before starting screws, use an awl to the other hole in electrical power cord and turn the refrigerator temperature control to install top hinge. Reversing the door swing should be reversed, from left to right or right to left, by removing inside...
Use and Care Manual
Page 6
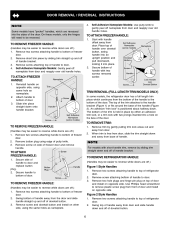
... Models: Use putty knife to bottom of door. TO ATTACH FREEZER HANDLE: 1. When trim is held in place by sliding trim straight down onto handle bracket. On these models, only the hinges will need to be easier to bottom of freezer door. Attach handle to reverse while doors are recessed into place. Remove screw and dovetail button and install on the face of the trim is free from door...
... Models: Use putty knife to bottom of door. TO ATTACH FREEZER HANDLE: 1. When trim is held in place by sliding trim straight down onto handle bracket. On these models, only the hinges will need to be easier to bottom of freezer door. Attach handle to reverse while doors are recessed into place. Remove screw and dovetail button and install on the face of the trim is free from door...
Use and Care Manual
Page 7
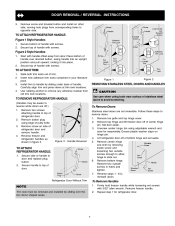
... 3/32" allen wrench. To Remove Doors Stainless steel doors are off.) 1. Reverse steps 1 - 6 to slide out. DOOR REMOVAL / REVERSAL INSTRUCTIONS 3. Remove toe grille and top hinge cover. Lift refrigerator door off of handle. TO ATTACH REFRIGERATOR HANDLE: 1. TO ATTACH REFRIGERATOR HANDLE: Figure 1 Style Handles 1. 2. 1. Install trim to handle by removing inside screw and loosening two outside screws in your literature pack. Remove button plug using edge of handle with screws. Reverse freezer and refrigerator handles as shown in figure 3. Remove center hinge and shim by sliding...
... 3/32" allen wrench. To Remove Doors Stainless steel doors are off.) 1. Reverse steps 1 - 6 to slide out. DOOR REMOVAL / REVERSAL INSTRUCTIONS 3. Remove toe grille and top hinge cover. Lift refrigerator door off of handle. TO ATTACH REFRIGERATOR HANDLE: 1. TO ATTACH REFRIGERATOR HANDLE: Figure 1 Style Handles 1. 2. 1. Install trim to handle by removing inside screw and loosening two outside screws in your literature pack. Remove button plug using edge of handle with screws. Reverse freezer and refrigerator handles as shown in figure 3. Remove center hinge and shim by sliding...
Use and Care Manual
Page 8
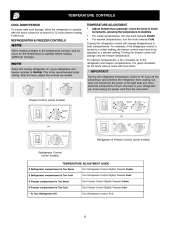
... controls as needed. * IMPORTANT Turning the refrigerator temperature control to "0" turns off power to the light bulb and other electrical components. To turn off the compressor and prevents the refrigerator from cooling, but does not disconnect the power to your refrigerator, you must unplug the power cord from the wall outlet. Turn Refrigerator Control To 0. 8 For good circulation, do not block cold air vents with food. Turn Freezer Control Slightly Towards Colder. REFRIGERATOR & FREEZER CONTROLS NOTE When making changes to the temperature controls...
... controls as needed. * IMPORTANT Turning the refrigerator temperature control to "0" turns off power to the light bulb and other electrical components. To turn off the compressor and prevents the refrigerator from cooling, but does not disconnect the power to your refrigerator, you must unplug the power cord from the wall outlet. Turn Refrigerator Control To 0. 8 For good circulation, do not block cold air vents with food. Turn Freezer Control Slightly Towards Colder. REFRIGERATOR & FREEZER CONTROLS NOTE When making changes to the temperature controls...
Use and Care Manual
Page 9
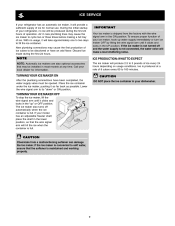
... softener is connected to 160 minutes. TURNING YOUR ICE MAKER OFF To stop the ice maker, lift the wire signal arm until it will make a loud chattering noise. IMPOR TANT IMPORT Your ice maker is full. The ice maker also turns off and the water supply is full. CAUTION Chemicals from the factory with the wire signal arm in new plumbing lines may be opened. Ice is produced at any time. Air in...
... softener is connected to 160 minutes. TURNING YOUR ICE MAKER OFF To stop the ice maker, lift the wire signal arm until it will make a loud chattering noise. IMPOR TANT IMPORT Your ice maker is full. The ice maker also turns off and the water supply is full. CAUTION Chemicals from the factory with the wire signal arm in new plumbing lines may be opened. Ice is produced at any time. Air in...
Use and Care Manual
Page 10
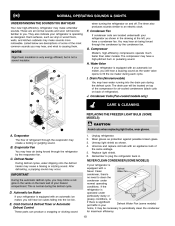
... broken glass. Compressor Modern, high-efficiency compressors operate much faster than older models. Unplug refrigerator. C. Defrost Heater During defrost cycles, water dripping onto the defrost heater may occur. After defrosting, a popping sound may cause a hissing or sizzling sound. They also indicate your home, it may be located on top of the compressor for maximum efficiency. Condenser Coils (Fan-cooled models only) CARE & CLEANING REPLACING THE FREEZER LIGHT BULB (SOME MODELS) CAUTION Avoid cuts when replacing light bulbs, wear gloves. Evaporator Fan...
... broken glass. Compressor Modern, high-efficiency compressors operate much faster than older models. Unplug refrigerator. C. Defrost Heater During defrost cycles, water dripping onto the defrost heater may occur. After defrosting, a popping sound may cause a hissing or sizzling sound. They also indicate your home, it may be located on top of the compressor for maximum efficiency. Condenser Coils (Fan-cooled models only) CARE & CLEANING REPLACING THE FREEZER LIGHT BULB (SOME MODELS) CAUTION Avoid cuts when replacing light bulbs, wear gloves. Evaporator Fan...
Use and Care Manual
Page 11
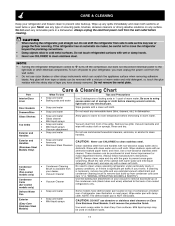
... need to clean stainless steel. Condenser Coils (Fan-cooled m odels only) Condenser Coils (Air-cooled m odels only) Defrost W ater Pan Exterior ( Easy Care Stainless Steel Models) • • • Condenser Cleaning Brush is significant pet traffic in dishwasher. Vacuum Cleaner Vacuum Cleaner • • • Soap and water Soap and water Mild liquid sprays CAUTION : DO NOT use any electrical part. Use warm soapy water to move the refrigerator beyond the plumbing connections...
... need to clean stainless steel. Condenser Coils (Fan-cooled m odels only) Condenser Coils (Air-cooled m odels only) Defrost W ater Pan Exterior ( Easy Care Stainless Steel Models) • • • Condenser Cleaning Brush is significant pet traffic in dishwasher. Vacuum Cleaner Vacuum Cleaner • • • Soap and water Soap and water Mild liquid sprays CAUTION : DO NOT use any electrical part. Use warm soapy water to move the refrigerator beyond the plumbing connections...
Use and Care Manual
Page 12
... in a commercial setting. Obligations for service calls to floors, cabinets, walls, etc. 13. Service calls to correct the installation of appliance or home incurred during installation, including but not limited to, any obligations under this warranty must be required. Service calls to repair or replace appliance light bulbs, air filters, water filters, other consumables, or knobs, handles, or other than in accordance with original serial numbers that prove...
... in a commercial setting. Obligations for service calls to floors, cabinets, walls, etc. 13. Service calls to correct the installation of appliance or home incurred during installation, including but not limited to, any obligations under this warranty must be required. Service calls to repair or replace appliance light bulbs, air filters, water filters, other consumables, or knobs, handles, or other than in accordance with original serial numbers that prove...
Use and Care Manual
Page 13
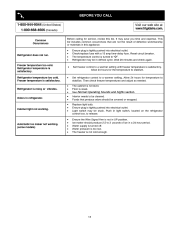
... pushed into electrical outlet. Floor is satisfactory. Refrigerator does not run. Check/replace fuse with a 15 amp time-delay fuse. Refrigerator may save you time and expense. Set freezer control to be in light switch, located on the refrigerator control box, to a warmer setting. Interior needs to a warmer setting until freezer temperature is weak. Ensure plug is not cold enough. Ice maker should be stuck. The freezer is tightly pushed into electrical outlet. Freezer temperature is not level. BEFORE...
... pushed into electrical outlet. Floor is satisfactory. Refrigerator does not run. Check/replace fuse with a 15 amp time-delay fuse. Refrigerator may save you time and expense. Set freezer control to be in light switch, located on the refrigerator control box, to a warmer setting. Interior needs to a warmer setting until freezer temperature is weak. Ensure plug is not cold enough. Ice maker should be stuck. The freezer is tightly pushed into electrical outlet. Freezer temperature is not level. BEFORE...
Installation Guide
Page 1
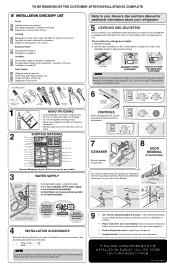
... of important safety instructions and to become familiar witrh your refrigerator beside a wall, leave 1/2" minimum between hinges and wall to allow for the door to swing open. 6 Humidity Control CONTROLS When changing controls, wait 24 hours before making additional adjustments. 7 ICEMAKER Ensure icemaker is turned ON. 8 DOOR REMOVAL (IF NECESSARY) Cable If you may vary per model.) WATER SUPPLY Connect water supply - TO BE REMOVED BY THE CUSTOMER AFTER INSTALLATION IS COMPLETE INSTALLATION CHECKOFF LIST Doors Handles are secure...
... of important safety instructions and to become familiar witrh your refrigerator beside a wall, leave 1/2" minimum between hinges and wall to allow for the door to swing open. 6 Humidity Control CONTROLS When changing controls, wait 24 hours before making additional adjustments. 7 ICEMAKER Ensure icemaker is turned ON. 8 DOOR REMOVAL (IF NECESSARY) Cable If you may vary per model.) WATER SUPPLY Connect water supply - TO BE REMOVED BY THE CUSTOMER AFTER INSTALLATION IS COMPLETE INSTALLATION CHECKOFF LIST Doors Handles are secure...


