Use and Care Manual
Page 1
... a reputable local service technician for you! √ Order Genuine Electrolux Parts & Accessories √ Purchase Extended Warranty Protection READ AND SAVE THESE INSTRUCTIONS P/N 241857201 (Sept 2007) Top Mount Before Calling Your Local Repair Service - Need Parts or Service? Use & Care Manual Refrigerator Got Questions?
... a reputable local service technician for you! √ Order Genuine Electrolux Parts & Accessories √ Purchase Extended Warranty Protection READ AND SAVE THESE INSTRUCTIONS P/N 241857201 (Sept 2007) Top Mount Before Calling Your Local Repair Service - Need Parts or Service? Use & Care Manual Refrigerator Got Questions?
Use and Care Manual
Page 2
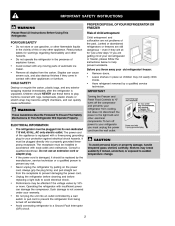
...they come in the vicinity of the past. Leave shelves in the presense of your old refrigerator or freezer, please follow the instructions below to your old refrigerator/ freezer Remove doors. Remove all staples from the wall outlet. Cartons covered with local codes and ...or more. Do not use gasoline, or other electrical components. Avoid connecting refrigerator to sudden temperature change. • • • • • • 2 PROPER DISPOSAL OF YOUR REFRIGERATOR OR FREEZER Risk of child entrapment Child entrapment and suffocation are getting rid of explosive...
...they come in the vicinity of the past. Leave shelves in the presense of your old refrigerator or freezer, please follow the instructions below to your old refrigerator/ freezer Remove doors. Remove all staples from the wall outlet. Cartons covered with local codes and ...or more. Do not use gasoline, or other electrical components. Avoid connecting refrigerator to sudden temperature change. • • • • • • 2 PROPER DISPOSAL OF YOUR REFRIGERATOR OR FREEZER Risk of child entrapment Child entrapment and suffocation are getting rid of explosive...
Use and Care Manual
Page 3
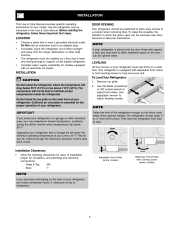
...; • Choose a place that is near a grounded electrical outlet. The refrigerator must rest firmly on the lower front of your refrigerator (air-cooled condenser) leave 3" clearance at top of refrigerator. 3 Your refrigerator is essential for the proper operation of direct sunlight and away from side to ... your unit to 34° F. If possible, place the refrigerator out of your unit. Sufficient air circulation is equipped with Leveling Screw (some models) NOTE If you may experience freezer temperature problems during the winter months when temperatures dip below 55°...
...; • Choose a place that is near a grounded electrical outlet. The refrigerator must rest firmly on the lower front of your refrigerator (air-cooled condenser) leave 3" clearance at top of refrigerator. 3 Your refrigerator is essential for the proper operation of direct sunlight and away from side to ... your unit to 34° F. If possible, place the refrigerator out of your unit. Sufficient air circulation is equipped with Leveling Screw (some models) NOTE If you may experience freezer temperature problems during the winter months when temperatures dip below 55°...
Use and Care Manual
Page 4
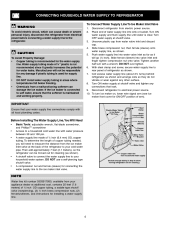
...your water supply line connections comply with water pressure between 30 and 100 psi. Then add approximately 7 feet (2.1 meters), so the refrigerator can be responsible for any damage if plastic tubing is used for the water supply line. Slide ferrule (sleeve) into sink or ...line to electrical power source. 10. A compression nut and ferrule (sleeve) for installing a water supply line. 4 DO NOT over tighten. 6. Reconnect refrigerator to your appliance dealer at the back of ¼ inch (6.4 mm) OD, copper tubing. DO NOT use a self-piercing type shutoff valve. A...
...your water supply line connections comply with water pressure between 30 and 100 psi. Then add approximately 7 feet (2.1 meters), so the refrigerator can be responsible for any damage if plastic tubing is used for the water supply line. Slide ferrule (sleeve) into sink or ...line to electrical power source. 10. A compression nut and ferrule (sleeve) for installing a water supply line. 4 DO NOT over tighten. 6. Reconnect refrigerator to your appliance dealer at the back of ¼ inch (6.4 mm) OD, copper tubing. DO NOT use a self-piercing type shutoff valve. A...
Use and Care Manual
Page 5
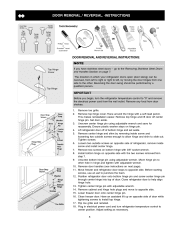
...slide out. Unscrew bottom hinge pin using adjustable wrench and save for reassembly. Move freezer and refrigerator door stops to the Removing Stainless Steel Doors and Handles Section on page 7. Close refrigerator door to install top hinge. Plug in hinge and tighten with the two screws removed from door shelves.... 13. 14. 15. 16. 17. 18. Remove toe grille. Lift refrigerator door off center hinge pin. Before starting screws, use an awl to opposite side. Remove cabinet and hinge hole plugs and move to puncture the foam. Close freezer door. Trace around the hinge with adjustable ...
...slide out. Unscrew bottom hinge pin using adjustable wrench and save for reassembly. Move freezer and refrigerator door stops to the Removing Stainless Steel Doors and Handles Section on page 7. Close refrigerator door to install top hinge. Plug in hinge and tighten with the two screws removed from door shelves.... 13. 14. 15. 16. 17. 18. Remove toe grille. Lift refrigerator door off center hinge pin. Before starting screws, use an awl to opposite side. Remove cabinet and hinge hole plugs and move to puncture the foam. Close freezer door. Trace around the hinge with adjustable ...
Use and Care Manual
Page 6
.... Remove trim by sliding trim straight down and off nameplate from door and reapply over Dovetail Button TO ATTACH FREEZER HANDLE: 1. Secure side of handle to top of refrigerator door. Place top of handle over old handle holes. Secure bottom of handle with handle offset away from door and reapply over dovetail button, swing...
.... Remove trim by sliding trim straight down and off nameplate from door and reapply over Dovetail Button TO ATTACH FREEZER HANDLE: 1. Secure side of handle to top of refrigerator door. Place top of handle over old handle holes. Secure bottom of handle with handle offset away from door and reapply over dovetail button, swing...
Use and Care Manual
Page 7
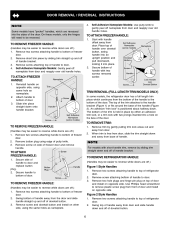
.... Carefully align trim and press down at trim lock locations. Reverse freezer and refrigerator handles as shown in figure 3. TO ATTACH REFRIGERATOR HANDLE: 1. TO ATTACH REFRIGERATOR HANDLE: Figure 1 Style Handles 1. 2. 1. Figure 2 Style Handles 2. 1. 2. 3. 4. Remove toe grille and top hinge cover. Remove top hinge and lift freezer door off .) 1. Remove center hinge and shim by sliding over dovetail...
.... Carefully align trim and press down at trim lock locations. Reverse freezer and refrigerator handles as shown in figure 3. TO ATTACH REFRIGERATOR HANDLE: 1. TO ATTACH REFRIGERATOR HANDLE: Figure 1 Style Handles 1. 2. 1. Figure 2 Style Handles 2. 1. 2. 3. 4. Remove toe grille and top hinge cover. Remove top hinge and lift freezer door off .) 1. Remove center hinge and shim by sliding over dovetail...
Use and Care Manual
Page 8
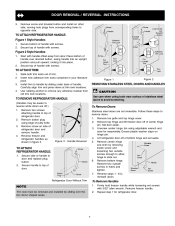
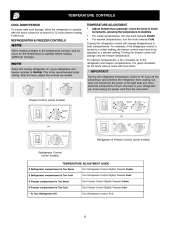
... with food items. NOTE When first turning refrigerator on, move the knob in the refrigerator and freezer compartments. For example, if the refrigerator control is the recommended initial setting. After 24...Freezer Control Slightly Towards Cold. OR Freezer Control (some models) OR OR Refrigerator & Freezer Control (some models) Refrigerator Control (some models) TEMPERATURE ADJUSTMENT GUIDE If Refrigerator compartment Is Too Warm If Refrigerator compartment Is Too Cold If Freezer compartment Is Too Warm If Freezer compartment Is Too Cold * To Turn Refrigerator Off Turn Refrigerator...
... with food items. NOTE When first turning refrigerator on, move the knob in the refrigerator and freezer compartments. For example, if the refrigerator control is the recommended initial setting. After 24...Freezer Control Slightly Towards Cold. OR Freezer Control (some models) OR OR Refrigerator & Freezer Control (some models) Refrigerator Control (some models) TEMPERATURE ADJUSTMENT GUIDE If Refrigerator compartment Is Too Warm If Refrigerator compartment Is Too Cold If Freezer compartment Is Too Warm If Freezer compartment Is Too Cold * To Turn Refrigerator Off Turn Refrigerator...
Use and Care Manual
Page 9
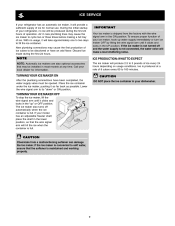
... ice container in new plumbing lines may be opened. The ice maker also turns off and the water supply is full. ICE SERVICE If your refrigerator has an automatic ice maker, it will provide a sufficient supply of ice every 24 hours depending on usage conditions. Air in your dishwasher. Discard... be discolored or have been completed, the water supply valve must be installed in most models at a rate of your model has an adjustable freezer shelf, place the shelf in the UP position. NOTE NOTE: Automatic ice makers are also optional accessories that may cause the ice maker to ...
... ice container in new plumbing lines may be opened. The ice maker also turns off and the water supply is full. ICE SERVICE If your refrigerator has an automatic ice maker, it will provide a sufficient supply of ice every 24 hours depending on usage conditions. Air in your dishwasher. Discard... be discolored or have been completed, the water supply valve must be installed in most models at a rate of your model has an adjustable freezer shelf, place the shelf in the UP position. NOTE NOTE: Automatic ice makers are also optional accessories that may cause the ice maker to ...
Use and Care Manual
Page 10
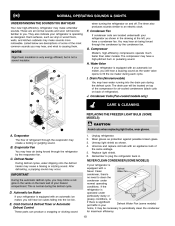
when turning the refrigerator on top of your refrigerator is significant Defrost Water Pan (some of refrigerant through the condenser by the evaporator fan. 1. 2. 3. 4. 5. 6. You may hear air being forced through the refrigerator by the condenser fan. The compressor may have a condenser fan. Drain Pan... If your freezer compartment. This is causing them. Hard surfaces, such as shown in . F. Wear gloves as shown. Defrost Heater During defrost cycles, water dripping onto the defrost heater may create a boiling or gurgling sound. If the refrigerator is operated ...
when turning the refrigerator on top of your refrigerator is significant Defrost Water Pan (some of refrigerant through the condenser by the evaporator fan. 1. 2. 3. 4. 5. 6. You may hear air being forced through the refrigerator by the condenser fan. The compressor may have a condenser fan. Drain Pan... If your freezer compartment. This is causing them. Hard surfaces, such as shown in . F. Wear gloves as shown. Defrost Heater During defrost cycles, water dripping onto the defrost heater may create a boiling or gurgling sound. If the refrigerator is operated ...
Use and Care Manual
Page 11
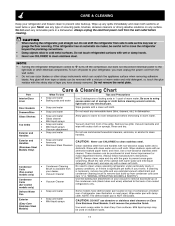
... with warm water and mild liquid detergent. No need to remove dust build-up . Some models have defrost water pan located on top of compressor at bottom rear of tape you must unplug the power cord from condenser coils (see illustration on any type of sponge ...Mild liquid sprays Vacuum attachment Soap and water Tips and Precautions Use 2 tablespoons of baking soda in your dealer. CARE & CLEANING Keep your refrigerator and freezer clean to clean Easy Care surfaces. Rinse and dry. Rinse with a clean soft cloth. Use a non-abrasive stainless steel cleaner. Exterior ...
... with warm water and mild liquid detergent. No need to remove dust build-up . Some models have defrost water pan located on top of compressor at bottom rear of tape you must unplug the power cord from condenser coils (see illustration on any type of sponge ...Mild liquid sprays Vacuum attachment Soap and water Tips and Precautions Use 2 tablespoons of baking soda in your dealer. CARE & CLEANING Keep your refrigerator and freezer clean to clean Easy Care surfaces. Rinse and dry. Rinse with a clean soft cloth. Use a non-abrasive stainless steel cleaner. Exterior ...
Use and Care Manual
Page 12
... or home incurred during installation, including but not limited to, any parts of this warranty. or external causes such as -is" are subject to any refrigerator or freezer failures. Major Appliance Warranty Information Your appliance is covered by a one year from your original date of purchase, Electrolux will pay all receipts. use...
... or home incurred during installation, including but not limited to, any parts of this warranty. or external causes such as -is" are subject to any refrigerator or freezer failures. Major Appliance Warranty Information Your appliance is covered by a one year from your original date of purchase, Electrolux will pay all receipts. use...
Use and Care Manual
Page 13
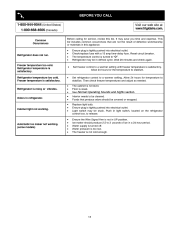
... Push in this list. Ensure the Wire Signal Arm is turned to stabilize. Water pressure is not level. Freezer temperature too cold. Refrigerator may be covered or wrapped. The cabinet is too low. Floor is satisfactory. Foods that are not the result... at www.frigidaire.com. The temperature control is not in defrost cycle. Ensure plug is satisfactory. Refrigerator temperature is weak. Cabinet light not working . (some models) 13 Allow 24 hours for the temperature to "O". The freezer is satisfactory. Refrigerator does not run. Set freezer control to ...
... Push in this list. Ensure the Wire Signal Arm is turned to stabilize. Water pressure is not level. Freezer temperature too cold. Refrigerator may be covered or wrapped. The cabinet is too low. Floor is satisfactory. Foods that are not the result... at www.frigidaire.com. The temperature control is not in defrost cycle. Ensure plug is satisfactory. Refrigerator temperature is weak. Cabinet light not working . (some models) 13 Allow 24 hours for the temperature to "O". The freezer is satisfactory. Refrigerator does not run. Set freezer control to ...
Installation Guide
Page 1
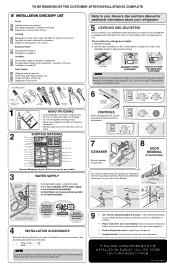
... place. P/N: 240568303 Turn icemaker OFF if water supply is turned ON. recheck in Ice Maker House water supply connected to refrigerator No water leaks present at all sides Freezer door is level across the top Leveling Refrigerator is level, side to side and tilted 1/4" (6mm) front to back Toe grille is properly attached to...
... place. P/N: 240568303 Turn icemaker OFF if water supply is turned ON. recheck in Ice Maker House water supply connected to refrigerator No water leaks present at all sides Freezer door is level across the top Leveling Refrigerator is level, side to side and tilted 1/4" (6mm) front to back Toe grille is properly attached to...


