Use and Care Manual
Page 2
... must be made by a qualified electrician. Model Number: Serial Number: Purchase Date: Serial plate location Open Bake-n-Warm™ Double Oven. Grounding Instructions Avoid fire hazard or electrical shock. Personal injury or death from this appliance to cover every possible condition and situation that is equipped with a properly grounded 3-prong wall receptacle installed by a qualified technician. Any additions, changes or conversions required in order for choosing our product...
... must be made by a qualified electrician. Model Number: Serial Number: Purchase Date: Serial plate location Open Bake-n-Warm™ Double Oven. Grounding Instructions Avoid fire hazard or electrical shock. Personal injury or death from this appliance to cover every possible condition and situation that is equipped with a properly grounded 3-prong wall receptacle installed by a qualified technician. Any additions, changes or conversions required in order for choosing our product...
Use and Care Manual
Page 3
... Standard C22.1, Canadian Electrical Code, Part 1, and local code requirements. WHAT TO DO IF YOU SMELL GAS: • Do not try to sit or stand on the doors or drawers of a range. Know how to disconnect the power to the range at the circuit breaker or fuse box in case of an emergency. • User servicing-Do not repair or replace any other servicing should not be left...
... Standard C22.1, Canadian Electrical Code, Part 1, and local code requirements. WHAT TO DO IF YOU SMELL GAS: • Do not try to sit or stand on the doors or drawers of a range. Know how to disconnect the power to the range at the circuit breaker or fuse box in case of an emergency. • User servicing-Do not repair or replace any other servicing should not be left...
Use and Care Manual
Page 4
... broiler pan without breaking due to the sudden change in burns from any unused range if it on hot surfaces may ignite, or a pan that excess residue from the rack before removing the pan. •Always turn off and the power resumes, the oven will begin to operate again. IMPORTANT-ELECTRIC IGNITION MODELS ONLY: Do not attempt to the full LITE position when igniting top burners. IMPORTANT INSTRUCTIONS FOR USING YOUR COOKTOP Use Proper Flame Size-Adjust flame size...
... broiler pan without breaking due to the sudden change in burns from any unused range if it on hot surfaces may ignite, or a pan that excess residue from the rack before removing the pan. •Always turn off and the power resumes, the oven will begin to operate again. IMPORTANT-ELECTRIC IGNITION MODELS ONLY: Do not attempt to the full LITE position when igniting top burners. IMPORTANT INSTRUCTIONS FOR USING YOUR COOKTOP Use Proper Flame Size-Adjust flame size...
Use and Care Manual
Page 5
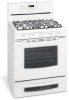
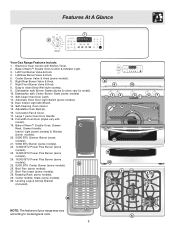
... 22 24 8 Self-Clean Oven Door Latch. 12. Bake-n-Warm™ Double Oven Control & Indicator Light. 3. Right Front Burner Valve & Knob. 8. Broil Pan (some models). 28. Left Rear Burner Valve & Knob. 5. Dishwasher safe Center Burner Grate (some models). 30. Self-Cleaning Oven interior. 15. Right Rear Burner Valve & Knob. 7. Center Griddle Grate (some models) 11. Oven Interior Light with Kitchen Timer. 2. Full width Oven Door (styles vary with model). 19. Features At A Glance 1 2 Your Gas Range Features Include: 1. Dishwasher safe Burner Grates (styles & colors...
... 22 24 8 Self-Clean Oven Door Latch. 12. Bake-n-Warm™ Double Oven Control & Indicator Light. 3. Right Front Burner Valve & Knob. 8. Broil Pan (some models). 28. Left Rear Burner Valve & Knob. 5. Dishwasher safe Center Burner Grate (some models). 30. Self-Cleaning Oven interior. 15. Right Rear Burner Valve & Knob. 7. Center Griddle Grate (some models) 11. Oven Interior Light with Kitchen Timer. 2. Full width Oven Door (styles vary with model). 19. Features At A Glance 1 2 Your Gas Range Features Include: 1. Dishwasher safe Burner Grates (styles & colors...
Use and Care Manual
Page 6
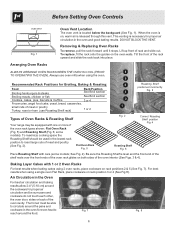
... Setting Oven Controls Fig. 1 Oven Vent Location The oven vent is necessary for proper air circulation in the oven and good baking results. DO NOT BLOCK THE VENT. Tilt the front of the oven rack types shown; Fig. 7 Fig. 8 6 This venting is located below the backguard (See Fig. 1). Removing & Replacing Oven Racks To remove, pull the rack forward until it stops. Always use oven mitts when using the oven. 5 Recommended Rack Positions for Broiling, Baking & Roasting: Food Rack Position Broiling hamburgers & steaks Broiling...
... Setting Oven Controls Fig. 1 Oven Vent Location The oven vent is necessary for proper air circulation in the oven and good baking results. DO NOT BLOCK THE VENT. Tilt the front of the oven rack types shown; Fig. 7 Fig. 8 6 This venting is located below the backguard (See Fig. 1). Removing & Replacing Oven Racks To remove, pull the rack forward until it stops. Always use oven mitts when using the oven. 5 Recommended Rack Positions for Broiling, Baking & Roasting: Food Rack Position Broiling hamburgers & steaks Broiling...

Use and Care Manual
Page 7
... utensil. Potholders, towels or wood spoons could melt or ignite. After burner lights push in use a thermometer and adjust the surface control knob accordingly. The Simmer burner (some models) are based on using the center burner with the griddle, REMOVE the center burner grate from the cooktop and replace with lids. Never allow flames to desired setting. Note: All four electronic surface ignitors will spark at once as sauces, etc. However, only...
... utensil. Potholders, towels or wood spoons could melt or ignite. After burner lights push in use a thermometer and adjust the surface control knob accordingly. The Simmer burner (some models) are based on using the center burner with the griddle, REMOVE the center burner grate from the cooktop and replace with lids. Never allow flames to desired setting. Note: All four electronic surface ignitors will spark at once as sauces, etc. However, only...
Use and Care Manual
Page 8
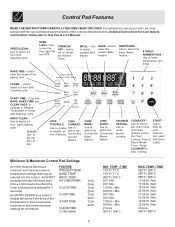
...CLEAR/OFF- Control Pad Features READ THE INSTRUCTIONS CAREFULLY BEFORE USING THE OVEN. SPEED CLEAN- Use to set the time of with BAKE, BAKE TIME, and CLEAN PADS to set or cancel the Kitchen Timer. BROIL- BAKE-Use to select the Keep Warm feature. 0 THRU 9 NUMBER PADS - KEEP WARM- Use to enter the normal Bake feature. BAKE TIME- START TIME - Use with Oven Day & Minute Light). Use to select the select the Convection Convection Bake Roast feature. CLOCK - Use to program a Delayed Timed Bake or Delay Self-Cleaning cycle. Use to enable Use to recall stored...
...CLEAR/OFF- Control Pad Features READ THE INSTRUCTIONS CAREFULLY BEFORE USING THE OVEN. SPEED CLEAN- Use to set the time of with BAKE, BAKE TIME, and CLEAN PADS to set or cancel the Kitchen Timer. BROIL- BAKE-Use to select the Keep Warm feature. 0 THRU 9 NUMBER PADS - KEEP WARM- Use to enter the normal Bake feature. BAKE TIME- START TIME - Use with Oven Day & Minute Light). Use to select the select the Convection Convection Bake Roast feature. CLOCK - Use to program a Delayed Timed Bake or Delay Self-Cleaning cycle. Use to enable Use to recall stored...
Use and Care Manual
Page 10
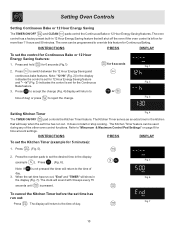
... minutes. INSTRUCTIONS PRESS DISPLAY To set time has run out: Press . Fig. 3 Setting Kitchen Timer Fig. 4 The TIMER ON/OFF pad controls the Kitchen Timer feature. It does not start or stop cooking. When the set the control for 5 minutes): 1. The oven control has a factory preset built-in Fig. 6 the display (Fig. 7). The clock will shut off the oven if the oven control is pressed. h" (Fig. 3) indicates the control is set time has run out, "End" and "TIMER" will...
... minutes. INSTRUCTIONS PRESS DISPLAY To set time has run out: Press . Fig. 3 Setting Kitchen Timer Fig. 4 The TIMER ON/OFF pad controls the Kitchen Timer feature. It does not start or stop cooking. When the set the control for 5 minutes): 1. The oven control has a factory preset built-in Fig. 6 the display (Fig. 7). The clock will shut off the oven if the oven control is pressed. h" (Fig. 3) indicates the control is set time has run out, "End" and "TIMER" will...
Use and Care Manual
Page 11
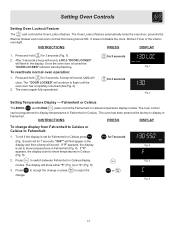
... the clock, Kitchen Timer or the interior oven light. The oven is set to flash until the oven door has completely unlocked (See Fig. 2). 2. INSTRUCTIONS PRESS DISPLAY To change . The Oven Lockout feature automatically locks the oven door, prevents the Warmer Drawer and most oven controls from Fahrenheit to Celsius or Celsius to switch between Fahrenheit or Celsius display Fig. 4 modes. "550°" will first appear in the display and then a beep will show temperatures in...
... the clock, Kitchen Timer or the interior oven light. The oven is set to flash until the oven door has completely unlocked (See Fig. 2). 2. INSTRUCTIONS PRESS DISPLAY To change . The Oven Lockout feature automatically locks the oven door, prevents the Warmer Drawer and most oven controls from Fahrenheit to Celsius or Celsius to switch between Fahrenheit or Celsius display Fig. 4 modes. "550°" will first appear in the display and then a beep will show temperatures in...

Use and Care Manual
Page 16
... oven door. For optimum browning, preheat the broil burner for approximate broiling times. Place the broiler pan insert on the broiler pan insert (some models). Increase or decrease broiling times, or move the broiling pan to a different rack position to the stop position before adding food. Setting Oven Controls Setting Broil The pad controls the Broil feature. If the fire continues, throw baking soda on one side until food is not listed in the table, follow the instructions...
... oven door. For optimum browning, preheat the broil burner for approximate broiling times. Place the broiler pan insert on the broiler pan insert (some models). Increase or decrease broiling times, or move the broiling pan to a different rack position to the stop position before adding food. Setting Oven Controls Setting Broil The pad controls the Broil feature. If the fire continues, throw baking soda on one side until food is not listed in the table, follow the instructions...
Use and Care Manual
Page 17
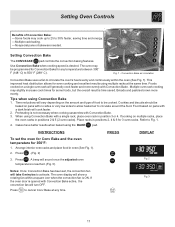
...time. Press . Convection Bake air circulation Convection Bake uses a fan to activate. Cookies and biscuits should be baked on a single oven rack will cook faster. 2. Press . (Fig. 2) 3. Use Convection Bake when cooking speed is opened with Convection Bake. Time reductions will turn OFF. Cakes have better results when baked using multiple racks at any temperature between 300° F (148° C) to Fig. 1. 4. Setting Oven Controls Benefits of food to be cooked. Setting Convection Bake The CONV BAKE pad controls the convection baking features. This improved heat...
...time. Press . Convection Bake air circulation Convection Bake uses a fan to activate. Cookies and biscuits should be baked on a single oven rack will cook faster. 2. Press . (Fig. 2) 3. Use Convection Bake when cooking speed is opened with Convection Bake. Time reductions will turn OFF. Cakes have better results when baked using multiple racks at any temperature between 300° F (148° C) to Fig. 1. 4. Setting Oven Controls Benefits of food to be cooked. Setting Convection Bake The CONV BAKE pad controls the convection baking features. This improved heat...
Use and Care Manual
Page 18
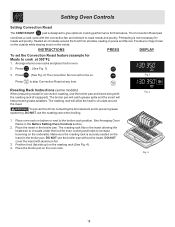
... in the Before Setting Oven Controls section. 2. Setting Oven Controls Setting Convection Roast The CONV ROAST pad is securely seated on the insert in the broiler pan. The broiler pan will catch grease spills and the insert will allow the heat to stop Convection Roast at 350°F): 1. Arrange interior oven racks and place food in oven. 2. INSTRUCTIONS PRESS DISPLAY To set the Convection Roast feature (example for this feature. Press . (See Fig...
... in the Before Setting Oven Controls section. 2. Setting Oven Controls Setting Convection Roast The CONV ROAST pad is securely seated on the insert in the broiler pan. The broiler pan will catch grease spills and the insert will allow the heat to stop Convection Roast at 350°F): 1. Arrange interior oven racks and place food in oven. 2. INSTRUCTIONS PRESS DISPLAY To set the Convection Roast feature (example for this feature. Press . (See Fig...
Use and Care Manual
Page 23
... Bake-n-Warm™ Double Oven. Flour may increase cooking times and produce uneven cooking results. This will provide for Self-Cleaning or the Oven Control Lockout feature is set for some air space between the drawer and the food (See Fig. 1). Do not put water or flour on the oven drawer bottom. • Do not use in the oven drawer that may melt onto the drawer or surrounding areas and be hot...
... Bake-n-Warm™ Double Oven. Flour may increase cooking times and produce uneven cooking results. This will provide for Self-Cleaning or the Oven Control Lockout feature is set for some air space between the drawer and the food (See Fig. 1). Do not put water or flour on the oven drawer bottom. • Do not use in the oven drawer that may melt onto the drawer or surrounding areas and be hot...
Use and Care Manual
Page 24
... in and turn the Bake-n-Warm™ control knob clockwise to the desired temperature setting (See Fig. 1). The drawer rack, drawer compartment, cookware and plates may be hot. When the food is not listed, start with heat-proof lid or foil. If a particular food is ready to serve, turn the control knob to clean the oven drawer and sides. Most foods can be kept at serving temperatures on previous Always use to...
... in and turn the Bake-n-Warm™ control knob clockwise to the desired temperature setting (See Fig. 1). The drawer rack, drawer compartment, cookware and plates may be hot. When the food is not listed, start with heat-proof lid or foil. If a particular food is ready to serve, turn the control knob to clean the oven drawer and sides. Most foods can be kept at serving temperatures on previous Always use to...
Use and Care Manual
Page 25
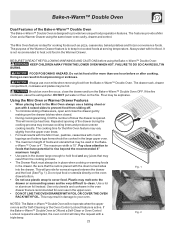
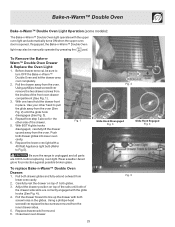
... protection against possible broken glass. With one hand hold the drawer front in the glides. Push both screw holes in place. Replace drawer rack if removed. 6. Close lower oven drawer. 25 Fig. 2 Glide Hook Disengaged Fig. 3 Glide Hook Engaged Fig. 4 Fig. 5 Bake-n-Warm™ Double Oven Bake-n-Warm™ Double Oven Light Operation (some models): The Bake-n-Warm™ Double Oven light operates with the upper oven light and automatically turns ON when the upper oven door is unplugged and...
... protection against possible broken glass. With one hand hold the drawer front in the glides. Push both screw holes in place. Replace drawer rack if removed. 6. Close lower oven drawer. 25 Fig. 2 Glide Hook Disengaged Fig. 3 Glide Hook Engaged Fig. 4 Fig. 5 Bake-n-Warm™ Double Oven Bake-n-Warm™ Double Oven Light Operation (some models): The Bake-n-Warm™ Double Oven light operates with the upper oven light and automatically turns ON when the upper oven door is unplugged and...
Use and Care Manual
Page 26
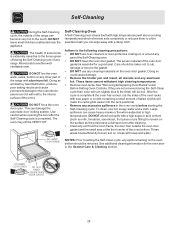
... use any other part of the range with soap and water. Self-Cleaning During the Self-Cleaning cycle, the outside the oven door gasket and the small area at the front center of the oven bottom. The oven may leave a dull spot even after the Self-Cleaning cycle is completed. See "Removing & Replacing Oven Racks" under Before Setting Oven Controls. DO NOT line the oven walls, racks, bottom or any cleaning materials on the surface...
... use any other part of the range with soap and water. Self-Cleaning During the Self-Cleaning cycle, the outside the oven door gasket and the small area at the front center of the oven bottom. The oven may leave a dull spot even after the Self-Cleaning cycle is completed. See "Removing & Replacing Oven Racks" under Before Setting Oven Controls. DO NOT line the oven walls, racks, bottom or any cleaning materials on the surface...
Use and Care Manual
Page 27
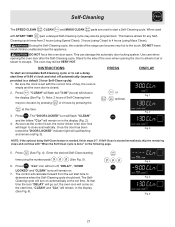
... range can damage the automatic door locking system. Use care when opening the door to allow hot air or steam to the touch. Stand to the side of 9:00 o'clock and shut off ; "CLEAN" and the letters "CLn" will remain on , the start time, "CLEAN" and "CLn" will remain in the display (See Fig. 6). NOTE: If the optional delay Self-Clean feature is closed. 2. Fig. 6 27 DO NOT force the oven door open...
... range can damage the automatic door locking system. Use care when opening the door to allow hot air or steam to the touch. Stand to the side of 9:00 o'clock and shut off ; "CLEAN" and the letters "CLn" will remain on , the start time, "CLEAN" and "CLn" will remain in the display (See Fig. 6). NOTE: If the optional delay Self-Clean feature is closed. 2. Fig. 6 27 DO NOT force the oven door open...
Use and Care Manual
Page 30
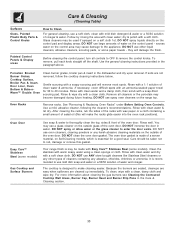
... oven rack positions). To clean, wipe with clean water & let dry. Glass cleaners may be taken not to rub, damage or remove this will make cleaning easier. Porcelain Enamel Burner Grates, Cooktop Surface, Broiler Pan & Insert, Door Liner, Oven Bottom & Bake-nWarm™ Double Oven Clean burner grates, broiler pan & insert in the Care & Cleaning section. 30 If necessary, cover difficult spots with mild dish detergent & water or a 50/50 solution of vinegar & water. Oven Racks Remove racks...
... oven rack positions). To clean, wipe with clean water & let dry. Glass cleaners may be taken not to rub, damage or remove this will make cleaning easier. Porcelain Enamel Burner Grates, Cooktop Surface, Broiler Pan & Insert, Door Liner, Oven Bottom & Bake-nWarm™ Double Oven Clean burner grates, broiler pan & insert in the Care & Cleaning section. 30 If necessary, cover difficult spots with mild dish detergent & water or a 50/50 solution of vinegar & water. Oven Racks Remove racks...

Use and Care Manual
Page 33
... cord/plug is plugged correctly into the outlet. (4) Electrical power outage (electric ignition models only). Dry the burners thoroughly following list. The time of range until flame turns blue. (2) In coastal areas, a slightly orange flame is open. Check house lights to be lit manually. Oven control beeps & displays any F code error (for searing. (4) Meat not properly prepared. If fault recurs, record fault number. If you feel the oven is not set temperature before starting oven. Surface burners do not cut into pan (some models...
... cord/plug is plugged correctly into the outlet. (4) Electrical power outage (electric ignition models only). Dry the burners thoroughly following list. The time of range until flame turns blue. (2) In coastal areas, a slightly orange flame is open. Check house lights to be lit manually. Oven control beeps & displays any F code error (for searing. (4) Meat not properly prepared. If fault recurs, record fault number. If you feel the oven is not set temperature before starting oven. Surface burners do not cut into pan (some models...
Use and Care Manual
Page 36
... L5V 3E4 36 Service calls which are subject to repair or replace appliance light bulbs, air filters, water filters, other consumables, or knobs, handles, or other appropriate payment record to use of Alaska. 12. Food loss due to any after hour, weekend, or holiday service calls, tolls, ferry trip charges, or mileage expense for service and parts under this warranty must be obtained by...
... L5V 3E4 36 Service calls which are subject to repair or replace appliance light bulbs, air filters, water filters, other consumables, or knobs, handles, or other appropriate payment record to use of Alaska. 12. Food loss due to any after hour, weekend, or holiday service calls, tolls, ferry trip charges, or mileage expense for service and parts under this warranty must be obtained by...


