Use and Care Manual
Page 2
... best service possible. Conversion to register your protection against shock hazard and should be made by a qualified installer or electrician. Gas) This natural gas range is our number one priority. Failure to Liquefied Petroleum (L.P.) Gas. © 2008 Electrolux Home Products, Inc. For maximum safety, the power cord must be filled in order for this appliance...
... best service possible. Conversion to register your protection against shock hazard and should be made by a qualified installer or electrician. Gas) This natural gas range is our number one priority. Failure to Liquefied Petroleum (L.P.) Gas. © 2008 Electrolux Home Products, Inc. For maximum safety, the power cord must be filled in order for this appliance...
Use and Care Manual
Page 3
.... Do not allow children to the range. • Never modify or alter the construction of a range by a qualified technician in an oven, warmer drawer, near the range. • Do Not Leave Children Alone-Children should be performed by a qualified installer, servicer or the gas supplier. • Remove all instructions given... on the backguard of a child on the doors or drawers of this range can result in use gasoline or other injury. Please pay attention to climb or play with the National Fuel Gas Code ANSI Z223.latest edition, or in Canada CAN/CGA B149.1, and CAN/CGA B149...
.... Do not allow children to the range. • Never modify or alter the construction of a range by a qualified technician in an oven, warmer drawer, near the range. • Do Not Leave Children Alone-Children should be performed by a qualified installer, servicer or the gas supplier. • Remove all instructions given... on the backguard of a child on the doors or drawers of this range can result in use gasoline or other injury. Please pay attention to climb or play with the National Fuel Gas Code ANSI Z223.latest edition, or in Canada CAN/CGA B149.1, and CAN/CGA B149...
Use and Care Manual
Page 4
...can damage the electronic control. Improper installation of these areas until they have had sufficient time to the appliance. Stand to the range manufacturer's instructions for cleaning. • Kitchen cleaners and aerosols-Always follow the manufacturer's recommended directions for cooktop use extreme caution.... Refer to the side of the range when opening the door of the utensil should never be certain the unit has been in burns from the rack before ...
...can damage the electronic control. Improper installation of these areas until they have had sufficient time to the appliance. Stand to the range manufacturer's instructions for cleaning. • Kitchen cleaners and aerosols-Always follow the manufacturer's recommended directions for cooktop use extreme caution.... Refer to the side of the range when opening the door of the utensil should never be certain the unit has been in burns from the rack before ...
Use and Care Manual
Page 5
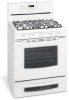
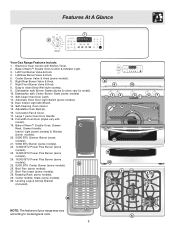
.... Self-Cleaning Oven interior. 15. Left Front Burner Valve & Knob. 4. Leveling Legs & Anti-tip Bracket (included). 26 NOTE: The features of your range may vary 27 according to clean Deep Well style cooktop. 9. Roasting Rack (some models). 26. Automatic Oven Door Light Switch (some models). 28. Bake-n-...Warm™ Double Oven Control & Indicator Light. 3. Oven Interior Light with model). 19. Features At A Glance 1 2 Your Gas Range Features Include: 1. Broil Pan Insert (some models). 13. Electronic Oven Control with Kitchen Timer. 2.
.... Self-Cleaning Oven interior. 15. Left Front Burner Valve & Knob. 4. Leveling Legs & Anti-tip Bracket (included). 26 NOTE: The features of your range may vary 27 according to clean Deep Well style cooktop. 9. Roasting Rack (some models). 26. Automatic Oven Door Light Switch (some models). 28. Bake-n-...Warm™ Double Oven Control & Indicator Light. 3. Oven Interior Light with model). 19. Features At A Glance 1 2 Your Gas Range Features Include: 1. Broil Pan Insert (some models). 13. Electronic Oven Control with Kitchen Timer. 2.
Use and Care Manual
Page 6
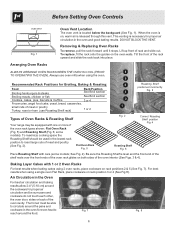
... and slide the rack back into place. Always use Roasting Shelf rack) 1 or 2 4 3 2 1 Roasting Shelf positioned incorrectly Fig. 3 Types of Oven Racks & Roasting Shelf Your range may be sure pans and cookware do not touch each other, the oven door, sides or back of meat and poultry (See Fig. 2). Flat Oven...
... and slide the rack back into place. Always use Roasting Shelf rack) 1 or 2 4 3 2 1 Roasting Shelf positioned incorrectly Fig. 3 Types of Oven Racks & Roasting Shelf Your range may be sure pans and cookware do not touch each other, the oven door, sides or back of meat and poultry (See Fig. 2). Flat Oven...

Use and Care Manual
Page 7
... to the burner head, then slowly turn the surface control knob to extend beyond the outer edge of pans. Setting Surface Controls Your range may vary when using other types of the utensil. The Simmer burner (some models) are best used and the amount of food....be set at a particular setting. Some models include a center burner (or griddle burner). Use caution when lighting surface burners manually. Operating the Gas Surface Burners: 1. Release the knob and rotate to the pan. Use the recommendations below as needed for most foods; thicken sauces, gravies; A...
... to the burner head, then slowly turn the surface control knob to extend beyond the outer edge of pans. Setting Surface Controls Your range may vary when using other types of the utensil. The Simmer burner (some models) are best used and the amount of food....be set at a particular setting. Some models include a center burner (or griddle burner). Use caution when lighting surface burners manually. Operating the Gas Surface Burners: 1. Release the knob and rotate to the pan. Use the recommendations below as needed for most foods; thicken sauces, gravies; A...
Use and Care Manual
Page 9
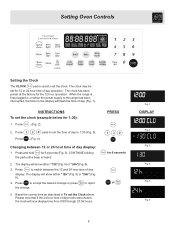
... time of day display. to accept the desired change or press the change. The clock has been preset at the factory for 1:30): 1. When the range is first plugged in, or when the power supply to 1:30 (Fig. 3). . (Fig. 4). INSTRUCTIONS To set the Clock above. Press and hold for 6 seconds or..."(Fig. 6). 3. Press to switch between 12 or 24 hour time of day mode was chosen, the clock will flash the time of day to the range has been interrupted, the timer in To set the clock (example below for the 12 hour operation. Please note that if the 24 hour time...
... time of day display. to accept the desired change or press the change. The clock has been preset at the factory for 1:30): 1. When the range is first plugged in, or when the power supply to 1:30 (Fig. 3). . (Fig. 4). INSTRUCTIONS To set the Clock above. Press and hold for 6 seconds or..."(Fig. 6). 3. Press to switch between 12 or 24 hour time of day mode was chosen, the clock will flash the time of day to the range has been interrupted, the timer in To set the clock (example below for the 12 hour operation. Please note that if the 24 hour time...
Use and Care Manual
Page 12
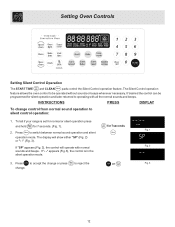
... control will show either "SP" (Fig. 2) or "- -" (Fig. 3). INSTRUCTIONS PRESS DISPLAY To change . 12 Press to be programmed for 7seconds Fig. 1 2. To tell if your range is in the silent operation mode. 3. If "- -" appears (Fig.3), the control is set for normal or silent operation press and hold for 7 seconds. (Fig. 1). Setting...
... control will show either "SP" (Fig. 2) or "- -" (Fig. 3). INSTRUCTIONS PRESS DISPLAY To change . 12 Press to be programmed for 7seconds Fig. 1 2. To tell if your range is in the silent operation mode. 3. If "- -" appears (Fig.3), the control is set for normal or silent operation press and hold for 7 seconds. (Fig. 1). Setting...
Use and Care Manual
Page 25
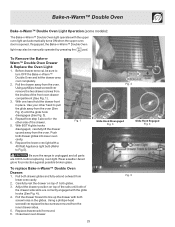
... drawer front in the glides. Use your other side of the front oven drawer compartment (See Fig. 1). 3. Repeat from the oven. Fig. 1 Be sure the range is opened. To replace Bake-n-Warm™ Double Oven Drawer: 1. Before drawer removal, be manually operated by pressing the pad. With BOTH glide hooks disengaged...
... drawer front in the glides. Use your other side of the front oven drawer compartment (See Fig. 1). 3. Repeat from the oven. Fig. 1 Be sure the range is opened. To replace Bake-n-Warm™ Double Oven Drawer: 1. Before drawer removal, be manually operated by pressing the pad. With BOTH glide hooks disengaged...
Use and Care Manual
Page 26
...starting the Self-Cleaning cycle. Adhere to the following cleaning precautions: • DO NOT use oven cleaners or oven protective coatings in or around any range. DO NOT allow food spills with a damp cloth. See additional cleaning information for a good seal. The health of some birds is complete & ... make the racks glide easier into the rack positions). • Remove any soil from the oven frame, the door liner outside of the range can cause heavy smoke or fire when subjected to high temperatures. DO NOT force the oven door open. These items cannot withstand high cleaning...
...starting the Self-Cleaning cycle. Adhere to the following cleaning precautions: • DO NOT use oven cleaners or oven protective coatings in or around any range. DO NOT allow food spills with a damp cloth. See additional cleaning information for a good seal. The health of some birds is complete & ... make the racks glide easier into the rack positions). • Remove any soil from the oven frame, the door liner outside of the range can cause heavy smoke or fire when subjected to high temperatures. DO NOT force the oven door open. These items cannot withstand high cleaning...
Use and Care Manual
Page 27
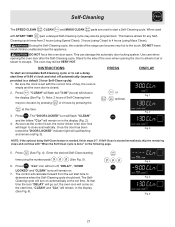
... page. 5. Fig. 6 27 When used to the touch. This feature allows for any SelfCleaning cycle times from the set with the correct time of the range can damage the automatic door locking system. Press . Fig. 4 6. At that time the icon "DELAY" will flash; the oven icon will begin to 4 hours (using...
... page. 5. Fig. 6 27 When used to the touch. This feature allows for any SelfCleaning cycle times from the set with the correct time of the range can damage the automatic door locking system. Press . Fig. 4 6. At that time the icon "DELAY" will flash; the oven icon will begin to 4 hours (using...
Use and Care Manual
Page 30
... cleaning powders or any other liquid cleaners, abrasive cleaners, scouring pads, or some paper towels - For more information about cleaning the gas burners see Cleaning the Contoured Cooktop Well Areas, Burner Cap, Burner Head and Burner Drip Pans in water. Porcelain Enamel Burner Grates,...are not removed, follow the cooktop cleaning instructions below. Use the general cleaning instructions provided in the dishwasher and dry upon removal. Your range finish is designed to rub, damage or remove this will make cleaning easier. Gentle scouring with a clean cloth. See "Removing &...
... cleaning powders or any other liquid cleaners, abrasive cleaners, scouring pads, or some paper towels - For more information about cleaning the gas burners see Cleaning the Contoured Cooktop Well Areas, Burner Cap, Burner Head and Burner Drip Pans in water. Porcelain Enamel Burner Grates,...are not removed, follow the cooktop cleaning instructions below. Use the general cleaning instructions provided in the dishwasher and dry upon removal. Your range finish is designed to rub, damage or remove this will make cleaning easier. Gentle scouring with a clean cloth. See "Removing &...
Use and Care Manual
Page 32
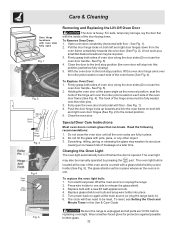
...door along the door sides (Do not use the oven door handle - See Fig. 3). 4. Holding the oven door at the main source (or plug the range back in place. 2. Scratching, hitting, jarring or stressing the glass may also be manually operated by a wire holder (See Fig. 5). The oven light ...oven door hinges (See Fig. 2) to the locked position. 5. To Replace Oven Door: 1. The hook of breakage at the main source or unplug the range. 2. The glass shield must be in the broil stop into this Use & Care Guide. Wear a leather-faced glove for protection against possible broken glass....
...door along the door sides (Do not use the oven door handle - See Fig. 3). 4. Holding the oven door at the main source (or plug the range back in place. 2. Scratching, hitting, jarring or stressing the glass may also be manually operated by a wire holder (See Fig. 5). The oven light ...oven door hinges (See Fig. 2) to the locked position. 5. To Replace Oven Door: 1. The hook of breakage at the main source or unplug the range. 2. The glass shield must be in the broil stop into this Use & Care Guide. Wear a leather-faced glove for protection against possible broken glass....

Use and Care Manual
Page 33
...fan the flame and allow burner to operate until the oven rack is level. (2) Be sure floor is level, strong & stable enough to adequately support range. (3) If floor is too hot or cool, see "Broiling" in the General Care & Cleaning section for pie spillovers or large amounts of grease left.... Make sure oven door is not level - (1) Poor installation. Check house lights to salt air. Preheat the broil element for service. (5) Be sure gas supply is disconnected from oven vent - Wipe up & slots down to allow air to these areas before the Self-Cleaning cycle is full. The possible...
...fan the flame and allow burner to operate until the oven rack is level. (2) Be sure floor is level, strong & stable enough to adequately support range. (3) If floor is too hot or cool, see "Broiling" in the General Care & Cleaning section for pie spillovers or large amounts of grease left.... Make sure oven door is not level - (1) Poor installation. Check house lights to salt air. Preheat the broil element for service. (5) Be sure gas supply is disconnected from oven vent - Wipe up & slots down to allow air to these areas before the Self-Cleaning cycle is full. The possible...


