Use and Care Manual
Page 3
...breaker or fuse box in case of an emergency. • User servicing-Do not repair or replace any part of the appliance unless specifically recommended in the cabinets above a range or on any part of this range can result in this appliance. Destroy the carton and plastic bags after use, do not use... This manual contains important safety symbols and instructions. This symbol will help alert you to situations that may cause the range to climb or play with the National Fuel Gas Code ANSI Z223.latest edition, or in Canada CAN/CGA B149.1, and CAN/CGA B149.2, and the the National ...
...breaker or fuse box in case of an emergency. • User servicing-Do not repair or replace any part of the appliance unless specifically recommended in the cabinets above a range or on any part of this range can result in this appliance. Destroy the carton and plastic bags after use, do not use... This manual contains important safety symbols and instructions. This symbol will help alert you to situations that may cause the range to climb or play with the National Fuel Gas Code ANSI Z223.latest edition, or in Canada CAN/CGA B149.1, and CAN/CGA B149.2, and the the National ...
Use and Care Manual
Page 4
... burners. • Never Leave Surface Burners Unattended at least 3 hours before you remove or replace food in the oven. IMPORTANT INSTRUCTIONS FOR USING YOUR OVEN • Use Care When Opening ...for the first time, or when the appliance has not been used in or around any part of the burner flame to the appliance. Among these openings, oven door and window. •...time, be used for use . IMPORTANT-ELECTRIC IGNITION MODELS ONLY: Do not attempt to the range manufacturer's instructions for cleaning. • Kitchen cleaners and aerosols-Always follow the manufacturer's recommended ...
... burners. • Never Leave Surface Burners Unattended at least 3 hours before you remove or replace food in the oven. IMPORTANT INSTRUCTIONS FOR USING YOUR OVEN • Use Care When Opening ...for the first time, or when the appliance has not been used in or around any part of the burner flame to the appliance. Among these openings, oven door and window. •...time, be used for use . IMPORTANT-ELECTRIC IGNITION MODELS ONLY: Do not attempt to the range manufacturer's instructions for cleaning. • Kitchen cleaners and aerosols-Always follow the manufacturer's recommended ...
Use and Care Manual
Page 25
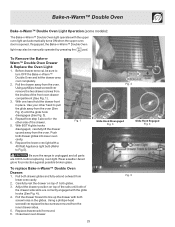
... rack if removed. 6. Use your other side of the drawer side slots are COOL before replacing oven light. Before drawer removal, be manually operated by pressing the pad. Fig. 1 Be sure the range is opened. If equipped, the Bake-n-Warm™ Double Oven light may also be sure to Fig.5). ...carefully lift the drawer up the drawer with the upper oven light and automatically turns ON when the upper oven door is unplugged and all parts are correctly engaged with a 40 Watt Appliance light bulb (Refer to turn OFF the Bake-n-Warm™ Double Oven and let the drawer ...
... rack if removed. 6. Use your other side of the drawer side slots are COOL before replacing oven light. Before drawer removal, be manually operated by pressing the pad. Fig. 1 Be sure the range is opened. If equipped, the Bake-n-Warm™ Double Oven light may also be sure to Fig.5). ...carefully lift the drawer up the drawer with the upper oven light and automatically turns ON when the upper oven door is unplugged and all parts are correctly engaged with a 40 Watt Appliance light bulb (Refer to turn OFF the Bake-n-Warm™ Double Oven and let the drawer ...
Use and Care Manual
Page 26
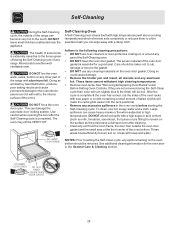
...oven interior (aluminum foil will be VERY HOT. Clean with a damp cloth. DO NOT line the oven walls, racks, bottom or any part of the range with aluminum foil. This can cause heavy smoke or fire when subjected to the touch. Self-Cleaning Oven A Self-Cleaning oven cleans itself... the Self-Cleaning cycle. DO NOT allow food spills with wax paper or a cloth containing a small amount of the oven). See "Removing & Replacing Oven Racks" under Before Setting Oven Controls. Doing so could cause damage. • Remove the broiler pan and insert, all utensils and any soil...
...oven interior (aluminum foil will be VERY HOT. Clean with a damp cloth. DO NOT line the oven walls, racks, bottom or any part of the range with aluminum foil. This can cause heavy smoke or fire when subjected to the touch. Self-Cleaning Oven A Self-Cleaning oven cleans itself... the Self-Cleaning cycle. DO NOT allow food spills with wax paper or a cloth containing a small amount of the oven). See "Removing & Replacing Oven Racks" under Before Setting Oven Controls. Doing so could cause damage. • Remove the broiler pan and insert, all utensils and any soil...
Use and Care Manual
Page 30
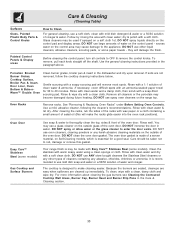
... dry with a soapy scouring pad will remove most spots. See "Removing & Replacing Oven Racks" under Before Setting Oven Controls. Use a mild, abrasive cleaner,...other liquid cleaners, abrasive cleaners, scouring pads, or some models) Gas Cooktop and Surface Burners Use soap & water to thoroughly clean the .... To clean, wipe with clean water; Rinse well. Your range finish is designed to make the racks glide easier into the oven... above. Care & Cleaning (Cleaning Table) Surfaces Glass, Painted Plastic Body Parts & Control Knobs Painted Control Panels & Display areas How to Clean For...
... dry with a soapy scouring pad will remove most spots. See "Removing & Replacing Oven Racks" under Before Setting Oven Controls. Use a mild, abrasive cleaner,...other liquid cleaners, abrasive cleaners, scouring pads, or some models) Gas Cooktop and Surface Burners Use soap & water to thoroughly clean the .... To clean, wipe with clean water; Rinse well. Your range finish is designed to make the racks glide easier into the oven... above. Care & Cleaning (Cleaning Table) Surfaces Glass, Painted Plastic Body Parts & Control Knobs Painted Control Panels & Display areas How to Clean For...
Use and Care Manual
Page 31
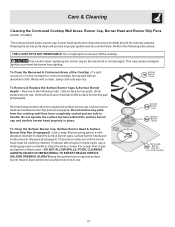
..., CLEANING AGENTS OR ANY OTHER MATERIAL TO ENTER THE GAS ORIFICE HOLDER OPENING. If residue still remains in these ...clean the slots or holes. For proper flow of gas and ignition of the Cooktop - Remove in place....Use a soap-filled scouring pad or a mild abrasive cleanser to replace the surface burner cap, surface burner head and surface burner drip pans...improper ignition and an uneven flame. Use caution when replacing the burner cap so the electrode is in the ... dry. Rinse with an absorbent cloth. To Remove & Replace the Surface Burner Caps & Surface Burner Heads - Reverse the...
..., CLEANING AGENTS OR ANY OTHER MATERIAL TO ENTER THE GAS ORIFICE HOLDER OPENING. If residue still remains in these ...clean the slots or holes. For proper flow of gas and ignition of the Cooktop - Remove in place....Use a soap-filled scouring pad or a mild abrasive cleanser to replace the surface burner cap, surface burner head and surface burner drip pans...improper ignition and an uneven flame. Use caution when replacing the burner cap so the electrode is in the ... dry. Rinse with an absorbent cloth. To Remove & Replace the Surface Burner Caps & Surface Burner Heads - Reverse the...
Use and Care Manual
Page 32
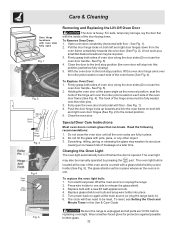
... the same angle as a small flat-blade screwdriver may be fully seated onto the roller pins. 3. Do not close the oven door until all parts are fully in place whenever the oven is covered with a new 40 watt appliance bulb. 4. The oven light may weaken its structure causing an ... facing down from the oven frame completely towards and into place. 5. Turn electrical power off at the main source (or plug the range back in this position just before replacing oven light. To Remove Oven Door: 1. Open oven door completely (horizontal with pots, pans, or any other object. 3. With the ...
... the same angle as a small flat-blade screwdriver may be fully seated onto the roller pins. 3. Do not close the oven door until all parts are fully in place whenever the oven is covered with a new 40 watt appliance bulb. 4. The oven light may weaken its structure causing an ... facing down from the oven frame completely towards and into place. 5. Turn electrical power off at the main source (or plug the range back in this position just before replacing oven light. To Remove Oven Door: 1. Open oven door completely (horizontal with pots, pans, or any other object. 3. With the ...
Use and Care Manual
Page 36
... warranty. Box 212378 Augusta, GA 30907 Canada 1.800.668.4606 Electrolux Canada Corp. 5855 Terry Fox Way Mississauga, Ontario, Canada L5V 3E4 36 Food loss due to any parts of your appliance or to instruct you how to repair or replace appliance light bulbs, air filters...: 1. Service calls which are not a part of parts other than genuine Electrolux parts or parts obtained from its original owner to , any after hour, weekend, or holiday service calls, tolls, ferry trip charges, or mileage expense for repairing or replacing any refrigerator or freezer failures. 6. Products ...
... warranty. Box 212378 Augusta, GA 30907 Canada 1.800.668.4606 Electrolux Canada Corp. 5855 Terry Fox Way Mississauga, Ontario, Canada L5V 3E4 36 Food loss due to any parts of your appliance or to instruct you how to repair or replace appliance light bulbs, air filters...: 1. Service calls which are not a part of parts other than genuine Electrolux parts or parts obtained from its original owner to , any after hour, weekend, or holiday service calls, tolls, ferry trip charges, or mileage expense for repairing or replacing any refrigerator or freezer failures. 6. Products ...

