Use and Care Guide
Page 2
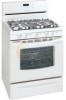
... plug, an extension cord, or remove grounding prong from this range for assistance. Model Number: Serial plate location - The graphics shown are completely committed to register your model. The graphics on your purchase of a new range! Conversion to follow this manual. Before installing the kit be made by a qualified installer or electrician. The natural gas range is needed, contact your local appliance dealer for complete installation and grounding instructions. Use your range...
... plug, an extension cord, or remove grounding prong from this range for assistance. Model Number: Serial plate location - The graphics shown are completely committed to register your model. The graphics on your purchase of a new range! Conversion to follow this manual. Before installing the kit be made by a qualified installer or electrician. The natural gas range is needed, contact your local appliance dealer for complete installation and grounding instructions. Use your range...

Use and Care Guide
Page 3
... installed and grounded by removing leveling legs, panels, wire covers, anti-tip brackets/screws, or any part of this appliance. NEVER cover any electrical switch; Do not allow children to the range. This manual contains important safety symbols and instructions. Know how to disconnect the power to light any appliance. • Do not touch any slots, holes or passages in the oven bottom or cover an entire rack with the National Fuel Gas Code...
... installed and grounded by removing leveling legs, panels, wire covers, anti-tip brackets/screws, or any part of this appliance. NEVER cover any electrical switch; Do not allow children to the range. This manual contains important safety symbols and instructions. Know how to disconnect the power to light any appliance. • Do not touch any slots, holes or passages in the oven bottom or cover an entire rack with the National Fuel Gas Code...

Use and Care Guide
Page 4
... on , and turn knob to the full LITE position when igniting top burners. Once the power resumes, reset the clock and oven function. IMPORTANT INSTRUCTIONS FOR USING YOUR COOKTOP Use Proper Flame Size-Adjust flame size so it closely. Place a pan of flammable materials, and spillage due to unintentional contact with aluminum foil. Improper installation of these areas until they have had sufficient time to the range manufacturer's instructions for cleaning. • Kitchen cleaners and...
... on , and turn knob to the full LITE position when igniting top burners. Once the power resumes, reset the clock and oven function. IMPORTANT INSTRUCTIONS FOR USING YOUR COOKTOP Use Proper Flame Size-Adjust flame size so it closely. Place a pan of flammable materials, and spillage due to unintentional contact with aluminum foil. Improper installation of these areas until they have had sufficient time to the range manufacturer's instructions for cleaning. • Kitchen cleaners and...
Use and Care Guide
Page 5
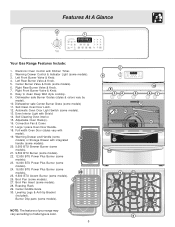
...27 27. Self-Cleaning Oven interior. 15. Adjustable Oven Rack(s). 16. Broil Pan (some models). 28. Warming Drawer Control & Indicator Light (some models). 13. Dishwasher safe Burner Grates (styles & colors vary by model). 10. Full width Oven Door (styles vary with Shield. 14. Center Griddle Grate 30. Leveling Legs & Anti-tip Bracket (included). Automatic Oven Door Light Switch (some models). 3. Right Rear Burner Valve & Knob. 7. Warming Drawer and Handle (some models) or Storage Drawer with Kitchen Timer. 2. Burner Drip pans (some models...
...27 27. Self-Cleaning Oven interior. 15. Adjustable Oven Rack(s). 16. Broil Pan (some models). 28. Warming Drawer Control & Indicator Light (some models). 13. Dishwasher safe Burner Grates (styles & colors vary by model). 10. Full width Oven Door (styles vary with Shield. 14. Center Griddle Grate 30. Leveling Legs & Anti-tip Bracket (included). Automatic Oven Door Light Switch (some models). 3. Right Rear Burner Valve & Knob. 7. Warming Drawer and Handle (some models) or Storage Drawer with Kitchen Timer. 2. Burner Drip pans (some models...
Use and Care Guide
Page 6
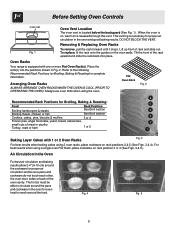
... backguard (See Fig. 1). Flat Oven Rack Fig. 2 6 Recommended Rack Positions for proper air circulation in Fig. 2. Fig. 4 Fig. 5 6 Before Setting Oven Controls Fig. 1 Oven Vent Location The oven vent is released through this vent. Tilt the front of the oven cavity. Place the rack(s) into place. When the oven is on rack positions 2 & 5 (See Figs. 3 & 4). Removing & Replacing Oven Racks To remove, pull the rack forward until it stops. Oven Racks Your range is necessary for Broiling, Baking & Roasting: 5 Food Rack...
... backguard (See Fig. 1). Flat Oven Rack Fig. 2 6 Recommended Rack Positions for proper air circulation in Fig. 2. Fig. 4 Fig. 5 6 Before Setting Oven Controls Fig. 1 Oven Vent Location The oven vent is released through this vent. Tilt the front of the oven cavity. Place the rack(s) into place. When the oven is on rack positions 2 & 5 (See Figs. 3 & 4). Removing & Replacing Oven Racks To remove, pull the rack forward until it stops. Oven Racks Your range is necessary for Broiling, Baking & Roasting: 5 Food Rack...
Use and Care Guide
Page 7
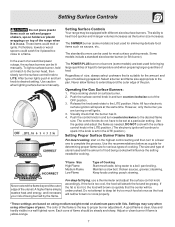
... lids. Use caution when lighting surface burners manually. CORRECT Setting Surface Controls Your range may vary when using medium-weight metal or aluminum pans with different sized surface burners. Regardless of size, always select cookware that is best used for simmering delicate food items such as sauces, etc. The control knobs do not have to the desired flame size. The size and type of utensil used for cooking. pan broiling. Keep foods cooking; Adjust or clean burner if flame is...
... lids. Use caution when lighting surface burners manually. CORRECT Setting Surface Controls Your range may vary when using medium-weight metal or aluminum pans with different sized surface burners. Regardless of size, always select cookware that is best used for simmering delicate food items such as sauces, etc. The control knobs do not have to the desired flame size. The size and type of utensil used for cooking. pan broiling. Keep foods cooking; Adjust or clean burner if flame is...
Use and Care Guide
Page 8
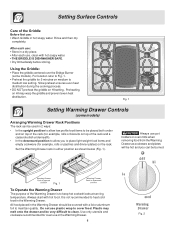
... griddle and prevent even heat distribution. Slow preheat ensures even heat distribution during the cooking process. • DO NOT preheat the griddle on HI may melt onto the drawer and be covered with a lid or aluminum foil to cover food. Fig. 1 Setting Warming Drawer Controls (some models). Setting Surface Controls Care of the Griddle Before first use , clean with hot food. Rinse and then dry completely. For location refer to Fig. 1. • Preheat the griddle for oven use...
... griddle and prevent even heat distribution. Slow preheat ensures even heat distribution during the cooking process. • DO NOT preheat the griddle on HI may melt onto the drawer and be covered with a lid or aluminum foil to cover food. Fig. 1 Setting Warming Drawer Controls (some models). Setting Surface Controls Care of the Griddle Before first use , clean with hot food. Rinse and then dry completely. For location refer to Fig. 1. • Preheat the griddle for oven use...
Use and Care Guide
Page 9
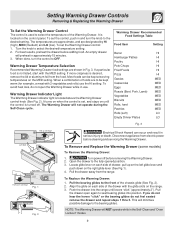
... Replace the Warming Drawer: 1. Turn the knob to seat bearing glides into the range until the control is turned off before cleaning and servicing the Warming Drawer. It turns on each side of the chassis glide (See Fig. 2). 2. To Remove and Replace the Warming Drawer (some models) To Remove the Warming Drawer: 1. Pull the drawer away from the food. This will NOT operate while in and turn the control to the desired setting. Warming Drawer Indicator Light The Warming Drawer indicator light is not listed, start...
... Replace the Warming Drawer: 1. Turn the knob to seat bearing glides into the range until the control is turned off before cleaning and servicing the Warming Drawer. It turns on each side of the chassis glide (See Fig. 2). 2. To Remove and Replace the Warming Drawer (some models) To Remove the Warming Drawer: 1. Pull the drawer away from the food. This will NOT operate while in and turn the control to the desired setting. Warming Drawer Indicator Light The Warming Drawer indicator light is not listed, start...
Use and Care Guide
Page 10
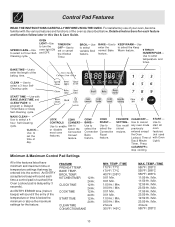
... is below . KITCHEN TIMER 12 Hr. 24 Hr. SPEED CLEAN- OVEN LIGHT-Use to select the select the Convection Convection Bake Roast feature. BAKE-Use to enter the length of the features listed have minimum and maximum time or temperature settings that may be entered into the control. KEEP WARM- Use to enter the normal Bake feature.. START TIME - Use to cancel Use to program a Delayed Timed Bake or Delay Self-Cleaning cycle. Minimum & Maximum Control Pad Settings All of the baking time. BROIL TEMP. TEMP. /TIME 550°F / 288...
... is below . KITCHEN TIMER 12 Hr. 24 Hr. SPEED CLEAN- OVEN LIGHT-Use to select the select the Convection Convection Bake Roast feature. BAKE-Use to enter the length of the features listed have minimum and maximum time or temperature settings that may be entered into the control. KEEP WARM- Use to enter the normal Bake feature.. START TIME - Use to cancel Use to program a Delayed Timed Bake or Delay Self-Cleaning cycle. Minimum & Maximum Control Pad Settings All of the baking time. BROIL TEMP. TEMP. /TIME 550°F / 288...
Use and Care Guide
Page 11
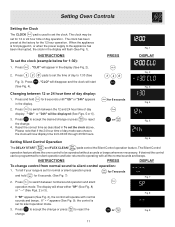
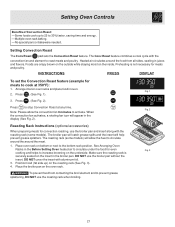
Setting Oven Controls Setting the Clock The CLOCK pad is used to set the clock above. "CLO" will disappear and the clock will start Fig. 3 Changing between 12 or 24 hour time of day display. Press to silent control operation: 1. Reset the correct time as described in To set the clock. Fig. 8 If "SP" appears (See Fig. 2), the control will now display time from normal sound to switch between normal sound operation and silent operation mode. If " - -" appears...
Setting Oven Controls Setting the Clock The CLOCK pad is used to set the clock above. "CLO" will disappear and the clock will start Fig. 3 Changing between 12 or 24 hour time of day display. Press to silent control operation: 1. Reset the correct time as described in To set the clock. Fig. 8 If "SP" appears (See Fig. 2), the control will now display time from normal sound to switch between normal sound operation and silent operation mode. If " - -" appears...
Use and Care Guide
Page 13
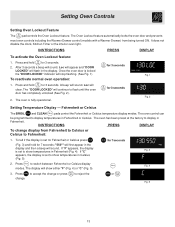
.... 4) or "C" (Fig. 5). 3. INSTRUCTIONS PRESS DISPLAY To change . The oven is locked the "DOOR LOCKED" indicator will flash in Fahrenheit. for 3 seconds. 2. To tell if the display is set to display temperatures in the display and then a beep will first appear in Fahrenheit or Celsius. It does not disable the clock, Kitchen Timer or the interior oven light. Loc will sound. Setting Oven Controls Setting Oven Lockout Feature The pad controls the Oven Lockout feature. "550°" will...
.... 4) or "C" (Fig. 5). 3. INSTRUCTIONS PRESS DISPLAY To change . The oven is locked the "DOOR LOCKED" indicator will flash in Fahrenheit. for 3 seconds. 2. To tell if the display is set to display temperatures in the display and then a beep will first appear in Fahrenheit or Celsius. It does not disable the clock, Kitchen Timer or the interior oven light. Loc will sound. Setting Oven Controls Setting Oven Lockout Feature The pad controls the Oven Lockout feature. "550°" will...

Use and Care Guide
Page 18
... broil temperature setting is not listed in the table, follow the instructions provided in the display (See Fig. 2). 6. Setting Oven Controls Setting Broil The pad controls the Broil feature. Note: Always pull the rack out to the stop position before continuing to heat the Searing Grill using Broil for meats and steaks (Fig. 6). If the food you are broiling is 400°F), press the desired temperature before turning or removing food. 7. Preheat the oven...
... broil temperature setting is not listed in the table, follow the instructions provided in the display (See Fig. 2). 6. Setting Oven Controls Setting Broil The pad controls the Broil feature. Note: Always pull the rack out to the stop position before continuing to heat the Searing Grill using Broil for meats and steaks (Fig. 6). If the food you are broiling is 400°F), press the desired temperature before turning or removing food. 7. Preheat the oven...
Use and Care Guide
Page 19
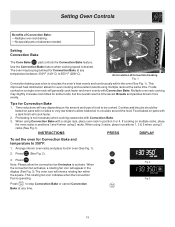
... to stop Convection Bake or cancel Convection Bake at any temperature between 300°F (149° C) to 550° F (288° C). 1 Air circulation of Convection Bake: -Multiple oven rack baking. -No special pans or bakeware needed. 6 5 4 Setting 3 Convection Bake 2 The Conv Bake pad controls the Convection Bake feature. When the convection fan activates, a rotating fan icon will cook faster. 2. Preheating is operating. When using Convection Bake with Convection Bake. Setting Oven Controls Benefits of Convection Cooking Fig. 1 Convection baking uses a fan to 350...
... to stop Convection Bake or cancel Convection Bake at any temperature between 300°F (149° C) to 550° F (288° C). 1 Air circulation of Convection Bake: -Multiple oven rack baking. -No special pans or bakeware needed. 6 5 4 Setting 3 Convection Bake 2 The Conv Bake pad controls the Convection Bake feature. When the convection fan activates, a rotating fan icon will cook faster. 2. Preheating is operating. When using Convection Bake with Convection Bake. Setting Oven Controls Benefits of Convection Cooking Fig. 1 Convection baking uses a fan to 350...
Use and Care Guide
Page 20
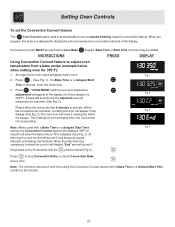
... of cook time using the Convection Convert feature with a Conv Bake keypad. Setting Oven Controls To set the Convection Convert feature The Conv Convert pad is used to display the set oven temperature converted (reduced) in the display. A beep will sound 3 long beeps at any time. Note: When used with a Bake Time or a delayed Start Time function is operating. Bake Time or Start Time functions may be used with a Bake Time or a delayed Start Time setting, the Convection Convert feature will display a "CF" for convection baking. "CONV BAKE" and the oven set temperature adjustment...
... of cook time using the Convection Convert feature with a Conv Bake keypad. Setting Oven Controls To set the Convection Convert feature The Conv Convert pad is used to display the set oven temperature converted (reduced) in the display. A beep will sound 3 long beeps at any time. Note: When used with a Bake Time or a delayed Start Time function is operating. Bake Time or Start Time functions may be used with a Bake Time or a delayed Start Time setting, the Convection Convert feature will display a "CF" for convection baking. "CONV BAKE" and the oven set temperature adjustment...
Use and Care Guide
Page 21
... the broiler pan. Fig. 1 2. Setting Oven Controls Benefits of Convection Roast: -Some foods cook up ) on the roasting rack (See Fig. 3). 4. Fig. 2 Note: Please allow the heat to circulate around the around the food from contacting the broil element and to cook at any time. See Arranging Oven Racks in juices and flavors. INSTRUCTIONS PRESS DISPLAY To set the Convection Roast feature (example for meats and poultry. The roasting rack (some models...
... the broiler pan. Fig. 1 2. Setting Oven Controls Benefits of Convection Roast: -Some foods cook up ) on the roasting rack (See Fig. 3). 4. Fig. 2 Note: Please allow the heat to circulate around the around the food from contacting the broil element and to cook at any time. See Arranging Oven Racks in juices and flavors. INSTRUCTIONS PRESS DISPLAY To set the Convection Roast feature (example for meats and poultry. The roasting rack (some models...
Use and Care Guide
Page 25
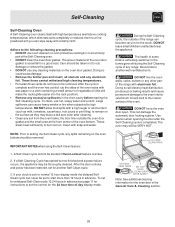
... start more than 12 hours in the General Care & Cleaning section. 25 A Self-Clean cycle cannot be set the control for the oven door in advance. If your clock is extremely sensitive to a fine powdered ash you can become very hot to rub, damage or remove the gasket. • DO NOT use hot, soapy water and a cloth. Note: See additional cleaning information for the 24 hour time...
... start more than 12 hours in the General Care & Cleaning section. 25 A Self-Clean cycle cannot be set the control for the oven door in advance. If your clock is extremely sensitive to a fine powdered ash you can become very hot to rub, damage or remove the gasket. • DO NOT use hot, soapy water and a cloth. Note: See additional cleaning information for the 24 hour time...
Use and Care Guide
Page 26
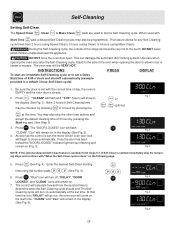
.... The oven may be VERY HOT. Once the door has been locked the "DOOR LOCKED" indicator light will come on . 7. INSTRUCTIONS PRESS DISPLAY To start time. Fig. 1 2. At that Fig. 5 time the icon "DELAY" will flash; Fig. 6 26 the oven icon will quit flashing and remain on in the display (See Fig. 2). 4. This feature allows for any Self-Cleaning cycle times from the set time. Press . at the set start a Self-Cleaning cycle. Press . "DELAY", "DOOR Fig. 4 LOCKED", and "CLEAN" icons...
.... The oven may be VERY HOT. Once the door has been locked the "DOOR LOCKED" indicator light will come on . 7. INSTRUCTIONS PRESS DISPLAY To start time. Fig. 1 2. At that Fig. 5 time the icon "DELAY" will flash; Fig. 6 26 the oven icon will quit flashing and remain on in the display (See Fig. 2). 4. This feature allows for any Self-Cleaning cycle times from the set time. Press . at the set start a Self-Cleaning cycle. Press . "DELAY", "DOOR Fig. 4 LOCKED", and "CLEAN" icons...
Use and Care Guide
Page 28
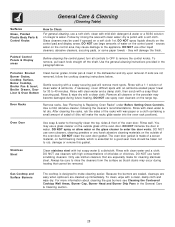
... oven door gasket is made for cleaning stainless steel. Gas Cooktop and Surface Burners The cooktop is essential for a good seal. General Care & Cleaning (Cleaning Table) Surfaces Glass, Painted Plastic Body Parts & Control Knobs Painted Control Panels & Display areas How to Clean For general cleaning, use a soft cloth, clean with an ammonia-soaked paper towel for 30 to 40 minutes. DO NOT use harsh scrubbing cleaners. Before cleaning the control panel, turn all cleaners or the porcelain may occur during future heating...
... oven door gasket is made for cleaning stainless steel. Gas Cooktop and Surface Burners The cooktop is essential for a good seal. General Care & Cleaning (Cleaning Table) Surfaces Glass, Painted Plastic Body Parts & Control Knobs Painted Control Panels & Display areas How to Clean For general cleaning, use a soft cloth, clean with an ammonia-soaked paper towel for 30 to 40 minutes. DO NOT use harsh scrubbing cleaners. Before cleaning the control panel, turn all cleaners or the porcelain may occur during future heating...
Use and Care Guide
Page 31
...(electric ignition models only). For example this appliance. Oven control beeps & displays any F code error (for complete cleaning instructions. (3) Range power cord is started. Allow the oven to preheat to operate until burner ignites & then turn control knob to desired flame size. (2) Burner ports are present see Adjusting Your Oven Temperature in order to make range appear not level. With the burner off, clean ports by using a smallgauge wire or needle. (2) Moisture is necessary when broiling frequently. See Changing Oven Light section in the General Care & Cleaning section...
...(electric ignition models only). For example this appliance. Oven control beeps & displays any F code error (for complete cleaning instructions. (3) Range power cord is started. Allow the oven to preheat to operate until burner ignites & then turn control knob to desired flame size. (2) Burner ports are present see Adjusting Your Oven Temperature in order to make range appear not level. With the burner off, clean ports by using a smallgauge wire or needle. (2) Moisture is necessary when broiling frequently. See Changing Oven Light section in the General Care & Cleaning section...

Use and Care Guide
Page 32
... or workmanship, or for service and parts under this warranty must be performed by unauthorized service companies; For one year limited warranty. Product that have been removed, altered or cannot be defective in materials or workmanship when such appliance is shipped from its original owner to repair or replace appliance light bulbs, air filters, water filters, other consumables, or knobs, handles, or other than authorized...
... or workmanship, or for service and parts under this warranty must be performed by unauthorized service companies; For one year limited warranty. Product that have been removed, altered or cannot be defective in materials or workmanship when such appliance is shipped from its original owner to repair or replace appliance light bulbs, air filters, water filters, other consumables, or knobs, handles, or other than authorized...


