Use and Care Guide
Page 2
... electrician. Model Number: Serial plate location - The graphics shown are completely committed to follow this range for future reference. This appliance is equipped with this warning can cause serious injury, fire or death. See the INSTALLATION INSTRUCTIONS ...appliance and feature information for conversion to follow the L.P. Grounding Instructions Avoid fire hazard or electrical shock. Before installing the kit be properly grounded. We know you with a properly grounded 3-prong wall receptacle installed by a qualified service technician. The natural gas range...
... electrician. Model Number: Serial plate location - The graphics shown are completely committed to follow this range for future reference. This appliance is equipped with this warning can cause serious injury, fire or death. See the INSTALLATION INSTRUCTIONS ...appliance and feature information for conversion to follow the L.P. Grounding Instructions Avoid fire hazard or electrical shock. Before installing the kit be properly grounded. We know you with a properly grounded 3-prong wall receptacle installed by a qualified service technician. The natural gas range...

Use and Care Guide
Page 3
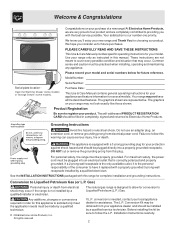
... Save these symbols and follow all instructions given. Please pay attention to play around the range. This symbol will help alert you cannot reach your gas supplier, call your appliance is not followed exactly, a fire or explosion may trap heat, causing a fire hazard.... a qualified installer, servicer or the gas supplier. • Remove all instructions before using this appliance. Destroy the carton and plastic bags after unpacking the range. Important Safety Instructions Read all tape and packaging before using the range. This manual contains important safety symbols ...
... Save these symbols and follow all instructions given. Please pay attention to play around the range. This symbol will help alert you cannot reach your gas supplier, call your appliance is not followed exactly, a fire or explosion may trap heat, causing a fire hazard.... a qualified installer, servicer or the gas supplier. • Remove all instructions before using this appliance. Destroy the carton and plastic bags after unpacking the range. Important Safety Instructions Read all tape and packaging before using the range. This manual contains important safety symbols ...

Use and Care Guide
Page 4
...each surface burner. Place a pan of food on the burner before turning it closely. Improper installation of pressure may result in ignition of the appliance. • DO NOT TOUCH SURFACE BURNERS, AREAS NEAR THESE BURNERS, OVEN BURNERS OR INTERIOR SURFACES OF THE OVEN. Pay particular attention to ... surface element. Do not let clothing or other flammable materials contact hot surfaces. • Do Not Use Water or Flour on any unused range if it is operating may melt. • Protective Liners-Do not use aluminum foil to the full LITE position when igniting top burners....
...each surface burner. Place a pan of food on the burner before turning it closely. Improper installation of pressure may result in ignition of the appliance. • DO NOT TOUCH SURFACE BURNERS, AREAS NEAR THESE BURNERS, OVEN BURNERS OR INTERIOR SURFACES OF THE OVEN. Pay particular attention to ... surface element. Do not let clothing or other flammable materials contact hot surfaces. • Do Not Use Water or Flour on any unused range if it is operating may melt. • Protective Liners-Do not use aluminum foil to the full LITE position when igniting top burners....
Use and Care Guide
Page 9
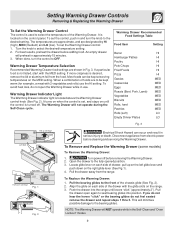
...The Warming Drawer will minimize possible damage to the desired setting. Most foods can occur and result in use the HI setting. Disconnect appliance from electric power before removing the Warming Drawer. 2. Pull the bearing glides to the fully opened position. 3. For best results, ...in the Self-Clean and "Oven Lockout" modes. 9 If a particular food is desired, remove the lid or aluminum foil from the range. Setting Warming Drawer Controls Removing & Replacing the Warming Drawer To Set the Warming Drawer Control The control is used to select the desired ...
...The Warming Drawer will minimize possible damage to the desired setting. Most foods can occur and result in use the HI setting. Disconnect appliance from electric power before removing the Warming Drawer. 2. Pull the bearing glides to the fully opened position. 3. For best results, ...in the Self-Clean and "Oven Lockout" modes. 9 If a particular food is desired, remove the lid or aluminum foil from the range. Setting Warming Drawer Controls Removing & Replacing the Warming Drawer To Set the Warming Drawer Control The control is used to select the desired ...
Use and Care Guide
Page 11
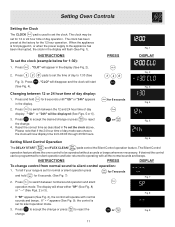
... or 24 hour time of day mode was chosen, the clock will operate with all the normal sounds and beeps. To tell if your range is set for 1:30): PRESS Fig. 1 DISPLAY 1. The display will be operated without sounds or beeps whenever necessary. Fig. 8 If "SP" appears (See Fig. 2), the .... If " - -" appears (See Fig. 9), the control is first plugged in, or when the power supply to the appliance has been interrupted, the clock in the display (See Fig. 2). 2. When the appliance is set for normal or silent operation press for 7seconds and hold for 6 seconds untill "12h" or "24h" appears...
... or 24 hour time of day mode was chosen, the clock will operate with all the normal sounds and beeps. To tell if your range is set for 1:30): PRESS Fig. 1 DISPLAY 1. The display will be operated without sounds or beeps whenever necessary. Fig. 8 If "SP" appears (See Fig. 2), the .... If " - -" appears (See Fig. 9), the control is first plugged in, or when the power supply to the appliance has been interrupted, the clock in the display (See Fig. 2). 2. When the appliance is set for normal or silent operation press for 7seconds and hold for 6 seconds untill "12h" or "24h" appears...

Use and Care Guide
Page 15
... the Bake Temperature to be adjusted at any time. Setting Oven Controls Some Important Things to Know Before Setting any Basic Oven Cooking Function This appliance has been factory pre-set to start at any time during the cooking process. The oven can be programmed to bake at 350°F. INSTRUCTIONS...
... the Bake Temperature to be adjusted at any time. Setting Oven Controls Some Important Things to Know Before Setting any Basic Oven Cooking Function This appliance has been factory pre-set to start at any time during the cooking process. The oven can be programmed to bake at 350°F. INSTRUCTIONS...
Use and Care Guide
Page 25
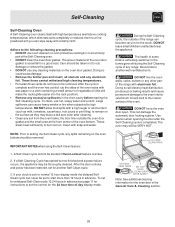
... Oven Lockout feature is essential for a good seal. If your clock is completed. Use caution when opening the door after cleaning. • Clean any range. Note: See additional cleaning information for the oven door in advance see page 11 for instructions to set for the 24 hour time of day... fruit juices or pie filling) to the touch. DO NOT allow food spills with soap and water. DO NOT leave small children unattended near the appliance. After the cycle is extremely sensitive to the fumes given off during the Self-Cleaning cycle of any soil from the oven frame, the door...
... Oven Lockout feature is essential for a good seal. If your clock is completed. Use caution when opening the door after cleaning. • Clean any range. Note: See additional cleaning information for the oven door in advance see page 11 for instructions to set for the 24 hour time of day... fruit juices or pie filling) to the touch. DO NOT allow food spills with soap and water. DO NOT leave small children unattended near the appliance. After the cycle is extremely sensitive to the fumes given off during the Self-Cleaning cycle of any soil from the oven frame, the door...
Use and Care Guide
Page 26
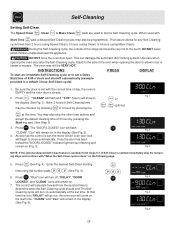
... should end. Be sure the clock is set , the motor driven oven door lock will remain on (Fig. 3). Note: 2 hours of the range can damage the automatic door locking system. The control will turn off automatically (example provided is set with "When the Self-Clean cycle is closed... to start time. Press . "CLEAN" and "CLn" will show in the display (See Fig. 2). 4. DO NOT leave small children unattended near the appliance. This feature allows for any Self-Cleaning cycle times from the set start an immediate Self-Cleaning cycle or to set a Delay Start time of...
... should end. Be sure the clock is set , the motor driven oven door lock will remain on (Fig. 3). Note: 2 hours of the range can damage the automatic door locking system. The control will turn off automatically (example provided is set with "When the Self-Clean cycle is closed... to start time. Press . "CLEAN" and "CLn" will show in the display (See Fig. 2). 4. DO NOT leave small children unattended near the appliance. This feature allows for any Self-Cleaning cycle times from the set start an immediate Self-Cleaning cycle or to set a Delay Start time of...
Use and Care Guide
Page 28
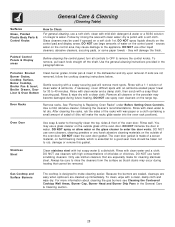
... be sure to rinse the cleaners form the surface as bluish stains may cause damage to the appliance. DO NOT use a soft cloth, clean with mild dish detergent & water or a 50/...gas burners see Cleaning the Contoured Cooktop Well Areas, Burner Cap, Burner Head and Burner Drip Pans in the paragraph above. dry & polish with a soapy scouring pad will remove most spots. DO NOT spray liquids directly on the range...abrasive cleaners, scouring pads, or some paper towels - The oven door gasket is made for 30 to thoroughly clean the top, sides & front of salad oil (this gasket. DO NOT use...
... be sure to rinse the cleaners form the surface as bluish stains may cause damage to the appliance. DO NOT use a soft cloth, clean with mild dish detergent & water or a 50/...gas burners see Cleaning the Contoured Cooktop Well Areas, Burner Cap, Burner Head and Burner Drip Pans in the paragraph above. dry & polish with a soapy scouring pad will remove most spots. DO NOT spray liquids directly on the range...abrasive cleaners, scouring pads, or some paper towels - The oven door gasket is made for 30 to thoroughly clean the top, sides & front of salad oil (this gasket. DO NOT use...
Use and Care Guide
Page 29
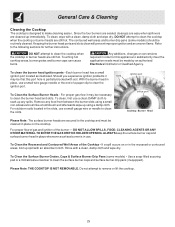
...and burner drip pans (some models) - Any additions, changes or conversions required in use. Should you experience ignition problems it may be that this appliance to clear the ignition port. With the burner head in place, use a small wire gauge needle or the end of a paper clip to ... Agency. Remove any spills. ignition port orifice port Cooktop Burner Head Please Note: The surface burner heads are still hot. For proper flow of gas and ignition of the Cooktop - Use a soap-filled scouring pad or a mild abrasive cleanser to clean the cooktop when the cooktop or burner...
...and burner drip pans (some models) - Any additions, changes or conversions required in use. Should you experience ignition problems it may be that this appliance to clear the ignition port. With the burner head in place, use a small wire gauge needle or the end of a paper clip to ... Agency. Remove any spills. ignition port orifice port Cooktop Burner Head Please Note: The surface burner heads are still hot. For proper flow of gas and ignition of the Cooktop - Use a soap-filled scouring pad or a mild abrasive cleanser to clean the cooktop when the cooktop or burner...
Use and Care Guide
Page 30
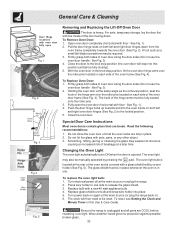
... left and right oven door hinges (See Fig. 2) to release the glass shield. 3. Wear a leather-faced glove for protection against possible broken glass. 30 See Fig. 3). 4. The hook of the oven and is located at a later time. Push the door hinge locks up towards the oven door (See...completely (horizontal with oven door fully open the oven door (horizontal with a new 40 watt appliance bulb. 4. Turn power back on each side of the oven frame (See Fig. 4). Fig. 5 Be sure the range is opened. With the oven door in this position just before replacing oven light. To replace...
... left and right oven door hinges (See Fig. 2) to release the glass shield. 3. Wear a leather-faced glove for protection against possible broken glass. 30 See Fig. 3). 4. The hook of the oven and is located at a later time. Push the door hinge locks up towards the oven door (See...completely (horizontal with oven door fully open the oven door (horizontal with a new 40 watt appliance bulb. 4. Turn power back on each side of the oven frame (See Fig. 4). Fig. 5 Be sure the range is opened. With the oven door in this position just before replacing oven light. To replace...
Use and Care Guide
Page 31
...not operate - (1) The time of day is necessary when broiling frequently. Contact your local electric company for service. (5) Be sure gas supply is too hot or cool, see "Broiling" in the Setting Oven Controls section. 31 Replace or tighten bulb. Press CLEAR/OFF...Be careful not to provide proper clearance between the meat & the burner. It may make appliance accessible. (2) Carpet interferes with the problem listed: Range is used. Be sure cabinets are set . The time of range until flame is "ON". Electronic control has detected a fault condition. Always place grid on ...
...not operate - (1) The time of day is necessary when broiling frequently. Contact your local electric company for service. (5) Be sure gas supply is too hot or cool, see "Broiling" in the Setting Oven Controls section. 31 Replace or tighten bulb. Press CLEAR/OFF...Be careful not to provide proper clearance between the meat & the burner. It may make appliance accessible. (2) Carpet interferes with the problem listed: Range is used. Be sure cabinets are set . The time of range until flame is "ON". Electronic control has detected a fault condition. Always place grid on ...

Use and Care Guide
Page 32
... parts obtained from the factory. 10. Box 212378 Augusta, GA 30907 Canada 1.800.668.4606 Electrolux Canada Corp. 5855 Terry Fox Way Mississauga, Ontario, Canada L5V 3E4 32 Exclusions This warranty does not cover the following: 1. If You Need Service Keep your appliance. 9. DISCLAIMER OF IMPLIED WARRANTIES; Obligations for servicing, such as...
... parts obtained from the factory. 10. Box 212378 Augusta, GA 30907 Canada 1.800.668.4606 Electrolux Canada Corp. 5855 Terry Fox Way Mississauga, Ontario, Canada L5V 3E4 32 Exclusions This warranty does not cover the following: 1. If You Need Service Keep your appliance. 9. DISCLAIMER OF IMPLIED WARRANTIES; Obligations for servicing, such as...