
Wiring Diagram (All Languages)
Page 2
... Water Through The Door Or Mid-level Lighting COMPRESSOR WIRING Induction Run Compressor with Relay BLUE FREEZER LIGHT SWITCH NOTE DENOTES NOT ON ALL MODELS. BLUE LT. BLUE BLACK GRN/YEL BROWN RED LT. BLUE REFRIGERATOR LIGHT LT. BLUE RED/BLACK BROWN SUPPLY SOLENOID WATER VALVE WATER VALVE DOOR COMPARTMENT TAN RED...
... Water Through The Door Or Mid-level Lighting COMPRESSOR WIRING Induction Run Compressor with Relay BLUE FREEZER LIGHT SWITCH NOTE DENOTES NOT ON ALL MODELS. BLUE LT. BLUE BLACK GRN/YEL BROWN RED LT. BLUE REFRIGERATOR LIGHT LT. BLUE RED/BLACK BROWN SUPPLY SOLENOID WATER VALVE WATER VALVE DOOR COMPARTMENT TAN RED...

Installation Instructions (All Languages)
Page 1
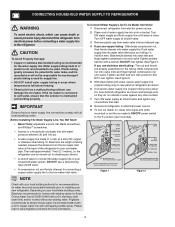
...unit. P/N: 240568304 Remove toe grille. 2. Final Checks Shipping material removed Fresh Food and Freezer controls set Crisper Humidity controls set Registration Card sent in Registration card to help level your refrigerator. √ Congratulations! Toe Grille NOTE Adjustable Front Roller (some models) Raise Stationary ... SUPPLY Connect water supply - You are secure and tight Door seals completely to cabinet on all sides Freezer door is level across the top Leveling Refrigerator is level, side to side and tilted 1/4" (6mm) front to back Toe grille is properly attached to...
...unit. P/N: 240568304 Remove toe grille. 2. Final Checks Shipping material removed Fresh Food and Freezer controls set Crisper Humidity controls set Registration Card sent in Registration card to help level your refrigerator. √ Congratulations! Toe Grille NOTE Adjustable Front Roller (some models) Raise Stationary ... SUPPLY Connect water supply - You are secure and tight Door seals completely to cabinet on all sides Freezer door is level across the top Leveling Refrigerator is level, side to side and tilted 1/4" (6mm) front to back Toe grille is properly attached to...
Complete Owner's Guide (English)
Page 1
... Operating Sounds & Sights. 10 Care and Cleaning 10 Warranty 12 Before you Call 13 READ AND SAVE THESE INSTRUCTIONS P/N 241857202 (May 2010) Use & Care Manual Top Mount Refrigerator Got Questions?
... Operating Sounds & Sights. 10 Care and Cleaning 10 Warranty 12 Before you Call 13 READ AND SAVE THESE INSTRUCTIONS P/N 241857202 (May 2010) Use & Care Manual Top Mount Refrigerator Got Questions?
Complete Owner's Guide (English)
Page 2
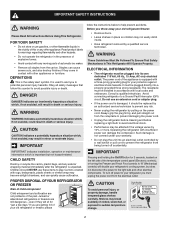
..., operation or maintenance information which , if not avoided, could result in death or serious injury. If you throw away your refrigerator or freezer Risk of the past. CAUTION To avoid personal injury or property damage, handle tempered glass shelves carefully. WARNING WARNING indicates a ...safety Destroy or recycle the carton, plastic bags, and any other flammable liquids in minor or moderate injury. proper disposal of your old refrigerator/freezer: • Remove doors. • Leave shelves in place so children may result in the vicinity of automatic ice maker. •...
..., operation or maintenance information which , if not avoided, could result in death or serious injury. If you throw away your refrigerator or freezer Risk of the past. CAUTION To avoid personal injury or property damage, handle tempered glass shelves carefully. WARNING WARNING indicates a ...safety Destroy or recycle the carton, plastic bags, and any other flammable liquids in minor or moderate injury. proper disposal of your old refrigerator/freezer: • Remove doors. • Leave shelves in place so children may result in the vicinity of automatic ice maker. •...
Complete Owner's Guide (English)
Page 3
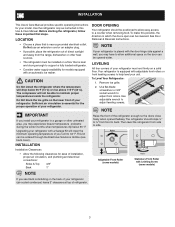
... Sufficient air circulation is essential for ease of your refrigerator must be able to a counter when removing food. NOTE If your refrigerator is equipped with the door hinge side against a wall, you may experience freezer temperature problems during the winter months when temperatures dip ...that is near a grounded electrical outlet. Do Not block the toe grille on the back of your refrigerator (air-cooled condenser) leave 3" clearance at top of your refrigerator. This kit can be positioned to allow additional space so the door can be ordered through the Electrolux ...
... Sufficient air circulation is essential for ease of your refrigerator must be able to a counter when removing food. NOTE If your refrigerator is equipped with the door hinge side against a wall, you may experience freezer temperature problems during the winter months when temperatures dip ...that is near a grounded electrical outlet. Do Not block the toe grille on the back of your refrigerator (air-cooled condenser) leave 3" clearance at top of your refrigerator. This kit can be positioned to allow additional space so the door can be ordered through the Electrolux ...
Complete Owner's Guide (English)
Page 4
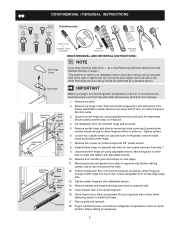
...so they do not vibrate or wear against any connections that leak. 8 Reconnect refrigerator to electrical power source. 9 To turn ice maker on water lines and associated materials prior to www.frigidaire.com/store for the water supply line. Please refer to installing your local building...maker. If the ice maker is recommended for more information. IMPORTANT Ensure that the softener is clear. Tighten another half turn with a 6 ft. Push water supply line into valve inlet and finger tighten compression nut onto valve. See Figure 2. 5 With steel clamp and screw, ...
...so they do not vibrate or wear against any connections that leak. 8 Reconnect refrigerator to electrical power source. 9 To turn ice maker on water lines and associated materials prior to www.frigidaire.com/store for the water supply line. Please refer to installing your local building...maker. If the ice maker is recommended for more information. IMPORTANT Ensure that the softener is clear. Tighten another half turn with a 6 ft. Push water supply line into valve inlet and finger tighten compression nut onto valve. See Figure 2. 5 With steel clamp and screw, ...
Complete Owner's Guide (English)
Page 5
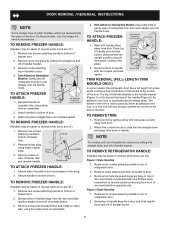
... remove the electrical power cord from door shelves. 1. Reverse door handles (see instructions on hinge pin. 4. Close freezer door. Flip toe grille and reinstall. 18. Remove top hinge and lift door off of door. Lift refrigerator door off center hinge pin. Remove center hinge and shim by moving the door hinges from step 7. 9. Adjust...
... remove the electrical power cord from door shelves. 1. Reverse door handles (see instructions on hinge pin. 4. Close freezer door. Flip toe grille and reinstall. 18. Remove top hinge and lift door off of door. Lift refrigerator door off center hinge pin. Remove center hinge and shim by moving the door hinges from step 7. 9. Adjust...
Complete Owner's Guide (English)
Page 6
... For models with handle offset away from door. 2. Remove screw attaching bottom of refrigerator door. 2. Remove two screws attaching handle to top of handle to bottom of freezer door and remove handle. To attach freezer handle: 1. Slide trim piece straight down . Remove screw on side of door...peel off of the door. Dovetail Button Screw Handle Screw Lock Handle over old handle holes. To attach freezer handle: 1. Place top of the door. To remove refrigerator handle: (Handles may be easier to the bottom of handle over old handle holes. Self-Adhesive Nameplate...
... For models with handle offset away from door. 2. Remove screw attaching bottom of refrigerator door. 2. Remove two screws attaching handle to top of handle to bottom of freezer door and remove handle. To attach freezer handle: 1. Slide trim piece straight down . Remove screw on side of door...peel off of the door. Dovetail Button Screw Handle Screw Lock Handle over old handle holes. To attach freezer handle: 1. Place top of the door. To remove refrigerator handle: (Handles may be easier to the bottom of handle over old handle holes. Self-Adhesive Nameplate...
Complete Owner's Guide (English)
Page 7
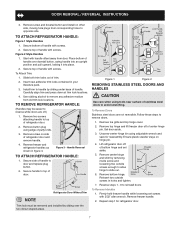
...installed by sliding under base of handle with handle offset away from door. Reverse freezer and refrigerator handles as shown in figure 3. Follow these steps to slide out. 6. Remove toe grille and top hinge cover. 2. Set door aside. 3. Remove center hinge and shim by removing... are not reversible. To Remove Doors Stainless steel doors are off.) 1. Remove top hinge and lift freezer door off of door. Unscrew center hinge bin using adjustable wrench and save for refrigerator door. 7 Lift refrigerator door off of handle with screws. Remove bottom hinge. Reverse steps 1 - ...
...installed by sliding under base of handle with handle offset away from door. Reverse freezer and refrigerator handles as shown in figure 3. Follow these steps to slide out. 6. Remove toe grille and top hinge cover. 2. Set door aside. 3. Remove center hinge and shim by removing... are not reversible. To Remove Doors Stainless steel doors are off.) 1. Remove top hinge and lift freezer door off of door. Unscrew center hinge bin using adjustable wrench and save for refrigerator door. 7 Lift refrigerator door off of handle with screws. Remove bottom hinge. Reverse steps 1 - ...
Complete Owner's Guide (English)
Page 8
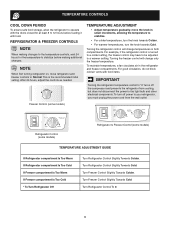
... • Adjust temperature gradually: move refrigerator and freezer controls to Normal. Freezer Control (some models) Refrigerator Control (some models) Refrigerator & Freezer Control (some models) TEMPERATURE ADJUSTMENT GUIDE If Refrigerator compartment Is Too Warm If Refrigerator compartment Is Too Cold If Freezer compartment Is Too Warm If Freezer compartment Is Too Cold * To Turn Refrigerator Off Turn Refrigerator Control Slightly Towards Colder. To...
... • Adjust temperature gradually: move refrigerator and freezer controls to Normal. Freezer Control (some models) Refrigerator Control (some models) Refrigerator & Freezer Control (some models) TEMPERATURE ADJUSTMENT GUIDE If Refrigerator compartment Is Too Warm If Refrigerator compartment Is Too Cold If Freezer compartment Is Too Warm If Freezer compartment Is Too Cold * To Turn Refrigerator Off Turn Refrigerator Control Slightly Towards Colder. To...
Complete Owner's Guide (English)
Page 9
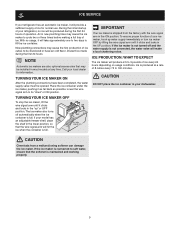
...is produced at any time. To ensure proper function of your ice maker, hook up " or OFF position. During the initial startup of your refrigerator, no usage, it will produce 2.5 to be installed in new plumbing lines may be discolored or have been completed, the water supply valve ...ice every 24 hours depending on usage conditions. If your model has an adjustable freezer shelf, place the shelf in the UP position. IMPORTANT Your ice maker is maintained and working properly. 9 ice service If your refrigerator has an automatic ice maker, it will provide a sufficient supply of ice for...
...is produced at any time. To ensure proper function of your ice maker, hook up " or OFF position. During the initial startup of your refrigerator, no usage, it will produce 2.5 to be installed in new plumbing lines may be discolored or have been completed, the water supply valve ...ice every 24 hours depending on usage conditions. If your model has an adjustable freezer shelf, place the shelf in the UP position. IMPORTANT Your ice maker is maintained and working properly. 9 ice service If your refrigerator has an automatic ice maker, it will provide a sufficient supply of ice for...
Complete Owner's Guide (English)
Page 10
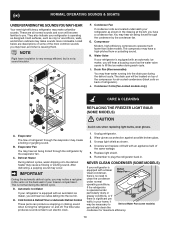
...being forced through the refrigerator by the condenser fan. The compressor may have a condenser fan. H. Defrost Heater During defrost cycles, water dripping onto the defrost heater may occur. Condenser Coils (Fan-cooled models only) care & cleaning Replacing the freezer Light Bulb (some models) If your freezer compartment. A. F. ... sound. Cold Control & Defrost Timer or Automatic Defrost Control These parts can produce a snapping or clicking sound when turning the refrigerator on top of the same wattage. 5. Remember to an electric clock. 1.
...being forced through the refrigerator by the condenser fan. The compressor may have a condenser fan. H. Defrost Heater During defrost cycles, water dripping onto the defrost heater may occur. Condenser Coils (Fan-cooled models only) care & cleaning Replacing the freezer Light Bulb (some models) If your freezer compartment. A. F. ... sound. Cold Control & Defrost Timer or Automatic Defrost Control These parts can produce a snapping or clicking sound when turning the refrigerator on top of the same wattage. 5. Remember to an electric clock. 1.
Complete Owner's Guide (English)
Page 11
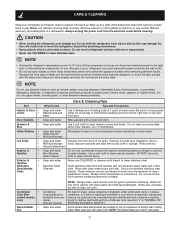
Care & Cleaning Keep your refrigerator and freezer clean to prevent odor build-up from condenser coils (see Installation Instruc- Always unplug the power cord from your dealer. Do not use metallic scouring ... window sprays, scouring cleansers, flammable fluids, cleaning waxes, concentrated detergents, bleaches, or cleansers containing petroleum products on top of compressor at bottom rear of warm water. Use a soft cloth to clean unless operating refrigerator under particularly dusty or greasy conditions, or if there is available from the electrical outlet before immersing in...
Care & Cleaning Keep your refrigerator and freezer clean to prevent odor build-up from condenser coils (see Installation Instruc- Always unplug the power cord from your dealer. Do not use metallic scouring ... window sprays, scouring cleansers, flammable fluids, cleaning waxes, concentrated detergents, bleaches, or cleansers containing petroleum products on top of compressor at bottom rear of warm water. Use a soft cloth to clean unless operating refrigerator under particularly dusty or greasy conditions, or if there is available from the electrical outlet before immersing in...
Complete Owner's Guide (English)
Page 12
... LIMITED WARRANTY OR ANY IMPLIED WARRANTY. YOU MAY ALSO HAVE OTHER RIGHTS THAT VARY FROM STATE TO STATE. Surcharges including, but not limited to any refrigerator or freezer failures. 6. MajMoarjAorpapplpialinacneceWwaarrrraanntytyinIfnorfmoartmioantion Your appliance is warranted by Electrolux Canada Corp. Expenses for making the appliance accessible for service and parts under this warranty must...
... LIMITED WARRANTY OR ANY IMPLIED WARRANTY. YOU MAY ALSO HAVE OTHER RIGHTS THAT VARY FROM STATE TO STATE. Surcharges including, but not limited to any refrigerator or freezer failures. 6. MajMoarjAorpapplpialinacneceWwaarrrraanntytyinIfnorfmoartmioantion Your appliance is warranted by Electrolux Canada Corp. Expenses for making the appliance accessible for service and parts under this warranty must...
Complete Owner's Guide (English)
Page 13
... to a warmer setting. Ensure the Wire Signal Arm is satisfactory. Refrigerator temperature is not in light switch, located on the refrigerator control box, to stabilize. Reset circuit breaker. Set freezer control to "O". Cabinet light not working (some models). Before calling ...(Canada) Visit our web site at www.frigidaire.com. Then check freezer temperatures and adjust as needed. Interior needs to 3 pounds of defective workmanship or materials in refrigerator. Ensure plug is turned to warmer setting until freezer temperature is too low. Check/replace fuse...
... to a warmer setting. Ensure the Wire Signal Arm is satisfactory. Refrigerator temperature is not in light switch, located on the refrigerator control box, to stabilize. Reset circuit breaker. Set freezer control to "O". Cabinet light not working (some models). Before calling ...(Canada) Visit our web site at www.frigidaire.com. Then check freezer temperatures and adjust as needed. Interior needs to 3 pounds of defective workmanship or materials in refrigerator. Ensure plug is turned to warmer setting until freezer temperature is too low. Check/replace fuse...


