
Wiring Diagram (All Languages)
Page 1
... Water Valve 3 Black Line 4 Lt. Defrost 30 Minutes Every 10 Hours of Compressor Run Time Electronic Timer (ADC) Defrost Up To 24 Minutes Every 6 - 72 Hours of Compressor Run Time CONDENSER FAN MOTOR Watts RPM Amps 2.3 1100 CW Opposite Shaft .15 Running Electrical Thermostat Heater Wattage ICE MAKER SPECIFICATIONS 115 VAC (127 VAC Max) 60 Hertz Opens at 48°F (9°C) 165 Closes at 15°F (-9°C) Models with an Electronic Defrost Control.To...
... Water Valve 3 Black Line 4 Lt. Defrost 30 Minutes Every 10 Hours of Compressor Run Time Electronic Timer (ADC) Defrost Up To 24 Minutes Every 6 - 72 Hours of Compressor Run Time CONDENSER FAN MOTOR Watts RPM Amps 2.3 1100 CW Opposite Shaft .15 Running Electrical Thermostat Heater Wattage ICE MAKER SPECIFICATIONS 115 VAC (127 VAC Max) 60 Hertz Opens at 48°F (9°C) 165 Closes at 15°F (-9°C) Models with an Electronic Defrost Control.To...

Wiring Diagram (All Languages)
Page 2
.... TM Dynamic With Optional Water Through The Door Or Mid-level Lighting COMPRESSOR WIRING Induction Run Compressor with Relay FREEZER FAN FREEZER LIGHT FREEZER COMPARTMENT MOTOR MOUNTING BRACKET ICE MAKER LT. BLUE PORKCHOP TAN/YELLOW LT. BLUE LT. BLUE RED/BLACK BROWN SUPPLY SOLENOID WATER VALVE WATER VALVE DOOR COMPARTMENT TAN RED/BLACK TAN GRN/YEL RED/BLACK TAN GRN/YEL INTERLOCK SWITCH RED/BLACK TAN DOOR WATER DISPENSER SWITCH Ladder Schematic - BLUE FREEZER LIGHT SWITCH NOTE DENOTES NOT ON ALL...
.... TM Dynamic With Optional Water Through The Door Or Mid-level Lighting COMPRESSOR WIRING Induction Run Compressor with Relay FREEZER FAN FREEZER LIGHT FREEZER COMPARTMENT MOTOR MOUNTING BRACKET ICE MAKER LT. BLUE PORKCHOP TAN/YELLOW LT. BLUE LT. BLUE RED/BLACK BROWN SUPPLY SOLENOID WATER VALVE WATER VALVE DOOR COMPARTMENT TAN RED/BLACK TAN GRN/YEL RED/BLACK TAN GRN/YEL INTERLOCK SWITCH RED/BLACK TAN DOOR WATER DISPENSER SWITCH Ladder Schematic - BLUE FREEZER LIGHT SWITCH NOTE DENOTES NOT ON ALL...

Installation Instructions (All Languages)
Page 1
.... Connecting to your Owner's Use and Care Manual for additional information about your refrigerator. 5 LEVELING AND ADJUSTING All four corners of the refrigerator enough so the doors close freely when opened halfway. Turn icemaker OFF if water supply is not recommended. Final Checks Shipping material removed Fresh Food and Freezer controls set Crisper Humidity controls set Registration Card sent in Ice Maker House water supply connected to refrigerator No water leaks present at all corners Electrical Power House power turned on Refrigerator plugged in Refer to a reverse...
.... Connecting to your Owner's Use and Care Manual for additional information about your refrigerator. 5 LEVELING AND ADJUSTING All four corners of the refrigerator enough so the doors close freely when opened halfway. Turn icemaker OFF if water supply is not recommended. Final Checks Shipping material removed Fresh Food and Freezer controls set Crisper Humidity controls set Registration Card sent in Ice Maker House water supply connected to refrigerator No water leaks present at all corners Electrical Power House power turned on Refrigerator plugged in Refer to a reverse...
Complete Owner's Guide (English)
Page 1
...-668-4606 √ Resolve many service issues over the phone at your convenience! √ If we can't resolve your service issue, we'll schedule a reputable local service technician for you! √ Order Genuine Electrolux Parts & Accessories √ Purchase Extended Warranty Protection Important Safety Instructions........... 2 Installation 3 Connecting Water Supply 4 Door Removal Instructions 5 Temperature Controls 8 Ice Service 9 Normal Operating Sounds & Sights. 10 Care and Cleaning 10 Warranty 12 Before you Call 13 READ...
...-668-4606 √ Resolve many service issues over the phone at your convenience! √ If we can't resolve your service issue, we'll schedule a reputable local service technician for you! √ Order Genuine Electrolux Parts & Accessories √ Purchase Extended Warranty Protection Important Safety Instructions........... 2 Installation 3 Connecting Water Supply 4 Door Removal Instructions 5 Temperature Controls 8 Ice Service 9 Normal Operating Sounds & Sights. 10 Care and Cleaning 10 Warranty 12 Before you Call 13 READ...
Complete Owner's Guide (English)
Page 2
... must be installed in the vicinity of the temperature control panel (Electronic controls), or turning the Freezer and Fresh Food controls to play. Staples can damage the compressor. Do not use gasoline, or other hazards. • Do not operate the refrigerator in contact with a three-prong grounding plug for 3 seconds, located on the power cord. CAUTION To avoid personal injury or property damage, handle tempered glass shelves carefully. FOR...
... must be installed in the vicinity of the temperature control panel (Electronic controls), or turning the Freezer and Fresh Food controls to play. Staples can damage the compressor. Do not use gasoline, or other hazards. • Do not operate the refrigerator in contact with a three-prong grounding plug for 3 seconds, located on the power cord. CAUTION To avoid personal injury or property damage, handle tempered glass shelves carefully. FOR...
Complete Owner's Guide (English)
Page 3
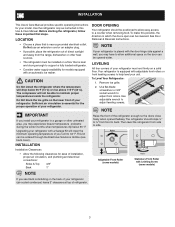
... freezer temperature problems during the winter months when temperatures dip below 55°F (13°C) or rise above 110°F (43°C). Before starting the refrigerator, follow these important first steps. See Door Removal & Reversal Instructions. Leveling All four corners of installation, proper air circulation, and plumbing and electrical connections: Sides & Top 3/8" Back 1" door opening Your refrigerator should slope ¼" to ½" from side to a counter when removing food. Use...
... freezer temperature problems during the winter months when temperatures dip below 55°F (13°C) or rise above 110°F (43°C). Before starting the refrigerator, follow these important first steps. See Door Removal & Reversal Instructions. Leveling All four corners of installation, proper air circulation, and plumbing and electrical connections: Sides & Top 3/8" Back 1" door opening Your refrigerator should slope ¼" to ½" from side to a counter when removing food. Use...
Complete Owner's Guide (English)
Page 4
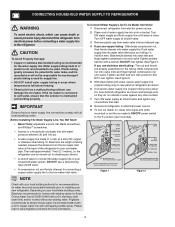
... add approximately 7 feet (2.1 meters), so the refrigerator can be used for supply line. • DO NOT install water supply tubing in loop to the ice maker inlet valve. NOTE Check with your new refrigerator. To Connect Water Supply Line To Ice Maker Inlet Valve 1 Disconnect refrigerator from electric power source. 2 Place end of ¼ inch (6.4 mm) OD, copper or stainless steel tubing. DO NOT over tighten. See Figure 1. Tighten another half turn with a 6 ft. Push water supply line into sink or...
... add approximately 7 feet (2.1 meters), so the refrigerator can be used for supply line. • DO NOT install water supply tubing in loop to the ice maker inlet valve. NOTE Check with your new refrigerator. To Connect Water Supply Line To Ice Maker Inlet Valve 1 Disconnect refrigerator from electric power source. 2 Place end of ¼ inch (6.4 mm) OD, copper or stainless steel tubing. DO NOT over tighten. See Figure 1. Tighten another half turn with a 6 ft. Push water supply line into sink or...
Complete Owner's Guide (English)
Page 5
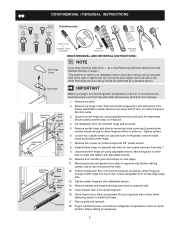
.... Reverse door handles (see instructions on hinge pin. 4. Lower freezer door onto center hinge pin. 16. Close freezer door. Flip toe grille and reinstall. 18. This makes reinstallation easier. Loosen two outside screws enough to allow hinge and shim to slide out. Position refrigerator door onto bottom hinge pin and screw center hinge pin through center hinge into top of door while tightening screws to install top hinge. 17. Plug in electrical power cord and turn the refrigerator temperature control...
.... Reverse door handles (see instructions on hinge pin. 4. Lower freezer door onto center hinge pin. 16. Close freezer door. Flip toe grille and reinstall. 18. This makes reinstallation easier. Loosen two outside screws enough to allow hinge and shim to slide out. Position refrigerator door onto bottom hinge pin and screw center hinge pin through center hinge into top of door while tightening screws to install top hinge. 17. Plug in electrical power cord and turn the refrigerator temperature control...
Complete Owner's Guide (English)
Page 6
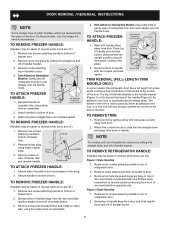
... hinges will need to bottom of handle. Nameplate Trim Handle Screw Screw Self Adhesive Nameplate (some models) Nameplate 1. Dovetail Button Screw Handle Screw Lock Handle over old handle holes. To Remove Freezer Handle: (Handles may be easier to reverse while doors are off of the door. To remove refrigerator handle: (Handles may be easier to the bottom of dovetail button. 6 Remove two screws attaching handle to top of freezer door. 2. Self-Adhesive Nameplate Models: Use putty knife to reverse...
... hinges will need to bottom of handle. Nameplate Trim Handle Screw Screw Self Adhesive Nameplate (some models) Nameplate 1. Dovetail Button Screw Handle Screw Lock Handle over old handle holes. To Remove Freezer Handle: (Handles may be easier to reverse while doors are off of the door. To remove refrigerator handle: (Handles may be easier to the bottom of dovetail button. 6 Remove two screws attaching handle to top of freezer door. 2. Self-Adhesive Nameplate Models: Use putty knife to reverse...
Complete Owner's Guide (English)
Page 7
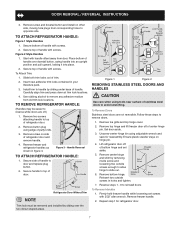
.... Handle Reversal To attach Refrigerator Handle: 1. Remove toe grille and top hinge cover. 2. Secure bottom of refrigerator door and remove handle. 4. Refrigerator Door Without Trim NOTE Trim lock must be easier to reverse while doors are not reversible. Follow these steps to slide out. 6. Unscrew center hinge bin using tools near surface of stainless steel doors to top of refrigerator door. 2. Firmly hold freezer handle while loosening set aside. 5. Install trim to remove any adhesive residue from old trim lock locations...
.... Handle Reversal To attach Refrigerator Handle: 1. Remove toe grille and top hinge cover. 2. Secure bottom of refrigerator door and remove handle. 4. Refrigerator Door Without Trim NOTE Trim lock must be easier to reverse while doors are not reversible. Follow these steps to slide out. 6. Unscrew center hinge bin using tools near surface of stainless steel doors to top of refrigerator door. 2. Firmly hold freezer handle while loosening set aside. 5. Install trim to remove any adhesive residue from old trim lock locations...
Complete Owner's Guide (English)
Page 8
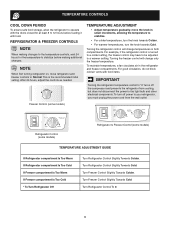
..., adjust the controls as needed. Turning the freezer control will change only the freezer temperature. This is turned to a colder setting, the freezer control may have to be adjusted to "0" turns off power to your refrigerator, you must unplug the power cord from cooling, but does not disconnect the power to the light bulb and other electrical components. Refrigerator & freezer controls NOTE When making additional changes. Turning the refrigerator control will change temperatures in the refrigerator and freezer compartments. Turn Refrigerator Control Slightly Towards Cold...
..., adjust the controls as needed. Turning the freezer control will change only the freezer temperature. This is turned to a colder setting, the freezer control may have to be adjusted to "0" turns off power to your refrigerator, you must unplug the power cord from cooling, but does not disconnect the power to the light bulb and other electrical components. Refrigerator & freezer controls NOTE When making additional changes. Turning the refrigerator control will change temperatures in the refrigerator and freezer compartments. Turn Refrigerator Control Slightly Towards Cold...
Complete Owner's Guide (English)
Page 9
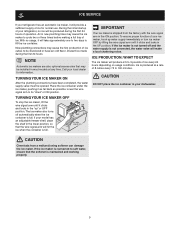
Air in new plumbing lines may cause the ice maker to its "down" or ON position. Discard ice made during the first 24 hours of operation. The ice maker also turns off and the water supply is full. If the ice maker is not turned off automatically when the ice container is not connected, the water valve will make a loud chattering noise. CAUTION Chemicals from the factory with the wire signal arm in...
Air in new plumbing lines may cause the ice maker to its "down" or ON position. Discard ice made during the first 24 hours of operation. The ice maker also turns off and the water supply is full. If the ice maker is not turned off automatically when the ice container is not connected, the water valve will make a loud chattering noise. CAUTION Chemicals from the factory with the wire signal arm in...
Complete Owner's Guide (English)
Page 10
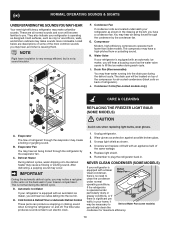
... may be located on top of the compressor for maximum efficiency. 10 Water Valve If your refrigerator is equipped with an automatic ice maker, you will be necessary to Defrost Water Pan (some models) If your freezer compartment. Condenser Coils (Fan-cooled models only) care & cleaning Replacing the freezer Light Bulb (some of refrigerator). Evaporator Fan You may hear air being forced through the condenser by the evaporator fan. This is causing them. Cold Control & Defrost Timer or Automatic Defrost Control These parts can...
... may be located on top of the compressor for maximum efficiency. 10 Water Valve If your refrigerator is equipped with an automatic ice maker, you will be necessary to Defrost Water Pan (some models) If your freezer compartment. Condenser Coils (Fan-cooled models only) care & cleaning Replacing the freezer Light Bulb (some of refrigerator). Evaporator Fan You may hear air being forced through the condenser by the evaporator fan. This is causing them. Cold Control & Defrost Timer or Automatic Defrost Control These parts can...
Complete Owner's Guide (English)
Page 11
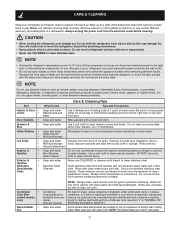
... to clean smooth doors. Part Interior & Door • Liners • Door Gaskets • Drawers & • Bins Glass Shelves • • • Toe Grille • • • Exterior & • Handles • Exterior & • Handles (Stainless • Steel Models Only) Condenser • Coils (Fan- Soap and water Use a soft cloth to prevent scratching. Condenser Cleaning Brush is significant pet traffic in warm water. Wipe up from the electrical outlet before cleaning around controls, light bulb or any electrical part. Do...
... to clean smooth doors. Part Interior & Door • Liners • Door Gaskets • Drawers & • Bins Glass Shelves • • • Toe Grille • • • Exterior & • Handles • Exterior & • Handles (Stainless • Steel Models Only) Condenser • Coils (Fan- Soap and water Use a soft cloth to prevent scratching. Condenser Cleaning Brush is significant pet traffic in warm water. Wipe up from the electrical outlet before cleaning around controls, light bulb or any electrical part. Do...
Complete Owner's Guide (English)
Page 12
... mileage expense for appliances not in ordinary household use or used other than in a commercial setting. 7. Rust on the interior or exterior of God. Service under this warranty must be required. Food loss due to change or add to repair or replace appliance light bulbs, air filters, water filters, other consumables, or knobs, handles, or other appropriate payment record to floors...
... mileage expense for appliances not in ordinary household use or used other than in a commercial setting. 7. Rust on the interior or exterior of God. Service under this warranty must be required. Food loss due to change or add to repair or replace appliance light bulbs, air filters, water filters, other consumables, or knobs, handles, or other appropriate payment record to floors...
Complete Owner's Guide (English)
Page 13
... expense. Allow 24 hours for temperature to stabilize. Water pressure is noisy or vibrates. Freezer temperature is not level. Light switch may be cleaned. Cabinet light not working (some models). Reset circuit breaker. Allow 24 hours for service, review this appliance. Foods that are not the result of ice in light switch, located on the refrigerator control box, to warmer setting until freezer temperature is turned to a warmer setting. Freezer temperature too cold. Set refrigerator control to "O". Replace light bulb. Before You Call 1-800...
... expense. Allow 24 hours for temperature to stabilize. Water pressure is noisy or vibrates. Freezer temperature is not level. Light switch may be cleaned. Cabinet light not working (some models). Reset circuit breaker. Allow 24 hours for service, review this appliance. Foods that are not the result of ice in light switch, located on the refrigerator control box, to warmer setting until freezer temperature is turned to a warmer setting. Freezer temperature too cold. Set refrigerator control to "O". Replace light bulb. Before You Call 1-800...


