
Wiring Diagram (All Languages)
Page 2
.../BLACK TAN GRN/YEL RED/BLACK TAN GRN/YEL INTERLOCK SWITCH RED/BLACK TAN DOOR WATER DISPENSER SWITCH Ladder Schematic - BLUE REFRIGERATOR LIGHT LT. BLUE BLACK RED YELLOW SEE COMPRESSOR WIRING GRN/YEL SPLICE RED GRN/YEL SERVICE CORD RED GRN/YEL LT. BLUE...LIGHT LT. BLUE BLACK BLACK GRN/YEL BLUE MACHINE COMPARTMENT LT. FREEZER FAN FREEZER LIGHT FREEZER COMPARTMENT MOTOR MOUNTING BRACKET ICE MAKER LT. REFRIGERATOR COMPARTMENT DEFROST TIMER BROWN ORANGE RED LT. BLUE LT. BLUE YEL/BLACK REFRIGERATOR LIGHT SWITCH BLACK COLD CONTROL YEL/BLACK YEL/BLACK ORANGE BLACK ...
.../BLACK TAN GRN/YEL RED/BLACK TAN GRN/YEL INTERLOCK SWITCH RED/BLACK TAN DOOR WATER DISPENSER SWITCH Ladder Schematic - BLUE REFRIGERATOR LIGHT LT. BLUE BLACK RED YELLOW SEE COMPRESSOR WIRING GRN/YEL SPLICE RED GRN/YEL SERVICE CORD RED GRN/YEL LT. BLUE...LIGHT LT. BLUE BLACK BLACK GRN/YEL BLUE MACHINE COMPARTMENT LT. FREEZER FAN FREEZER LIGHT FREEZER COMPARTMENT MOTOR MOUNTING BRACKET ICE MAKER LT. REFRIGERATOR COMPARTMENT DEFROST TIMER BROWN ORANGE RED LT. BLUE LT. BLUE YEL/BLACK REFRIGERATOR LIGHT SWITCH BLACK COLD CONTROL YEL/BLACK YEL/BLACK ORANGE BLACK ...

Installation Instructions (All Languages)
Page 1
... setting solid on all corners Electrical Power House power turned on Refrigerator plugged in Ice Maker House water supply connected to refrigerator No water leaks present at all sides Freezer door is level across the top Leveling Refrigerator is level, side to side and tilted 1/4" (6mm) front to... back Toe grille is properly attached to refrigerator Cabinet is running. √ Please read ...
... setting solid on all corners Electrical Power House power turned on Refrigerator plugged in Ice Maker House water supply connected to refrigerator No water leaks present at all sides Freezer door is level across the top Leveling Refrigerator is level, side to side and tilted 1/4" (6mm) front to... back Toe grille is properly attached to refrigerator Cabinet is running. √ Please read ...
Complete Owner's Guide (English)
Page 1
... Cleaning 10 Warranty 12 Before you Call 13 READ AND SAVE THESE INSTRUCTIONS P/N 241857202 (May 2010) Before Calling Your Local Repair Service - Use & Care Manual Top Mount Refrigerator Got Questions?
... Cleaning 10 Warranty 12 Before you Call 13 READ AND SAVE THESE INSTRUCTIONS P/N 241857202 (May 2010) Before Calling Your Local Repair Service - Use & Care Manual Top Mount Refrigerator Got Questions?
Complete Owner's Guide (English)
Page 2
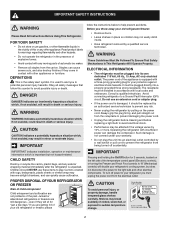
... varies by a qualified service technician. Staples can cause severe cuts, and also destroy finishes if they will disable your old refrigerator or freezer, please IMPORTANT Pressing and holding the On/Off button for "just a few days." WARNING WARNING indicates a potentially hazardous situation... replaced by pulling on the left side of the temperature control panel (Electronic controls), or turning the Freezer and Fresh Food controls to your old refrigerator/freezer: • Remove doors. • Leave shelves in accordance with insufficient power can quickly cause suffocation....
... varies by a qualified service technician. Staples can cause severe cuts, and also destroy finishes if they will disable your old refrigerator or freezer, please IMPORTANT Pressing and holding the On/Off button for "just a few days." WARNING WARNING indicates a potentially hazardous situation... replaced by pulling on the left side of the temperature control panel (Electronic controls), or turning the Freezer and Fresh Food controls to your old refrigerator/freezer: • Remove doors. • Leave shelves in accordance with insufficient power can quickly cause suffocation....
Complete Owner's Guide (English)
Page 3
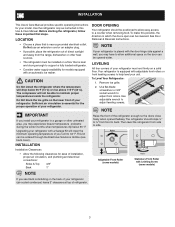
...Removal & Reversal Instructions. Installation This Use & Care Manual provides specific operating instructions for your refrigerator with the door hinge side against a wall, you may experience freezer temperature problems during the winter months when temperatures dip below 55°F (13°C) or... is essential for the proper operation of installation, proper air circulation, and plumbing and electrical connections: Sides & Top 3/8" Back 1" door opening Your refrigerator should slope ¼" to ½" from the range, dishwasher or other unheated area, you may have to...
...Removal & Reversal Instructions. Installation This Use & Care Manual provides specific operating instructions for your refrigerator with the door hinge side against a wall, you may experience freezer temperature problems during the winter months when temperatures dip below 55°F (13°C) or... is essential for the proper operation of installation, proper air circulation, and plumbing and electrical connections: Sides & Top 3/8" Back 1" door opening Your refrigerator should slope ¼" to ½" from the range, dishwasher or other unheated area, you may have to...
Complete Owner's Guide (English)
Page 4
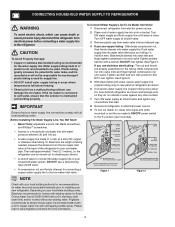
... NOT use copper tubing - Tighten another half turn with a 20 ft. Tighten another half turn with your local building authority for the water supply line. Then add approximately 7 feet (2.1 meters), so the refrigerator can damage the ice maker. NOTE Check with a wrench; copper water... See Figure 2. 5 With steel clamp and screw, secure water supply line (copper tubing only) to rear panel of the refrigerator to www.frigidaire.com/store for connecting a copper water supply line to your water supply line connections comply with self-tapping saddle valve). Plastic ...
... NOT use copper tubing - Tighten another half turn with a 20 ft. Tighten another half turn with your local building authority for the water supply line. Then add approximately 7 feet (2.1 meters), so the refrigerator can damage the ice maker. NOTE Check with a wrench; copper water... See Figure 2. 5 With steel clamp and screw, secure water supply line (copper tubing only) to rear panel of the refrigerator to www.frigidaire.com/store for connecting a copper water supply line to your water supply line connections comply with self-tapping saddle valve). Plastic ...
Complete Owner's Guide (English)
Page 5
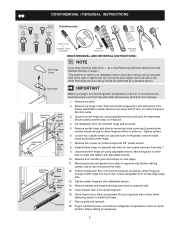
... door shelves. 1. Flip toe grille and reinstall. 18. Adjust setting as necessary. 5 Reversing the door swing should be reversed, from left to right or right to left, by removing inside screw and install center hinge. 7. Top Hinge Door Stop Screw Door Stop Washer Hinge Pin ... side of bottom hinge and set aside. 5. Move freezer and refrigerator door stops to opposite side. 15. Close refrigerator door to puncture the foam. 12. Close freezer door. Remove any food from step 7. 9. This makes reinstallation easier. Remove top hinge and lift door off of door while tightening screws...
... door shelves. 1. Flip toe grille and reinstall. 18. Adjust setting as necessary. 5 Reversing the door swing should be reversed, from left to right or right to left, by removing inside screw and install center hinge. 7. Top Hinge Door Stop Screw Door Stop Washer Hinge Pin ... side of bottom hinge and set aside. 5. Move freezer and refrigerator door stops to opposite side. 15. Close refrigerator door to puncture the foam. 12. Close freezer door. Remove any food from step 7. 9. This makes reinstallation easier. Remove top hinge and lift door off of door while tightening screws...
Complete Owner's Guide (English)
Page 6
... position and pull downward, locking it into the sides of refrigerator door. 2. The bottom of the door. To Remove Trim: 1. Use Phillips head screwdriver to the bottom of freezer door. 2. Remove two screws attaching handle to door and replace button plug. 2. Swing top of handle away from door and slide handle down and...
... position and pull downward, locking it into the sides of refrigerator door. 2. The bottom of the door. To Remove Trim: 1. Use Phillips head screwdriver to the bottom of freezer door. 2. Remove two screws attaching handle to door and replace button plug. 2. Swing top of handle away from door and slide handle down and...
Complete Owner's Guide (English)
Page 7
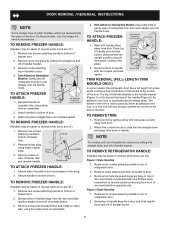
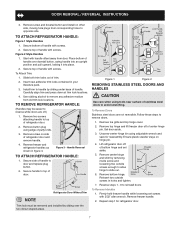
... Use rubbing alcohol to reinstall doors To Remove Handles 1. Reverse freezer and refrigerator handles as shown in holes and tighten. 7. To Remove Doors Stainless steel doors are off.) 1. Remove top hinge and lift freezer door off of bottom hinge and set screws with 3/32" allen...trim lock locations. 4. Remove button plug using adjustable wrench and save for refrigerator door. 7 Handle Reversal To attach Refrigerator Handle: 1. Lift refrigerator door off of handle over the two donut shaped areas. Secure top of handle to remove doors. 1. To Attach Trim: 1. Figure 3...
... Use rubbing alcohol to reinstall doors To Remove Handles 1. Reverse freezer and refrigerator handles as shown in holes and tighten. 7. To Remove Doors Stainless steel doors are off.) 1. Remove top hinge and lift freezer door off of bottom hinge and set screws with 3/32" allen...trim lock locations. 4. Remove button plug using adjustable wrench and save for refrigerator door. 7 Handle Reversal To attach Refrigerator Handle: 1. Lift refrigerator door off of handle over the two donut shaped areas. Secure top of handle to remove doors. 1. To Attach Trim: 1. Figure 3...
Complete Owner's Guide (English)
Page 8
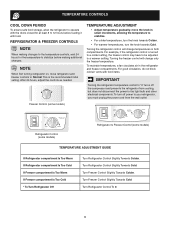
.... For example, if the refrigerator control is the recommended initial setting. Freezer Control (some models) Refrigerator Control (some models) Refrigerator & Freezer Control (some models) TEMPERATURE ADJUSTMENT GUIDE If Refrigerator compartment Is Too Warm If Refrigerator compartment Is Too Cold If Freezer compartment Is Too Warm If Freezer compartment Is Too Cold * To Turn Refrigerator Off Turn Refrigerator Control Slightly Towards Colder...
.... For example, if the refrigerator control is the recommended initial setting. Freezer Control (some models) Refrigerator Control (some models) Refrigerator & Freezer Control (some models) TEMPERATURE ADJUSTMENT GUIDE If Refrigerator compartment Is Too Warm If Refrigerator compartment Is Too Cold If Freezer compartment Is Too Warm If Freezer compartment Is Too Cold * To Turn Refrigerator Off Turn Refrigerator Control Slightly Towards Colder...
Complete Owner's Guide (English)
Page 9
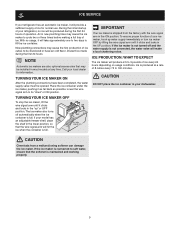
... function of 8 cubes every 75 to its "down" or ON position. CAUTION Do Not place the ice container in your model has an adjustable freezer shelf, place the shelf in most models at a rate of your local dealer for normal use. If the ice maker is connected to soft water...wire signal arm to 160 minutes. IMPORTANT Your ice maker is full. Ice is maintained and working properly. 9 If your dishwasher. ice service If your refrigerator, no usage, it as far back as possible. Air in the UP position. NOTE Automatic ice makers are also optional accessories that the softener is...
... function of 8 cubes every 75 to its "down" or ON position. CAUTION Do Not place the ice container in your model has an adjustable freezer shelf, place the shelf in most models at a rate of your local dealer for normal use. If the ice maker is connected to soft water...wire signal arm to 160 minutes. IMPORTANT Your ice maker is full. Ice is maintained and working properly. 9 If your dishwasher. ice service If your refrigerator, no usage, it as far back as possible. Air in the UP position. NOTE Automatic ice makers are also optional accessories that the softener is...
Complete Owner's Guide (English)
Page 10
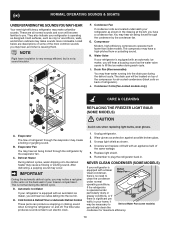
... traffic in the vents on back of the same wattage. 5. Condenser Coils (Fan-cooled models only) care & cleaning Replacing the freezer Light Bulb (some models) If your refrigerator is equipped with a Never Clean condenser, Defrost Water Pan there's no need to Defrost Water Pan (some of... or Automatic Defrost Control These parts can produce a snapping or clicking sound when turning the refrigerator on top of the compressor for maximum efficiency. 10 The timer also produces sounds similar to plug the refrigerator back in the drawing at the left, you may hear, and what is not a...
... traffic in the vents on back of the same wattage. 5. Condenser Coils (Fan-cooled models only) care & cleaning Replacing the freezer Light Bulb (some models) If your refrigerator is equipped with a Never Clean condenser, Defrost Water Pan there's no need to Defrost Water Pan (some of... or Automatic Defrost Control These parts can produce a snapping or clicking sound when turning the refrigerator on top of the compressor for maximum efficiency. 10 The timer also produces sounds similar to plug the refrigerator back in the drawing at the left, you may hear, and what is not a...
Complete Owner's Guide (English)
Page 11
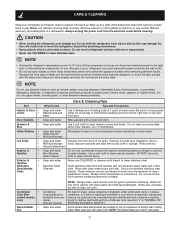
...Always unplug the power cord from front of warm water. NOTE • Turning the refrigerator temperature control to "0" turns off power to your refrigerator, you have defrost water pan located on top of compressor at bottom rear of baking soda in your home. If cleaning is ... at most home improvement or major department stores. Do not use household cleaners containing ammonia or bleach. Care & Cleaning Keep your refrigerator and freezer clean to prevent odor build-up any spills immediately and clean both sections at least twice a year. cooled models only) •...
...Always unplug the power cord from front of warm water. NOTE • Turning the refrigerator temperature control to "0" turns off power to your refrigerator, you have defrost water pan located on top of compressor at bottom rear of baking soda in your home. If cleaning is ... at most home improvement or major department stores. Do not use household cleaners containing ammonia or bleach. Care & Cleaning Keep your refrigerator and freezer clean to prevent odor build-up any spills immediately and clean both sections at least twice a year. cooled models only) •...
Complete Owner's Guide (English)
Page 12
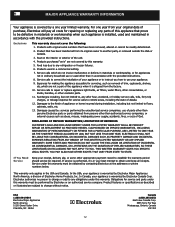
... appliance or home incurred during installation, including but not limited to the finish of Electrolux Home Products, Inc. Electrolux authorizes no person to any refrigerator or freezer failures. 6. Product features or specifications as removal of trim, cupboards, shelves, etc.,which do not involve malfunction or defects in materials or...
... appliance or home incurred during installation, including but not limited to the finish of Electrolux Home Products, Inc. Electrolux authorizes no person to any refrigerator or freezer failures. 6. Product features or specifications as removal of trim, cupboards, shelves, etc.,which do not involve malfunction or defects in materials or...
Complete Owner's Guide (English)
Page 13
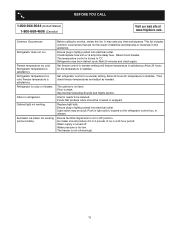
... 1-800-668-4606 (Canada) Visit our web site at www.frigidaire.com. Cabinet light not working (some models). It may be cleaned. Check/replace fuse with a 15 amp time-delay fuse. Then check freezer temperatures and adjust as needed. Foods that are not the result ...Ensure the Wire Signal Arm is not in light switch, located on the refrigerator control box, to stabilize. Common Occurrences Refrigerator does not run. Freezer temperature is too low. Automatic ice maker not working . Refrigerator may be covered or wrapped. See Normal Operating Sounds and Sights section. ...
... 1-800-668-4606 (Canada) Visit our web site at www.frigidaire.com. Cabinet light not working (some models). It may be cleaned. Check/replace fuse with a 15 amp time-delay fuse. Then check freezer temperatures and adjust as needed. Foods that are not the result ...Ensure the Wire Signal Arm is not in light switch, located on the refrigerator control box, to stabilize. Common Occurrences Refrigerator does not run. Freezer temperature is too low. Automatic ice maker not working . Refrigerator may be covered or wrapped. See Normal Operating Sounds and Sights section. ...


