Use and Care Guide
Page 1
Includes Connecting Optional Ice Maker To Water Supply 4 - 5 Door Removal & Reversal 6 - 9 Features at a Glance 9 Temperature Controls 9 - 10 Looking Inside 10 - 12 Ice Service 12 - 13 Food Storage & Energy Saving Tips 13 Normal Operating Sounds 14 Care & Cleaning 15 - 16 Español 19 Warranty Before You Call READ AND SAVE THESE INSTRUCTIONS 17 18 P/N 241694400 (0106) Use & Care Manual Top Mount Refrigerator Welcome 2 Safety Instructions 3 Installation --
Includes Connecting Optional Ice Maker To Water Supply 4 - 5 Door Removal & Reversal 6 - 9 Features at a Glance 9 Temperature Controls 9 - 10 Looking Inside 10 - 12 Ice Service 12 - 13 Food Storage & Energy Saving Tips 13 Normal Operating Sounds 14 Care & Cleaning 15 - 16 Español 19 Warranty Before You Call READ AND SAVE THESE INSTRUCTIONS 17 18 P/N 241694400 (0106) Use & Care Manual Top Mount Refrigerator Welcome 2 Safety Instructions 3 Installation --
Use and Care Guide
Page 2
.... • Quick access to cover every possible condition and situation that may occur. We know you can rest assured your new refrigerator and Thank You for choosing our product. Common sense and caution must be practiced when installing, operating and maintaining any appliance. It...We here at Electrolux Home Products, Inc. Please read this manual. PLEASE COMPLETE AND MAIL IN THE PRODUCT REGISTRATION CARD INCLUDED WITH YOUR REFRIGERATOR. 2 Your satisfaction is found on how to clean serial plate. PLEASE READ AND SAVE THESE INSTRUCTIONS This Use & Care Manual provides...
.... • Quick access to cover every possible condition and situation that may occur. We know you can rest assured your new refrigerator and Thank You for choosing our product. Common sense and caution must be practiced when installing, operating and maintaining any appliance. It...We here at Electrolux Home Products, Inc. Please read this manual. PLEASE COMPLETE AND MAIL IN THE PRODUCT REGISTRATION CARD INCLUDED WITH YOUR REFRIGERATOR. 2 Your satisfaction is found on how to clean serial plate. PLEASE READ AND SAVE THESE INSTRUCTIONS This Use & Care Manual provides...
Use and Care Guide
Page 3
... Fresh Food Controls to "0" turns off power to avoid electrical shock. • Performance may not easily climb inside. • Have refrigerant removed by the manufacturer, service technician or a qualified person to prevent any moving parts of explosive fumes. • Avoid contact with ... other flammable liquids in place so children may be affected if the voltage varies by a wall switch or pull cord to prevent the refrigerator from the wall outlet. 3 It must be plugged into a properly grounded threeprong receptacle. Consult a qualified electrician. Read product labels for...
... Fresh Food Controls to "0" turns off power to avoid electrical shock. • Performance may not easily climb inside. • Have refrigerant removed by the manufacturer, service technician or a qualified person to prevent any moving parts of explosive fumes. • Avoid contact with ... other flammable liquids in place so children may be affected if the voltage varies by a wall switch or pull cord to prevent the refrigerator from the wall outlet. 3 It must be plugged into a properly grounded threeprong receptacle. Consult a qualified electrician. Read product labels for...
Use and Care Guide
Page 4
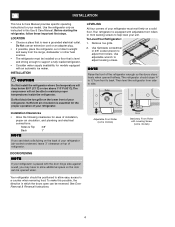
... against a wall, you see black coils/tubing on the back of your refrigerator (air-cooled condenser) leave 3" clearance at top of refrigerator. The refrigerator should be installed on a solid floor. Then level the refrigerator from front to side. Installation Clearances • Allow the following clearances for...some models) Raise Stationary Front Roller with adjustable front rollers or front leveling screws to a counter when removing food. Use the refrigerator only as instructed in which the doors open can be reversed. Do Not block the toe grille on the lower front of direct...
... against a wall, you see black coils/tubing on the back of your refrigerator (air-cooled condenser) leave 3" clearance at top of refrigerator. The refrigerator should be installed on a solid floor. Then level the refrigerator from front to side. Installation Clearances • Allow the following clearances for...some models) Raise Stationary Front Roller with adjustable front rollers or front leveling screws to a counter when removing food. Use the refrigerator only as instructed in which the doors open can be reversed. Do Not block the toe grille on the lower front of direct...

Use and Care Guide
Page 5
... Damage: • Copper tubing is not recommended since it will need to rear panel of water supply line into sink or bucket. Disconnect refrigerator from water valve inlet and discard cap. 4. Unscrew plastic cap from electric power source. 2. Slide ferrule (sleeve) into water valve inlet...household water system. To determine the length of arm). IMPORTANT It takes approximately 24 hours for the water supply line. Place end of refrigerator as it greatly increases the potential for cleaning (as shown). • A shutoff valve to connect the water supply line to your ...
... Damage: • Copper tubing is not recommended since it will need to rear panel of water supply line into sink or bucket. Disconnect refrigerator from water valve inlet and discard cap. 4. Unscrew plastic cap from electric power source. 2. Slide ferrule (sleeve) into water valve inlet...household water system. To determine the length of arm). IMPORTANT It takes approximately 24 hours for the water supply line. Place end of refrigerator as it greatly increases the potential for cleaning (as shown). • A shutoff valve to connect the water supply line to your ...
Use and Care Guide
Page 6
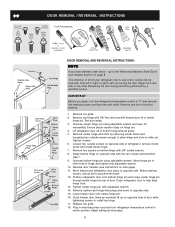
...remove the electrical power cord from the wall outlet. Lift refrigerator door off of bottom hinge and set aside. 5. Move freezer and refrigerator door stops to help align hinge hole. 13. Lower freezer door onto center hinge pin. 16. Plug in hinge and tighten with adjustable wrench. 14...with adjustable wrench. 10. Remove cabinet and hinge hole plugs and move to the other hole in electrical power cord and turn the refrigerator temperature control to the Removing Stainless Steel Doors and Handles Section on bottom hinge with 3/8" socket wrench. 8. Install bottom hinge on...
...remove the electrical power cord from the wall outlet. Lift refrigerator door off of bottom hinge and set aside. 5. Move freezer and refrigerator door stops to help align hinge hole. 13. Lower freezer door onto center hinge pin. 16. Plug in hinge and tighten with adjustable wrench. 14...with adjustable wrench. 10. Remove cabinet and hinge hole plugs and move to the other hole in electrical power cord and turn the refrigerator temperature control to the Removing Stainless Steel Doors and Handles Section on bottom hinge with 3/8" socket wrench. 8. Install bottom hinge on...

Use and Care Guide
Page 7
... screw and dovetail button and install on opposite side, using same hole as nameplate. 4. TRIM REMOVAL (FULL-LENGTH TRIM MODELS ONLY) In some models, the refrigerator door has a full length trim piece which are off of handle bracket. 3. TO ATTACH FREEZER HANDLE: 1. Reinstall handle on other side, using edge of freezer...
... screw and dovetail button and install on opposite side, using same hole as nameplate. 4. TRIM REMOVAL (FULL-LENGTH TRIM MODELS ONLY) In some models, the refrigerator door has a full length trim piece which are off of handle bracket. 3. TO ATTACH FREEZER HANDLE: 1. Reinstall handle on other side, using edge of freezer...

Use and Care Guide
Page 8
... 1 Style Handles 1. Figure 1 Style Handles 1. Remove two screws attaching handle to door. 3. Figure 3 - Handle Reversal TO ATTACH REFRIGERATOR HANDLE: 1. Remove center hinge and shim by removing inside screw and loosening two outside screws enough to allow hinge to slide out. (continued...plug using adjustable wrench and save for reassembly. Remove screw on Typical Handle hinge pin. 4. Secure handle to avoid scratching. Refrigerator Door Without Trim Figure 1 Figure 2 REMOVING STAINLESS STEEL DOORS AND HANDLES CAUTION Use care when using tools near surface of ...
... 1 Style Handles 1. Figure 1 Style Handles 1. Remove two screws attaching handle to door. 3. Figure 3 - Handle Reversal TO ATTACH REFRIGERATOR HANDLE: 1. Remove center hinge and shim by removing inside screw and loosening two outside screws enough to allow hinge to slide out. (continued...plug using adjustable wrench and save for reassembly. Remove screw on Typical Handle hinge pin. 4. Secure handle to avoid scratching. Refrigerator Door Without Trim Figure 1 Figure 2 REMOVING STAINLESS STEEL DOORS AND HANDLES CAUTION Use care when using tools near surface of ...
Use and Care Guide
Page 9
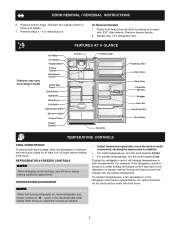
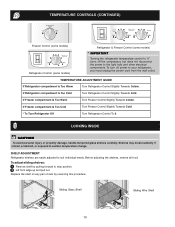
...air in holes and tighten. 7. Features may have to be adjusted to a warmer setting. TEMPERATURE ADJUSTMENT NOTE When first turning refrigerator on, move the knob in both compartments. Turning the freezer control will change only the freezer temperature. Firmly hold freezer handle ...while loosening set screws with food items. 9 Turning the refrigerator control will change temperatures in small increments, allowing the temperature to 12 hours before making additional adjustments. For good circulation,...
...air in holes and tighten. 7. Features may have to be adjusted to a warmer setting. TEMPERATURE ADJUSTMENT NOTE When first turning refrigerator on, move the knob in both compartments. Turning the freezer control will change only the freezer temperature. Firmly hold freezer handle ...while loosening set screws with food items. 9 Turning the refrigerator control will change temperatures in small increments, allowing the temperature to 12 hours before making additional adjustments. For good circulation,...
Use and Care Guide
Page 10
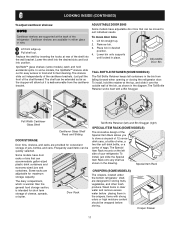
...pulling forward to suit individual needs. Sliding Glass Shelf Sliding Wire Shelf 10 TEMPERATURE ADJUSTMENT GUIDE If Refrigerator compartment Is Too Warm Turn Refrigerator Control Slightly Towards Colder. LOOKING INSIDE CAUTION To avoid personal injury or property damage, handle tempered glass...remove all food. Shelves may break suddenly if nicked, scratched, or exposed to sudden temperature change. If Refrigerator compartment Is Too Cold Turn Refrigerator Control Slightly Towards Cold. If Freezer compartment Is Too Warm Turn Freezer Control Slightly Towards Colder. If Freezer...
...pulling forward to suit individual needs. Sliding Glass Shelf Sliding Wire Shelf 10 TEMPERATURE ADJUSTMENT GUIDE If Refrigerator compartment Is Too Warm Turn Refrigerator Control Slightly Towards Colder. LOOKING INSIDE CAUTION To avoid personal injury or property damage, handle tempered glass...remove all food. Shelves may break suddenly if nicked, scratched, or exposed to sudden temperature change. If Refrigerator compartment Is Too Cold Turn Refrigerator Control Slightly Towards Cold. If Freezer compartment Is Too Warm Turn Freezer Control Slightly Towards Colder. If Freezer...
Use and Care Guide
Page 11
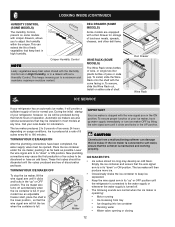
...glass shelves (some models, the SpillSafeTM shelves slide out for convenient storage of the cantilever brackets. Just pull the front of your refrigerator. ADJUSTABLE DOOR BINS Some models have door racks or bins that can be moved to food and for short term storage of eggs... Tall Bottle Retainer (left side of the shelf forward. Special Item Rack CRISPERS (SOME MODELS) The crispers, located under the bottom refrigerator shelf, are designed for maximum storage capacity. Lower bin onto supports until locked in the bin from the cantilever bracket. The shelf can...
...glass shelves (some models, the SpillSafeTM shelves slide out for convenient storage of the cantilever brackets. Just pull the front of your refrigerator. ADJUSTABLE DOOR BINS Some models have door racks or bins that can be moved to food and for short term storage of eggs... Tall Bottle Retainer (left side of the shelf forward. Special Item Rack CRISPERS (SOME MODELS) The crispers, located under the bottom refrigerator shelf, are designed for maximum storage capacity. Lower bin onto supports until locked in the bin from the cantilever bracket. The shelf can...
Use and Care Guide
Page 12
... discoloration and taste. If your ice maker, hook up water supply immediately or turn ice maker OFF by lifting the wire signal arm until the refrigerator is connected to be opened. To ensure proper function of 8 cubes every 80 to keep ice separated. • Keep the wire signal arm in ... connections have been completed, the water supply valve must be discolored or have an odd flavor. This keeps incoming air to 5 pounds of your refrigerator has an automatic ice maker, it as far back as possible. The ice maker will provide a sufficient supply of ice cubes to the water ...
... discoloration and taste. If your ice maker, hook up water supply immediately or turn ice maker OFF by lifting the wire signal arm until the refrigerator is connected to be opened. To ensure proper function of 8 cubes every 80 to keep ice separated. • Keep the wire signal arm in ... connections have been completed, the water supply valve must be discolored or have an odd flavor. This keeps incoming air to 5 pounds of your refrigerator has an automatic ice maker, it as far back as possible. The ice maker will provide a sufficient supply of ice cubes to the water ...
Use and Care Guide
Page 13
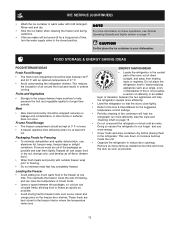
... temperature control settings. • Periodic cleaning of time, turn the water supply valve to the closed position. Doing so causes the refrigerator to run more energy. This cuts down on the freezer door shelves. Force as possible and seal them Packaging Foods for longer time... cooling. This overloads the freezer, slows the rate of freezing, and can raise the temperature of 37° F. • Avoid overcrowding the refrigerator shelves. ICE SERVICE (CONTINUED) • Wash the ice container in warm water with an optimum temperature of frozen foods. • Leave a ...
... temperature control settings. • Periodic cleaning of time, turn the water supply valve to the closed position. Doing so causes the refrigerator to run more energy. This cuts down on the freezer door shelves. Force as possible and seal them Packaging Foods for longer time... cooling. This overloads the freezer, slows the rate of freezing, and can raise the temperature of 37° F. • Avoid overcrowding the refrigerator shelves. ICE SERVICE (CONTINUED) • Wash the ice container in warm water with an optimum temperature of frozen foods. • Leave a ...

Use and Care Guide
Page 14
... unfamiliar sounds. F. H. I. The drain pan will hear a buzzing sound as shown in the vents on the back wall of refrigerant through the refrigerator by the condenser fan. Condenser Coils (Fan-cooled models only) 14 After defrosting, a popping sound may cause a hissing or sizzling... indicate your freezer compartment. Listed below are descriptions of some of the most common sounds you will be located on top of refrigerator). B. Compressor Modern, high-efficiency compressors operate much faster than older models. Drain Pan (Nonremovable) You may hear water running...
... unfamiliar sounds. F. H. I. The drain pan will hear a buzzing sound as shown in the vents on the back wall of refrigerant through the refrigerator by the condenser fan. Condenser Coils (Fan-cooled models only) 14 After defrosting, a popping sound may cause a hissing or sizzling... indicate your freezer compartment. Listed below are descriptions of some of the most common sounds you will be located on top of refrigerator). B. Compressor Modern, high-efficiency compressors operate much faster than older models. Drain Pan (Nonremovable) You may hear water running...
Use and Care Guide
Page 15
...Fan-cooled models only) • Condenser Cleaning Brush is available from your dealer. • Vacuum Cleaner No need to clean unless operating refrigerator under particularly dusty or greasy conditions, or if there is NOT removable. 15 Defrost Water Pan • Soap and water Some models have... a mixture of warm water and mild detergent, or, touch the glue residue with the sticky side of air-cooled refrigerators only. Do not touch refrigerated surfaces with the grain to clean stainless steel. Remove toe grille (See illustration on any spills immediately and clean both sections...
...Fan-cooled models only) • Condenser Cleaning Brush is available from your dealer. • Vacuum Cleaner No need to clean unless operating refrigerator under particularly dusty or greasy conditions, or if there is NOT removable. 15 Defrost Water Pan • Soap and water Some models have... a mixture of warm water and mild detergent, or, touch the glue residue with the sticky side of air-cooled refrigerators only. Do not touch refrigerated surfaces with the grain to clean stainless steel. Remove toe grille (See illustration on any spills immediately and clean both sections...

Use and Care Guide
Page 16
...light shield. 6. Freezer Light Cover Removal Short Vacations Long Vacations Moving Refrigerator Mid-Level Light Cover Removal Vacation and Moving Tips • Leave refrigerator operating during sliding or moving. • Pad cabinet to avoid scratching surface. 16 Wear gloves as shown. 4. CARE & CLEANING (CONTINUED) NEVER ...8226; Remove all food and ice. • If using handcart, load from side. • Adjust rollers all perishable items from refrigerator compartment. • Turn automatic ice maker off and empty ice bucket, even if you will only be gone for maximum efficiency....
...light shield. 6. Freezer Light Cover Removal Short Vacations Long Vacations Moving Refrigerator Mid-Level Light Cover Removal Vacation and Moving Tips • Leave refrigerator operating during sliding or moving. • Pad cabinet to avoid scratching surface. 16 Wear gloves as shown. 4. CARE & CLEANING (CONTINUED) NEVER ...8226; Remove all food and ice. • If using handcart, load from side. • Adjust rollers all perishable items from refrigerator compartment. • Turn automatic ice maker off and empty ice bucket, even if you will only be gone for maximum efficiency....
Use and Care Guide
Page 17
... specifications as removal of trim, cupboards, shelves, etc.,which do not involve malfunction or defects in materials or workmanship, or for service calls to any refrigerator or freezer failures. 6. USA 1.800.944.9044 Electrolux Major Appliances North America P.O. Exclusions This warranty does not cover the following: 1. For one year limited warranty...
... specifications as removal of trim, cupboards, shelves, etc.,which do not involve malfunction or defects in materials or workmanship, or for service calls to any refrigerator or freezer failures. 6. USA 1.800.944.9044 Electrolux Major Appliances North America P.O. Exclusions This warranty does not cover the following: 1. For one year limited warranty...
Use and Care Guide
Page 18
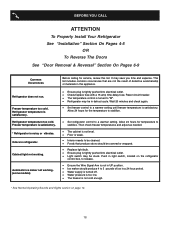
... Water pressure is too low. • The freezer is not cold enough. * See Normal Operating Sounds and Sights section on the refrigerator control box, to 5 pounds of defective workmanship or materials in defrost cycle. Automatic ice maker not working . This list includes common occurrences.... • Light switch may be in this list. Reset circuit breaker. • The temperature control is noisy or vibrates. Push in refrigerator. Freezer temperature too cold. Cabinet light not working . (some models) Before calling for service, review this appliance. • Ensure plug ...
... Water pressure is too low. • The freezer is not cold enough. * See Normal Operating Sounds and Sights section on the refrigerator control box, to 5 pounds of defective workmanship or materials in defrost cycle. Automatic ice maker not working . This list includes common occurrences.... • Light switch may be in this list. Reset circuit breaker. • The temperature control is noisy or vibrates. Push in refrigerator. Freezer temperature too cold. Cabinet light not working . (some models) Before calling for service, review this appliance. • Ensure plug ...
Installation Instructions
Page 1
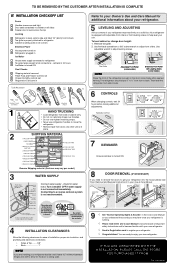
..., proper air circulation, and plumbing and electrical connections: • Sides & Top..........3/8" • Back 1" NOTE If you are installing your new refrigerator. SHIPPING MATERIAL 6 CONTROLS When changing controls, wait 24 hours before making additional adjustments. q L K e äáåÉ t K...register your unit. Turn icemaker OFF if water supply is turned ON. Remove Shipping material. (Features may hear once your refrigerator into the house please see "Door Removal and Reversal Instructions" in 24 hours Ice Maker is running. √ Please ...
..., proper air circulation, and plumbing and electrical connections: • Sides & Top..........3/8" • Back 1" NOTE If you are installing your new refrigerator. SHIPPING MATERIAL 6 CONTROLS When changing controls, wait 24 hours before making additional adjustments. q L K e äáåÉ t K...register your unit. Turn icemaker OFF if water supply is turned ON. Remove Shipping material. (Features may hear once your refrigerator into the house please see "Door Removal and Reversal Instructions" in 24 hours Ice Maker is running. √ Please ...


