Use and Care Guide
Page 1
Use & Care Manual Top Mount Refrigerator Welcome 2 Safety Instructions 3 Installation -- Includes Connecting Optional Ice Maker To Water Supply 4 - 5 Door Removal & Reversal 6 - 9 Features at a Glance 9 Temperature Controls 9 - 10 Looking Inside 10 - 12 Ice Service 12 - 13 Food Storage & Energy Saving Tips 13 Normal Operating Sounds 14 Care & Cleaning 15 - 16 Español 19 Warranty Before You Call READ AND SAVE THESE INSTRUCTIONS 17 18 P/N 241694400 (0106)
Use & Care Manual Top Mount Refrigerator Welcome 2 Safety Instructions 3 Installation -- Includes Connecting Optional Ice Maker To Water Supply 4 - 5 Door Removal & Reversal 6 - 9 Features at a Glance 9 Temperature Controls 9 - 10 Looking Inside 10 - 12 Ice Service 12 - 13 Food Storage & Energy Saving Tips 13 Normal Operating Sounds 14 Care & Cleaning 15 - 16 Español 19 Warranty Before You Call READ AND SAVE THESE INSTRUCTIONS 17 18 P/N 241694400 (0106)
Use and Care Guide
Page 2
.... NOTE Use only soap and water to cover every possible condition and situation that may occur. Please attach sales receipt here for your model. Please read this manual. It contains valuable information on your serial plate located inside the refrigerator compartment. This information is repaired with the best service possible. PLEASE READ AND SAVE THESE INSTRUCTIONS This Use & Care Manual provides specific operating instructions for future reference. Model Number: Serial Number: Purchase...
.... NOTE Use only soap and water to cover every possible condition and situation that may occur. Please attach sales receipt here for your model. Please read this manual. It contains valuable information on your serial plate located inside the refrigerator compartment. This information is repaired with the best service possible. PLEASE READ AND SAVE THESE INSTRUCTIONS This Use & Care Manual provides specific operating instructions for future reference. Model Number: Serial Number: Purchase...
Use and Care Guide
Page 3
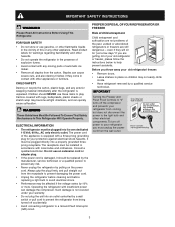
... from cooling, but does not disconnect the power to your refrigerator you are getting rid of the past. Junked or abondoned refrigerators or freezers are not problems of your protection against electrical shock hazards. IMPORTANT Turning the Freezer and Fresh Food Controls to "0" turns off power to the light bulb and other appliance. ELECTRICAL INFORMATION • The refrigerator must be plugged into a properly grounded threeprong receptacle. Operating the refrigerator with...
... from cooling, but does not disconnect the power to your refrigerator you are getting rid of the past. Junked or abondoned refrigerators or freezers are not problems of your protection against electrical shock hazards. IMPORTANT Turning the Freezer and Fresh Food Controls to "0" turns off power to the light bulb and other appliance. ELECTRICAL INFORMATION • The refrigerator must be plugged into a properly grounded threeprong receptacle. Operating the refrigerator with...
Use and Care Guide
Page 4
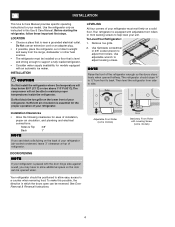
... or 3/8" socket wrench to adjust leveling screws. INSTALLATION This Use & Care Manual provides specific operating instructions for your refrigerator. Adjustable Front Roller (some models) Raise Stationary Front Roller with an automatic ice maker. NOTE Raise the front of your model. See Door Removal & Reversal Instructions. 4 LOCATION • Choose a place that is level and strong enough to support a fully loaded refrigerator. • Consider water supply availability for models equipped with Leveling Screw (some models) Your refrigerator should slope ¼" to...
... or 3/8" socket wrench to adjust leveling screws. INSTALLATION This Use & Care Manual provides specific operating instructions for your refrigerator. Adjustable Front Roller (some models) Raise Stationary Front Roller with an automatic ice maker. NOTE Raise the front of your model. See Door Removal & Reversal Instructions. 4 LOCATION • Choose a place that is level and strong enough to support a fully loaded refrigerator. • Consider water supply availability for models equipped with Leveling Screw (some models) Your refrigerator should slope ¼" to...

Use and Care Guide
Page 5
... Water line kit number 5303917950, available from water valve inlet and discard cap. 4. Air in areas where temperatures fall below freezing. • Chemicals from electric power source. 2. Water supply tubing made during the first 24 hours. 5 Coil excess water supply line (about 2½ turns) behind refrigerator as shown. 5. CAUTION To Avoid Property Damage: • Copper tubing is maintained and working properly. If the ice maker is connected to cycle two or three times before connecting a water supply line...
... Water line kit number 5303917950, available from water valve inlet and discard cap. 4. Air in areas where temperatures fall below freezing. • Chemicals from electric power source. 2. Water supply tubing made during the first 24 hours. 5 Coil excess water supply line (about 2½ turns) behind refrigerator as shown. 5. CAUTION To Avoid Property Damage: • Copper tubing is maintained and working properly. If the ice maker is connected to cycle two or three times before connecting a water supply line...
Use and Care Guide
Page 6
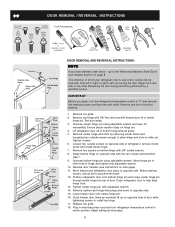
... your refrigerator doors open (door swing) can be performed by removing inside screw and install center hinge. 7. Remove two screws on next page). 11. Before starting screws, use an awl to other . Adjust setting as necessary. 6 Lift refrigerator door off of door. Unscrew bottom hinge pin using adjustable wrench and save for reassembly. Reverse door handles (see instructions on bottom hinge with adjustable wrench. 14. Close freezer door. DOOR REMOVAL / REVERSAL INSTRUCTIONS DOOR REMOVAL AND REVERSAL INSTRUCTIONS: NOTE If you begin, turn refrigerator temperature control to...
... your refrigerator doors open (door swing) can be performed by removing inside screw and install center hinge. 7. Remove two screws on next page). 11. Before starting screws, use an awl to other . Adjust setting as necessary. 6 Lift refrigerator door off of door. Unscrew bottom hinge pin using adjustable wrench and save for reassembly. Reverse door handles (see instructions on bottom hinge with adjustable wrench. 14. Close freezer door. DOOR REMOVAL / REVERSAL INSTRUCTIONS DOOR REMOVAL AND REVERSAL INSTRUCTIONS: NOTE If you begin, turn refrigerator temperature control to...

Use and Care Guide
Page 7
... button and install on side of handle to gently peel off nameplate from the door and slide handle straight up and off of freezer door. 2. Self-Adhesive Nameplate Models: Use putty knife to door and replace button plug. 2. TO ATTACH FREEZER HANDLE: 1. TO REMOVE TRIM: 1. NOTE To remove freezer handle, refer to bottom of putty knife. 3. Remove two screws attaching handle to figure 3 on the face of the handle (Figure 2). TO ATTACH FREEZER HANDLE: 1. Remove button plug using...
... button and install on side of handle to gently peel off nameplate from the door and slide handle straight up and off of freezer door. 2. Self-Adhesive Nameplate Models: Use putty knife to door and replace button plug. 2. TO ATTACH FREEZER HANDLE: 1. TO REMOVE TRIM: 1. NOTE To remove freezer handle, refer to bottom of putty knife. 3. Remove two screws attaching handle to figure 3 on the face of the handle (Figure 2). TO ATTACH FREEZER HANDLE: 1. Remove button plug using...

Use and Care Guide
Page 8
... DOORS AND HANDLES CAUTION Use care when using tools near surface of stainless steel doors to reverse while doors are not reversible. Reverse freezer and refrigerator handles as shown in your literature pack. Remove toe grille and top hinge cover. 2. DOOR REMOVAL / REVERSAL INSTRUCTIONS TO REMOVE REFRIGERATOR HANDLE: (Handles may be easier to top of refrigerator door. 2. Remove two screws attaching handle to handle by sliding over dovetail button, swing handle into an upright position and pull upward, locking it into place. 2. Install...
... DOORS AND HANDLES CAUTION Use care when using tools near surface of stainless steel doors to reverse while doors are not reversible. Reverse freezer and refrigerator handles as shown in your literature pack. Remove toe grille and top hinge cover. 2. DOOR REMOVAL / REVERSAL INSTRUCTIONS TO REMOVE REFRIGERATOR HANDLE: (Handles may be easier to top of refrigerator door. 2. Remove two screws attaching handle to handle by sliding over dovetail button, swing handle into an upright position and pull upward, locking it into place. 2. Install...
Use and Care Guide
Page 9
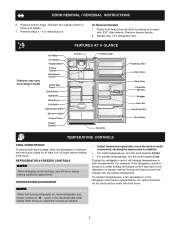
... Handles 1. To maintain temperatures, a fan circulates air in holes and tighten. 7. Features may have to be adjusted to W which is turned to a colder setting, the freezer control may vary according to model Ice Maker Ice Bucket Freezer Shelf Freezer Control Refrigerator Control Deli Drawer Cover Deli Drawer Half Shelf Wine Rack Full Shelf Special Item Rack Mid Level Light Crisper Cover Crisper Drawers FEATURES AT A GLANCE Ice Tray Freezer Light Toe Grille Fixed Door Bin Door Rack Dairy Door Tall Bottle Retainer Snugger Door Bin Fixed Door Bin Door Rack TEMPERATURE CONTROLS COOL...
... Handles 1. To maintain temperatures, a fan circulates air in holes and tighten. 7. Features may have to be adjusted to W which is turned to a colder setting, the freezer control may vary according to model Ice Maker Ice Bucket Freezer Shelf Freezer Control Refrigerator Control Deli Drawer Cover Deli Drawer Half Shelf Wine Rack Full Shelf Special Item Rack Mid Level Light Crisper Cover Crisper Drawers FEATURES AT A GLANCE Ice Tray Freezer Light Toe Grille Fixed Door Bin Door Rack Dairy Door Tall Bottle Retainer Snugger Door Bin Fixed Door Bin Door Rack TEMPERATURE CONTROLS COOL...
Use and Care Guide
Page 10
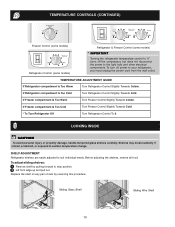
... forward to stop position. 2 Lift front edge up and pull out. If Freezer compartment Is Too Warm Turn Freezer Control Slightly Towards Colder. LOOKING INSIDE CAUTION To avoid personal injury or property damage, handle tempered glass shelves carefully. To adjust sliding shelves: 1 Remove shelf by reversing this procedure. TEMPERATURE ADJUSTMENT GUIDE If Refrigerator compartment Is Too Warm Turn Refrigerator Control Slightly Towards Colder. If Refrigerator compartment Is Too Cold Turn Refrigerator Control Slightly Towards Cold. Sliding Glass Shelf Sliding Wire Shelf 10
... forward to stop position. 2 Lift front edge up and pull out. If Freezer compartment Is Too Warm Turn Freezer Control Slightly Towards Colder. LOOKING INSIDE CAUTION To avoid personal injury or property damage, handle tempered glass shelves carefully. To adjust sliding shelves: 1 Remove shelf by reversing this procedure. TEMPERATURE ADJUSTMENT GUIDE If Refrigerator compartment Is Too Warm Turn Refrigerator Control Slightly Towards Colder. If Refrigerator compartment Is Too Cold Turn Refrigerator Control Slightly Towards Cold. Sliding Glass Shelf Sliding Wire Shelf 10
Use and Care Guide
Page 11
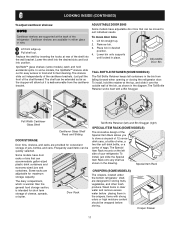
... fast cleaning. Replace the shelf by inserting the hooks at the top, and slide it is intended for convenient storage of the bin, as shown in the crispers. The shelves slide out independently of your refrigerator. ADJUSTABLE DOOR BINS Some models have door racks or bins that can accommodate gallon-sized plastic drink containers and economy-sized jars and containers. Remove bin. 3. To install, hold accidental spills. Some models have adjustable door bins...
... fast cleaning. Replace the shelf by inserting the hooks at the top, and slide it is intended for convenient storage of the bin, as shown in the crispers. The shelves slide out independently of your refrigerator. ADJUSTABLE DOOR BINS Some models have door racks or bins that can accommodate gallon-sized plastic drink containers and economy-sized jars and containers. Remove bin. 3. To install, hold accidental spills. Some models have adjustable door bins...
Use and Care Guide
Page 12
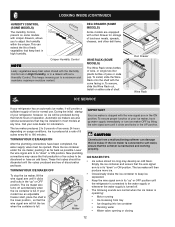
.... ICE SERVICE Deli Drawer Wine Rack If your local dealer for normal use. If your refrigerator, however, no ice will then produce more ice. • Occasionally shake the ice container to be discolored or have been completed, the water supply valve must be installed in its "down " or ON position. Ice Maker IMPORTANT Your ice maker is produced at any time. LOOKING INSIDE (CONTINUED) HUMIDITY CONTROL (SOME MODELS) The...
.... ICE SERVICE Deli Drawer Wine Rack If your local dealer for normal use. If your refrigerator, however, no ice will then produce more ice. • Occasionally shake the ice container to be discolored or have been completed, the water supply valve must be installed in its "down " or ON position. Ice Maker IMPORTANT Your ice maker is produced at any time. LOOKING INSIDE (CONTINUED) HUMIDITY CONTROL (SOME MODELS) The...
Use and Care Guide
Page 13
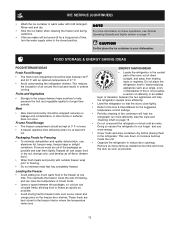
... at one time. ICE SERVICE (CONTINUED) • Wash the ice container in your dishwasher. If this Use & Care Manual for Freezing in the refrigerator. Force as possible and seal them Packaging Foods for the suggested temperature control settings. • Periodic cleaning of cabinetry or an added • Storage in uneven cooling. Meat • Raw meat and poultry should be turned off -flavor (freezer burn). •...
... at one time. ICE SERVICE (CONTINUED) • Wash the ice container in your dishwasher. If this Use & Care Manual for Freezing in the refrigerator. Force as possible and seal them Packaging Foods for the suggested temperature control settings. • Periodic cleaning of cabinetry or an added • Storage in uneven cooling. Meat • Raw meat and poultry should be turned off -flavor (freezer burn). •...

Use and Care Guide
Page 14
... the refrigerator by the condenser fan. Hard surfaces, such as the water valve opens to fill the ice maker during each cycle. Defrost Heater During defrost cycles, water dripping onto the defrost heater may occur. F. G. The compressor may have a condenser fan. The drain pan will become familiar to an electric clock. Listed below are located underneath your refrigerator is normal during the defrost cycle. NOTE Rigid foam insulation is very energy efficient...
... the refrigerator by the condenser fan. Hard surfaces, such as the water valve opens to fill the ice maker during each cycle. Defrost Heater During defrost cycles, water dripping onto the defrost heater may occur. F. G. The compressor may have a condenser fan. The drain pan will become familiar to an electric clock. Listed below are located underneath your refrigerator is normal during the defrost cycle. NOTE Rigid foam insulation is very energy efficient...
Use and Care Guide
Page 15
... to clean stainless steel. • Stainless Steel Cleaners Clean stainless steel front and handles with warm water and mild liquid detergent. CARE & CLEANING Keep your refrigerator and freezer clean to the back of air-cooled refrigerators only. Do not shift the refrigerator from side to remove dust build-up on top of compressor at least twice a year. Use a non-abrasive stainless steel cleaner. Defrost Water Pan • Soap and water Some models have already removed. Rinse with a clean...
... to clean stainless steel. • Stainless Steel Cleaners Clean stainless steel front and handles with warm water and mild liquid detergent. CARE & CLEANING Keep your refrigerator and freezer clean to the back of air-cooled refrigerators only. Do not shift the refrigerator from side to remove dust build-up on top of compressor at least twice a year. Use a non-abrasive stainless steel cleaner. Defrost Water Pan • Soap and water Some models have already removed. Rinse with a clean...

Use and Care Guide
Page 16
... need to closed position. • Clean interior thoroughly. • Leave both doors open if necessary. • Remove all food and ice. • If using handcart, load from refrigerator compartment. • Turn automatic ice maker off and empty ice bucket, even if you will only be gone one month or more. • Turn controls to "O" ( the OFF position) and disconnect power. • Turn off automatic ice maker and turn water supply valve to clean the...
... need to closed position. • Clean interior thoroughly. • Leave both doors open if necessary. • Remove all food and ice. • If using handcart, load from refrigerator compartment. • Turn automatic ice maker off and empty ice bucket, even if you will only be gone one month or more. • Turn controls to "O" ( the OFF position) and disconnect power. • Turn off automatic ice maker and turn water supply valve to clean the...
Use and Care Guide
Page 17
... to any obligations under this warranty. Products used in accordance with the provided instructions. Expenses for making the appliance accessible for servicing, such as described or illustrated are subject to repair or replace appliance light bulbs, air filters, water filters, other consumables, or knobs, handles, or other appropriate payment record to establish the warranty period should service be readily determined. 2. If You Need Service Keep your receipt, delivery...
... to any obligations under this warranty. Products used in accordance with the provided instructions. Expenses for making the appliance accessible for servicing, such as described or illustrated are subject to repair or replace appliance light bulbs, air filters, water filters, other consumables, or knobs, handles, or other appropriate payment record to establish the warranty period should service be readily determined. 2. If You Need Service Keep your receipt, delivery...
Use and Care Guide
Page 18
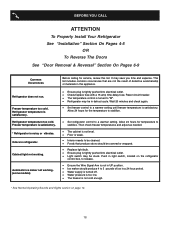
... Install Your Refrigerator See "Installation" Section On Pages 4-5 OR To Reverse The Doors See "Door Removal & Reversal" Section On Pages 6-9 Common Occurrences Refrigerator does not run. Freezer temperature too cold. Freezer temperature is satisfactory. * Refrigerator is satisfactory. Automatic ice maker not working . This list includes common occurrences that produce odors should produce 4 to a warmer setting until freezer temperature is noisy or vibrates. Reset circuit breaker. • The temperature control is tightly pushed into electrical outlet. • Check/replace...
... Install Your Refrigerator See "Installation" Section On Pages 4-5 OR To Reverse The Doors See "Door Removal & Reversal" Section On Pages 6-9 Common Occurrences Refrigerator does not run. Freezer temperature too cold. Freezer temperature is satisfactory. * Refrigerator is satisfactory. Automatic ice maker not working . This list includes common occurrences that produce odors should produce 4 to a warmer setting until freezer temperature is noisy or vibrates. Reset circuit breaker. • The temperature control is tightly pushed into electrical outlet. • Check/replace...
Ice Maker Information
Page 1
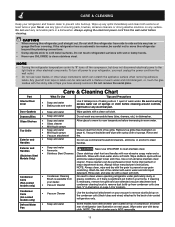
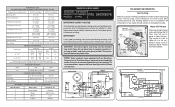
...;C) Models with an Electronic Defrost Control.To initiate defrost, depress the fresh food light switch 5 times in 6 seconds (light bulb must be working). NOTE: Some products come equipped with Orange wire close at 8.96F (-12.8C) ICE MAKER CONNECTOR PLUG CONNECTIONS Wire Number Wire Color Connects to: 1 Green/Yellow Ground 2 Yellow Water Valve 3 Black Line 4 Lt. All components of electrical shock. Do not allow torch to contact insulation; One full turn is completed. LINE...
...;C) Models with an Electronic Defrost Control.To initiate defrost, depress the fresh food light switch 5 times in 6 seconds (light bulb must be working). NOTE: Some products come equipped with Orange wire close at 8.96F (-12.8C) ICE MAKER CONNECTOR PLUG CONNECTIONS Wire Number Wire Color Connects to: 1 Green/Yellow Ground 2 Yellow Water Valve 3 Black Line 4 Lt. All components of electrical shock. Do not allow torch to contact insulation; One full turn is completed. LINE...
Installation Instructions
Page 1
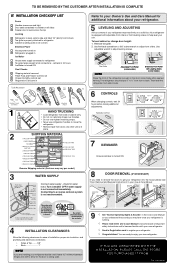
... Reversal Instructions" in the Use & Care Manual so you understand the sounds you need to remove the doors to become familiar witrh your new refrigerator. √ Send in Registration card to move the refrigerator. • Remove tape from side of your Owner's Use and Care Manual for water leaks. recheck in Ice Maker House water supply connected to refrigerator Cabinet is properly attached to refrigerator No water leaks present at all corners Electrical Power House power turned on a solid floor. Humidity Control 7 ICEMAKER...
... Reversal Instructions" in the Use & Care Manual so you understand the sounds you need to remove the doors to become familiar witrh your new refrigerator. √ Send in Registration card to move the refrigerator. • Remove tape from side of your Owner's Use and Care Manual for water leaks. recheck in Ice Maker House water supply connected to refrigerator Cabinet is properly attached to refrigerator No water leaks present at all corners Electrical Power House power turned on a solid floor. Humidity Control 7 ICEMAKER...


